Showing posts with label icing. Show all posts

Wednesday, September 27, 2017

Apple cinnamon rolls with cream cheese icing

Apple cinnamon rolls with cream cheese icing / Pãezinhos de maçã e canela com cobertura de cream cheese

Baking bread is something I deeply enjoy, even though I have not done that much lately. Unless you have access to good artisanal bakeries (which are very few here in Sao Paulo), it is the only guaranteed way of having good bread on the table.

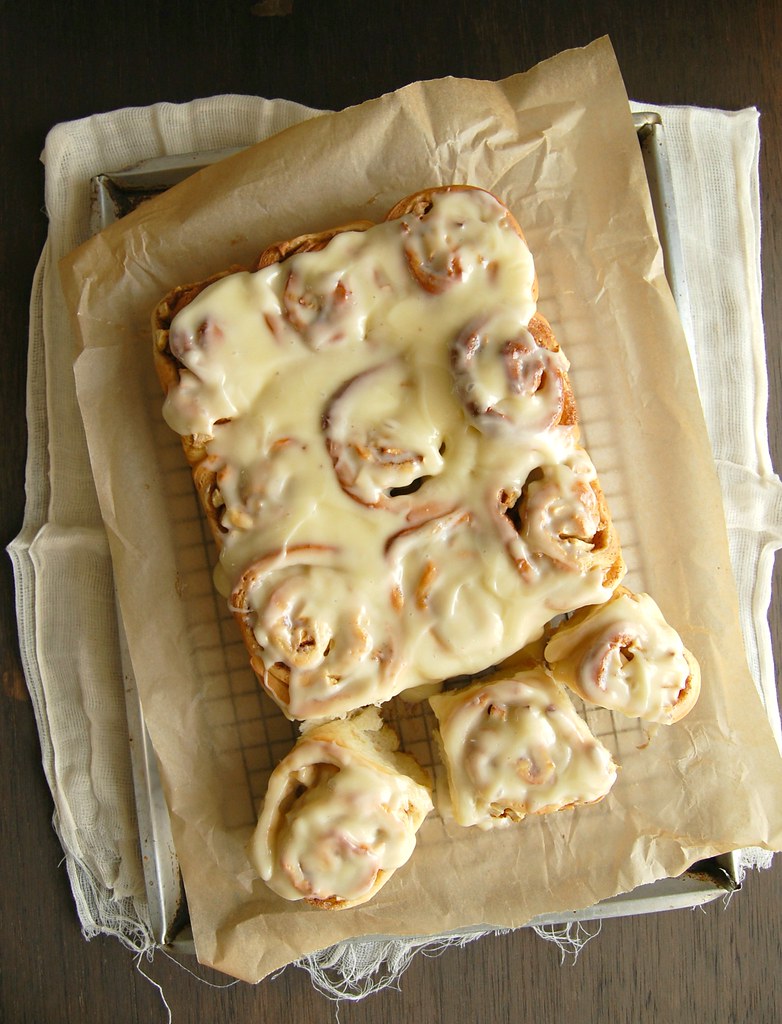
These apple rolls were my idea to turn the humble cinnamon roll into something even more special, to get people interested in them again – like Nic Pizzolatto casting Mahershala Ali for the third season of True Detective, after that not-so-great season 2. :D

I was very happy with the recipe: the rolls are tender and perfumed with cinnamon and the tangy icing compliments the apples beautifully. They disappeared quite quickly every time I made them, and next time I prepare this recipe I intend to use pears + nutmeg instead of apples + cinnamon – I believe it will be just as delicious.

Apple cinnamon rolls with cream cheese icing
own recipe

Dough:
200ml whole milk
¼ cup (56g) unsalted butter, room temperature and chopped
2 ¼ teaspoons (7g) dried yeast
¼ cup + 2 tablespoons (75g) granulated sugar
1 large egg, room temperature
pinch of salt
½ teaspoon vanilla extract
3 ¼ cups (455g) all purpose flour

Filling:
¼ cup (56g) unsalted butter, softened
4 Granny Smith apples (about 650g/1 ½ pounds), peeled, cored and cut into small dice*
¼ cup (50g) granulated sugar
¼ cup (44g) light brown sugar, packed
1 ½ teaspoons ground cinnamon

Icing:
½ cup (113g) cream cheese, very soft
¼ cup (56g) unsalted butter, very soft
1 teaspoon vanilla extract
1 cup (140g) icing sugar, sifted

Start by making the dough: in a small saucepan, heat milk until it starts to boil. Remove from the heat, stir in the butter and let it melt. Once the mixture is lukewarm, pour it into the bowl of an electric mixer and stir in the yeast and sugar. Set aside until foamy, about 5 minutes. Add the egg, salt, vanilla and flour and mix with the dough hook for 8-10 minutes or until smooth and elastic. Transfer to a lightly buttered large bowl and cover with plastic wrap. Set aside in a draft-free area until doubled in volume, about 1 ½ hours.

Generously butter a 20x30cm (8x12in, and 13x9in also works) baking pan. Set aside.
Transfer the dough to a lightly floured surface and roll it into a 30x40cm (12x16in) rectangle. Spread the butter over the dough leaving a 1cm (½in) border. In a medium bowl, stir the apples with the sugar and cinnamon until well coated, then spread evenly on top of the butter layer. Starting from the longest side, roll the dough into a tight cylinder, then slice into 12 equal pieces. Place the slices side-by-side in the prepared pan, cover loosely with a clean kitchen towel and set aside to prove again, 40-45 minutes – in the meantime, preheat the oven to 200°/400°F.

Bake the buns for 25-30 minutes or until risen and golden. Cool in the pan over a wire rack for 5 minutes, then carefully unmold the buns onto the rack. Now, make the icing: in a small bowl, whisk the ingredients together until smooth. Spread over the buns and set aside to cool completely, or serve them warm.

* it is important to keep the apple pieces small otherwise they will not bake properly inside the dough

Makes 12

Friday, March 3, 2017

One bowl chocolate cake for my nephew

One bowl chocolate cake / Bolo de chocolate de uma tigela só, ou "Bolo Pinguinho"

Up until two years ago my apartment was a home of two adults with no kids: glass objects here and there, pointy drawer handles… Now, there are safety nets on the balcony and on the windows and the glass objects get moved to a very high shelter every time our favorite visitor – my baby nephew – is around.

My husband and I went from not knowing we had any cartoon channels on the cable TV to knowing them by heart. :)

I came to learn that there is a cartoon called Peppa Pig and one day, after my nephew saw a chocolate cake on one of the episodes he immediately asked for one, or “boo cuatche” as he says. :) I had no butter at home, so a quick search brought me this recipe. It is insanely easy to put together and tastes absolutely amazing – and even after two days the texture was still amazing, kept in an airtight container at room temperature.

From that day on I have made this cake several times – I thought it was about time I shared it with you. This recipe is a keeper and has become a family’s favorite. For the one on the photo I used some chocolate sprinkles I had left from making brigadeiros for my nephew's birthday party.

One bowl chocolate cake
cake slightly adapted from here, the icing I don’t remember where I got it from

Cake:
2 cups (280g) all-purpose flour
½ cup (45g) unsweetened Dutch process cocoa powder
2 teaspoons baking soda
1 teaspoon baking powder
½ teaspoon table salt
½ teaspoon ground cinnamon
1 ¾ cups (350g) granulated sugar
2 large eggs, lightly beaten with a fork
1 cup (240ml) canola oil
1 cup (240ml) buttermilk*
2 teaspoons instant coffee granules
1 cup (240ml) hot water

Icing:
3 tablespoons (42g) unsalted butter, softened
3 tablespoons heavy cream
1 ½ tablespoons unsweetened Dutch process cocoa, sifted
1 cup (140g) icing sugar, sifted

Cake: preheat oven to 180°C/350°F. Butter or oil a 20x30cm (8x12in) deep baking pan (if your 8x12in pan is not 5cm deep, use a 13x9in pan).

In a large bowl, sift together the flour, cocoa, baking soda, baking powder, salt and cinnamon. Stir in sugar. Stir in the eggs, oil and buttermilk. Dissolve the coffee into the hot water and stir into the batter, mixing until combined.
Transfer batter to prepared pan. Bake 35-40 minutes or until a toothpick inserted in center comes out clean. When cake has cooled for 20 minutes, make the icing: in a small saucepan, place butter, cream and cocoa and stir over medium heat until melted. When it starts to boil, turn off the heat and whisk in the icing sugar. Spread over warm cake and let cool completely in the pan over a wire rack.

*homemade buttermilk: to make 1 cup buttermilk place 1 tablespoon lemon juice in a 240ml-capacity measuring cup and complete with whole milk (room temperature). Wait 10 minutes for it to thicken, then use the whole mixture in your recipe

Serves 16-20


Monday, December 5, 2016

Spiced cake bars (gewürzschnitten) - flavors of my childhood on a recipe I had never seen before

Spiced cake bars (gewürzschnitten) / Bolo de especiarias e chocolate (gewürzschnitten)

In my searches for Christmas themed recipes every year I have learned about new types of baked goods, have seen beautiful photos and known gorgeous food blogs and websites. Some of the recipes were completely new to me, some were made of flavors I recognize from my childhood, from the sweets my German grandmother used to make.

These delicious bars, super easy to make, were new to as I did not know their name – gewürzschnitten; however, the taste was no stranger to me: as I bit into a square and tasted the mix of spices, chocolate and lemon from the glaze, my taste buds took a trip down memory lane. I don’t really remember what I ate as a kid that reminded me so much of these bars, but what started as inspiration found on this beautiful blog ended up as wonderful discovery – grandma Frida is no longer around for me to ask her this, but I can start my own tradition and bake gewürzschnitten every December from now on. <3

Spiced cake bars (gewürzschnitten)
slightly adapted from this beautiful blog

Cake:
1 ¼ cups (175g) all purpose flour
¾ cup (75g) ground almonds
2 tablespoons unsweetened cocoa, sifted
1 ½ teaspoons baking powder
pinch of freshly ground nutmeg
pinch of ground cloves
½ teaspoon ground ginger
½ teaspoon ground cinnamon
½ teaspoon ground allspice
2 large eggs, yolks and whites separated
pinch of salt
¾ cup (150g) granulated sugar, divided use
1/3 cup (75g) unsalted butter, softened
1 teaspoon vanilla extract
1 teaspoon Amaretto (optional)
100ml whole milk, room temperature

Glaze:
¾ cup (105g) icing sugar, sifted
2-3 tablespoons lemon juice

Preheat oven to 180°C/350°F. Lightly butter a 20cm (8in) square baking pan, line it with baking paper leaving an overhang on two opposite sides, then butter the paper.

In a medium bowl, whisk together the flour, almond meal, cocoa, baking powder and spices. Set aside.
In a small bowl, using an electric mixer, beat egg whites and salt until soft peaks form. Gradually add half of the granulated sugar (75g), beating until mixture gets thick, silky and shiny. Set aside.
In another large bowl, using again the electric mixer, beat the yolks, butter and remaining sugar until light and creamy, scraping the sides of the bowl occasionally. Beat in the vanilla and the Amaretto. Add the dry ingredients in three additions alternating with the milk in two additions, starting and ending with the dry ingredients. Fold in the egg whites. Spread onto the prepared pan and smooth the top. Bake for about 20 minutes or until risen and cooked through when tested with a skewer. Cool completely in the pan over a wire rack.

Glaze: mix the icing sugar and lemon juice until you get a thin glaze. Spread over cooked cake, set aside until set and then cut into squares to serve.

Makes 16


Tuesday, February 3, 2015

Maple cake - simple and delicious

Maple cake / Bolo de xarope de bordo

When I started blogging, a good eight years ago, there were several ingredients I saw in my foreign cookbooks that I could not find here in Brazil, and some were too expensive – so I kept some recipes in the back of my head for a long time, just waiting for an opportunity to try them someday.

Things have changed and now many ingredients have become available here, and some of the prices have dropped a bit, too. The two times I visited NYC I brought home huge bottles of maple syrup for it was very expensive here and not easy to find, but lately I’ve seen it everywhere for a more affordable price – I even brought home a small bottle since the ones from NY are long gone.

This cake is delicious and it was a great way of using my precious maple syrup – I wasn’t too keen on the icing, though, for I thought it was too sweet. I would definitely make this cake again, but I’d serve it with a dusting of icing sugar and nothing more.

Maple cake
from the delicious Martha Stewart's Cakes: Our First-Ever Book of Bundts, Loaves, Layers, Coffee Cakes, and more

Cake:
1 cup (2 sticks/226g) unsalted butter, room temperature
2 ½ cups (350g) all-purpose flour
2 teaspoons baking powder
½ teaspoon baking soda
¼ teaspoon table salt
¾ cup (180ml) maple syrup
½ cup (100g) granulated sugar
2 large eggs
1 teaspoon vanilla extract
¾ cup (180ml) sour cream*

Icing:
1/3 cup (80ml) pure maple syrup, plus more if needed
3 tablespoons unsalted butter, melted
2 ½ cups (350g) confectioners' sugar, plus more if needed

Make the cake: preheat oven to 180°C/350°F. Butter a 23cm (9in) round cake, line the bottom with a circle of baking paper and butter it as well.

In a medium bowl, whisk together flour, baking powder, baking soda, and salt.
With an electric mixer on medium speed, beat butter, maple syrup, and granulated sugar until pale and fluffy, 3-5 minutes. Add eggs, one at a time, beating well after each addition; mix in vanilla.
Reduce mixer speed to low. Add flour mixture in 3 batches, alternating with 2 batches of sour cream; beat until just combined. Transfer batter to prepared pan; smooth top with an offset spatula. Bake until a cake tester comes out clean, about 40 minutes. Transfer pan to a wire rack to cool 25 minutes. Turn out cake onto rack to cool completely.

Icing: combine maple syrup and butter in a bowl. Sift in confectioners’ sugar, and whisk until combined. Adjust consistency with more syrup or sugar, if necessary. Spread maple icing over top of cake. Let set, at least 15 minutes, before serving.

* homemade sour cream: to make 1 cup of sour cream, mix 1 cup (240ml) heavy cream with 2-3 teaspoons lemon juice in a bowl. Whisk until it starts to thicken. Cover with plastic wrap and leave at room temperature for 1 hour or until thicker (I usually leave mine on the counter overnight – except on very warm nights – and it turns out thick and silky in the following morning; refrigerate for a creamier texture)

Serves 8-10

Monday, November 17, 2014

Sticky toffee squares

Sticky toffee squares / Quadradinhos de caramelo

I have a sweet tooth and that’s not a secret, but there are sweets and desserts that have a special place in my heart for something other than their taste: they remind me of certain periods of my life, certain days and occasions, and that makes them extra special.

When I was a kid my grandmother would make dulce de leche at home every now and then, and it was one of my favorite things: it was delicious on its own, by the spoonful, spread on sliced of bread, with cheese… The thought of it makes my mouth water already – grandma used to make a big pot of dulce de leche at a time, but it never lasted long. :)

I still love dulce de leche, but I have never tried making it at home the way my grandmother used to – so far I’ve only made it by cooking a can of sweetened condensed milk in the pressure cooker, but nowadays it’s so easy to find Argentinean dulce de leche around here I don’t even do that anymore – all I do is open up a jar, and to stop myself from eating it all by myself I bake with it, too, making yummy things like these squares. :)

Sticky toffee squares
slightly adapted from the delicious Olive magazine

Cake:
175g all purpose flour
1 ¾ teaspoons baking powder
pinch of salt
2 tablespoons ground almonds
175g unsalted butter, softened
150g light brown sugar
1 teaspoon vanilla extract
3 eggs

Icing:
2/3 cup dulce de leche
2 tablespoons heavy cream

Preheat the oven to 180°C/350°F. Lightly butter a 20cm (8in) square baking pan, line the bottom with a square of baking paper and butter it as well.

In a medium bowl, whisk together the flour, baking powder, salt and almond meal. Using an electric mixer, beat the butter and sugar together until light and creamy. Beat in the vanilla.
Beat the flour mixture into the sugar and butter in 3 batches, adding an egg each time. Beat the mixture until smooth and then spoon it into the pan and level the top. Bake for about 30 minutes or until a skewer comes out clean. Cool in the pan for 30 minutes, then carefully unmold, peel off the paper and invert onto the rack to cool completely.

Icing: place dulce de leche and cream in a small bowl and mix to combine. Spread over the cooled cake. Cut into squares to serve.

Makes 16

Monday, February 10, 2014

Citrus and poppy seed slice and bakes, Matthew and Leo

Citrus and poppy seed slice and bakes / Biscoitinhos cítricos com sementes de papoula

I admire actors committed to their craft who are willing to go the extra mile for a part, but getting fat/thin/ugly to play a character must be part of the preparation, not the only highlight – the physical transformation and the talent to play the part must go in hand. Nicole won an Oscar with a prosthetic nose and not much else, while Christian Bale’s impressive weight lost in The Fighter was part of his portrayal of Dicky Eklund, not all of it.

I watched Dallas Buyers Club last week and though not very impressed by the movie – it is an OK movie with great performances, like Monster – the amount of dedication put into characters by both Matthew McConaughey and Jared Leto is outstanding. I wish Leto had had more screen time for he’s absolutely amazing as Rayon, and Matthew’s contained yet strong performance is something completely different from the movies from his past, but I think that a better script and a more talented director could have gotten much more out of him (he’s even more brilliant in True Detective, for instance).

Having said that, if I were the one choosing the winner for Best Actor in a Leading Role this year Leonardo DiCaprio would take the award home: he is ten times the actor Matthew will ever be (and the latter has evolved quite a lot in the last few years) and his character is a despicable one, even with the sort of comedy route Scorsese chose for the movie, while Matthew’s character has the empathy/sympathy factor going on for him; the Wolf is a complex character that expresses and ignites several different feelings and emotions throughout the three hours of the movie and Leonardo adds layer after layer to the character, making him hateful yet very interesting, and I did not see that in Ron Woodroof – I think that the character could have been taken to a whole new level by someone more talented, such as the very Leo or Christian Bale.

These slice and bake cookies are delicious, buttery and a snap to make – the original recipe called for lemons only but I decided to use oranges, too, and added poppy seeds to make the cookies even more interesting, for they add crunch and make the cookies look beautiful.

You can omit them, of course, for the cookies will still taste great – let’s say that they will be the Matthew McConaughey version while the ones with poppy seeds will be the Leonardo DiCaprio version. ;)

Citrus and poppy seed slice and bakes
slightly adapted from Epicurious

Cookies:
2 ½ cups (350g) all-purpose flour
¼ teaspoons table salt
2 ½ tablespoons poppy seeds
1 cup (226g/2 sticks) unsalted butter, room temperature
¾ cup (150g) granulated sugar
finely grated zest of 1 large lemon
finely grated zest of 1 large orange
1 teaspoon vanilla extract
4 large egg yolks

Icing:
¾ cup (105g) icing sugar
½ tablespoon lemon juice, more if necessary
½ tablespoon orange juice, more if necessary

Cookies: whisk flour, salt and poppy seeds in a medium bowl. Using an electric mixer on medium-high speed, beat butter, sugar, lemon and orange zest and vanilla in a large bowl, occasionally scraping down sides, until light and fluffy, about 3 minutes. Add egg yolks; beat just to blend. Reduce speed to low; add flour mixture and beat, occasionally scraping down sides, just to blend. Divide the dough into two equal parts. Place each on a piece of parchment paper; shape dough into logs. Fold parchment over dough; using a ruler, roll and press into a 3.5 cm (1.4in) log – like Martha does here. Wrap in parchment. Chill in the refrigerator until very firm, about 2 hours.
Preheat oven to 180°C/350°F; line two large baking sheets with baking paper. Unwrap one log at a time (keep the other in the fridge). Cut into 5mm thick rounds; space 2.5cm (1in) apart onto prepared sheets. Bake one sheet at a time until cookies are firm and golden brown around the edges, 12-14 minutes. Cool slightly on sheets, then transfer to a wire rack to cool completely. Repeat with the other log.

Icing: whisk sugar and juice in a small bowl, adding more juice by ½-teaspoonfuls if too thick. Spread or drizzle icing over cookies. Let stand until icing sets, about 10 minutes.
The cookies can be stored in an airtight at room temperature for up to 3 days.

Makes about 50

Thursday, October 3, 2013

Back from vacation with fresh orange pound cake with passion fruit icing

Fresh orange pound cake with passion fruit icing / Bolo de laranja com cobertura de maracujá

Hey, everyone!

After a couple of weeks on vacation I am back home, tired and immensely happy. I haven’t baked in a while but have a delicious cake recipe to share with you today, something I prepared weeks ago and that turned out really good. The passion fruit icing is completely optional: in fact, I personally liked the cake better without it.

Oh, and I’ll be answering your questions and emails over the next few days. :)

Fresh orange pound cake with passion fruit icing
adapted from the wonderful and delicious Desserts from the Famous Loveless Cafe

Cake:
1 ¾ sticks (198g) unsalted butter, softened
1 ¾ cups (350g) granulated sugar
finely grated zest of 2 large oranges
½ teaspoon vanilla extract
3 large eggs
3 large egg yolks
2 ¼ cups (315g) all purpose flour
¼ teaspoon baking soda
pinch of salt
½ cup sour cream*
1 ½ tablespoons orange juice

Glaze:
2 cups (280g) icing sugar
2-3 tablespoons passion fruit juice, more if necessary

Preheat the oven to 180°C/350°F. Butter two 20x10x5cm (8x4x2in) loaf pans, line them with baking paper and butter the paper as well.
In the large bowl of an electric mixer, cream butter, sugar, zest and vanilla until light and fluffy. Add the eggs, one at a time, followed by the yolks, beating well after each addition. Scrape the sides of the bowl occasionally. Sift the flour, baking soda and salt over the bowl, add the sour cream and juice and fold together by hand. Transfer the batter to the prepared pans.
Bake for about 45 minutes or until the cakes are golden and risen and a toothpick inserted in the center comes out clean. Let the cakes cool in the pans over a wire rack for 10-15 minutes then carefully unmold onto the rack. Peel off the paper. Cool completely.
Make the glaze: sift the icing sugar into a medium bowl, add the passion fruit juice gradually, mixing until desire consistency. Drizzle over the cooled cakes.

* homemade sour cream: to make 1 cup of sour cream, mix 1 cup (240ml) heavy cream with 2-3 teaspoons lemon juice in a bowl. Whisk until it starts to thicken. Cover with plastic wrap and leave at room temperature for 1 hour or until thicker (I usually leave mine on the counter overnight – except on very warm nights – and it turns out thick and silky in the following morning; refrigerate for a creamier texture)

Makes 2 loaves (serves 6 each)

Friday, August 23, 2013

Vanilla cookie buttons with strawberry icing and being tricked by my memory

Vanilla cookie buttons with strawberry icing / Botõezinhos de baunilha com cobertura de morango

I don’t know about you, but sometimes my mind plays tricks on me and I just can’t trust my memory. I was listening to “Never” the other day when my husband asked whose song that was. I told him it was Heart’s and said “remember that band from the 80s formed exclusively by girls?”, but he had no recollection of it. Then I decided to show him the music video, and there was a man playing the drums and another playing the guitar. “I could have sworn there were only girls on this band”, I said, and the hubby stared laughing. :D

Having too many cookbooks can wreck someone’s memory as well – thank heavens for EYB. I set up to make Nancy Baggett’s beautiful cookies – I was thrilled with the idea of a pink icing made without artificial food coloring – but really could not wait 6 hours for the cookie dough to chill (who has that kind of time these days? Not me). Ok, I’d slather the icing onto someone else’s vanilla cookies. As usual, I reached for Martha, but rolling cookie dough was definitely out of the question. I knew I’d seen drop sugar cookies somewhere, but my memory had already been tricked by people with big hair, I could not trust it. :) EYB helped my find John Barricelli’s super easy recipe, which I modified slightly for I did not want the cookies to spread – it turned out perfect.

Vanilla cookie buttons with strawberry icing
adapted from two great sources: The SoNo Baking Company Cookbook and The All-American Dessert Book

Cookies:
2 cups (280g) all purpose flour
1 ½ teaspoons baking powder
pinch of salt
½ cup (113g/1 stick) unsalted butter, softened
¾ cup + 2 tablespoons (175g) granulated sugar
2 teaspoons vanilla extract
1 large egg

Icing:
½ cup strawberries
2 cups (280g) icing sugar
1 tablespoon (14g) unsalted butter, very soft but not melted
generous ½ tablespoon corn syrup

Make the cookies: preheat the oven to 180°C/350°F. Line two large baking sheets with baking paper.
In a medium bowl, whisk together the flour, baking powder and salt. Using an electric mixer with the paddle attachment, cream butter, sugar and vanilla together until light and creamy. Beat in the egg. At low speed, beat in the dry ingredients just until incorporated. Make balls using 1 ½ teaspoons of dough and place 2.5cm (1in) apart onto prepared sheets. Bake for 10 minutes or until golden on the bottom. Cool on the sheets for 2-3 minutes, then slide the paper with the cookies onto a wire rack to cool completely.

Icing: Sift the icing sugar in a medium bowl. In a food processor, process the strawberries with 2 tablespoons of the icing sugar until puréed. Press the mixture through a fine sieve to extract as much of the strawberry pulp and juice as possible. Add 2 tablespoons of the strawberry pulp to the icing sugar, with the butter and corn syrup and mix to combine. Gradually add more strawberry pulp, mixing until desired consistency.
Dip the top of the cookies into the icing and place them onto a wire rack for the icing to set, about 2 hours – there might be some icing left.

Makes about 70

Friday, August 9, 2013

Iced little lemon drops and the reasons behind each recipe

Iced little lemon drops / Biscoitinhos de limão siciliano com cobertura

Those of us who cook and bake have different reasons for choosing this or that recipe, right? I believe that wanting to eat is the most basic reason, but that is followed by the ingredients available, the seasons, the weather, if we’ve having company or if we’re eating alone... Do you agree?

I add to that list a certain technique I want to learn or improve, recipes with curious names, and peculiar or unusual methods, the latter being the reason why I made these cookies (plus the beautiful and fragrant lemons I had around). Here, part of the unfinished dough is set aside only to become the icing later on – I thought that was really interesting and had to try it myself. It worked perfectly and the cookies turned out delicious, very delicate in size – which is something I love – and very lemony, on the verge of puckering lips – which is something I love even more. :)

Iced little lemon drops
from the delicious Simply Sensational Cookies

finely grated zest and juice of 2 lemons
¾ cup (1 ½ sticks/170g) unsalted butter, softened
2 cups (280g) icing sugar, divided use
generous ¼ teaspoon baking soda
1 ½ cups (210g) all-purpose flour
pinch of salt

Preheat to 180°C/350°F. Line 2 large baking sheets with baking paper.
Put the lemon zest in the bowl of an electric mixer, then reserve the juice separately in a cup. To the zest add the butter, 3 tablespoons of the reserved lemon juice and 1 cup (140g) of the icing sugar. Beat on low, then medium speed, until lightened in color and fluffy, about 1 ½ minutes – mixture might look curdled at first, but keep on beating it. Measure out 2 tablespoons of the beaten butter mixture and reserve in a small deep bowl; it will be used to make the icing.
On low speed, thoroughly beat the baking soda into the butter mixture left in the large bowl. Then beat in the flour and salt just until evenly incorporated. If dough is very soft, let it stand for 5 minutes.
Drop dough by heaping measuring teaspoons, spacing about 5cm (2in) apart on baking sheets; keep the cookies small.
Bake on middle rack one pan at a time for about 10 minutes, until cookies are tinged with brown at the edges and just firm when pressed in the center top. Transfer pan to wire rack. Let cool.
Stir 1 ½ tablespoons of the reserved lemon juice and the remaining 1 cup of icing sugar into the reserved 2 tablespoons butter mixture until very well blended. If necessary, then the icing with a little more lemon juice stirring well, until it is fluid but no runny. Stir in a little more icing sugar if the icing is too runny to hold some shape. Spread the icing on top of the cookies then place them on a wire rack until the icing sets, 30-40 minutes.

Makes about 30 – I made the exact recipe above, used 1 ½ leveled teaspoons of dough per cookie and got 70 tiny cookies

Friday, July 26, 2013

Pistachio doughnuts with rose water glaze

Pistachio doughnuts with rose water icing / Doughnuts de pistache com glacê de água de rosas

I adore fried food, but living in an apartment I rarely feel like frying things – I try to avoid having the whole house smelling like the dinner we’d just had. Up until a couple of months ago fries had been the exception because both the hubby and I love them, but after trying Annabel’s recipe for oven fries the problem was solved – Joao told me they were even tastier than the original fried version.

I did, however, had another exception days ago when I made Gourmet Traveller’s pistachio doughnuts – I’d been meaning to make them forever. The doughnuts turned out really good and being cake doughnuts (no yeast involved) it didn’t take me too long to make them from start to finish. The problem was the rose water glaze: disappointing and too sweet, it tasted of nothing but icing sugar even after I squeezed half a lemon in it. The raspberry syrup, prior to the addition of the icing sugar, was really delicious, so I suggest you make it up to that point and dunk your doughnuts in it. Another suggestion: after photographing and eating the first doughnuts, I fried the remaining batter like small churros (instead of piping it into rings) and liked them even more: they were easier to move around in the frying pan and turned out crispier on the outside.

Pistachio doughnuts with rosewater icing / Doughnuts de pistache com glacê de água de rosas

Pistachio doughnuts with rose water glaze
slightly adapted from the always gorgeous Australian Gourmet Traveller

Doughnuts:
75g pistachio kernels
2 ¼ cups (315g) all purpose flour
½ cup (100g) granulated sugar
3 teaspoons baking powder
finely grated zest of 1 orange
1 teaspoon vanilla extract
pinch of salt
1 cup (240ml) whole milk
¼ cup (56g) unsalted butter, melted and cooled
1 egg, lightly beaten
vegetable oil, for deep frying

Rose water glaze:
½ cup (100g) granulated sugar
10 raspberries, fresh or frozen (unthawed)
1 ½ cups (210g) icing sugar, sifted
3 teaspoons rose water, or to taste

Process pistachios in a food processor until finely ground, transfer to a large bowl, add flour, sugar, baking powder, orange zest, vanilla extract and salt. Stir to combine, make a well in the centre, then add milk, butter and egg. Mix until smooth, transfer to a piping bag fitted with a 2cm-fluted nozzle, refrigerate to rest for 1 hour.
For rosewater glaze, combine sugar and 50ml water in a small saucepan, stir over medium-high heat until sugar dissolves, add raspberries, crush them with the back of a wooden spoon, then simmer until syrupy (2-3 minutes). Strain into a heatproof bowl (discard pulp), add icing sugar, whisk until smooth, then whisk in rose water and set aside (thin with a little water to drizzling consistency if necessary.)
Preheat oil in a deep-fryer or deep-sided saucepan to 180°C/350°F. Pipe 8cm-diameter rings onto squares of lightly oiled baking paper. Slide rings, in batches, into oil and cook, turning occasionally, until puffed, golden and cooked through (3-4 minutes; be careful as hot oil may spit). Drain on absorbent paper, then, while still warm, drizzle with rose water glaze and place on a cooling rack until glaze sets. Serve warm or at room temperature.

Makes 18-20

Monday, July 22, 2013

Pineapple and toasted coconut cake + a very tedious movie

Pineapple and toasted coconut cake / Bolo de coco tostado e abacaxi

Spielberg will probably never be one of my favorite directors, but because I’m still in awe with the fantastic “Munich” I decided to give “Lincoln” a chance. One hour into the film and I was bored to death, one hour and 10 minutes into the film and I was sound asleep. O_O
All I could think was that the Academy Award Daniel Day Lewis took home should be on a shelf at Joaquin Phoenix’s house (or maybe in the bathroom or inside the refrigerator, Joaquin being Joaquin). :)

My husband watched “Lincoln” and actually liked it, so maybe I’ll give the film another go one of these days. I’m in no rush, though, because there are many other great movies to be seen. I will, however, rush you to make this absolutely fantastic cake that combine flavors that work really well together – toasting the coconut makes it even more flavorsome and it pairs beautifully with the pineapple chunks. Another winner recipe from one of my favorite cookbooks.

Pineapple and toasted coconut cake
from the delicious and foolproof Cake Keeper Cakes: 100 Simple Recipes for Extraordinary Bundt Cakes, Pound Cakes, Snacking Cakes and Other Good-To-The-Last-Crumb Treats

Cake:
1 ½ cups (150g) sweetened flaked coconut
2 large eggs
1 cup sour cream*
1 teaspoon pure vanilla extract
1 ¾ cups (245g) all-purpose flour
1 ½ teaspoons baking powder
¼ teaspoon baking soda
¼ teaspoon table salt
½ cup (113g/1 stick) unsalted butter, softened
¾ cup (150g) granulated sugar
1 can (20oz/560g) pineapple chunks in juice, drained well and patted dry

Glaze:
½ cup (70g) confectioners’ sugar
1 tablespoon fresh lime juice

Preheat the oven to 180°F/350°F. Butter and flour a 12-cup Bundt pan.
Spread the coconut on a baking sheet and toast until just golden, stirring frequently, about 5 minutes. Set aside to cool completely. Keep the oven on.
Combine the eggs, sour cream and vanilla in a large measuring cup and lightly beat with a fork. In a medium bowl, whisk together the flour, baking powder, baking soda and salt in a medium bowl.
In the large bowl of an electric mixer cream the butter and sugar until light and fluffy, scraping down the sides of the bowl once or twice if necessary.
On low speed, alternately add the dry ingredients in three additions with the sour cream in two additions, beginning and ending with the dry ingredients. Scrape the sides of the bowl after each addition. Beat the batter on medium speed for 1 minute. Stir in the toasted coconut and the pineapple chunks.
Scrape the batter into the prepared pan. Bake the cake until a toothpick inserted in the center comes out clean, 50-60 minutes. Let the cake cool in the pan for 15 minutes, then invert onto a wire rack to cool completely.
Glaze: sift the confectioners’ into a small bowl, then gradually add the lime juice, stirring until desired consistency. Drizzle the glaze over the cake, then let the glaze set for 30 minutes before slicing and serving.

*homemade sour cream: to make 1 cup of sour cream, mix 1 cup (240ml) heavy cream with 2-3 teaspoons lemon juice in a bowl. Whisk until it starts to thicken. Cover with plastic wrap and leave at room temperature for 1 hour or until thicker (I usually leave mine on the counter overnight – except on very warm nights – and it turns out thick and silky in the following morning; refrigerate for a creamier texture)

Serves 8-10

Tuesday, July 2, 2013

Lemon cornmeal cake with lemon glaze and the book I'll read next

Lemon cornmeal cake with lemon glaze / Bolo de milho e limão siciliano com glacê de limão siciliano

Thank you for your comments on my issue with “The Great Gatsby” – I feel much better now. :)
I already have something else to read, Somerset Maugham’s "Of Human Bondage", a book suggested by my good friend Cristina – I’ll try to balance it with my cookbooks since I don’t plan on stop cooking and baking.

I started cooking when I was very young and my grandmother and my great-aunt would give me instructions over the phone, which I would carefully and in a very detailed way write down to follow in the kitchen afterwards. If anything, anything at all turned out differently from the ladies’ information I would call them immediately so they could help me solve the problem. I can’t tell you how many days were spent that way – those women are somehow responsible for all the treats you guys see here on this blog. They were the ones that kept me going, even after small disasters in the kitchen. And now, after many, many years, I continue to prepared food, and that gives me tons of pleasure. The more I cook and bake the more I feel confident enough to make changes, to adapt recipes – I guess that maybe you feel the same way. This cake, for instance, called for mascarpone to be mixed into the batter, but I decided to use heavy cream instead, since the Italian cheese is made with cream. It worked really well: the cake turned out fantastic, tender and full of lemon flavor, thanks to the syrup poured over it while still hot from the oven. And to make this recipe even more perfect, the butter is melted, so there is no need to wait for it to soften (which can take forever in the cold days we’ve been having here).

I guess both grandma and aunt Angelica would be proud. :)

Lemon cornmeal cake with lemon glaze
slightly adapted from the delicious The Dahlia Bakery Cookbook: Sweetness in Seattle

Cake:
220g all-purpose flour
115g medium-ground yellow cornmeal – I used polenta
finely grated zest of 2 lemons
1 teaspoon baking powder
1/8 teaspoon table salt
2/3 cup (160ml) heavy cream
4 large eggs
265g granulated sugar
1 teaspoon vanilla extract
½ cup (113g/1 stick) unsalted butter, melted and slightly cooled

Lemon syrup:
½ cup (120ml) fresh lemon juice
1/3 cup (67g) granulated sugar

Lemon glaze:
175g confectioners’ sugar
2 tablespoons heavy cream
1 tablespoon fresh lemon juice

Preheat the oven to 180°C/350°F. Butter a 23cm (9in) round cake pan, line it with a circle of baking paper and butter the paper as well.
In a medium bowl, whisk together the flour, cornmeal, zest, baking powder, and salt.
Place the cream in a large bowl. Whisk in the eggs, one at a time, then the sugar and vanilla. Fold in the dry ingredients in two batches. Stir in the butter. Transfer the batter to the prepared pan and bake until risen and golden and a skewer comes out clean, about 40 minutes.
Towards the end of the baking time, make the lemon syrup: combine the lemon juice and the sugar in a small saucepan over medium heat and cook a few minutes, stirring occasionally, until the sugar dissolves. Remove from the heat.
Cool the cake for 5 minutes in the pan over a wire rack. With a toothpick, poke a few dozen holes all over the top of the cake, then brush the cake with the lemon syrup until all the syrup is absorbed.
Cool completely in the pan.
Carefully unmold the cake, peel off the paper and invert it back onto a plate.
Make the glaze: sift the confectioners’ sugar into a small bowl. Add the cream and the lemon juice, stirring until you get a drizzable consistency. Pour over the cake and allow to set, about 30 minutes.

Serves 8-10

Sunday, June 30, 2013

Oatmeal maple cookies + a book I never finished reading

Oatmeal maple cookies / Cookies de aveia e xarope de bordo

I was reading a friend’s blog post about books when I suddenly felt a pang of guilt - I felt guilty because I love to read but haven’t read anything in months because of a book that I started reading but never finished.

It all began last year after I watched the first trailer for “The Great Gatsby” – I deciced to read the book before the movie got released. And then I tried reading it. Many, many times. I even took the book with me to the hairdresser since it’s one of the most boring places in the whole world. But I never got hooked. I know it’s a classic and I know it’s F. Scott Fitzgerald and I should have read it in college but I couldn’t go through with it. Could that be a case of bad timing? Maybe I should try going back to it in the future.
In the meantime, I think I’ll watch the movie, that might inspire me. And I’ll also start reading another book – I will have to be strong enough to put my cookbooks aside, especially my current favorites like "Piece of Cake", which these great cookies come from.

Wish me luck. :)

Oatmeal maple cookies
from the oh, so delicious Piece of Cake: Home Baking Made Simple

Cookies:
225g all-purpose flour
2 teaspoons baking soda
¼ teaspoon table salt
250g rolled oats
225g dried cranberries
175g unsalted butter, softened
¼ cup (60ml) pure maple syrup
115g granulated sugar
175g light brown sugar
2 large eggs
1 ½ teaspoons vanilla extract

Glaze:
175g confectioners’ sugar
¼ cup (60ml) pure maple syrup
¼ cup (60ml) heavy cream
pinch of salt

Preheat the oven to 180°C/350°F. Line 2 large baking sheets with baking paper.
In a medium bowl, whisk together the flour, baking soda, and salt. Add the oats and dried cranberries and mix thoroughly. Set aside.
In the large bowl of an electric mixer, cream the butter, maple syrup, and sugars on medium speed until creamy and well combined. Beat in the eggs, one at a time, until evenly incorporated. Beat in the vanilla. On low speed, add the dry ingredients, mixing only until they disappear. Finish mixing with a rubber spatula.
Using 2 leveled tablespoons of dough per cookie, roll into balls and place 5cm (2in) apart onto prepared sheets. Bake for 12-15 minutes or until golden brown, especially around the edges. Cool on the sheets over a wire rack for 5 minutes, then carefully transfer to rack and cool completely.

Glaze: sift the confectioners’ sugar into a small bowl. Add the remaining ingredients and stir until smooth. Spoon glazer over cookies and let set for 30 minutes.

Makes 40

Wednesday, June 5, 2013

Chocolate Victoria sponge cake

Chocolate victoria sponge cake / Bolo Victoria de chocolate

This delicious and very easy to make Victoria sponge was the first layer cake I baked in years: after my sister became an adult and started to celebrate her birthday with her friends (and now boyfriend – I am definitely getting old) I had no excuses to bake layer cakes; the hubby and I both like to celebrate our birthdays by going out to dinner, and my brother and I are no longer close as we used to be. So there was no one left to bake a birthday cake for. :(

Last week, however, I received some great news and decided to bake a layer cake to celebrate it – Annie Bell’s beautiful yet simple Victoria sponge caught my attention, and I felt really glad while making it. Layer cakes are one of my favorite things to bake and after I finished spreading the icing on top of it I thought to myself: “I should make layer cakes more often – birthdays or no birthdays”; after all, I have so many wonderful layer cake recipes at home just waiting to be prepared, it would be a waste not to – it’s like having a Ferrari without knowing how to drive (or having Christina Aguilera’s voice and record the songs she does). :D

Chocolate Victoria sponge cake
slightly adapted from the magnificent Annie Bell's Baking Bible (I bought mine here)

Cake:
1 ¼ cups (175g) self-rising flour*
½ cup (45g) cocoa powder
2 teaspoons baking powder
1/8 teaspoon table salt
1 cup (2 sticks/226g) unsalted butter, softened
2 cups + 2 tablespoons (224g) granulated sugar
4 large eggs
1 teaspoon vanilla extract
100ml whole milk, room temperature

Filling:
100g unsalted butter, softened
¾ cup (105g) icing sugar, sifted
2 teaspoons cocoa powder, sifted
pinch of salt
1 egg yolk
1 teaspoon vanilla extract

Icing:
100g dark chocolate, chopped – I used one with 53% cocoa solids
2 tablespoons (14g) unsalted butter
1/3 cup (30g) cocoa powder, sifted
50ml water
1 tablespoon honey

Preheat the oven to 180°C/350°F. Lightly butter two 20cm (8in) round cake pans, line the bottom with a circle of baking paper and butter the paper as well.
In a medium bowl, sift together the flour, cocoa, baking powder and salt. Set aside.
In the large bowl of an electric mixer, cream the butter until soft. Add the sugar and beat until light and fluffy. Beat in the eggs, one at a time, and scrape the sides of the bowl after each addition. Beat in the vanilla. At low speed, mix the dry ingredients, then the milk, and mix just until incorporated. Divide the batter between the two pans, smooth the surface, then bake for 25-30 minutes or until a skewer inserted in the center of the cakes comes out clean. Cool completely in the pans over a wire rack.

Filling: in the large bowl of an electric mixer, beat butter, icing sugar, cocoa and salt until fluffy and lighter in color – scrape the sides of the bowl occasionally. Beat in the egg yolk, then the vanilla, and beat for 1 minute longer.
Assemble the cake before making the icing: unmold one of the cakes and place onto a serving plate or cake stand. Spread the filling evenly on top of the cake. Unmold the other cake and place it over the filling.

Icing: place chocolate and butter in a medium bowl set over a saucepan of simmering water – do not let the bottom of the bowl touch the water. Stir occasionally until smooth and melted. At the same time, combine the cocoa, water and honey in a small saucepan and heat until it starts to boil, whisking to dissolve the cocoa. Add this to the melted chocolate and blend to a thick icing. Immediately spread the icing over the cake (if you wait too long the icing might lose its shine).
This cake keeps well in a cake tin for several days.

* instead of self-rising flour, I used 175g all purpose flour + 1 ¼ teaspoons baking powder (in addition to the 2 teaspoons of baking powder called for in the recipe)

Serves 8-10

Monday, May 13, 2013

Lamington bars - lamingtons for the lazy

Lamington bars / Barrinhas lamington

People often tell me that they admire me for cooking and baking so frequently, and I reply that preparing food really makes me happy. However, I do have some lazy moments, too, of course, and these bars are proof: I’ve always wanted to make lamingtons but kept postponing it because the thought of baking the cake, cutting it into squares, dipping them in chocolate and rolling in coconut made me tired already – not to mention the versions in which the cake squares are filled! :) It’s a lot of work, and I’m not always up for it. Therefore, Donna Hay’s bars are perfect: they are lamingtons made in half the time, or even less, and they taste great.

Lamington bars
from the über beautiful Donna Hay Magazine

Cake:
125g unsalted butter, softened
¾ cup (150g) granulated sugar
1 teaspoon vanilla extract
2 eggs
1¼ cups (175g) all-purpose flour
1¼ teaspoons baking powder
pinch of salt
½ cup (120ml) whole milk, room temperature
1 cup (100g) sweetened shredded coconut, for sprinkling over the bars

Chocolate icing:
¾ cup (105g) confectioners’ sugar, sifted
2 tablespoons cocoa powder, sifted
1/3 cup (80ml) boiling water
1 ½ tablespoons (21g) unsalted butter, melted

Preheat oven to 180°C/350°F. Lightly butter a 20x30cm (8x12in) baking pan, line it with foil and butter ht the foil as well.
Cake: beat the butter, sugar and vanilla in an electric mixer until light and fluffy. Gradually add the eggs and beat well, scraping the sides of the bowl occasionally. Sift the flour, baking powder and salt over the mixture and mix until well combined. Stir in the milk. Spoon into the prepared pan and bake for about 30 minutes or until cooked when tested with a skewer – the cake won’t color much. Cool completely in the pan over a wire rack.
Icing: place the icing sugar, cocoa, water and butter in a bowl and whisk to combine.
Cut the cake into squares and carefully pour over icing. Top with coconut.

Makes 20

Thursday, May 2, 2013

Chocolate whisky cupcakes with peanut butter icing

Chocolate whisky cupcakes with peanut butter icing / Cupcakes de chocolate e uísque com cobertura de manteiga de amendoim

Every time a new DH magazine issue arrives I go crazy with so many delicious recipes and it’s a tough task to choose which one to make first. This time, however, it was a bit easier: I decided I would only make something if I had all the ingredients home. Since I was out of cream cheese all the gorgeous cheesecakes would have to wait, that way I settled for these cupcakes: tender and deeply chocolaty, they are enhanced by the delicious icing. The original recipe called for smooth peanut butter but I used crunchy and thought that it worked really well, adding a nice bite to the smooth frosting. The recipe also called for a caramel sauce to be poured over the frosting but to me the cupcakes were sweet enough without it – more sugar wouldn’t do them any good.

Chocolate whisky cupcakes with peanut butter icing
slightly adapted from the always delicious and stunning Donna Hay Magazine

Cupcakes:
200g all purpose flour
1 teaspoon baking soda
pinch of salt
2 tablespoons whisky
140g unsalted butter, chopped
½ cup (45g) Dutch-processed cocoa, sifted
2 eggs
1/3 cup sour cream*
1 teaspoon vanilla extract
275g granulated sugar

Peanut butter icing:
160g icing sugar, sifted
1 cup crunchy peanut butter
80g unsalted butter, softened
1 teaspoon vanilla extract
1/3 cup (80ml) heavy cream

Preheat the oven to 180°C/350°F. Line a 12-hole (½ cup capacity each) cupcake pan with paper liners.
Cupcakes: in a small bowl, whisk together the flour, baking soda and salt. Set aside.
Place the whisky and butter in a medium saucepan over medium heat and stir until the butter is melted. Remove from the heat and whisk in the cocoa. Add the eggs, sour cream and vanilla and whisk to combine. Whisk in the sugar, then the flour mixture and mix until smooth. Pour the batter equally into the prepared pan (don’t go over 1/3 of the capacity or the batter might overflow) and bake for 25-30 minutes or until risen and cooked through when tested with a skewer. Cool in the pan for 5 minutes then carefully transfer to a wire rack to cool completely.

Icing: place the sugar, peanut butter, butter and vanilla in the large bowl of an electric mixer and beat until pale and fluffy, 6-8 minutes, scraping the sides of the bowl occasionally. Add the cream and beat for 1 minute. Spread the icing over the cooled cupcakes.

*homemade sour cream: to make 1 cup of sour cream, mix 1 cup (240ml) heavy cream with 2-3 teaspoons lemon juice in a bowl. Whisk until it starts to thicken. Cover with plastic wrap and leave at room temperature for 1 hour or until thicker (I usually leave mine on the counter overnight – except on very warm nights – and it turns out thick and silky in the following morning; refrigerate for a creamier texture)

Makes 12 – I halved the recipe above, used 1/3-cup capacity muffin pans and got 9 cupcakes

Monday, January 21, 2013

Marbled sour cream pound cake with white chocolate icing

Marbled sour cream pound cake with white chocolate icing / Bolo mármore de sour cream com cobertura de chocolate branco

A while ago I nominated Flo Braker and Lisa Yockelson the Queens of Pound Cakes but now I have to add another name to that fabulous list: Alisa Huntsman, who to me was already the Queen of Layer Cakes, kicks ass in other fields, too, and her pound cakes have become favorites of mine, not only because they are insanely tender and delicious but also because her pound cake recipes from this wonderful book make more than one cake, and to me that is always a bonus. :)

I’ve had my share of marbled cakes and always felt that the chocolate part was usually a bit on the dry side, but not here: this cake is sheer perfection and to be honest with you the icing is not even necessary.

Marbled sour cream pound cake with white chocolate icing
cake from the absolutely delicious Desserts from the Famous Loveless Cafe and icing from the equally wonderful Martha Stewart's Baking Handbook

Cake:
1 ¾ sticks (200g) unsalted butter, softened
1 ¾ cups (350g) granulated sugar
2 teaspoons vanilla extract
3 large eggs
3 large egg yolks
2 ¼ cups (315g) unbleached all purpose flour
¼ teaspoon baking soda
pinch of salt
2/3 cup sour cream*
85g (3oz) dark chocolate, melted and slightly cooled

Icing:
¾ cup (105g) confectioners' sugar, sifted
2 tablespoons whole milk, room temperature
65g (2¼ oz) best-quality white chocolate, melted and cooled

Preheat the oven to 180°C/350°F. Butter two 20x10x5cm (8x4x2in) loaf pans, line with baking paper and butter the paper as well.
In the large bowl of an electric mixer, cream butter, sugar and vanilla until light and fluffy. Add the whole eggs and egg yolks in 2 or 3 additions, scraping the sides of the bowl after each addition. Beat to incorporate. Sift the flour, baking soda and salt into the batter, add the sour cream and fold with a rubber spatula until batter is evenly blended.
Measure out 2 cups of the batter into another bowl. Add the chocolate and mix to combine. Spoon both vanilla and chocolate batters into prepared pans in layers, alternating spoonfuls of vanilla and chocolate. To create marbling, run a table knife (or wooden skewer) through the batters in a swirling motion.
Bake for about 45 minutes or until a toothpick inserted in the center of the cakes comes out clean. Cool in the pans over a wire rack for 5 minutes, then very carefully unmold, remove the paper and let cool completely on the rack.

Icing: in a small bowl, whisk together the confectioners' sugar and milk. The mixture should have the consistency of thin sour cream. Add the melted chocolate and whisk until glaze is smooth. If it is too thin, add more sugar, 1 tablespoon at a time; if too thick, add more milk, 1 teaspoon at a time. Immediately pour over the cake.

* homemade sour cream: to make 1 cup of sour cream, mix 1 cup (240ml) heavy cream with 2-3 teaspoons lemon juice in a bowl. Whisk until it starts to thicken. Cover with plastic wrap and leave at room temperature for 1 hour or until thicker (I usually leave mine on the counter overnight – except on very warm nights – and it turns out thick and silky in the following morning; refrigerate for a creamier texture)

Makes 2 cakes, each serving 6

Thursday, December 13, 2012

Fruit mince muffins with eggnog icing

Fruit mince muffins with eggnog icing / Muffins de fruit mince com cobertura de eggnog

Eggnog is not part of Brazilian Christmas celebrations but everything I’ve made so far flavored as the drink turned out delicious, the sablé rounds and Flo Braker’s cake being my favorites –therefore, I bookmarked Rachel Allen’s muffins the minute I saw them on the book. This fantastic recipe is a keeper, not only because the delicious muffins match eggnog and fruit mince, flavors I love, but also because Allen’s homemade fruit mince is very tasty and easy to make – so good that I used it in my brownies, too.

Fruit mince muffins with eggnog icing
slightly adapted from the wonderful Cake (mine was bought here)

Muffins:
150g unsalted butter, softened
½ cup + 1 tablespoon (112g) granulated sugar
3 eggs
1 teaspoon vanilla extract
1 quantity fruit mince, cooled - recipe here
1 cup + 1 tablespoon (150g) all purpose flour
1 ½ teaspoons baking powder
pinch of salt

Icing:
4 egg yolks
1 teaspoon corn starch
¼ cup (50g) granulated sugar
1 tablespoon brandy
½ cup (120ml) heavy cream
½ teaspoon finely grated nutmeg
12 dried cranberries, for decoration (optional) – if you decide to use them, place them in a small bowl with some hot water till they plump up

Preheat the oven to 180°C/350°F, and line a 12-hole (1/3 cup-capacity cavities) muffin pan with paper cases.
Muffins: using an electric mixer, cream the butter and sugar together until light and fluffy. Beat in the eggs, one at a time, beating well after each addition – scrape the sides of the bowl occasionally. Beat in the vanilla, then the cooled fruit mince. Sift in the flour, baking powder and salt and fold in gently to combine. Divide between the muffin cases, filling each ¾ full, then bake for 20-25 minutes or until well risen, golden on top and a skewer inserted in the center comes out clean. Cool in the pan over a wire rack for 5 minutes then carefully remove from the pan and transfer to the rack. Cool completely.

Icing: whisk together all the ingredients and place in a small saucepan. Cook over medium heat, stirring continuously, until it starts to boil and becomes thick, then remove from the heat and put through a fine sieve into a medium bowl. With an electric mixer, whisk continuously for a few minutes until the mixture has cooled and become very thick (after doing that, I refrigerated the icing for 30 minutes and it became easier to spread). Spoon the icing onto the muffins and decorate each with a dried cranberry.

Makes 12

Related Posts with Thumbnails