Tuesday, March 27, 2018

Cornmeal, coconut and marmalade cake

Cornmeal, coconut and marmalade cake / Bolo de fubá, coco e geleia de laranja

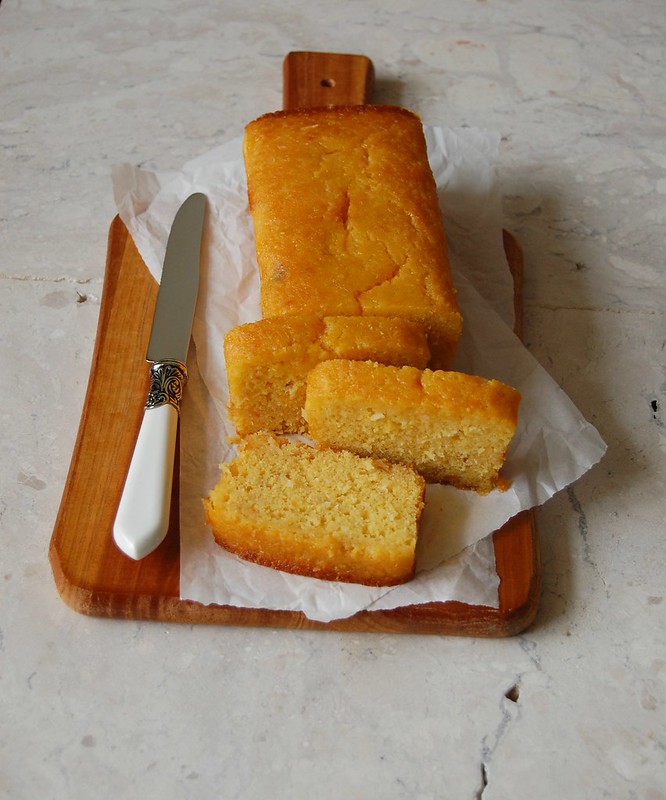
I bought Ottolenghi’s beautiful book ages ago and if I am not mistaken the first recipe I made from it was the semolina, coconut and marmalade cake – it is delicious and the recipe yields two cakes: you can enjoy one while making other people’s day better sharing the second loaf.

One day I wanted to make this cake again, however I did not have any semolina at home. I decided then to use corn flour instead and it worked beautifully. Feel free to use one or the other.

Cornmeal, coconut and marmalade cake
slightly adapted from the wonderful Jerusalem

Cake:
¾ cup (180ml) sunflower oil
finely grated zest of 1 orange
1 cup (240ml) freshly squeezed orange juice
160g orange marmalade
3 large eggs
70g granulated sugar
70g unsweetened desiccated coconut
90g all purpose flour
180g fine corn flour
2 tablespoons almond meal
2 teaspoons baking powder
pinch of salt

Soaking syrup:
¾ cup (150g) granulated sugar
140ml water
1 tablespoon orange blossom water

Preheat the oven to 180°C/350°F. Whisk together the oil, orange zest and juice, marmalade, and eggs until the marmalade dissolves. In a separate bowl, mix together all the dry ingredients and add to the wet ingredients. Mix until well combined. The mixture should be runny.
Butter or brush with oil, line two 1-lb loaf pans (8½x4½ in/22x11cm) with baking paper and butter the paper as well. Divide the filling evenly between them. Bake for 45-60 minutes, until a skewer inserted in a cake comes out clean and the tops turn an orangey brown.

Near the end of the baking time, place the syrup ingredients in a small saucepan and bring to a boil, then remove from the heat. As soon as the cakes come out of the oven, start brushing them with the hot syrup using a pastry brush; you’ll need to do this in a few goes, allowing the syrup to soak in for a minute or two before you carry on brushing with more syrup. Make sure you use up all the syrup and it is all absorbed into the cakes.
Cool completely on the pans over a wire rack.

Makes 2 cakes

Friday, March 23, 2018

Rye chocolate chip financiers

Rye chocolate chip financiers / Financiers de centeio com gotas de chocolate

Financiers are one of my downfalls: petite, delicate, but full of flavor, they are a great way of using leftover egg whites. I have been trying to make them using olive oil instead of butter, but the texture was a bit off, so more tests are necessary.

The recipe I bring you today is from ages ago (when I could still eat butter) and it is delicious: the rye flour makes the financiers a little bit heavier on texture, yet flavorsome, and the flavor of the rye flour goes really well with chocolate.

Rye chocolate chip financiers
own recipe

85g almond meal
¾ xícara (105g) icing sugar, sifted
3 tablespoons (30g) all purpose flour, sifted
3 tablespoons (30g) fine rye flour, sifted
pinch of salt
5 large egg whites
85g unsalted butter, melted and cooled
1 teaspoon vanilla extract
½ cup (85g) dark chocolate chips

In a medium bowl, whisk together the almond meal, icing sugar, all purpose flour, rye flour and salt. Whisk in the egg whites. Whisk in the butter and vanilla until smooth, then fold in the chocolate chips. Cover with plastic wrap and refrigerate for 1 hour.

Preheat the oven to 200°C. Butter ten 100ml-capacity molds or mini muffin pans.
Divide the batter among the prepared pans and smooth the top. Divide the berries among the pans, placing them on top of the batter and pushing them slightly into the batter. Bake for about 15 minutes or until golden and risen – a skewer in the center should come out clean.
Cool in the pans over a wire rack for 5 minutes, then carefully unmold and transfer to the rack, cooling completely.

Financiers are tastier on the day they are made, however they can be kept in an airtight container at room temperature for up to 2 days

Makes 10

Wednesday, March 21, 2018

Orecchiette with courgette and goat’s cheese sauce

Orecchiette with courgette and goat’s cheese sauce / Orecchiette com molho de abobrinha e queijo de cabra

This food stylist wannabe got crazy when she saw yellow courgettes in farmer’s market for the first time – until then I had only seen it on books, magazines and food TV shows. Of course I brought some home and immediately thought of something tasty and visually beautiful to make with it.

For this recipe I used red onion so I could have a nice color contrast, however after that day I made this pasta several other times using regular onions and courgettes and it was flavorsome anyway.

Orecchiette with courgette and goat’s cheese sauce
own recipe

2 tablespoons unsalted butter
1 teaspoon olive oil
½ large red onion, thinly sliced in half moons
1 large garlic clove, minced
1 courgette (about 350g/12oz), sliced in half lengthwise and then sliced into thin half moons
finely grated zest of 1 lime
handful of fresh marjoram leaves
2 tablespoons dry white wine
¼ cup (60ml) heavy cream
35g goat’s cheese, coarsely grated or crumbled
200g orecchiette pasta

Cook the pasta in plenty of boiling salted water until al dente (follow the instructions in the package). In the meantime, make the sauce: in a large frying pan, heat the butter and olive oil until butter is melted. Add the onion and cook, stirring occasionally, until softened. Stir in the garlic and cook for 1 minute only – do not let it burn or it will be bitter. Add the courgette and cook, stirring occasionally, for 5-7 minutes or until softened. Season with salt and pepper and stir in the lime zest and the marjoram. Add the wine and cook until it evaporates. Stir in the cream and the cheese and cook just until the cheese melts.

Drain the pasta, reserving some of the cooking water, and stir into the sauce – if sauce is too thick, stir in a bit of the cooking water to loosen it up. Serve immediately.

Serves 2

Other ideas: this recipe tastes great if gorgonzola and fresh oregano are used instead of goat’s cheese and marjoram.

Monday, March 12, 2018

Simple breakfast bread (dairy free)

Simple breakfast bread / Pão de forma do meu jeito

I wanted a bread recipe I could make sandwiches with, turn into toast for breakfast, and do everything we do with packaged white bread. I no longer buy that and most of the homemade versions I found called for milk or butter (or both). I thought of making Kim Boyce’s oatmeal bread, which is delicious, replacing the butter with olive oil, but the making of that recipe is not as straightforward as I needed it to be.

I reached out to King Arthur Flour’s website and I bring you my take on their white breakfast bread: a bit of whole meal flour, a bit of oats, no dairy. It is not a light bread and I like it that way, but the big surprise came when my 3-yeard old nephew saw the bread cooling on the counter and asked for some. I gave him a tiny piece, so sure that he would not enjoy such a dense kind of bread, but he devoured it in seconds and asked for seconds (and thirds). :)

Simple breakfast bread
slightly adapted from here

1 1/3 cups (320ml) lukewarm water
1 ½ teaspoons dried yeast
1 tablespoon demerara sugar – for the caramel flavor; use granulated if you prefer
½ tablespoon honey
1 ½ tablespoons extra virgin olive oil
3 cups (420g) all purpose flour
½ cup (70g) whole wheat flour
1/3 cup (30g) rolled oats
1 ½ teaspoons table salt

Place the water, yeast, sugar and honey in the bowl of an electric mixer fitted with the dough hook. Whisk with a fork and set aside until foamy. Add the olive oil, flours, oats and salt and knead for 8-10 minutes until a smooth and elastic dough forms. Transfer to a large bowl brushed with olive oil, cover with plastic wrap and set aside to prove for 1 ½ hours, or until doubled in size.

Brush with olive oil a 5-cup capacity loaf pan. Punch the dough to remove the excess of air and transfer to a slightly floured surface. Roll into a large rectangle, then fold it like a letter and fit into the prepared pan. Cover and set aside to prove again for 1 hour – in the meantime, preheat the oven to 200°C/400°F.
Bake for about 30 minutes or until golden brown – bread should sound hollow when tapped with your fingers. Cool in the pan over a wire rack for 5 minutes, then carefully unmold onto the rack to cool. Cool completely.

Makes about 10 slices

Related Posts with Thumbnails