Showing posts with label sandwich cookies. Show all posts

Monday, September 1, 2014

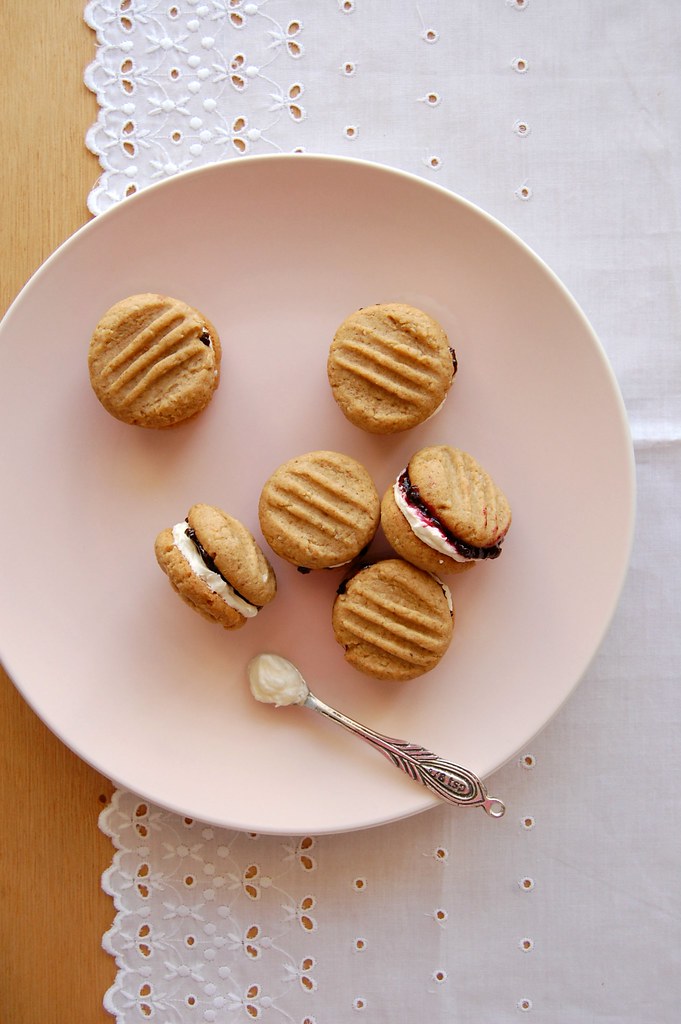
Monte Carlos - beautiful and delicious

Monte Carlos

Since I'm all for food that looks beautiful, it won't come as a surprise for you that the minute I saw these cookies I had to make them: delicate and pretty, they looked like miniature versions of a Victoria sandwich, with the cream and jam layers.

When I tried one cookie, I noticed that they weren't just pretty: they were delicious as well. The beautiful and flavorsome combo reminded me of The Great British Bake Off and how annoying Paul Hollywood was on the fourth season, telling one contestant over and over again that she was a case of "style over substance" - needless to say, by the end of that season I couldn't stand the show anymore.

These cookies, my friends, are definitely not a case of style over substance - they are cute and taste great. Give these a go and let me know if you agree with me.

Monte Carlos
slightly adapted from the beautiful and delicious The Baking Collection (The Australian Women's Weekly)

Cookies:
200g all purpose flour
100g whole wheat flour
2 teaspoons baking powder
pinch of salt
40g desiccated unsweetened coconut
185g unsalted butter, softened
110g light brown sugar
1 teaspoon vanilla
1 egg

Filling:
60g unsalted butter, softened
120g icing sugar, sifted
1 teaspoon vanilla extract
2 teaspoons whole milk, room temperature
about 50g blackberry jam

Preheat the oven to 180°/350°F. Line two large baking sheets with baking paper.
In a medium bowl, whisk together flours, baking powder, salt and coconut. Using an electric mixer, beat butter, sugar and vanilla until light and creamy. Beat in the egg. On low speed, add the dry ingredients and mix just until incorporated.
For each cookie, roll 1 leveled tablespoon of dough , place 2,5cm (1in) apart onto prepared sheets and flatten with a fork. Bake for 12-15 minutes or until golden on the edges. Cool on the sheets for 2 minutes, then slide the paper with the cookies to a wire rack and cool completely.

Cream filling: using an electric mixer, beat butter, sugar and vanilla and light and fluffy. Beat in milk.

Spread jam in half the cookies and cream in the remaining half, then sandwich them together.

Makes 22 sandwich cookies

Friday, August 2, 2013

Grown up Oreos

Grown up Oreos - Oreos versão adulta

My visit to Bouchon Bakery last year was one to remember and every now and then I think of the delicious treats I had there. However, I never got to taste Thomas Keller’s version of the Oreo cookie – me being me I ended up ordering lemon and raspberry sweets.

Days ago I set out to make Keller’s Oreo cookies, a recipe from "Bouchon Bakery", but wasn’t in the mood for rolling out cookie dough – I get lazy sometimes, you know. :) I thought that the slice and bake chocolate cookies I’d seen on Gourmet Traveller’s website would make great substitutes – and indeed, they did.

My Oreos don’t look as pretty as the cookies served at Bouchon Bakery, but I can guarantee that they tasted really good. :)

Grown up Oreos
from two gorgeous sources: Gourmet Traveller and Bouchon Bakery

Cookies:
260g all purpose flour
160g icing sugar, sifted
50g cocoa powder, sifted
pinch of salt
225g unsalted butter, cold and cut into 2cm pieces
1 egg yolk
1 teaspoon vanilla extract

Filling:
125g white chocolate, finely chopped
1 tablespoon (14g) unsalted butter, room temperature
½ cup (120ml) heavy cream

Cookies: process flour, icing sugar, cocoa and salt in a food processor to combine, then add butter and pulse until mixture is sand-textured. Add yolk and vanilla and process until mixture comes together (here I added another egg yolk because the mixture wasn’t coming together at all). Turn out onto a work surface and gently knead to come together. Divide the dough into two equal parts. Place each on a piece of parchment paper; shape dough into logs. Fold parchment over dough; using a ruler, roll and press into a 3.5 cm (1.4in) log – like Martha does here. Wrap in parchment. Chill in the refrigerator until very firm, about 2 hours.
Preheat oven to 180°C/350°F; line two large baking sheets with baking paper. Unwrap one log at a time (keep the other in the fridge). Cut into 5mm thick rounds; space 2.5cm (1in) apart onto prepared sheets. Bake one sheet at a time until cookies edges are firm (10-12 minutes). Cool slightly on trays, then transfer to a wire rack to cool completely.

Make the filling: in a small bowl over a saucepan of simmering water, melt chocolate and butter together. In the meantime, bring cream to a simmer in a small saucepan. Pour it over the chocolate and butter mixture and whisk to combine. Cool to room temperature, cover with plastic wrap and refrigerate for at least 4 hour or up to 1 day. Right before assembling the cookies, beat the filling with an electric mixer until smooth and creamy. Transfer to a piping bag with a small tip.

Assembling the cookies: arrange half of the cookies on a work surface, bottom side up, and pipe the filling onto each. Sandwich with the remaining cookies, pressing to spread the filling to the edges – I used a small cookie scoop instead of a pastry bag and placed rounded mounds of filling on the center of each cookie, topping with another cookie and pressing down gently to squish the filling.

Makes about 30 sandwich cookies

Wednesday, January 23, 2013

Milk chocolate cookies with malted cream

Milk chocolate cookies with malted cream / Biscoitos de chocolate ao leite com recheio de Ovomaltine

If I’m not mistaken – and over 6 years of blogging can play tricks on one’s mind, trust me – I first heard of “Food and Wine” magazine while watching season 1 of “Top Chef” when Gail Simmons was introduced. I’ve been using recipes from the magazine quite regularly lately, and if you’re not familiar with their website you should definitely check it out: there are tons of great recipes there, and these cookies are one of them – just be careful not to eat all the filling before putting the sandwich cookies together. ;)

Milk chocolate cookies with malted cream
slightly adapted from the always delicious Food and Wine

Cookies:
¾ cup (1 ½ sticks/170g) unsalted butter, softened
½ cup (88g) light brown sugar, packed
½ cup (100g) granulated sugar
170g (6oz) milk chocolate, melted and cooled slightly
1 tablespoon pure vanilla extract
1 ¾ cups (245g) all-purpose flour
2 tablespoons unsweetened cocoa powder
1 teaspoon baking soda
1/8 teaspoon salt

Filling:
½ cup (113g/1 stick) unsalted butter, softened
½ cup chocolate malt powder, such as Ovaltine
1 teaspoon pure vanilla extract
1 ¾ cups (245g) confectioners' sugar, sifted

In a large bowl, using an electric mixer, beat the butter with the brown sugar and granulated sugar until creamy and smooth. Add the melted chocolate and vanilla and beat until smooth. In a small bowl, whisk the flour with the cocoa powder, baking soda and salt. Add the dry ingredients to the bowl and beat at low speed just until incorporated. Wrap the dough in plastic wrap and refrigerate for 30 minutes – in the meantime, preheat the oven to 180°C/350°F and line 2 baking sheets with parchment paper.
Roll the dough between 2 sheets of parchment paper to a 6mm (¼in) thickness and freeze for about 7 minutes. Using a 5cm (2in) round cookie cutter, stamp out as many rounds as possible and transfer to the baking sheets, 2.5cm (1in) apart. Gather the scraps and chill, with the cut-out rounds, for 10 minutes. Reroll the scraps and stamp out more rounds.
Bake the cookies, one sheet at a time (keep the other in the fridge) for about 10 minutes, until dry and set. Cool the cookies completely on the sheet over a wire rack.
Filling: in a medium bowl, using an electric mixer, beat the butter with the chocolate malt powder at medium speed until light, about 3 minutes – my mixture was a bit dry so I added 1 tablespoon sour cream to it (I would have used heavy cream if I had any). Add the vanilla and confectioners' sugar and beat until light and fluffy. Transfer the filling to a pastry bag fitted with a ½-inch plain tip. Arrange half of the cookies on a work surface, bottom side up, and pipe a 1-inch mound of filling onto each. Sandwich with the remaining cookies, pressing to spread the filling to the edges – I used a small cookie scoop instead of a pastry bag and placed rounded mounds of filling on the center of each cookie, topping with another cookie and pressing down gently to squish the filling.

Makes about 2 ½ dozen cookie sandwiches – I used a 4cm square cookie cutter and got 28 sandwich cookies

Wednesday, February 15, 2012

Peanut butter sandwich cookies with milk chocolate filling + two favorite Tumblrs

Peanut butter cookies with milk chocolate filling / Biscoitos de manteiga de amendoim com recheio de chocolate ao leite

I’ve been obsessing with sandwich cookies lately – I want to bake each and every recipe for sandwich cookies I see (and no, I haven’t forgotten about biscotti, believe me). :)
I’d planned making one of Martha’s fabulous cookies but the jam I had around was very chunky – the jam is actually quite good but not thin enough for filling the cookies. I turned to the Karen DeMasco’s wonderful book and made these fantastic cookies, which allowed me to finish off a jar of peanut butter as well. Win/win situation. :)

You know that when I like something I really like it and because I am a movie junkie I have now two favorite Tumblrs: “Old Love” and “This Had Oscar Buzz” – I am sure some of you will love them, too. :)

Peanut butter sandwich cookies with milk chocolate filling
slightly adapted from the wonderful and delicious The Craft of Baking: Cakes, Cookies, and Other Sweets with Ideas for Inventing Your Own

Cookies:
1 ¾ cups (245g) all purpose flour
1 teaspoon baking powder
½ teaspoon baking soda
¼ teaspoon table salt
6 tablespoons (84g) unsalted butter, room temperature
½ cup + 1 tablespoon (100g) light brown sugar, packed
¾ cup + 1 tablespoon (115g) confectioners’ sugar, sifted
½ cup creamy peanut butter
¼ cup (60ml) vegetable oil, such as canola
1 ½ teaspoons vanilla extract
1 large egg

Filling:
168g (6oz) milk chocolate, chopped
½ cup creamy peanut butter
¼ cup (35g) confectioners’ sugar, sifted
1/8 teaspoon table salt
¾ cup (180ml) heavy cream

Start by making the cookies: preheat the oven to 180°C/350°F. Line two large baking sheets with baking paper.
In a large bowl, sift together the flour, baking powder, baking soda and salt.
In the bowl of an electric mixer, fitted with the paddle attachment, beat the butter, brown sugar and confectioners’ sugar on medium-high speed until creamy. Add the peanut butter and beat to combine, scraping down the sides of the bowl. With the mixer on low speed, slowly add the oil, vanilla and egg and beat until just combined. Add the flour mixture beating just to combine.
Roll the dough into balls – 1 ½ leveled teaspoons of dough per ball – and place them onto the prepared baking sheets, 2cm (1in) apart. Bake, rotating the sheets halfway through, until the cookies are golden brown on the edges, about 12 minutes. Transfer the baking sheets to a wire rack and let cool completely (unfilled cookies can be stored in an airtight container at room temperature for up to 1 week).

Make the filling: combine the chocolate, peanut butter, confectioners’ sugar and salt in a medium bowl. In a small saucepan, bring the cream to a boil. Remove the cream from the heat and pour it over the chocolate mixture. Stir until the ingredients are melted and the mixture is smooth. Refrigerate until thick enough to spread. Using an offset spatula, spread the filling over the flat sides of half of the cookies. Sandwich with the remaining cookies*.
Filled cookies are best eaten on the same day but can be kept in an airtight container in the refrigerator for up to 3 days.

* there was some filling left; I believe that ¾ of the filling recipe would be enough to fill all the cookies

Makes about 50 sandwich cookies

Related Posts with Thumbnails