Showing posts with label jam. Show all posts

Tuesday, April 6, 2021

Granola jam bars

Barrinhas de geleia e granola


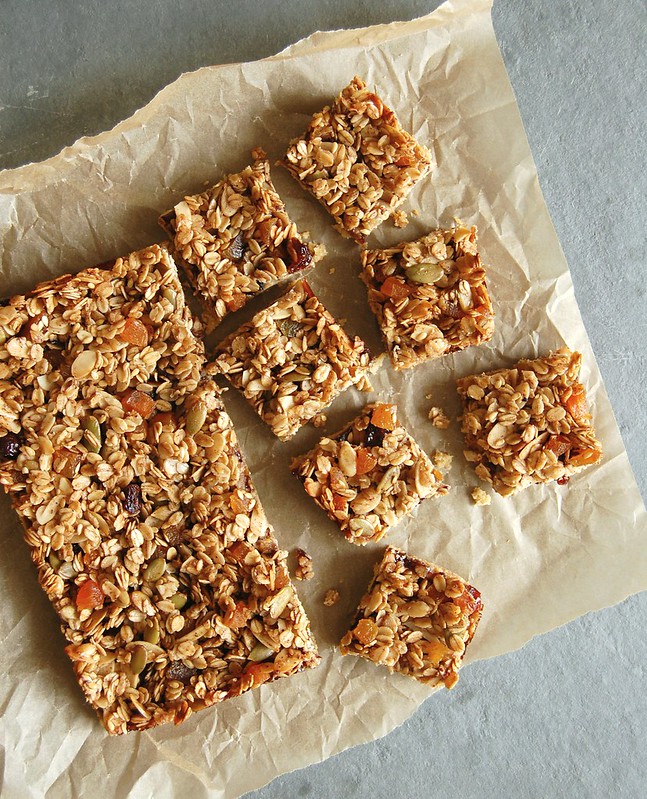
Once I started making my own granola I never looked back: store bought just doesn’t do it for me anymore. I am the only granola eater at my house, so one batch lasts quite a long time – I usually eat it in the afternoon with some yogurt and fruit, a nice snack between lunch and dinner, and that also gives me energy to exercise. 

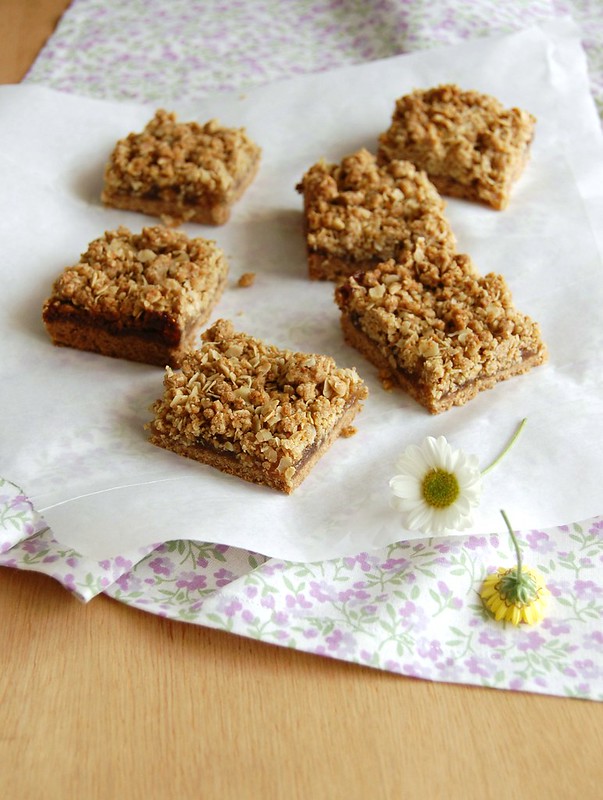
There were times, however, before quarantine, that I was not able to finish off the granola before it lost its crunch. For times like those, these granola and jam bars are absolutely perfect: you can vary the flavors of both the granola and the jam to make several different combinations.

The only jam I usually avoid for these bars is strawberry, for I think it is a tad too sweet.


Granola jam bars

own recipe

Base:

¼ cup (50g) granulated sugar

¾ cup (105g) all purpose flour

1/3 cup (45g) whole wheat flour

pinch of salt

100g unsalted butter, melted and cooled

1 egg yolk (save the white for making the topping)

½ teaspoon vanilla extract


Filling and topping:

½ cup (170g) your favorite jam – my favorite flavors for this recipe are raspberry, blackberry and apricot

1 ¾ cups (210g) granola

1 egg white


Start making the base: preheat the oven to 180°C. Line a 20x20cm (8x8in) square baking pan with foil, leaving an overhang in two opposite sides, to make unmolding the bars easier. Butter the foil.

In a large bowl, whisk the flours, sugar and salt. Add the butter, egg yolk and vanilla and mix until a dough starts to form – it might be crumbly, no problem, do not overmix to avoid getting a tough base. Transfer the mixture to the prepared pan and pat onto the bottom of the pan – you can use the bottom of a glass or measuring cup to help. Bake for 25-30 minutes or until golden brown.

Remove from the oven and very carefully not to get burned, spread the jam over the base.

In another bowl, mix well the granola and egg white and then spread evenly over the jam layer.

Bake for another 20 minutes. Remove from the oven, cool completely in the pan over a wire rack.

Remove the bars from the pan using the paper as guide and cut into squares to serve.


Makes 16

Wednesday, November 26, 2014

Whole wheat thumbprint cookies

Whole wheat thumbprints / Biscoitinhos thumbprint integrais

After making a batch of cookies that failed miserably, a lovely friend of mine asked what my favorite cookie recipe was and I found the question a very difficult one - I have baked several different cookies so far and have more than one that I love. Since the failed recipe was for chocolate chip cookies I stayed on that subject and told her that one of my favorites are Kim Boyce’s whole wheat choc chip cookies – they are delicious beyond words and before making them I would never have believed that a cookie made exclusively with whole wheat flour could be so good.

On that same day, I still had my mind set on baking more cookies – bad recipes drive me nuts, I’ll say – and decided to bake another cookie recipe made with whole wheat flour, but this time there was a little hazelnut meal to make them even nuttier: Louise Fulton Keats’ thumbprints, filled with blackberry jam. They turned out delicious and were super easy to put together – another win for whole wheat flour.

Two days later the cookies were a bit on the soft side, but still tasty – it didn’t bother me much, but next time I’ll try baking them without the jam first and then fill them when they are out of the oven and see if that fixes the problem.

Whole wheat thumbprints / Biscoitinhos thumbprint integrais

Whole wheat thumbprint cookies
from the delicious and beautiful Something for Everyone: Family Meals for Baby, Toddler and Beyond

250g unsalted butter, softened
150gbrown sugar
1 teaspoon vanilla extract
1 egg
260g whole wheat flour
55g ground hazelnuts
pinch of salt
blackberry jam, or the your favorite flavor

Preheat the oven to 180°C/350°F. Line two baking large baking sheets with baking paper.
Using an electric mixer, cream the butter and sugar until pale and creamy. Add the vanilla and egg and beat until combined.
With the mixer on low speed, add the flour, ground hazelnuts and salt, mixing until the dough just comes together to form a ball. Cover and refrigerate for at least 1 hour.

Take 1 leveled tablespoon of the dough per cookie at a time and roll into balls. Place 5cm (2in) apart onto prepared sheets. Using a wooden spoon with a rounded handle or other gadget, make a deep indentation in the center of each cookie. Fill the indentations with jam, then bake for 12-15 minutes or until cookies are golden.
Cool in the sheets for 2 minutes, then slice the paper with the cookies to a wire rack and cool completely.

Makes about 55

Wednesday, September 17, 2014

Back from vacation with apricot jam cake

Apricot jam cake / Bolo de geleia de damasco

Hello, everyone!

I am back after spending wonderful vacation days in Spain: beautiful places, delicious food and massive amounts of Cava. :D

I returned home very happy, but also a couple of pounds heavier, even though I walked around a lot while I was there – one can’t eat all that jamón and pan con tomate and get away with it, right? :) I intend to eat lots of vegetables and fruit in the weeks to come (there’s a huge pot of vegetable soup already in my fridge), but I know I can’t survive without a slice of cake on the weekend.

Moderation is my mantra. ;)

If you’re like me, may I suggest this jam cake? It tastes delicious and it is very tender – don’t worry if the center sinks a bit, it’s totally OK because of the weight of the jam added to the batter. I haven’t tried it with other jam flavors, but I believe it would work with something sharp, not too sweet.

Apricot jam cake
from one of my favorite cookbooks

1 ½ cups (210g) all purpose flour
1 teaspoon baking powder
½ teaspoon ground cinnamon
¼ teaspoon ground cloves
¼ teaspoon baking soda
1/8 teaspoon table salt
6 tablespoons (85g) unsalted butter, softened
150g light brown sugar
1 cup apricot jam
2 eggs, room temperature
2 tablespoons sour cream

Preheat the oven to 180°C/350°F. Butter a 20cm (8in) square cake pan, line the bottom with baking paper, butter the paper as well and flour everything, removing the excess.
In a medium bowl, whisk together the flour, baking powder, cinnamon, cloves, baking soda and salt.
In a large bowl, using an electric mixer, cream the butter and sugar until light and fluffy. Beat in the jam until smooth. Beat in the eggs, one at a time. Scrape the sides of the bowl occasionally.
Add the sour cream and mix until smooth. With the mixer on low speed, gradually add the flour mixture and beat just until combined.
Pour the batter into the prepared pan and bake for about 50 minutes or until golden, risen and a toothpick inserted in the center of the cake comes out clean.
Cool completely in the pan. Carefully unmold, remove the paper and invert onto a serving plate.

* homemade sour cream: to make 1 cup of sour cream, mix 1 cup (240ml) heavy cream with 2-3 teaspoons lemon juice in a bowl. Whisk until it starts to thicken. Cover with plastic wrap and leave at room temperature for 1 hour or until thicker (I usually leave mine on the counter overnight – except on very warm nights – and it turns out thick and silky in the following morning; refrigerate for a creamier texture)

Serves 8

Monday, September 1, 2014

Monte Carlos - beautiful and delicious

Monte Carlos

Since I'm all for food that looks beautiful, it won't come as a surprise for you that the minute I saw these cookies I had to make them: delicate and pretty, they looked like miniature versions of a Victoria sandwich, with the cream and jam layers.

When I tried one cookie, I noticed that they weren't just pretty: they were delicious as well. The beautiful and flavorsome combo reminded me of The Great British Bake Off and how annoying Paul Hollywood was on the fourth season, telling one contestant over and over again that she was a case of "style over substance" - needless to say, by the end of that season I couldn't stand the show anymore.

These cookies, my friends, are definitely not a case of style over substance - they are cute and taste great. Give these a go and let me know if you agree with me.

Monte Carlos
slightly adapted from the beautiful and delicious The Baking Collection (The Australian Women's Weekly)

Cookies:
200g all purpose flour
100g whole wheat flour
2 teaspoons baking powder
pinch of salt
40g desiccated unsweetened coconut
185g unsalted butter, softened
110g light brown sugar
1 teaspoon vanilla
1 egg

Filling:
60g unsalted butter, softened
120g icing sugar, sifted
1 teaspoon vanilla extract
2 teaspoons whole milk, room temperature
about 50g blackberry jam

Preheat the oven to 180°/350°F. Line two large baking sheets with baking paper.
In a medium bowl, whisk together flours, baking powder, salt and coconut. Using an electric mixer, beat butter, sugar and vanilla until light and creamy. Beat in the egg. On low speed, add the dry ingredients and mix just until incorporated.
For each cookie, roll 1 leveled tablespoon of dough , place 2,5cm (1in) apart onto prepared sheets and flatten with a fork. Bake for 12-15 minutes or until golden on the edges. Cool on the sheets for 2 minutes, then slide the paper with the cookies to a wire rack and cool completely.

Cream filling: using an electric mixer, beat butter, sugar and vanilla and light and fluffy. Beat in milk.

Spread jam in half the cookies and cream in the remaining half, then sandwich them together.

Makes 22 sandwich cookies

Thursday, July 3, 2014

Jam and rye crumble bars - falling in love with rye flour

Jam and rye crumble bars / Barrinhas de centeio e geleia

There was some beer left from Nigella’s spectacular cake, and I started looking for a good recipe to use it in. I froze part of the beer for another day and part of it was transformed into a rye bread. Very flavorful, it was gladly devoured in open sandwich form – I mixed Brazil and Scandinavia and made the open sandwiches with hearts of palm and cheese. They were extremely simple but oh, so delicious.

I liked the bread so much I couldn’t wait to use the rye flour again, and it was such a revelation to me to use it in baked goods other than bread – I’d seen the recipes before, but hadn’t tried them myself. In these bars, for instance, it adds a very interesting depth of flavor, not to mention it paired beautifully with the jam flavors I chose – I mixed apricot jam and marmalade because I did not have 1 cup of either to use in the recipe, and it ended up being a very nice thing. Because I was using marmalade, I added orange zest to the topping, and you can’t imagine how great my kitchen smelled while the bars were in the oven.

I still have some rye flour left and several ideas in my head from the recipes I’ve seen, like using it in cakes and tarts. Such a wonderful addition to my repertoire – and it all started with a simple (yet delicious) loaf of bread.

Jam and rye crumble bars
slightly adapted from the glorious Good to the Grain: Baking with Whole-Grain Flours

Shortbread base:
55g rye flour
105g all-purpose flour
40g light brown sugar
pinch of salt
75g unsalted butter, melted and cooled
¼ teaspoon vanilla extract

Crumble topping:
70g rolled oats
2 tablespoons light brown sugar, packed
40g rye flour
25g all-purpose flour
1 ½ tablespoons granulated sugar
1/8 teaspoon table salt
finely grated zest of 1 orange
55g unsalted butter, melted and cooled
1 cup jam – I used ½ cup apricot and ½ cup marmalade

Position a rack in the middle of the oven and preheat the oven to 160°C/320°F. Lightly butter a 20cm (8in) square pan, line it with foil leaving an overhang in two opposite sides and butter the foil as well.

Crust: in a large bowl, whisk together the flours, sugar and salt. Add the melted butter and vanilla and stir until thoroughly combined. Press the dough evenly into the bottom of the pan. Put the pan in the freezer for 30 minutes.

Crumble topping: add the oats, brown sugar, rye flour, all purpose flour, granulated sugar, salt and orange zest to the bowl of a food processor and process until the oats are partially ground, about 5 seconds. Pour the mixture into a bowl. Add the melted butter and stir with your hands, squeezing the dough as you mix to create small crumbly bits. Set aside.
Bake the frozen shortbread until golden brown and firm when touched, about 30 minutes. Remove from the oven and increase the temperature to 180°C/350°F.
Spread the jam over the shortbread crust and top with the crumble. Bake the bars for about 35 minutes or until golden brown. Cool completely in the pan. Cut into squares to serve.
The bars can be kept in an airtight container for up to 2 days.

Makes 16

Monday, April 23, 2012

Cherry jam frangipane tartlets + "Hanna"

Cherry jam frangipane tartlets / Tortinhas de frangipane e geléia de cereja

Sometimes I get mad at things that usually do not bother other people; for instance, I hate it that some incredible movies go straight to DVD here in Brazil, after I’d waited forever to see them on the big screen: that has happened quite frequently lately – “Take Shelter”, “Jane Eyre”, among others – and it was the case with “Hanna”. It is such a shame that not many people have heard of such an amazing film: brilliant script, great music, and the cast...

* spoilers *

Cate Blanchett is one of my favorite actresses – I love how versatile she is, and here, as one of the villains, she’s fabulous: the tone of her voice, the color of her hair, the way her eyes move... Fantastic. Eric Bana proves that good looks and talent can go hand in hand: he won my heart a long time ago playing the Hulk – I know that not everyone liked Ang Lee’s version of the hero, but I did; Bana played Banner as a very contained man, which is the perfect counterpoint to his explosive alter ego. He’s played a perfect Henry VIII and will play another King – I’m looking forward to it. Tom Hollander, so brilliantly playing a villain that looks he has come out of a cheap 1970s movie. And Saoirse Ronan... she’s the soul of the movie and having watched “Atonement” and “The Lovely Bones” I expected a lot from her, but she transcends as Hanna – the physicality of the role seems to be something quite difficult to accomplish, but what really stunned me was how perfectly she portrays Hanna’s emotions, her discovery moments: the first time seeing a plane or listening to music – the way her eyes shine... Her performance is poetic.
I’ve been telling everyone I know to watch “Hanna” as soon as possible and now I am telling you, too. :)

***

I really don’t mind doing the dishes but I hate washing the food processor parts: I usually cut my fingers while washing the blade and that sucks. Therefore, when I grab the food processor to make pastry, sweet or savory, I double the amount and freeze some – that is what I did when I made the chocolate crème brûlée tartlets, and a couple of weekends after that I used the frozen amount to make these delicious frangipane tartlets, courtesy of the always wonderful Jamie Oliver.

Cherry jam frangipane tartlets
slightly adapted from the amazing Jamie Oliver's Meals in Minutes: A Revolutionary Approach to Cooking Good Food Fast (mine was bought aqui)

6 small deep shortcrust pastry cases*
1 egg
1 cup (100g) almond meal
100g unsalted butter, softened
½ cup (100g) granulated sugar
finely grated zest of ½ orange
2 teaspoons vanilla extract
½ cup cherry jam, or your favorite flavor

Preheat the oven to 190°C.
Put the 6 pastry cases on a baking tray. In a medium bowl, make the frangipane: combine the egg, almond meal, butter, sugar, zest and vanilla and mix everything together. Spoon a small teaspoon of jam into each pastry base. Top with a heaped teaspoon of frangipane, add another small teaspoon of jam, then finally another heaped teaspoon of frangipane. Put the tray in the oven on the middle shelf and bake until the filling is puffed and golden, about 20 minutes
Serve them warm or at room temperature, with whipped cream or crème fraîche.

* I used this recipe to make the tartlet cases; baked them in 1/3-cup (80ml) capacity muffin pans (as described here) and got 8 tartlet cases; I halved the recipe above and it was enough for the 8 tartlet cases

Makes 6

Tuesday, September 6, 2011

Blackberry jam crumb cake

Blackberry jam crumb cake / Bolo cuca com geléia de amora

Not one to be afraid of massive amounts of ingredients – I have made this cake, after all – I must confess that I almost gave up baking the cake on the photo. Almost. Reading the recipe with a calculator on hand I shrieked at the idea of using nearly 400g of butter, 500g of sugar and – my goodness – over 700g of flour in one single cake; a recipe that would pretty much empty my entire pantry. :)

But then I thought that the cake would be huge and that I would be cutting it in several squares to feed all my coworkers – twelve of them – so I decided that they could handle 60g of flour each + a little butter and sugar. To this day no one has complained about it – and I found this cake one of the tastiest I’ve baked so far.. ;)

Blackberry jam crumb cake
slightly adapted from The Weekend Baker, inspired by Valentina’s cake

Topping:
1 cup (2 sticks/226g) unsalted butter, chopped
½ cup (100g) granulated sugar
¾ cup (132g) light brown sugar, packed
1 ½ teaspoons ground cinnamon
¼ teaspoon freshly ground nutmeg
pinch of salt
2 ½ cups minus 1 tablespoon (340g) all purpose flour

Cake:
2 ¾ cups (385g) all purpose flour
1 ¼ cups + 2 ½ tablespoons (280g) superfine sugar
1 ½ teaspoons baking powder
½ teaspoon salt
2 large eggs
1 cup (240ml) buttermilk*
¾ cup (170g) unsalted butter, melted and cooled slightly
2 teaspoons vanilla extract
1 cup blackberry jam – or use your favorite flavor

Start by making the topping: in a large saucepan, melt the butter over medium heat. Remove from the heat and add the granulated sugar, brown sugar, cinnamon, nutmeg and salt. Stir well and break up any sugar lumps. Add the flour and mix until well blended and pasty. Put it in the fridge while you make the batter.
Preheat the oven to 180°C/350°F. Butter a 32x22cm (13x9in) baking pan**.
Now, the batter: in a large bowl, combine the flour, superfine sugar, baking powder and salt. Combine them thoroughly. In a medium bowl, whisk together the eggs, milk, butter and vanilla until well combined. Pour the wet ingredients over the dry ingredients and gently stir with a rubber spatula just until blended – do not overmix. Pour the batter into the prepared pan and smooth the surface. Gently spread the jam over the batter. Top the jam layer with the topping, breaking up the pieces as you go, sprinkling it evenly over the jam, forming a generous layer.
Bake until the cake springs back when lightly pressed and a skewer inserted in the center of the cake comes out clean, 40-50 minutes. Remove from the oven and set the baking pan over a wire rack. Cool completely before slicing and serving.

*homemade buttermilk: place 1 tablespoon lemon juice in a 240ml-capacity measuring cup and complete with whole milk. Wait 10 minutes for it to thicken, then use the whole mixture in your recipe

** I made the exact recipe above using a 20x30cm (8x12in) pan

Serves 15-18

Friday, July 1, 2011

Raspberry Port linzer tartlets and a list of the movies I love

Raspberry Port linzer tartlets / Tortinhas linzer de geléia de framboesa e vinho do Porto

I’ve finally finished something I’d been meaning to do for ages: a list with my all time favorite movies – the ones I deeply love. It was rather difficult putting the list together – and I might have forgotten something, only time will tell – but it was a lot of fun doing it. It is posted here, if you’re curious. :)

These lovely tartlets were a similar challenge: the pastry was very difficult to work with – too crumbly – but it tasted so good it was all worth it. And the filling was delicious, too – raspberry jam spiked with booze? I’m in. ;)

Raspberry Port linzer tartlets
slightly adapted from The Boozy Baker

Dough:
1 ½ cups (157g) sliced almonds
2/3 cups (133g) superfine sugar
2 cups (280g) all purpose flour
1 teaspoon ground cinnamon
½ teaspoon baking powder
¼ teaspoon salt
¾ cup (170g) unsalted butter, softened
3 large egg yolks

Filling:
1 ½ cups raspberry preserves
3 tablespoons Port wine

Start by making the dough: combine the almonds and 1/3 cup (66g) of the sugar in a food processor and pulse until coarse. Add the remaining sugar (66g), flour, cinnamon, baking powder and salt and pulse to combine. Add the butter and the yolks and process until a dough begins to come together. Turn the dough onto a clean surface and knead lightly to make it come together. Divide in two pieces, one slightly larger than the other, flatten into a disk and wrap in plastic wrap. Refrigerate for at least 30 minutes.
Make the filling: place the preserves in a small bowl and break it with a fork. Add the wine and mix to combine.
Preheat the oven to 180°C/350°F. Roll the larger piece of dough between two pieces of lightly floured baking paper until you have a 30cm (12in) circle. Transfer to a lightly buttered 23cm (9in) tart pan with a removable bottom and press up the sides.
Roll the second piece of dough to a 30cm (12in) circle. Cut into strips, transfer to a baking sheet and freeze for 15 minutes.
Pour the filling into the tart shell and smooth the surface. Remove the dough strips from the freezer and arrange half horizontally and half vertically across the tart, creating a lattice pattern.
Bake for about 40 minutes or until crust is golden brown and the filling is bubbling. Cool completely in the pan over a wire rack. Remove the outer ring of the pan, cut into wedges and serve.

Serves 8 – I halved the recipe above, used 9cm tartlet pans and got 6 tartlets

Tuesday, June 14, 2011

Rose water panna cotta with baked blueberry jam

Rose water panna cotta with baked blueberry jam / Panna cotta de água de rosas com geléia de mirtilos feita no forno

Anyone who listens to my Ipod or my CDs will notice that most of the music I love is old – I’m not interested in the music enjoyed by most people nowadays (with a few exceptions). My favorite songs have been favorites for the last 20 years or so. Does that make me an old fart? You can be honest and tell me. ;)

To balance the situation, I’ve brought you today four “things” relatively new to me – things I tried for the first time in the past 4-5 years: panna cotta, buttermilk, rose water and blueberries (what a delicious combo they make, my goodness). :D

Rose water panna cotta with baked blueberry jam
from Donna Hay magazine

Panna cotta:
1/3 cup (80ml) water
1 tablespoon gelatin powder
2 cups (480ml) buttermilk*
2 cups (480ml) heavy cream
1 cup + 2 tablespoons (156g) icing sugar
1 tablespoon rose water

Blueberry jam**:
125g fresh blueberries
¼ cup (50g) superfine sugar
2 tablespoons lemon juice

Start with the panna cotta: place the water in a small bowl and sprinkle the gelatin on top. Set aside for 5 minutes or until gelatin absorbs the water. Combine the buttermilk, cream, icing sugar and rose water in a saucepan over medium heat and stir until sugar has just dissolved. Add the gelatin mixture and cook, stirring, for further 1-2 minutes or until gelatin is dissolved. Strain into a jug and allow cooling. Divide mixture into six 2/3 cup (160ml) capacity glasses or ramekins and refrigerate for 2-3 hours or until set.
Make the jam: preheat the oven to 180°/350°F. Place the blueberries, sugar and lemon juice in a small ovenproof dish and mix to combine. Bake for 15 minutes or until berries release their juices and mixture is bubbling. Cool completely.
Top each panna cotta with the jam and serve.

* homemade buttermilk: place 1 tablespoon lemon juice in a 240ml-capacity measuring cup and complete with whole milk. Wait 10 minutes for it to thicken, and then use the entire mixture in your recipe

** this jam is absolutely delicious with vanilla ice cream, too.

Serves 6

Friday, May 27, 2011

Back to school raspberry granola bars and my (many) obsessions

Back to school raspberry granola bars / Barrinhas de granola e geléia de framboesa

I’m someone who obsesses with certain things from time to time – directors, actors, music, you name it. And food, of course. I obsessed with Ralph Fiennes so badly after “Schindler’s List” that I had to watch each and every film with him – and that led me to Kathryn Bigelow’s “Strange Days” (which is far better than “The Hurt Locker”, imho). Did I mention I was about 17 back then? Well. ;)

It might seem that I’m on a cake kick right now, but I’ve been really thinking about bars lately – and these are the ones to blame. They were so irresistible – and easy to make, despite the layers – that a search for great bars has begun, and the granola ones you see on the picture can certainly be part of the bar hall of fame: they were so good I almost did not share them. :)

Back to school raspberry granola bars / Barrinhas de granola e geléia de framboesa

Back to school raspberry granola bars
from The Craft of Baking

¾ cup (168g/1 ½ sticks) unsalted butter, melted and cooled to room temperature
1 cup (110g) pecans, roughly chopped
1 ½ cups (210g) all purpose flour
1 ¼ cups (143g) old fashioned rolled oats – I made a mistake and used 1 ½ cups (172g)
1/3 cup (67g) granulated sugar
1/3 cup (58g) light brown sugar, packed
½ teaspoon salt
½ teaspoon baking soda
1 cup raspberry preserves

Preheat the oven to 180°C/350°F. Butter a 20cm (8in) square baking pan, line it with foil, leaving an overhang on two opposite sides and butter the foil as well.
Place the pecans on a baking sheet and bake until lightly golden and fragrant, about 5 minutes. Cool the sheet completely on a wire rack.
In a large bowl, combine flour, oats, granulated sugar, brown sugar, salt, baking soda and the cooled pecans. Pour in the melted butter and mix until well combined. Transfer about 2/3 of the mixture to the prepared pan. Press the dough evenly into the pan, forming a firmly packed layer. Using a spatula spread the preserves over the base. Evenly sprinkle the remaining dough over the preserves. Bake, rotating the pan halfway through, until the top is golden brown and fragrant, about 40 minutes. Transfer the pan to a wire rack and cool completely. With the aid of the foil handles, carefully remove from the pan and cut into squares.
The bars can be kept in an airtight container at room temperature for up to 1 week.

Makes 16

Tuesday, May 3, 2011

Gooey chocolate cake with raspberries and something positive about getting old

Gooey chocolate cake with raspberries / Bolo cremoso de chocolate e framboesa

Getting older is not a walk in the park – gray hair, anyone? – but there is definitely a positive side to it. I’ve become a more patient person, and let me tell you, patience was never one of my virtues.

After baking and unmolding this delicious cake – oh, it was really delicious and I’m no chocoholic – the result almost made me cry: the poor thing looked ugly as hell on the plate. A glance at the book and frustration started building in. In the past I would have gone mad about it, but I took a deep breath and decided to watch TV instead. As the cake cooled down, the ganache topping got firmer and I could smooth it down with a palette knife, making it shiny and beautiful.

I guess that in my case calm came with age – and a couple of hours with Detective Goren *sigh* can’t hurt, either. ;)

Gooey chocolate cake with raspberries
from the beautiful Feed Me Now

Topping:
100g dark chocolate
150g raspberry jam
½ cup (120ml) heavy cream

Cake:
¾ cup + 2 tablespoons (125g) all purpose flour
1 ½ teaspoons baking powder
pinch of salt
1/3 cup (30g) good quality cocoa powder
½ cup (120ml) boiling water
¼ cup (60ml) whole milk
½ teaspoon natural vanilla extract
90g raspberry jam
½ cup (113g/1 stick) unsalted butter, softened
1/3 cup (66g) caster (superfine) sugar
2 large eggs
80g raspberries, plus extra to serve – I used frozen, unthawed

Preheat the oven to 180°C/350°F. Generously grease a 22cm (9in) round cake pan*.
For the topping, put the chocolate, jam and cream into a small pan over a medium heat. Stir until melted and smooth, then pour into the prepared pan.
Sift together the flour, baking powder and salt into a medium bowl. Set aside.
In a small bowl, mix the cocoa powder with the water, stirring until smooth, then add the milk, vanilla and jam, whisking to combine.
In a large bowl, cream the butter and sugar together until light and fluffy, then add the eggs one at a time, mixing well after each. Using a large spoon, fold the sifted ingredients and the cocoa mix into the creamed mixture, alternating the two, then gently fold the raspberries through.
Pour the mixture into the prepared pan, ensuring you spread it right to the edge and cover the topping completely. Bake for 30–35 minutes or until firm. Leave the cake to cool in the pan for 15 minutes (if not serving straight away you can refrigerate the cake in the pan, but you will need to warm it in the oven before turning it out).
Turn the cake out onto a plate. You may need to scrape some sauce out of the pan and spread it over the top of the cake – my cake looked rather ugly when I unmolded it; I waited for it to cool down a little and the topping became firmer; then I was able to spread it evenly with a palette knife and the cake looked a lot prettier. :)
Serve warm or cold, with fresh raspberries.

* I made the exact recipe above and used a 20cm (8in) round cake pan with a removable bottom – I placed it on a baking sheet to catch any drippings

Serves 8

Friday, January 14, 2011

Pandoro with peach jam

Pandoro with peach jam / Pandoro com geléia de pêssego

I’ve been trying, for a while now, to cook and bake using seasonal ingredients – influenced by my good friend Ana Elisa – and for that reason this recipe was kept on my messy files for almost a year. Finally the peaches are in season and I could make it – this jam is so delicious it was worth waiting that long for it.

The pandoro itself is not very sweet, therefore perfect to be eaten with the luscious jam – add a bit more sugar to the dough if you have a sweet tooth.

Pandoro with peach jam
from Australian Gourmet Traveller

Pandoro:
½ cup (120ml) lukewarm whole milk
28g dry yeast (4 sachets)
2/3 cup (66g) caster (superfine) sugar, plus extra for glazing
4 1/3 cups (605g) all purpose flour
pinch of salt
¾ cup + 1 tablespoon (183g) unsalted butter, softened
2 egg yolks
¾ cup (180ml) heavy cream
1 egg yolk, mixed with 1 tablespoon of cream, for egg wash

Peach jam:
6 yellow peaches, ripe yet firm
½ cup (100g) caster (superfine) sugar

Combine milk, yeast and 1 tablespoon of the sugar in a bowl. Set aside until foamy (5-10 minutes). Sift in 50g of the flour, mix and stand until foamy (5-10 minutes). Place the remaining flour and salt in the large bowl of a stand mixer. Add butter and remaining sugar and, with the paddle attachment, beat until creamy. Change attachment to a dough hook, add yeast mixture, egg yolks and cream and beat until a smooth and elastic dough forms (10-12 minutes). Transfer dough to a lightly buttered bowl, cover with plastic wrap and stand in a warm place until doubled in size (1-2 hours).
Meanwhile, make the peach jam: cut an X at the bottom of each peach and lower them in a pot of boiling water for about 20 seconds. Using a slotted spoon, transfer the peaches to a colander and refresh with cold water – the peels will slip right off. Halve the peaches, remove the stone, then coarsely chop flesh, place in a saucepan with the sugar and cook over medium-high heat, stirring occasionally, until jam consistency is reached and volume has reduced to 375ml (20-30 minutes). Set aside to cool.
Preheat the oven to 200°C/392°F. Knock back dough and roll out to a 65cm (26in) long log shape. Twist log, bring ends together and knot to seal. Transfer to a foil-lined baking sheet, bake for 15 minutes, then reduce heat to 170°C/338°F. Brush cake with the egg wash, scatter with the extra caster sugar and bake until cooked through and golden (30-35 minutes).
Serve cake warm with the peach jam.

Serves 10

Tuesday, December 28, 2010

Cherry and almond tartlets

Cherry and almond tartlets / Tortinhas de cereja e amêndoa

I know, I know – another cherry tart in less than a week… But be honest with me: would you be able to resist such a beautiful dessert? I ran to the kitchen the moment the magazine arrived at my door. :D

Cherry and almond tartlets / Tortinhas de cereja e amêndoa

Cherry and almond tartlets
slightly adapted from Australian Gourmet Traveller

Filling:
500g crème fraîche*
100ml pouring cream
20g pure icing sugar, sifted, plus extra for dusting
fresh cherries, to serve

Cherry vanilla jam:
300g cherries, pitted and halved
1 cup (200g) caster (superfine) sugar
juice of 1 lemon and 1 orange
1 vanilla bean, split, seeds scraped

Almond pastry:
90g natural almonds
250g unsalted butter, room temperature
½ cup (100g) caster (superfine) sugar
2 cups + 2 tablespoons (300g) all purpose plain flour

For cherry vanilla jam, combine ingredients in a saucepan and stir over medium-high heat until sugar dissolves. Bring to the boil and cook, stirring occasionally, until mixture reaches setting point (6-8 minutes; see note), refrigerate until well chilled (1-2 hours).

Meanwhile, for almond pastry, process almonds in a food processor to form coarse crumbs (1 minute). Beat butter and sugar in an electric mixer until creamy, scrape down sides of bowl, add flour and almonds, beat to just combine. Form into a disc, wrap in plastic wrap and refrigerate for 1 hour to rest.
Butter a 20x28cm rectangular tart pan.
Roll out pastry on a lightly floured surface to 3mm thick and line the prepared pan, trim edges, prick with a fork and freeze until firm (30 minutes).
Preheat oven to 180°C/350°F. Line the pastry with a large piece of foil and fill it with baking weights or dried beans. Bake until light golden (10-12 minutes), remove paper and weights/beans, bake until golden and crisp (6-8 minutes), cool completely.
Whisk crème fraîche, cream and icing sugar in a bowl until firm peaks form (2-3 minutes), refrigerate until required.
Spread jam in base of pastry case, spoon over crème fraîche mixture, top with fresh cherries, dust with icing sugar and serve.

Note: to test for a jam’s setting point, place several saucers in the freezer before you start cooking the jam. When the mixture becomes thick, remove from heat, spoon a little onto a chilled saucer and return to freezer for 30 seconds. When you draw your finger through the mixture it should hold a trail. If it doesn’t, cook for 1-2 minutes longer and test again.

* I made a different filling, inspired by a trifle recipe by Bill Granger: I combined equal parts of heavy cream and plain yogurt (1/3 cup of each for ½ the recipe above), 1 tablespoon icing sugar and the seeds of ½ a vanilla bean, then beat the ingredients together until soft peaks formed

Serves 6 – I halved the recipe above, used 9cm tartlet pans and got 10 tartlets

Monday, November 29, 2010

Jam buns

Jam buns / Pãezinhos recheados com geléia

Yeasted challenged, fear not: these buns are absolutely easy to make and good to finish up that jar of jam that has been around your fridge for weeks (months, maybe?). :D

It’s not even right for me to take the credit over these – the standing ovation should go to my stand mixer.

Jam buns / Pãezinhos recheados com geléia

Jam buns
from Donna Hay magazine

2 teaspoons active dry yeast
5 tablespoons caster sugar
¾ cup (180ml) lukewarm whole milk
2 1/3 cups + 1 tablespoon (337g) all purpose flour
3 tablespoons (42g) unsalted butter, melted
1 egg yolk
1/3 cup raspberry jam or your favorite flavor
1 egg yolk, extra
2 tablespoons heavy cream
icing sugar, for dusting (optional)

Place the yeast, 2 teaspoons of the sugar and the milk in a large bowl and mix to combine. Set aside in a warm place for 5 minutes or until bubbles appear on the surface.
Add the flour, butter, yolk and remaining sugar to the yeast mixture and mix until a soft dough forms. Knead on a lightly floured surface for 5 minutes or until smooth and elastic, adding a little flour to the dough if it becomes too sticky – avoid adding too much flour or the dough will become tough. Make a ball with the dough, place in a lightly oiled large bowl, cover with plastic and set aside in a warm place for 1 hour or until doubled in size.
Butter a large baking sheet. Divide the dough into 16 pieces and roll into balls. Press out into circles measuring about 12cm (5in) in diameter and spoon 1 teaspoon of the ham into the center of each. Carefully fold over the dough to enclose the filling and pinch to seal. Place pinched side down onto prepared sheet.
Using a sharp knife, make a small cut in the top of each roll. Cover with a clean tea towel and set aside in a warm place for 1 hour or until doubled in size.
Preheat the oven to 180°C/350°F. Whisk together the yolk and the cream and brush over the buns. Bake for 15-20 minutes or until dark golden. Serve warm or at room temperature, dusted with the icing sugar – the jam is extremely hot when the buns first come out of the oven, so handle and eat with care.

Makes 16

Thursday, November 11, 2010

Almond and jam bars

Almond and jam bars / Barrinhas de geléia e amêndoa

You probably won’t believe me, but the universe conspired for me to make this recipe. :D

I was watching one of Bill’s shows – aren’t his daughters the cutest things ever? – and he made these bars. On the following morning, I found the exact amounts of almonds and jam in my fridge; I considered it a sign – you know how much I’m fond of signs – and started baking the bars right away. :D

Almond and jam bars
from Holiday

Almond topping:
4 ½ tablespoons (63g) unsalted butter, softened
½ cup + ½ tablespoon (56g) caster sugar
1 teaspoon vanilla extract
200g flaked or slivered almonds
2 tablespoons whole milk

Base and filling:
2/3 cup (150g) unsalted butter, softened
½ cup + 1 tablespoon (112g) caster sugar
1 teaspoon vanilla extract
1 ½ cups + 1 ½ tablespoons (225g) all-purpose flour
1/3 cup (40g) corn starch
160g raspberry jam – I used a different flavor, fruits de bois

Preheat an oven to 180°C/350°F. Lightly grease a 24x20cm baking pan*, line with parchment paper leaving an overhang on two opposite sides and butter the paper as well – I used foil.
To make the almond topping, combine the butter, sugar, vanilla extract with the almonds and milk in a medium-sized saucepan. Cook over a low heat until the butter has melted, and then leave the mixture out to cool.

Make the base: combine the butter, sugar and vanilla extract in the large bowl of an electric mixer and beat until pale and creamy. Sift the flour with cornstarch into a small bowl and add to the butter mixture in 2 batches, beating on low speed until just mixed – you might want to finish incorporating the dry ingredients with a spatula to avoid overmixing. Press the dough into the prepared pan and bake for 12 minutes, or until lightly golden brown. Remove the pastry from the oven and leave it out to cool for 10 minutes.
Carefully spread the raspberry jam over the pastry base, and then spread the cooled almond topping over the jam. Return to the oven and bake for an additional 25 minutes, or until golden.
Cool completely before cutting.

* I used a square 25cm pan and tried to remove the entire baked good from the pan – using the foil hangers – before cutting: it was a complete disaster; I highly recommend it to be cut inside the pan to avoid breaking the bars

Makes 20

Monday, October 11, 2010

Jam swirled muffins

Jam swirled muffins / Muffins mesclados com geléia

There’s something you need to know: I’m addicted to the blackberry lemon jam used in this ice cream recipe – I’ve eaten it with crackers, poured over panna cotta... I just can’t get enough of it.

I thought the jam would go wonderfully mixed in muffin batter – I don’t mean to sound pretentious, but I was right. :D

Jam swirled muffins
adapted from Dorie's lemon poppy seed muffins

2/3 cup (133g) caster sugar
2 cups (280g) all purpose flour
2 teaspoons baking powder
¼ teaspoon baking soda
¼ teaspoon salt
¾ cup plain yogurt or sour cream
2 large eggs
2 teaspoons vanilla extract
½ cup (113g/1 stick) unsalted butter, melted and cooled
2/3 cup jam of your choice – if too thick, thin it with a little lemon juice (I used this recipe)

Preheat the oven to 200°C/400°F; butter or spray 12 regular size muffin pans.
In a large bowl, sift the flour, baking powder, baking soda and salt. Add sugar and mix. In a large glass measuring cup or small bowl whisk together the yogurt, eggs, vanilla and melted butter until well blended. Pour the liquid ingredients over the dry ingredients and whisk lightly with a fork – do not overmix the batter, otherwise you’ll end up with tough muffins. Add the jam and whisk lightly, to keep the marbled effect. Divide the batter evenly among the prepared pans.
Bake for 18-20 minutes or until the tops are golden and a skewer inserted in the center of the muffins comes out clean. Transfer to a wire rack, cool 5 minutes, then carefully unmold. Let cool completely on the wire rack.

Makes 12 – I halved the recipe, used 1/3 cup (80ml) capacity pans and got 8 muffins

Friday, June 25, 2010

Baby spice and strawberry butter cakes

Baby spice and strawberry butter cakes / Bolinhos de especiarias com geléia de morango caseira

After making the strawberry crostata – with such great results – I started searching for the rhubarb recipes I’d been keeping forever in order to make them using strawberries.

It reminded me of when I watched “Heat” and then started looking for everything Michael Mann had done before. :)

Baby spice and strawberry butter cakes
adapted from Australian Gourmet Traveller

Cakes:
1 cup (226g/2 sticks) soft unsalted butter
¾ cup golden syrup
3 eggs
1 ½ cups + 1 ½ tablespoons (225g) all purpose flour
2 teaspoons baking powder
2 teaspoons ground ginger
2 teaspoons ground cinnamon
1 teaspoon ground cloves

Strawberry compote:
300g strawberries, hulled and thinly sliced
¼ cup (50g) caster sugar
1 tablespoon water

Start by making the strawberry compote: combine strawberries, sugar and water in a saucepan, and bring to the boil over high heat (give it a little stir just to dissolve the sugar). Reduce heat to low, cover and cook for 2 minutes or until softened, then cook, uncovered, for 8 minutes, mixing occasionally, or until liquid has reduced and strawberries are soft – while mixing, squash the berries down using a silicon spatula to release all their juices. Cool completely.

Preheat the oven to 180°C/350°F; butter nine 2/3-cup capacity mini loaf pans*.
Using an electric mixer, cream butter and golden syrup until pale, then add eggs, one at a time, beating well between each addition, until incorporated.
Sift over flour, baking powder and spices and beat in low speed to combine – batter will be thick.
Spoon into prepared pans and spoon 2 teaspoons strawberry compote down center.
Bake for 12-15 minutes or until just cooked. Allow to cool slightly, then turn out onto wire racks and cool.
Cakes will keep in an airtight container for up to 3 days.

* I halved the recipe above, used 1/3 cup (80ml) muffin pans and got 8 cakes

Makes 9

Wednesday, September 2, 2009

Strawberry frangipane tartlets

Strawberry frangipane tartlets / Tortinhas de morango com recheio de amêndoa

Paula has posted about something I completely relate to: the kitchen gadget addiction. I know that many of you reading me now can relate to it as well. :D
Inspired by her gorgeous chocolate tartelettes, I decided to put my tartlet pans into some good use, too.

My first thought was the strawberry tart my mom used to make for me as a kid – the filling is the one I used in this banana pie – but the idea of mixing frangipane and strawberries won me over.

Strawberry frangipane tartlets / Tortinhas de morango com recheio de amêndoa

Strawberry frangipane tartlets
from Australian Gourmet Traveller

Sweet pastry:
180g unsalted butter, at room temperature
40g pure icing sugar, sifted
2 egg yolks
250g all purpose flour

Frangipane:
125g icing sugar, sifted
125g almond meal
125g unsalted butter, at room temperature
2 eggs
1 egg yolk
25g all purpose flour

Topping:
90g strawberry jam, thinned with water, plus extra to serve
1kg strawberries, hulled (4 punnets)*

For sweet pastry, beat butter in an electric mixer until even in texture (3-5 minutes). Add icing sugar and mix to just combine. Add egg yolks and 1 ½ tablespoons water and mix to combine. Sift flour onto a work surface and make a well in the centre. Add butter mixture to well and gradually work in flour to form a dough. Knead several times with the heel of your hand until smooth – I added 1 ½ tablespoons of flour here, because it was too sticky.
Form dough into a disk, wrap in plastic and refrigerate until firm (3-4 hours). Roll pastry on a floured surface (I did this between two sheets of baking paper) to 5mm thick and use to line six 12cm-diameter buttered tart pans or one 20cm-diameter tart pan. Prick dough with a fork and refrigerate until firm (2-3 hours).
Meanwhile, preheat oven to 180ºC/350ºF. Using buttered foil, blind bake tartlets until golden (20-25 minutes). Remove foil and set aside.

For frangipane, combine icing sugar and almond meal in a bowl. Set aside. Beat butter in an electric mixer until fluffy (3-5 minutes). Add almond mixture and mix well to combine. Add eggs and yolk, then flour and mix to combine. Fill pastry shells with frangipane to 5mm from top (there may be some left over)**. Bake until golden and centre springs back when lightly touched (10-12 minutes; time may vary for 20cm tart). Allow to cool, then brush with jam.

Thinly slice strawberries lengthways, horizontally then divide among tartlets. Drizzle with extra jam and serve.

* I halved the recipe and 250g strawberries were enough

** I divided all the frangipane among the tartlets; it puffed while in the oven but didn’t spilled over

Makes 6 – I halved the recipe, used 9cm tart pans and got 8 tartlets

Monday, June 22, 2009

Vanilla cream cupcakes... and a bit of soccer

Vanilla cream cupcakes / Cupcakes com geléia e creme

When the Brazilian soccer team lost the World Cup to France in 1998 I was so shocked I made a promise: I would never cheer for the team again (because the whole thing looked like a huge set up involving $$$). I’m a soccer freak – love the sport – and even though it was a bit hard I was able to keep my promise. At least until yesterday – I could not resist watching Brazil x Italy, the greatest soccer classic ever. I felt that old flame back again: the team played beautifully and scored 3 goals – it was an amazing game.

I might no longer be able to keep the soccer promise, but will honor the one I made here a couple of weeks ago: more cupcakes!

Vanilla cream cupcakes / Cupcakes com geléia e creme

Vanilla cream cupcakes
from Donna Hay magazine

125g unsalted butter, softened
¾ cup + 1 tablespoon (162g) caster sugar
2 teaspoons vanilla extract
2 eggs
1 cup + 4 tablespoons (180g) all purpose flour, sifted
1 teaspoon baking powder, sifted
½ cup (120ml) milk, room temperature

Vanilla cream:
½ cup (120ml) heavy cream
1 tablespoon icing sugar
½ teaspoon vanilla extract
¼ cup strawberry jam

Preheat the oven to 160ºC/320ºF. Place the butter, sugar and vanilla extract in the bowl of an electric mixer and beat for 10-12 minutes or until light and creamy. Gradually add the eggs and beat well. Add the flour, baking powder and milk and beat until just combined. Spoon into twelve ½ cup-capacity muffin pans lined with cupcake papers. Bake for 18-20 minutes or until cooked when tested with a skewer. Cool completely on wire racks.
To make the vanilla cream, place the cream, icing sugar and vanilla in a bowl and whisk until stiff peaks form. Cut a small, round hole in the middle of each cupcake and remove the top; fill the holes with the jam and top with about 1 rounded teaspoon of cream. Place the lids by the side of each cream mound and serve.

Makes 12 – I halved the recipe, used 1/3-cup capacity muffin pans and got 6 cupcakes

Vanilla cream cupcakes / Cupcakes com geléia e creme

Related Posts with Thumbnails