Some songs have been favorites of mine for as long as I can remember, and I never get tired of listening to them.
As I was listening to “Sweet Sixteen” yesterday I kept thinking of the beauty of the song’s arrangement, and of how simple it is, with just a couple of instruments. Then I listened to it four or five times in a row, savoring those chords. It is truly a beautiful song (despite the sad story behind it), one that I first listened to when I was a kid and that I’m pretty sure I’ll be listening to when I’m 70.
From time to time I write here about simple things, how great they are to me. I guess that one doesn’t need much to create something beautiful like Billy Idol’s song, and that can be applied to food. Like cakes, simple savory dishes are also something close to my heart, something I feel like eating on a daily basis, and adding a twist here and there doesn’t change their essence – it just makes them even more delicious.
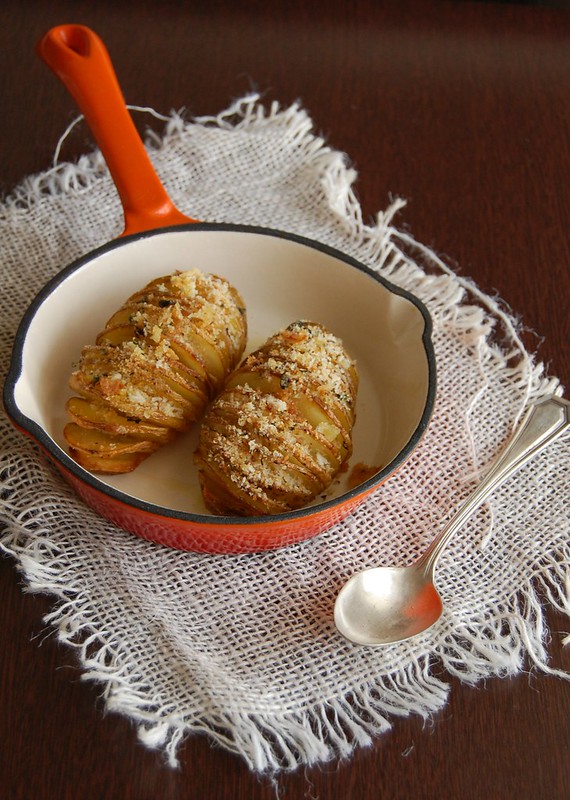
In today’s recipe, the humble potato, a root veggie I love (the German blood in my veins is probably responsible for part of that love) gets transformed into a flower, with full of flavor petals. The potatoes would be delicious already roasted with olive oil, salt and pepper only, but the zesty crumbs on top makes them extra special and irresistible.
Hasselback potatoes with oregano and lemon crumbs
slightly adapted from the always delicious Olive magazine
8 small potatoes
olive oil
salt and freshly ground black pepper
1 tablespoon fresh oregano, finely chopped
2 tablespoons dried breadcrumbs
finely grated zest of 1 lemon
Preheat the oven to 200°C/400°F.
Place the potatoes on a wooden spoon then slice downwards thinly until the knife touches the spoon (don’t slice all the way through).
Place the potatoes cut side up on a roasting pan and brush with some oil – making sure the oil drips among the slices – then season with salt and pepper. Roast for 50 minutes.
Mix the oregano, breadcrumbs, lemon zest in a small bowl, season with salt and pepper, then sprinkle over the potatoes and roast them for another 10 minutes or until topping is golden and potatoes are tender.
Serves 4
Friday, May 2, 2014
Hasselback potatoes with oregano and lemon crumbs, a great song and simple things
Wednesday, August 27, 2008
Grilled cheese and basil polenta
I never thought this would happen, but it did. Donna Hay disappointed me.
It was last Saturday – my Amazon box arrived and I couldn’t wait to go through my new cookbooks. Donna’s book looked so adorable and cute... I started to flip the pages, eager to choose the first recipe to prepare. Unfortunately, as I glanced at the photos there was only one thing going on in my mind – “I’ve already seen this. And this. And this one, too.”
Several of those recipes had been published in other Donna Hay’s books and magazines – the ones on my bookshelf. :(
I’m not interested in buying cookbooks with recipes I already own and I guess you aren’t either – that’s why I thought you should know about this. I have deleted the other “Simple Essentials” volumes from my wish list.
To remind me of how wonderful Donna’s recipes are, I prepared this polenta (from her magazine, issue 40). I’ll tell you, my friends: this is what I call reconciliation. :)
Grilled cheese and basil polenta
from Donna Hay magazine
3 cups (750ml) water
1 cup (170g) instant polenta
60g butter, chopped
½ cup (50g) finely grated parmesan
sea salt and freshly ground black pepper
½ cup basil leaves
2 cups (200g) grated mozzarella*
olive oil, for brushing
Place water in a saucepan over medium heat and bring to the boil. Gradually whisk in the polenta and cook, stirring, for 2-3 minutes or until thickened. Remove from the heat and stir through the butter, parmesan, salt and pepper. Pour half of the polenta into a 20cm square pan lined with non-stick baking paper (I used foil) and spread to smooth. Top with the basil, mozzarella and remaining polenta. Refrigerate for 45 minutes or until set.
Cut into squares/rectangles and brush with oil. Heat a char-grill pan or barbecue over high heat. Cook the polenta for 3-4 minutes each side or until golden and the cheese has melted. Serve with pan-fried veal cutlets, grilled lamb or steak and baby spinach.
* I used the yellow mozzarella we have here, that seems to be really similar to Monterey Jack
Serves 2 - I think it can serve 4, depending on what you serve it with
Monday, October 22, 2007
Tomato, Minas cheese and eggplant salad
Isn’t it wonderful when a recipe exceeds our expectations?? I love it when that happens. This salad is one of those recipes.
When I saw the photo on the book, I thought it would be good. But it turned out to be really, really good.
The dressing plays an amazing part here – and the garlic is the one to blame. I have a friend who loves to cook with garlic and I’m sure he would like this dressing very much.
The only problem for me is that I find garlic a bit hard to digest – so the dressing and I had long conversations throughout the afternoon. We even saw a movie together. :S
I know that roasting garlic is one way of getting rid of this problem but I’m not sure how much it would change the flavor of the dressing.
I adapted the recipe of a Brazilian book and used queijo Minas frescal (Minas cheese) instead of bocconcini – a cookie cutter came in handy for making round slices of cheese.
This is my post for this Weekend Herb Blogging, this time hosted by Pille, of the beautiful Nami-Nami.
Tomato, Minas cheese and eggplant salad
2 eggplants
olive oil
150-200g queijo Minas frescal (or bocconcini)
4 tomatoes
Dressing:
3 garlic cloves
1 tablespoon dried oregano
4 tablespoons extra virgin olive oil
salt
freshly ground black pepper
Start with the dressing: chop the garlic cloves and place them in a small bowl. Add the oregano, olive oil, salt and pepper. Mix well and set aside.
Wash the eggplants and cut them into 0.5cm slices. Do the same thing with the cheese and the tomatoes.
Heat a grilling pan over medium heat. Brush both sides of each eggplant slice with olive oil and grill (both sides). Set aside.
In a large plate, place the tomato slices, cover with the cheese and finish with the eggplant.
Drizzle with the dressing and serve.
Serves 4
Thursday, August 30, 2007
Almost Greek salad
Yep, almost Greek. Because I used a different type of cheese to replace feta – queijo Minas frescal. And I used lime juice in the dressing, instead of red wine vinegar.
The verdict? I had a huge bowl of this salad. HUGE. I mean it – it was all I had for lunch, with a glass of wine. Ok, 2 glasses of wine. :)
I still want to try it with feta, but my Brazilian twist worked so well I’m submitting this salad to this Weekend Herb Blogging, this time hosted by its creator, the lovely Kalyn, of Kalyn’s Kitchen.
Almost Greek salad
adapted from Kitchen: The Best of the Best
4 ripe tomatoes
2 Lebanese (short) cucumbers
1 red onion
175g (1 cup) Kalamata olives
½ teaspoon dried oregano
200g queijo fresco or creamy feta
Dressing:
juice of 1 small lime
3 tablespoons extra virgin olive oil
salt
freshly ground black pepper
Cut the tomatoes into chunks and arrange on a serving platter.
Thickly cut the cucumbers; cut the onion in paper thin slices. Add to the tomatoes and scatter the olives over the plate. Cut the cheese in thick slices and arrange over the vegetables. Sprinkle the salad with the oregano.
Make the dressing: mix well the ingredients. Drizzle over the salad and serve.
You can present the salad as I did, inspired by one episode of Take Home Chef: mix the vegetables in a bowl, sprinkle with oregano and drizzle with the dressing.
Place amounts of salad on serving plates and top with the slices of cheese. Drizzle once more with the dressing.
Serves: 4 (as a side dish)
Friday, August 17, 2007
Parsley polenta with balsamic tomatoes
One of the bad things about living in São Paulo is the huge traffic jams I have to face every single day; it takes me forever to get to work and then to get back home. So exhausting.
I don’t know what happened in one of these days but the streets were so free that I arrived home in less then 40 minutes! A miracle! That deserved a celebration – a delicious dinner that I put together in 20 minutes.
This recipe was really good so I’m submitting it to the Weekend Herb Blogging, this time hosted by Zorra, from the blog Kochtopf.
Parsley polenta with balsamic tomatoes
adapted from Off The Shelf: Cooking From the Pantry
4 ripe tomatoes, halved
2 tablespoons olive oil
3 tablespoons balsamic vinegar
3 tablespoons sugar
3 tablespoons basil leaves
Polenta:
2 cups (480ml) hot water
2 cups (480ml) milk
1 cup quick cook polenta*
½ cup grated parmesan cheese
½ cup chopped flat leaf parsley
60g (2 oz) butter
salt and freshly ground black pepper
Preheat the oven to 200ºC/400ºF. Place the tomatoes, cut side down, in an ovenproof ceramic dish. Combine the oil, balsamic, sugar and basil and pour over the tomatoes. Bake for 20 minutes or until the tomatoes are soft.
Make the polenta while the tomatoes are roasting. Place the water and milk in a saucepan over medium to high heat and bring to a boil. Slowly whisk in the polenta. Reduce the heat to medium-low and cook the polenta, stirring, for 3-5 minutes. Stir through the parmesan, parsley, butter, pepper and salt.
To serve, spoon the polenta onto serving plates. Top with the tomatoes and the pan juices. Finish with extra parmesan and serve.
* I made the polenta little bit thicker because that’s how João likes it.
Serves 4
Monday, July 30, 2007
Tomato, hearts of palm, olive and parmesan salad with basil dressing
Every time I visit Kalyn's blog - and I just won't do it on a daily basis in case I'm sick or loaded with work - I feel like cooking everything she posts! Her food has a healthy tone and looks delicious. Hard to resist.
This is my take on one of her recipes - I have made this salad several times already and even João likes it, even though he's not into tomatoes (crazy, I know).
I used parmesan shavings instead of feta because I couldn't find it where I live. I also changed the dressing a bit.
Make sure you check the original version - you'll be glad to!
Tomato, hearts of palm, olive and parmesan salad with basil dressing
4-6 small tomatoes, sliced
1 cup hearts of palm, sliced (or more)
½ cup black olives
½ cup parmesan shavings
Basil dressing:
1 cup fresh basil leaves (packed)
extra virgin olive oil, to taste – I didn’t use a lot because I wanted a low-calorie salad
lime juice
salt
freshly ground black pepper
In salad bowl, layer tomatoes, hearts of palm, olives and parmesan.
Using a mortar and pestle, mash the basil leaves and salt together. Add the pepper, olive oil and lime juice, mix well.
Drizzle basil dressing over salad.
Serves 2
Monday, July 23, 2007
Grilled Tilapia with basil-chive butter and parmesan steak fries
Yesterday Joao and I celebrated our 2 year and a half anniversary – I was (still am) recovering from a horrible flu that got me last week so we decided to stay in and celebrate it at home.
A nice meal made with love was mandatory!! :)
The recipe for the fish was taken from the July issue of Bon Appétit – I adapted some details. If you want to make it like the one in the magazine, use halibut instead of Saint Peter fish (Tilapia) and spring onions instead of chives.
I seasoned the fish with garlic, lemon juice, salt and pepper and marinated the fillets for 2 hours, even though it’s not asked in the recipe.
The potatoes were taken from this book, and they were delicious – the only problem was that I used waxed paper instead of parchment paper and I had to peel the potato spears off the paper. Next time, a spritz of cooking spray will do the trick – thank you, Lydia, for the hint on the spray, I’ve been using it like crazy! :)
Grilled Tilapia with basil-chive butter
from Everyday Food: Great Food Fast and from Bon Appetit magazine
1 ½ cups (loosely packed) fresh basil leaves
4 tablespoons chopped chives
8 tablespoons (½ cup-112g) unsalted butter, room temperature
1 teaspoon grated lemon zest
6 x 170g (6-ounce) Tilapia fillets
extra virgin olive oil
Finely chop basil and chives in a mini food processor. Add butter, 2 tablespoons at a time, and process until blended, stopping occasionally to scrape down sides. Transfer to a small bowl, stir in lemon zest and season with salt – I used a little freshly ground black pepper, too.
Prepare barbecue (medium heat) or grilling pan.
Rub fish fillets on both sides with olive oil. Grill until fillets are just opaque in center, about 4 minutes per side.
Transfer fish to plates and immediately spread some basil butter over fish.
Serve, passing additional basil butter alongside.
Serves 6.
Parmesan steak fries
3 large egg whites – I think 2 would be enough
coarse salt and freshly ground black pepper
3 baking potatoes, 220 to 280g (8-10 ounces) each
1 ¼ cups (125g) grated Parmesan cheese
Preheat the oven to 220ºC/425ºF.
In a wide shallow bowl, whisk the egg whites with 1 teaspoon salt until frothy.
Cut each potato into 6 long spears; add to the egg whites and turn to coat.
One at a time, lift the spears out of the egg whites shaking off excess.
Working over a plate, sprinkle with the parmesan cheese until coated (do not shake the excess). Place on a parchment-lined baking sheet.
Bake without turning until the potatoes are fork-tender and golden brown – about 30 minutes.
Season with salt and pepper before serving.
Serves 4
Wednesday, May 23, 2007
Tomato, broccolini and basil risotto
I was going through one of the editions of my Donna Hay magazines when I saw a delicious pasta dish* – I immediately thought of making it for our lazy Sunday lunch. The cold weather changed my mind – I knew then that I needed some risotto.
I’d seen a recipe for roasted tomato risotto and it sounded great – but the tomatoes I had at home were so beautiful and juicy I didn’t want to roast them. I decided to make the risotto my way (even using red wine instead of white).
There were some broccolini florets in my refrigerator and I used them too. The good thing is you don’t need to blanch them first – they’ll cook while the rice cooks.
The risotto turned out really good and this is my entry for the Weekend Herb Blogging, this time hosted by one of my favorite foodies ever, the sweet Ellie from Kitchen Wench.
Tomato, broccolini and basil risotto
1 liter vegetable stock – use a mild one otherwise it will be too overpowering
1 tablespoon butter
½ tablespoon olive oil
½ small onion, finely chopped
115g (a heaping ½ cup) risotto rice – I used Arborio
1 ½ tablespoons dry red wine
a heaping ½ cup broccolini florets, chopped in bite-sized pieces
1 tomato, plump but firm, finely diced
1 tablespoon cold butter – extra
¼ cup (not packed) basil leaves
50g (½ cup) parmesan, grated – reserve 1 tablespoon
freshly ground black pepper
Heat the stock and keep it gently simmering.
Place the butter and olive oil in a large heavy-based saucepan over high heat. Add the onion and sauté until it’s soft and transparent.
Add the rice and stir for 1 minute or until the grains are glossy and well coated in the butter/olive oil. Add the wine, mix well until the wine is absorbed, then add 1 ladle stock, simmer and stir until it is absorbed. Add the broccolini florets and continue to add the stock, 1 ladle at a time, stirring continuously until the stock is absorbed.
Before adding the last ladle of stock – the rice will be almost al dente - add the tomatoes then keep stirring.
When rice is al dente, fold in the butter, basil and parmesan through the risotto and season with freshly ground pepper – add salt if necessary.
Spoon onto warm serving plates, sprinkle with the reserved parmesan and top with an extra dash of pepper if desired.
Serves 2 with a very light appetite or 1 like me. ;)
* Joey posted the exact same recipe I intended to make – a delicious coincidence.
Thursday, May 17, 2007
Garlic chickpeas with cumin fried fish
This dish reminds of my dear friend Valentina – she is crazy for chickpeas and I’m sure she’d love this.
There’s not much left to say about Donna Hay’s recipes – they look good, taste fantastic and are not over the top complicated to put together. Her success is totally deserved – she’s the real deal, in my humble opinion.
What a delicious way to have chickpeas – they were the perfect side for the fish, which was unbelievably easy to prepare and full of flavor, even though I didn’t use the chilli.
This is my contribution to this week’s Weekend Herb Blogging – I keep forgetting to mention that it was created by the lovely Kalyn - this time hosted by Rinku from Cooking in Westchester.
Garlic chickpeas with cumin fried fish
adapted from Off The Shelf: Cooking From the Pantry
3 tablespoons olive oil
3 leeks, shredded
1 tablespoon shredded lemon zest – I used lime zest
3 cloves garlic, sliced
2x 400g cans chickpeas, drained and rinsed
¼ cup chopped flat-leaf parsley
salt
freshly ground black pepper
Cumin fried fish:
1 tablespoon butter
1 tablespoon olive oil
1 tablespoon ground cumin
1 small red chilli, seeded and chopped – I didn’t have any at home
4 x 200g firm white-fleshed fish, cut into pieces
salt
Heat a frying pan over medium heat. Cook the oil, leeks and lemon zest, stirring occasionally for 8 minutes or until the leeks are golden and a little crisp. Add the garlic and cook for 1 minute. Add the chickpeas and cook for 5 minutes or until heated through. Stir through the parsley and salt.
To cook the fish, heat a frying pan over medium heat. Add the butter, olive oil, cumin and chilli and cook for 3 minutes. Add the fish to the pan and cook for 2-3 minutes on each side or until just cooked through.
Place the chickpeas on serving plates, place the fish on the side and serve with a lime wedge.
Serves 4.
Sunday, April 22, 2007
Roasted tomato salad
For this edition of Weekend Herb Blogging, hosted by the lovely Sher - a wonderful cook and my fellow Daring Baker - I chose this delicious and easy to prepare salad, a recipe taken from Delia Smith’s website.
I’ve made three changes: I didn’t skin the tomatoes, I pitted the olives before adding them in the end and I also scattered the tomatoes with some capers.
Although I had it in room temperature – and it’s a warm day here, 28ºC - I think this would be wonderful served as a warm salad in cold days.
Roasted tomato salad
12 large tomatoes
2 large or 4 small cloves garlic, finely chopped
2 tablespoons extra virgin olive oil
12 large fresh basil leaves
salt and freshly milled black pepper
Dressing:
2 tablespoons extra virgin olive oil
2 tablespoons balsamic vinegar
To garnish:
fresh basil leaves
24 black olives
1 cup capers
Preheat the oven to 200ºC/400°F.
Oil a shallow 40 x 30cm (16 x 12 in) roasting tin and set aside.
Skin the tomatoes first of all by pouring boiling water over them and leaving for 1 minute, then drain and, as soon as they are cool enough to handle, slip off the skins. (Protect your hands with a cloth if necessary.)
Cut each tomato in half, around the middle rather than vertically, and place the halves in the roasting tin (cut side uppermost) and season with salt and freshly milled pepper. After that, sprinkle on the chopped garlic, distributing it evenly between the tomatoes. Follow this with a few droplets of olive oil on each one, then top each one with half a basil leaf, turning each piece of leaf over to get a coating of oil.
Place the roasting tin in the top half of the oven and roast the tomatoes for 50-60 minutes or until the edges are slightly blackened. Then remove the tin from the oven and allow the tomatoes to cool. All this can be done several hours ahead.
To serve the tomatoes, transfer them to individual serving plates, then whisk the oil and balsamic vinegar together and drizzle this over the tomatoes. Finally top each one with an olive and garnish with basil leaves. Lots of crusty bread is an essential accompaniment to this.
Serves 4-6 as a starter
Sunday, April 15, 2007
Baked zucchini and bacon risotto
Haalo is hosting this edition of Weekend Herb Blogging and being a huge fan of her blog I had to participate.
I adapted a recipe, using zucchini instead of pumpkin - it was delicious!
It was my first baked risotto and I must confess that while placing the ingredients together in the bowl I still wasn’t convinced it was going to work. I was so wrong: by the time I finished preparing Joao’s beef and potatoes my risotto was ready and all I had to do was stir it a bit to make it creamy.
I highly recommend this recipe and I think that many other vegetables would replace zucchini wonderfully here.
Baked zucchini and bacon risotto
adapted from Off The Shelf: Cooking From the Pantry
440g (2 cups) Arborio or carnaroli rice
1,250ml (5 cups) chicken or vegetable stock – I used vegetable
60g butter
500g zucchini, diced
12 rashers of bacon
75g (¾ cup) finely grated parmesan cheese
salt and freshly ground black pepper
1 tablespoon parsley, finely chopped
Preheat the oven to 200ºC/400ºF. Place the rice, stock, butter and zucchini in an ovenproof dish, mix and cover tightly with a lid or foil. Bake for 30 minutes or until the rice is soft – the risotto will be quite liquid.*
While the risotto is cooking, place the bacon under a hot grill (broiler) and cook for 2 minutes on each side or until crisp – I placed the rashers between sheets of paper towel and cooked in the microwave oven for 1 minute. Set aside.
Remove the risotto from the oven, add the salt, pepper, parmesan and parsley and stir constantly for 2 minutes to thicken it.
To serve, place in serving bowls and top with bacon.
* I used foil to cover the bowl and my risotto wasn’t that liquid – I cooked it for the exact time.
Serves 2 – I halved the recipe and got loads of risotto (that will be transformed in arancini). In my opinion, 1 recipe serves 3-4.
Monday, April 9, 2007
Hearts of palm quiche
As some of you know, I love cooking with hearts of palm. So, for my first participation on Weekend Herb Blogging – this time hosted by Anh - I decided to make a hearts of palm quiche.
I got the recipe from a Brazilian cookbook but the crust called for Crisco. I don’t like cooking with it. Call me silly, but I don’t even buy it.
Instead, I made a delicious crust out of a Gordon Ramsey’s recipe that had been posted by Valentina.
You see, Gordon’s recipe + Tina’s magic hands = perfection. :)
I had to adapt the amounts because my pan was a bit smaller than the required on the recipe. Next time I’ll add a bit more filling.
In the end, the quiche was so delicious I even had a piece at night, totally cold, and it still tasted good.
Hearts of palm quiche
Dough:
250g all-purpose flour
1 teaspoon salt
125g butter, cold and diced
1 egg, lightly beaten
1 tablespoon olive oil
1 egg yolk
Filling:
200g hearts of palm, chopped
½ small onion, chopped
2 tablespoons butter
½ teaspoon salt
20g parsley, chopped
100ml cream
4 eggs
Make the crust: in a bowl, combine flour, butter and salt, mixing with your fingertips until crumbly. Add the beaten egg and 1 tablespoon ice water and mix a little more. Knead it a little, wrap in cling film and refrigerate for 20 minutes.
Pre-heat the oven to 190ºC/375ºF. Brush a 24cm quiche pan with removable bottom* with the olive oil and sprinkle with salt and pepper.
On a lightly floured surface, roll out dough and line the pan with it.
Cover it with a circle of baking paper or foil and fill with uncooked beans – the blind baking process.
Bake for 20 minutes. Remove from the oven, remove the beans and the paper/foil and brush the crust with egg yolk. Bake for 5 minutes. Remove again from the oven and brush the crust again with egg yolk. Bake for 10-15 minutes or until golden.
This process will prevent the filling from leaking.
Remove from the oven. Keep the oven temperature at 190ºC/375ºF.
Make the filling: in a large frying pan, heat the butter over high heat. Add the onion and cook until lightly golden. Add the hearts of palm and salt and cook quickly. Remove from heat and add the parsley, mixing well.
In a separate bowl, beat the eggs and add the cream. Mix well. Add this mixture to the hearts of palm and mix.
Fill the baked quiche dough with this mixture and bake in a preheated oven (190ºC/375ºF) until firm.
Unmold and serve immediately.
* I used a regular teflon pan and had no trouble ummolding the quiche.
Serves 10
Wednesday, January 17, 2007
Tenderloin medallions with carrot “farofa” - updated post
It’s amazing how many people I’ve been in contact with since I discovered the delicious (yep, pun intended) foodblog world – and then started my own blog.
People who share the passion for food I have, people who understand the excitement of trying a new recipe, of cooking for family and friends, of tasting new ingredients for the first time.
One of these people is Terry, from Blue Kitchen – a blog you’ll get addicted to visiting, I can assure you.
Terry and I exchanged some e-mails after I wrote a comment on his blog about a very Brazilian dish - rice and beans. He said he would cook it – I crossed my fingers (and toes, as well, just in case) hoping we would like it.
He did like it and made a beautiful post about it!
Thanks, Terry! I loved your post and I’m very glad to be a part of your fantastic blog.
To keep on the Brazilian food theme, I’ll post a “farofa” recipe – click here to know more about farofa.
This is a bit different farofa, for the recipe calls for grated carrots – one way my grandmother found to make my brother eat at least one more kind of vegetable, besides French fries.
I used to cook this dish all the time when I was single and lived with my father and my brother – who still won’t eat anything green.
I still make it now because Joao loves it.
A simple side dish, quick to put together and that goes well with many things.
UPDATE: I make this farofa quite often, almost weekly during quarantine. It is delicious and also a family treasure. I have updated the recipe just to make it more like the version I make nowadays.
Tenderloin medallions with carrot “farofa”
4 tenderloin medallions
4 rashers of bacon
salt and cracked black pepper
1 tablespoon olive oil
Farofa:
2 tablespoons olive oil
½ small onion, finely diced
1 garlic clove, minced
1 large carrot, peeled and coarsely grated
salt and freshly ground black pepper
2 tablespoons finely chopped green olives
3 tablespoons chopped parsley leaves
70g manioc flour
Season the medallions with salt and pepper.
Wrap each medallion with a rasher of bacon and secure it with a toothpick.
Heat the olive oil over medium-high heat and grill the medallions to your liking.
Remove toothpicks and serve.
I served the medallions with the sauce found in this recipe.
For the farofa:
Heat the olive oil in a large frying pan over medium-high heat. Add the onion and cook,stirring occasionally, until translucent. Add the garlic and cook for 1 minute only - do not let it burn or it will get bitter. Add the carrot, cook for 2-3 minutes or until soft. Season with salt and pepper, add the parsley and the olives and mix. Stir in the manioc flour and cook for 1 minute. Remove from the heat and serve.
Serves 4 – or 2, depending on how hungry they are!

