Showing posts with label cheese. Show all posts

Tuesday, July 20, 2021

Green bean, tomato, feta and cannellini bean salad

Salada de vagem, tomate, feta e feijão branco / Green bean, tomato, feta and cannellini bean salad


It is super cold in Sao Paulo today – it is the winter after all – and I have been trying to keep myself warm with lots of clothes and buckets of hot tea (I might make soup for dinner to boot).

However, I know that many of you reading me on the top half of the planet are having a very intense summer, including devastating effects in some places due to extreme heat and storms. I do hope you are well and safe, and that things get back to normal soon.

I will share with you today one of my favorite salads, one that I have made several times and that I like specially to take to the office for lunch. It is not even a recipe to be honest: I start by grilling the green beans in a hot nonstick frying pan with a little bit of olive oil and half a clove of garlic, some salt and pepper (I later discard the garlic – it is only to perfume the beans).

When it is cool, I add halved cherry tomatoes, diced feta cheese and cannellini beans from a can.

The dressing is a very simple vinaigrette made with olive oil, lime or lemon juice, Dijon mustard, salt and pepper: everything added to an empty jar and shaken until creamy. When I take this salad to work for lunch, I pack the dressing separately and add it to the salad minutes before eating.

A fresh, colorful meal, made in minutes and without using the stove too much – I hope you like it. xx

Tuesday, March 30, 2021

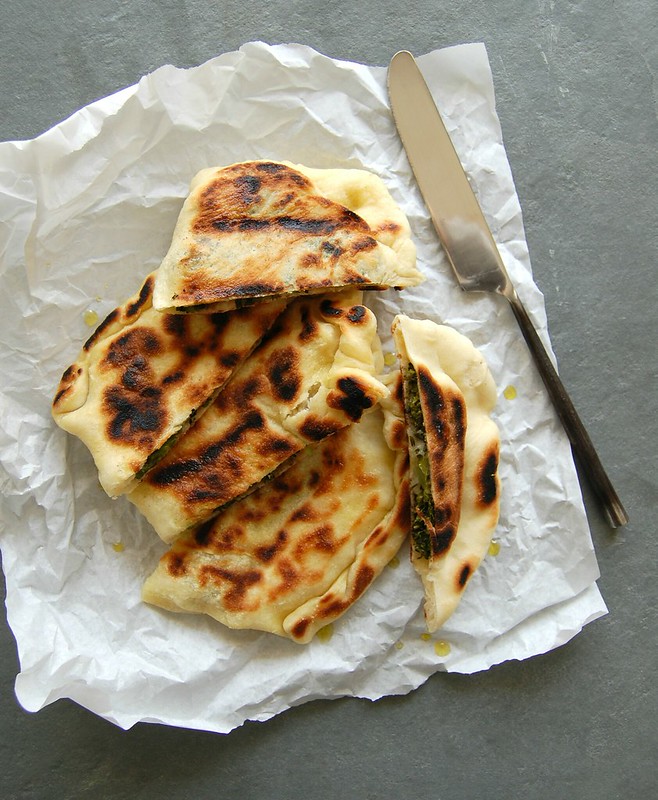
Broccolini, feta and pine nut gozleme and being inspired by TV shows

Gozleme de brócolis, feta e pinoli

One of the things I love the most about watching TV food shows is to learn about different foods and ingredients from places far from Brazil – when I traveled in the past I always wanted to try as many new things as I could while abroad. I remember when I visited my friend Valentina in London in 2009 and I begged her to buy me some rhubarb - I had never seen it in Brazil until then. :)

The same way Ottolenghi introduced me to pide, or Turkish pizza, Ainsley Harriott ate gozleme in his show and I immediately wanted to make it a home!

I used broccolini, feta and pine nuts in these gozleme, but you can pretty much use whatever you want for the filling – the sky is the limit! I am a sucker for all things feta – I like it so much that my dear friend Ellen who lives in California told me she will take me to a Greek restaurant when I come visit (cannot wait, Ellen!). 

I want to make this recipe again and use other vegetables for the filling, such as zucchini or eggplant, and other types of cheese as well.


Broccolini, feta and pine nut gozleme

own recipe, inspired by many I have seen online


Dough:

1 teaspoon dried yeast

½ teaspoon sugar

¾ cup (180ml) lukewarm water

1 teaspoon extra virgin olive oil

2 cups (280g) all purpose flour

1 tablespoon plain yogurt

1 teaspoon table salt


Filling:

1 tablespoon olive oil

1 garlic clove, minced

200g broccolini florets

salt and freshly ground black pepper

1 tablespoon Marsala wine – it gives a lovely smoky flavor to this recipe, but replace with white wine if Marsala is not available

100g feta cheese, finely chopped or crumbled

1 ½ tablespoons lightly toasted pine nuts


In the bowl of an electric mixer fitted with the dough hook, mix the yeast, sugar and water. Stir with a fork and set aside until foamy, about 5 minutes. Add the olive oil, flour, yogurt and salt and knead on medium speed for 6-8 minutes or until dough is smooth and elastic – if kneading by hand, it should take 10-12 minutes. Shape the dough into a ball and transfer to a large oiled bowl. Cover and set aside to proof for 60-80 minutes, depending on how warm the day is, or until doubled in size.

In the meantime, make the filling: heat the olive oil in a large nonstick frying pan over medium-high heat. Add the garlic and cook for 1 minute only – do not let it burn or it might turn bitter. Stir in the broccolini, cooking for 2-3 minutes. Season with salt and pepper (be careful with the salt, since feta can sometime be quite salty), add the Marsala and cook for another minute so the wine evaporates. Remove from the heat, let it cool, then stir in the feta and pine nuts.

Divide the dough into 4 equal portions. In a lightly floured surface, roll each portion of dough until you get a roughly 22-25cm (9-10in) circle. Place ¼ of the filling onto one half of the circle, then fold the other half over the filling, sealing the edges well.

Heat a nonstick frying pan over high heat. Brush one of the sides of the gozleme with olive oil and place brushed side down onto the pan. Cook for 2-3 minutes, or until golden. Brush the other side with olive oil and flip it, to cook the other side, for another 2-3 minutes or until golden. Repeat the process with the remaining gozleme. Serve immediately.

Makes 4

Thursday, September 17, 2020

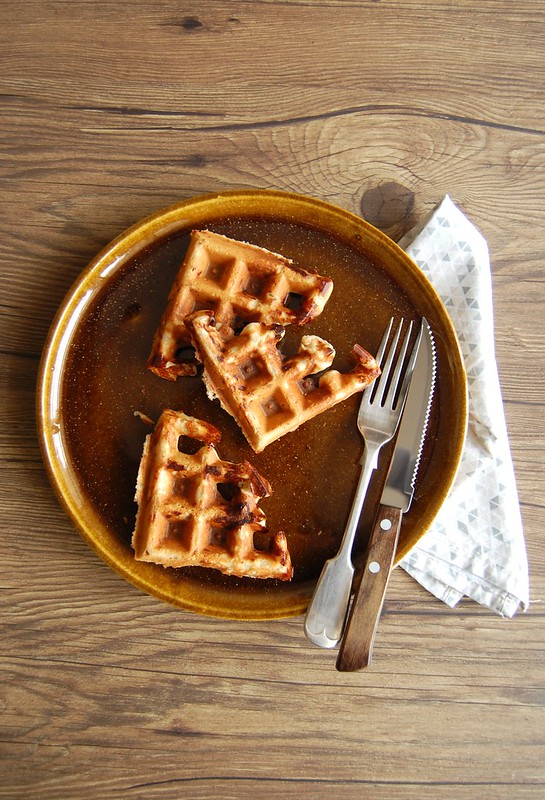
Pizza flavored whole wheat waffles and very different vacations

Waffles integrais sabor pizza

I was on vacation for most of July and it was very different from all the other previous vacations I ever took: in quarantine, I stayed home all the time. I had plans to go back to NYC this year, but unfortunately had to postpone the trip to god knows when due to the pandemic. On my vacation there was no travelling, no walking around the city, no nothing. I saw one movie a day, some TV shows, cooked a lot. I organized my books and my closet, took naps after lunch and rested.

In one of the afternoons watching movies I felt like nibbling on something, and there was freshly baked cake, but I really wanted something savory. I adapted my recipe for orange olive oil waffles to make it flavored like pizza, with cheese and dried oregano, and also added a bit of whole wheat flour to make the waffles more interesting and nuttier in flavor. The waffles turned out delicious, therefore I share the recipe with you today.


Pizza flavored whole wheat waffles

own recipe


100g all purpose flour

75g whole wheat flour

2 teaspoons baking powder

pinch of salt

2 teaspoons dried oregano

1 large egg, room temperature

¼ cup (60ml) extra virgin olive oil

¾ cup (180ml) whole milk, room temperature

1 cup (70g) coarsely grated yellow mozzarella*

2 tablespoons finely grated parmesan


In a medium bowl, whisk together the flours, baking powder, oregano and salt. Set aside.

In a small bowl, whisk together the egg, olive oil and milk. Pour over the dry ingredients and stir just until incorporated – do not overmix. Stir in the cheeses.

Heat a waffle iron until very hot; lightly coat with nonstick spray – my waffle maker is nonstick, so I do not coat it.

Working in batches, cook waffles until golden and cooked through. Transfer to a wire rack set inside a baking sheet and keep warm in oven until ready to serve.

* the yellow mozzarella I used is not like fresh mozzarella balls, therefore it does not release too much liquid. Replace by cheddar or something similar texture wise.

Makes 5-6 waffles


Monday, August 24, 2020

Cauliflower balls and feeling nostalgic

Bolinhos de couve-flor / Cauliflower balls

I have been feeling nostalgic lately, thinking of my mom a lot. Some ingredients and foods remind me of her so much, it is impossible not to think of her and of some moments of my childhood. Cauliflower, for instance, is something that immediately takes me back to the past, it is as if I could almost hear my mom telling me “eat the little trees, my dear, for they are very good for you”. Cauliflower, to me, will always be “little trees”.

As much as I love these little trees, I’ll admit that sometimes they need a little push when it comes to flavor: cauliflower can be pretty bland depending on how it is prepared. It is not the case with these balls: they are delicious! Very flavorful, crunchy on the outside and tender on the inside.

I served these balls as part of a meal with rice, beans and cooked kale, but they would be wonderful to nibble on with a cold beer. By the way, I recommend adding a few drops of Tabasco to the balls when eating them – they taste even better.


Cauliflower balls

own recipe, inspired by these lentil patties


400g cauliflower, cut into florets – a little more than ½ small cauliflower

salt

½ small onion, finely diced

1 egg, room temperature

2 tablespoons finely chopped parsley leaves

½ tablespoon olive oil

¼ cup finely grated parmesan

¾ cup breadcrumbs – I used homemade

freshly ground black pepper


Place the cauliflower in a large saucepan and cover with water. Heat over high heat and when the water starts to boil, add a pinch of salt and cook until cauliflower is tender, about 10 minutes. Drain well, then refresh under cold water until cauliflower is cool. Drain again and chop finely. Transfer to a large bowl.

Preheat the oven to 200°C/400°F. Line a large baking sheet with foil, then brush with olive oil

Add all the remaining ingredients to the chopped cauliflower and mix well. Season with salt and pepper. With a handheld mixer, process half the mixture (use a food processor if you don’t have a mixer). Stir well, then shape small balls with your hands using 1 ½ leveled tablespoons per ball. Place the balls into the prepared pan leaving 2.5cm (1in) between them. Bake for 15 minutes, then carefully turn the balls. Bake for another 15 minutes and serve.

Makes about 22 – we ate half of the balls on the day I made them, and I froze the rest for some other time

Monday, August 17, 2020

Spinach and mozzarella risotto - lunch on the table despite a bare fridge

Risoto de espinafre e mozarela / Spinach and mozzarella risotto

A while ago I made a risotto with severaldifferent veggies, using pretty much all there was in my crisper drawer – it turned out delicious and full of good-for-you stuff. This time, it was the complete opposite: the fridge was almost bare, so I reached out to the freezer and made a risotto using frozen spinach, throwing in some cheese to make it better. I never use garlic in risottos, but this time I added a small clove since garlic and spinach are so great together.

I was actually surprised with how good the risotto tasted! Joao is not fond of risotto and this time he had seconds – I was impressed, because that never happens. I always have frozen spinach in my freezer because I use it a lot in soups – like this one – but in a risotto was the first time. I was happy with the results and even happier to have lunch on the table in about half an hour – that is great on the days we clean the apartment. :D

Spinach and mozzarella risotto

own recipe


3 tablespoons unsalted butter

½ tablespoon olive oil

1/3 cup finely diced celery

½ small onion, finely diced

1 small garlic clove, minced

¾ cup (165g) Arborio or Carnaroli rice

¼ cup (60ml) dry white wine

salt and freshly ground black pepper

100g frozen spinach, thawed

3 cups (720ml) vegetable stock

1 cup (70g) coarsely grated yellow mozzarella*

2 tablespoons coarsely grated parmesan

In a medium saucepan, melt half the butter and olive oil. Add the celery and onion and cook, stirring occasionally, until tender, 3-4 minutes. Add the garlic and cook for 1 minute – do not let it burn or it will turn bitter. Add the rice and cook for about 2 minutes, to coat all the rice grains with fat. Add the wine and cook until it evaporates. Season with salt and pepper. Stir in the spinach. Start adding the stock, 1 ladle at a time, then stirring constantly so the rice releases its starch.

Repeat this until all the stock has been used, the rice is al dente and the risotto is thick and glossy – about 20 minutes. Stir in the remaining butter and the cheese. Check the seasoning, adjust if necessary, cover the pan and wait 5 minutes. Serve immediately.

* the yellow mozzarella I used is not like fresh mozzarella balls, therefore it does not release too much liquid. Replace by cheddar or something similar texture wise.

Serves 2 


Wednesday, August 5, 2020

Stuffed eggplants with tomato and cheese

Barquinhas de berinjela com tomate e queijo

Days ago I asked my Instagram followers what they like to see on the blog the most, the recipes they immediately feel like making in their homes when I post: cakes and cookies were the champions, followed by brownies and bread. Some followers told me they love my savory recipes, to vary the daily meals, and soups were also mentioned. 

I must confess that I love baking and photographing (and eating!) cakes and cookies, but one cannot live on these alone, especially now that I am no longer exercising daily as I used to. Therefore, I will continue posting the sweet recipes my Brazilian followers love so much, but will focus on the savory ones, like these stuffed eggplants I bring you today: they are delicious! A vegetarian meal full of flavor and that looks beautiful on the plate. 

I would also love to hear what you, my foreign readers, like to see around here the most – please share with me your thoughts. Thanks. xx

Barquinhas de berinjela com tomate e queijo

Stuffed eggplants with tomato and cheese

own recipe


Eggplant “boats”:

2 large eggplants (about 350g/12oz each)

2 teaspoons olive oil 


Filling:

2 tablespoons olive oil

1 small onion, finely chopped

2 garlic cloves, minced

2 ripe tomatoes, seeded, in small dice

sal and freshly ground black pepper

2 teaspoons dried oregano

a few fresh basil leaves

2 cups (140g) coarsely grated yellow mozzarella* - set aside 3 tablespoons to sprinkle over the dish

8 large black olives, pitted and finely chopped

Preheat the oven to 200°C/400°C. Line a large baking sheet with foil.

Cut the eggplants lengthwise, making little “boats” with them, and then make crisscross cuts on the flesh, but be careful not to pierce the skins. Brush the cut side with the olive oil and place it upside down, facing the foil. Bake for 30 minutes.

In the meantime, start the filling: heat the olive oil in a large frying pan (nonstick is better) over medium-high heat. Add the onion and cook, stirring occasionally, until translucent. Add the garlic and cook for 1 minute – do not let it burn or it will become bitter. Add the tomatoes, season with salt and pepper and cook, stirring occasionally, until the tomatoes start to break down. Add the oregano and cook for 2 more minutes. Stir in the basil and turn off the heat.

Remove the eggplants from the oven (keep it on), and very carefully not to get burned, using a spoon remove the flesh from the eggplants, but not too deep so the “boats” stay intact. Add the flesh to the cooked filling, stir in the cheese (do not forget to set aside 3 tablespoons for topping the dish) and the olives. Stuff the eggplant shells with the filling, sprinkle with the remaining cheese and place them back on the baking sheet. Bake for another 25 minutes. Serve immediately.

* the yellow mozzarella I used is not like fresh mozzarella balls, therefore it does not release too much liquid. Replace by cheddar or something similar texture wise.

Serves 4 – I served my stuffed eggplants with rice and a green salad on the side, so 1 “boat” (1/2 eggplant) was enough per person; if you intend to serve this as a single dish, I believe 2 “boats” (1 eggplant) per person should be enough

Thursday, June 11, 2020

Ratatouille calzones

Calzones de ratatouille / Ratatouille calzones

Last week I told Joao that for the weekend I wanted to make something different for lunch: I was not in the mood for pasta or for the good old rice and beans combo, and I definitely wanted to try my hands at a new recipe.

Going through the vegetables in my fridge I found one eggplant, one zucchini, a couple of carrots and that was it: not much to choose from. So I kept the carrots for some other time and used the eggplant and the zucchini to make a sort of ratatouille, adding tomato paste and olive to make the mixture more interesting. Mixed with cheese it became the filling for these calzones and I bring you this recipe with a very proud smile: the calzones turned out so good!

Apparently going through the crisper drawer might be a good creative exercise. :D

The recipe yields 8 large calzones, which is too much for the both of us for one meal, so I froze the remaining calzones and we ate them for dinner yesterday. If you want to do the same, just wait for the calzones to cool completely, wrap in foil and place them in a plastic bag, sealing well. Once the calzones are thawed, 10 minutes in a hot oven are enough to make them delicious again.

Calzones de ratatouille / Ratatouille calzones

Ratatouille calzones
own recipe

Dough:
2 teaspoons dried yeast
½ teaspoon granulated sugar
1 ¼ cups (300ml) lukewarm water
2 tablespoons extra-virgin olive oil
3 cups (420g) all purpose flour
1 ¼ teaspoons table salt

Filling:
1 ½ tablespoons olive oil
½ small onion, finely diced
1 large garlic clove, minced
1 medium zucchini (240g), in 1cm-cubes
1 medium eggplant (300g), in 1cm-cubes
1 bay leaf
salt and freshly ground black pepper
½ tablespoon tomato paste
1 tablespoon dry white wine
10 large black olives, pitted and finely chopped
1 ½ cups (150g) coarsely grated yellow mozzarella*
3 tablespoons coarsely grated parmesan
2 teaspoons dried oregano

After assembling the calzones:
olive oil, for brushing
finely grated parmesan, for sprinkling over the calzones

Start with the dough: in the bowl of an electric mixer fitted with the dough hook, mix the yeast, sugar and water with a fork. Set aside until foamy, about 5 minutes. Add the olive oil, flour and salt and mix for 6-8 minutes or until a soft and elastic dough forms. Shape dough into a ball and transfer to a lightly oiled bowl. Cover with plastic wrap and set aside to proof in a warm place for about 1 hour or until doubled in size – mine proved for 90 minutes.

In the meantime, make the filling: heat a large nonstick frying pan over medium heat. Add the onion and cook stirring occasionally until tender and translucent. Add the garlic and cook for 1 minute or until fragrant – do not let it burn or it will get bitter. Stir in zucchini, eggplant and bay leaf, season with salt and pepper. Cook for 5-7 minutes or until vegetables are softer. Stir in the tomato paste and cook for 2 minutes – it is important to cook it thoroughly to avoid the raw tomato aftertaste. Add the wine and cook for 1 minute, then stir in the olives. Remove from the heat, cool completely, discard the bay leaf and then stir in the cheeses and the oregano.

Preheat the oven to 420°F/220°C. Have ready two large baking sheets.
Divide the dough into 8 equal parts – each will be around 100g (3 ½ oz.). Roll out each portion of dough on a lightly floured surface until you get a rough 25cm (10in) circle. Place about ½ cup of the filling on one side of the dough and fold the other half over, pinching the seams well to keep the filling inside – since vegetables can vary in size, if you have a scale weigh the filling and divide it equally in 8 portions. Repeat the process with the remaining dough and filling. Place the calzones onto the sheets and brush them with the olive oil and sprinkle with the parmesan. Bake for about 20 minutes or until golden. Serve immediately.

* the yellow mozzarella I used is not like fresh mozzarella balls, therefore it does not release too much liquid. Replace by cheddar or something similar texture wise.

Makes 8

Tuesday, May 26, 2020

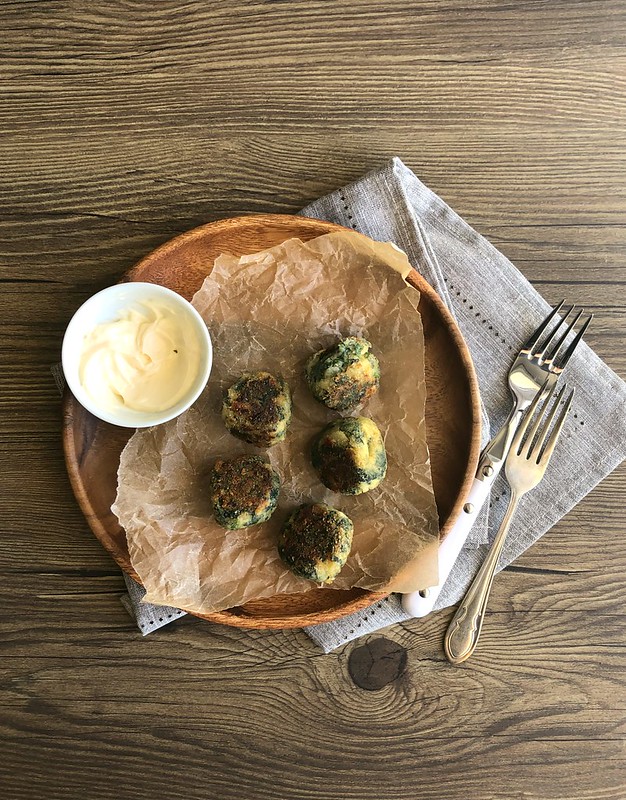
Spinach and cheese “meatballs”

Bolinhos de espinafre e queijo

Who follows me on Instagram has seen some of my lunch dishes: it is usually simple food, quick to put together, so I can make it and eat in on my lunch break. Rice and beans I keep ready at the fridge, so it is just a matter of roasting some vegetables, making a salad or an omelet, or getting meatballs from the fridge straight to the oven. All very quick.

But when I have a little more time, or when I get organized enough on the previous night, I like to make new recipes, food that takes a little bit longer in the kitchen, like these delicious spinach “meatballs”: I had some spinach in the fridge and wanted to use it in something different – on a busy day I would simple stir-fry it with olive oil, garlic and a pinch of nutmeg for a tasty side dish, but since I had a bit of extra time I went to my good old sources for recipes online (Donna Hay, Jamie Oliver, Gourmet Traveller, both Australian and UK Delicious magazines) and it was on the Guardian that I found something interesting. I adapted the recipe slightly and got truly delicious spinach cakes – I am calling them meatballs because I decided to roll them into balls.

I am sure these meatballs would be delicious baked, but since my oven was already full with something else I just grilled them quickly in a nonstick frying pan with a little bit of olive oil. If you decide to bake them, line the baking sheet with foil and brush it with olive oil, because the amount of cheese in these cakes will make them stick on the sheet.

Too bad the recipe does not yield much – the meatballs were gone in no time at all. :D

Spinach and cheese “meatballs”
adapted from Hugh Fearnley-Whittingstall's savory spinach cakes recipe

"Meatballs":
4 cups (260g) fresh spinach, tough stalks removed, leaves washed, packed
1 ½ tablespoons olive oil
½ medium onion, finely chopped
1 large garlic clove, minced
½ cup coarsely grated yellow mozzarella – cheddar should make a fine substitute, or even Monterey Jack
2 tablespoons finely grated parmesan
1 tablespoon cream cheese
2 tablespoons breadcrumbs
¼ teaspoon freshly grated nutmeg
1 egg, lightly beaten – the egg I used was a small one, 50g; I buy organic eggs and sizes vary
salt and freshly ground black pepper

For frying the balls:
2 tablespoons breadcrumbs
1 tablespoon olive oil

In a large nonstick frying pan over high heat, cook the spinach in two batches, stirring until wilted. Transfer to a colander. Once cool enough to handle, squeeze very well with your hands, then chop. Set aside to cool completely.
Using the same frying pan, heat the olive oil over medium-high heat. Add the onion and cook for 3-4 minutes, stirring occasionally, until translucent. Add the garlic and cook for 1 minute – don’t overcook or the garlic will turn bitter. Remove from the heat and let it cool completely.

Transfer spinach, onion and garlic mixture, cheeses, cream cheese, breadcrumbs and nutmeg to a medium bowl. Stir in the egg and season with salt and pepper. With damp hands, roll 1 ½ tablespoons of the mixture into balls, pressing slightly to compact the mixture. Transfer to a place and refrigerate for 30 minutes.

Before frying the meatballs, roll them into the breadcrumbs. Heat the olive oil in the same frying pan used before over medium-high heat and fry the balls, turning two or three times to evenly brown them – be careful because they are very soft. Serve immediately.

Makes 10-11 cakes

Thursday, April 19, 2018

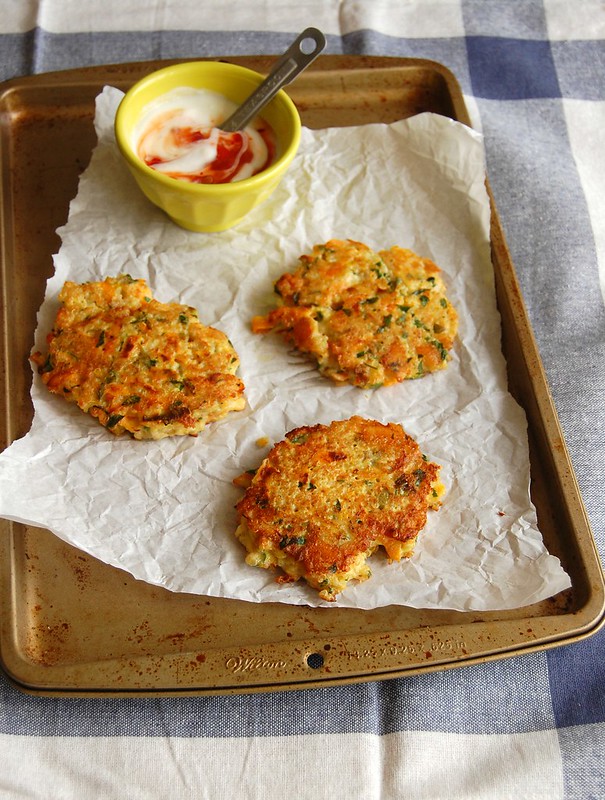
Quinoa, carrot and mozzarella fritters

Quinoa, carrot and mozzarella fritters / Bolinhos de quinoa, cenoura e mozarela

It took me a while to get on the quinoa bandwagon (I don’t really know why), but after I did I started making fritters with it quite often: with a salad they become a delicious and light lunch or dinner.

Here I have combined quinoa with other tasty ingredients such as carrots, mozzarella and olives – their saltiness goes really well with the sweetness of the carrots and the mozzarella. However, if you like intense flavors (I do), the mozzarella can be replaced with a stronger cheese.

Quinoa, carrot and mozzarella fritters
own recipe

1 small carrot, coarsely grated
150g cooked quinoa, drained and cooled
2 tablespoons finely grated parmesan
1 spring onion, sliced
2 tablespoons chopped fresh parsley leaves
1 tablespoon fresh thyme leaves
2 tablespoons chopped green olives
2 tablespoons all purpose flour
60g fresn mozzarella, finely chopped
2 large eggs
salt and freshly ground black pepper
canola oil, for frying

Place the carrot in a clean kitchen towel and squeeze to remove excess liquid. Transfer carrot to a large bowl and add the quinoa, parmesan, spring onion, parsley, thyme, olives, flour, mozzarella and eggs. Season with salt and pepper and stir until well combined.

Heat about ½ teaspoon oil in a large nonstick frying pan over medium heat. Pour about 2 tablespoons of batter per fritter and flatten with the back of a spoon, shaping the edges quickly to form a rough circle. Don’t overfill the frying pan. Cook for 2-3 minutes, then flip and cook until golden.

Serve immediately.

Makes about 10

Thursday, April 5, 2018

Beef and ricotta meatballs

Almôndegas de carne e ricota / Beef and ricotta meatballs

Meatballs are a big hit at my house and you will find some in my freezer whenever. They constantly become a quick weeknight dinner paired with salad – I do that quite often.

My go-to meatball recipe is this, but after seeing the wonderful Nigel Slater making burgers with the addition of ricotta I thought I would give it a go with meatballs: they tasted delicious and were incredibly light in texture.

Unfortunately I am no longer able to eat ricotta, but this is such a great recipe I had to share it with you.

Beef and ricotta meatballs
adapted from here, with Nigel’s idea

½ large onion
2 large garlic cloves
300g beef mince
175g ricotta – I used homemade
1 large egg
3 tablespoons finely grated pecorino or parmesan
1 teaspoon table salt
freshly ground black pepper
2 teaspoons dried oregano
handful of fresh parsley leaves, chopped
1/3 cup breadcrumbs

Place onion and garlic in a food processor and process until finely chopped*. Transfer to a large bowl and add all the remaining ingredients, mixing well with your hands. With wet hands, shape the mixture into balls using 1 ½ tablespoons of mixture per meatball.

You can either cook the meatballs at the stovetop or bake them in a preheated 200°C/400°F oven for 20-25 minutes or until golden and cooked through.

* I’ve tried this recipe with chopped, processed and grated onions and to me the best way of using them is processed – chopped with a knife the onion pieces are too large (which makes rolling the meatballs more difficult) and grated the onion becomes too wet

Makes about 22

Wednesday, March 21, 2018

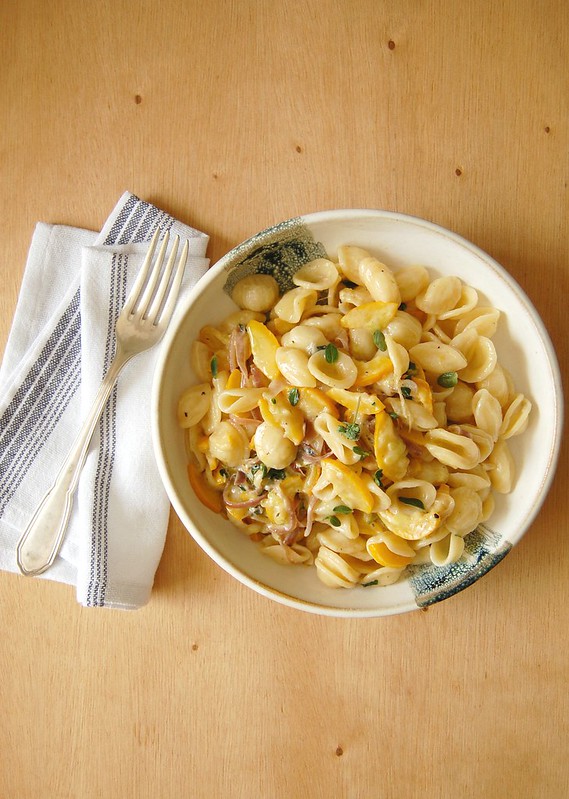
Orecchiette with courgette and goat’s cheese sauce

Orecchiette with courgette and goat’s cheese sauce / Orecchiette com molho de abobrinha e queijo de cabra

This food stylist wannabe got crazy when she saw yellow courgettes in farmer’s market for the first time – until then I had only seen it on books, magazines and food TV shows. Of course I brought some home and immediately thought of something tasty and visually beautiful to make with it.

For this recipe I used red onion so I could have a nice color contrast, however after that day I made this pasta several other times using regular onions and courgettes and it was flavorsome anyway.

Orecchiette with courgette and goat’s cheese sauce
own recipe

2 tablespoons unsalted butter
1 teaspoon olive oil
½ large red onion, thinly sliced in half moons
1 large garlic clove, minced
1 courgette (about 350g/12oz), sliced in half lengthwise and then sliced into thin half moons
finely grated zest of 1 lime
handful of fresh marjoram leaves
2 tablespoons dry white wine
¼ cup (60ml) heavy cream
35g goat’s cheese, coarsely grated or crumbled
200g orecchiette pasta

Cook the pasta in plenty of boiling salted water until al dente (follow the instructions in the package). In the meantime, make the sauce: in a large frying pan, heat the butter and olive oil until butter is melted. Add the onion and cook, stirring occasionally, until softened. Stir in the garlic and cook for 1 minute only – do not let it burn or it will be bitter. Add the courgette and cook, stirring occasionally, for 5-7 minutes or until softened. Season with salt and pepper and stir in the lime zest and the marjoram. Add the wine and cook until it evaporates. Stir in the cream and the cheese and cook just until the cheese melts.

Drain the pasta, reserving some of the cooking water, and stir into the sauce – if sauce is too thick, stir in a bit of the cooking water to loosen it up. Serve immediately.

Serves 2

Other ideas: this recipe tastes great if gorgonzola and fresh oregano are used instead of goat’s cheese and marjoram.

Thursday, February 8, 2018

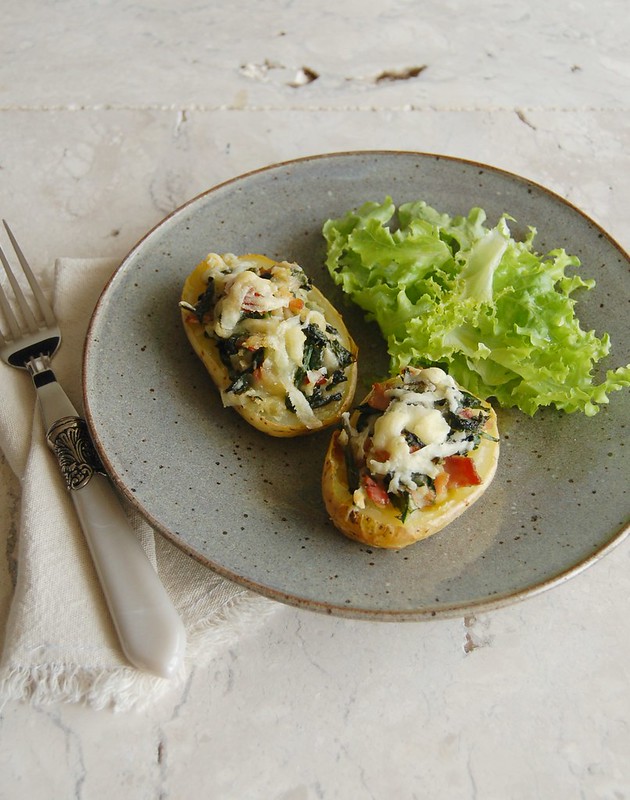
Loaded potatoes with spinach, cheese and bacon

Loaded potatoes with spinach, bacon and cheese / Barquinhas de batata com espinafre, bacon e queijo

I work for a Swiss company and this week several of my peers from Switzerland have been asking me about/wishing me a good Carnival – it is funny because I am not a Carnival person (they do not know that), but I do enjoy the days off (Netflix, here I come!). :)

To me these loaded potatoes are perfect for lazy days: just a handful of ingredients, easy prepping, and delicious results. My versions lately have been dairy free: I skip the cheese and add a couple of teaspoons of nutritional yeast to the filling to get the cheesy flavor. Sometimes I sprinkle a bit of Pecorino on top as well for a salty touch, since that cheese does not cause me digestion problems.

Loaded potatoes with spinach, cheese and bacon
own recipe

4 large potatoes
6 bacon rashers, chopped
2 garlic cloves, minced
1 ¾ cups (120g) spinach leaves, packed
salt and freshly ground black pepper
¾ cup (75g) coarsely grated Canastra cheese*

Preheat the oven to 200°C/400°F. Line a medium baking sheet with foil.
Pierce the potatoes all over with a fork. Place them on the foil and bake for about 50 minutes or until potatoes are tender (remove them from the oven, but keep it on). When potatoes are warm enough to handle, cut them in half horizontally, remove some of the pulp and transfer to a bowl – do not carve the potatoes too much or the shells will be too thin and delicate to hold the filling. Place the potato shells back on top of the foil.

In a large nonstick frying pan, cook the bacon over high heat stirring occasionally until crisp. Add the garlic and cook for 1 minute. Add the spinach, season with salt and pepper, and cook until wilted, 3-4 minutes. Remove from the heat, stir in the potato pulp and mix. Stir in ½ cup of the cheese. Spoon filling back into each potato half and sprinkle with the remaining cheese. Bake for about 15 minutes or until top is golden.

* for this recipe I used a kind of cheese typical from Brazil called Canastra cheese. Feel free to replace it with cheddar or the cheese of your liking

Serves 4 with a green salad on the side

Wednesday, January 10, 2018

Roasted garlic pecorino focaccia

Roasted garlic pecorino focaccia / Focaccia de alho assado e pecorino

I can say that after the lovely Ina my favorite Food Network presenter is Rachael Ray – she is fun and her food always looks good – even though most of the times her portions look too generous to me. :)

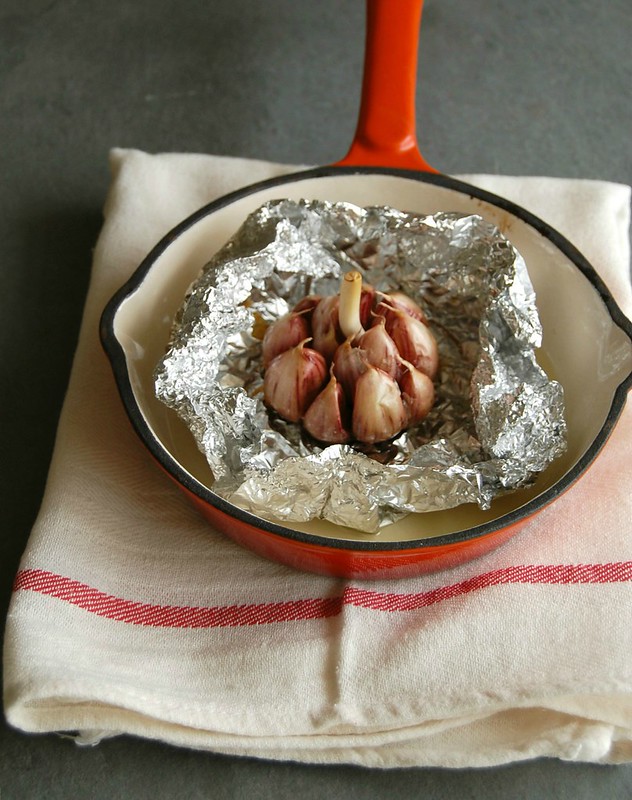
She constantly says how much she loves garlic and I always relate to that: I have a heavy hand with it comes to adding garlic to my food and usually double the amount requested in recipes (maybe that is why both my husband and I rarely have colds). And don’t even get me started on roasted garlic: I just love the stuff so much I had to mix it into a focaccia dough. It turned out delicious, but if you are not a fan of bold flavors you can tone this down by adding half the amount of garlic and replacing the pecorino with parmesan.

Roasted garlic pecorino focaccia / Focaccia de alho assado e pecorino


Roasted garlic pecorino focaccia
own recipe

For the roasted garlic:
1 large head of garlic, whole
1 tablespoon extra virgin olive oil

Dough:
2 teaspoons dried yeast
¼ teaspoon granulated sugar
300ml lukewarm water
3 tablespoons extra virgin olive oil, plus a little extra to drizzle over the focaccia
3 cups (455g) all purpose flour
1 teaspoon table salt
1/3 cup finely ground pecorino
2 tablespoons fresh thyme leaves

Preheat the oven to 180°C/350°F. Place the whole head of garlic in the center of a medium piece of foil. Drizzle with the olive oil and close the ends of the paper, pressing them together so the oil does not leak. Place the foil package in a small baking sheet and roast for about 45 minutes or until garlic is tender. Remove from the oven and leave to cool completely. When garlic is cold, remove the pulp from the skins and mash it with a fork to form a purée – save the olive oil left in the foil for later. Set the garlic aside.

In the large bowl of a stand mixer, combine the yeast, sugar and water and mix with a fork. Set aside for 5 minutes or until foamy. Add the olive oil, flour, salt and half of the pecorino and mix with the dough hook for 6-8 minutes or until an elastic and smooth dough forms – it kneading by hand, 10-12 minutes should do. Add the mashed garlic, half the thyme leaves and mix well. Transfer to a lightly oiled large bowl, cover with plastic wrap and set aside in a warm spot for 1 ½ hours or until doubled in volume.

Lightly brush a large baking sheet with olive oil. Carefully transfer the dough to the prepared sheet, gently so you don’t lose the air trapped in the dough. Shape it onto a 30x20cm (12x8in) oval. With lightly floured fingertips, pierce the dough in a few spots without pressing it too deep. Measure the olive oil left from roasting the garlic and add more olive oil until you have 1 tablespoon. Drizzle over the dough, then sprinkle it with the remaining thyme leaves and pecorino. Set aside in a warm place for about 20 minutes – in the meantime, preheat the oven to 200°C/400°F. Bake the focaccia for 25-30 or until golden brown. Remove from the oven and very carefully slide it onto a wire rack. Serve warm or at room temperature. The focaccia can be kept in an airtight container at room temperature for up to 2 days and tastes fresh again if reheated briefly in the oven.

Serves 8-10

Thursday, November 23, 2017

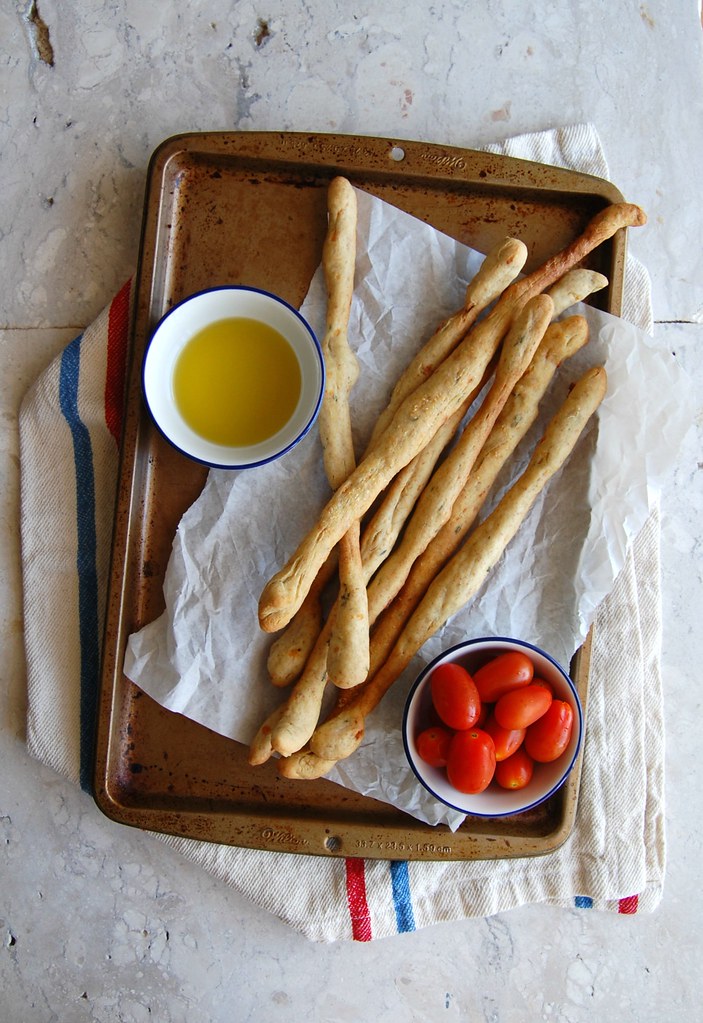
Gorgonzola and fresh oregano grissini

Gorgonzola and fresh oregano grissini / Grissini de orégano fresco e gorgonzola

At home we like nibbling very much, especially on weekends, and that came to my mind as I set up a plate of bread, cheese and fruit last Saturday for dinner: a glass of wine and the meal was perfect.
Sometimes we have guacamole with homemade tortillas, and of course there are days I don’t even want to enter the kitchen: those are the days for pizza. :)

If you are feeling a bit more enthusiastic than me lately please have a go at these grissini: they are absolutely delicious and great for the cheese/fruit platter (and with wine, too). :)

Gorgonzola and fresh oregano grissini
own recipe

1 teaspoon dried yeast
1 teaspoon granulated sugar
200ml lukewarm water
2 cups (280g) all purpose flour
1/3 cup (46g) whole wheat flour
3 tablespoons olive oil + a bit extra for brushing
1 teaspoon table salt
2 tablespoons fresh oregano leaves, packed
50g gorgonzola, coarsely grated or crumbled if too soft
3 tablespoons finely grated parmesan

In the bowl of an electric mixer fitted with the dough hook, mix the yeast, sugar and water with a fork. Set aside for about 5 minutes or until foamy. Add the flours, olive oil and salt. Mix on medium for about 8 minutes or until mixture turns into an elastic and smooth dough – if mixing by hand, 10-12 minutes should do it. Mix in the oregano and the gorgonzola, shape the dough into a ball and transfer to a large bowl lightly brushed with olive oil. Cover with plastic wrap and set aside to prove for 1 ½ hours, or until doubled in size.

Preheat the oven to 200°C/400°F. Line two large baking sheets with foil and brush it with olive oil.
Punch the dough to remove the excess air. Divide dough in 24 equal portions e roll each of them into a 30cm (12in) sausage shape – if dough is too stick, lightly flour your counter, but avoid too much flour or the dough will be tough and dry. Place the grissini onto the foil leaving 2cm (little less then 1in) between them. Brush them with olive oil, sprinkle with parmesan and bake for 20-25 minutes or until golden brown.
Transfer the sheets to a wire rack and cool completely.

Makes 24

Wednesday, October 4, 2017

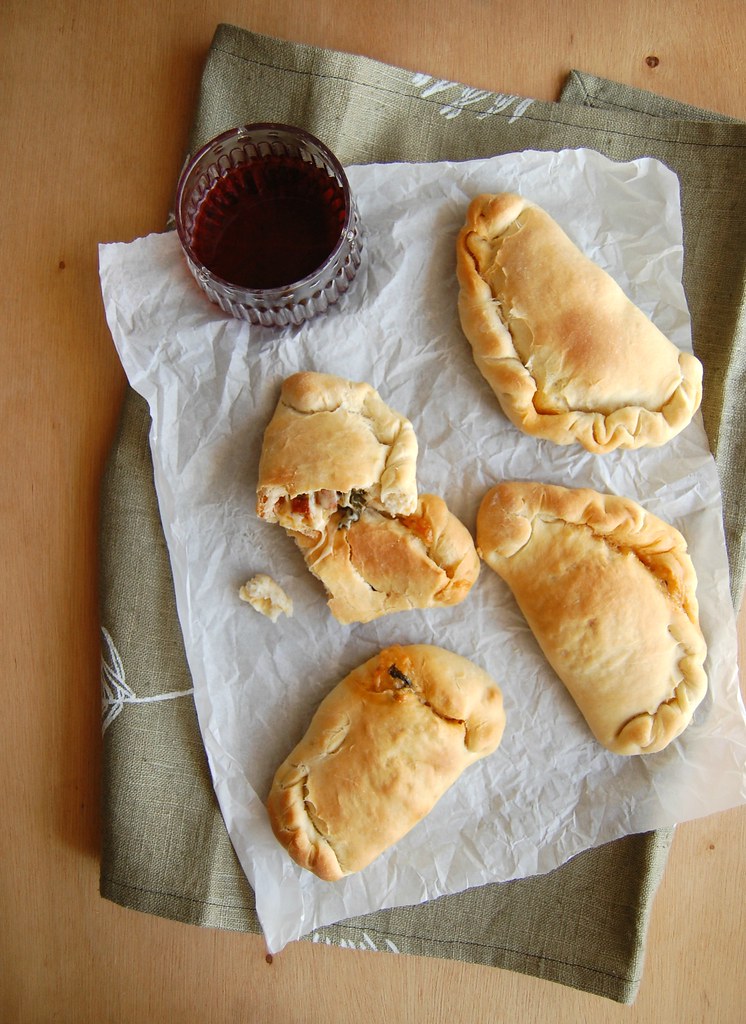
Spinach, cheese and chorizo calzones

Spinach, cheese and chorizo calzones / Calzones de espinafre, queijo e chorizo

When I have difficult and/or very busy days I usually take a breather and go to People magazine’s website: I get to read about celebrities and for that I don’t need to use any of my brain cells. :D

Today I read about how Kim Cattrall “killed” the plans of a third SATC movie, and for that we all have to send Kim a big thank you card – the first movie was nice, but the second was absolutely ridiculous and just the thought of certain scenes makes me agonize all over again. Some of the comments suggest that the writers kill Samantha Jones and do the movie with the other three women instead, however I don’t find it a smart decision for the fun of the TV show was the four of them together, and Samantha was always my favorite character (followed very closely by Miranda).

I will borrow inspiration from SATC and present you these delicious calzones: the filling is a combination of spinach, cheese and chorizo and I beg of you not to remove any of the ingredients from it: the calzones would not be the same. The spinach and the cheese benefit intensely from the saltiness of the chorizo, however if you can’t find it bacon goes well here too.

Spinach, cheese and chorizo calzones
own recipe

Dough:
2 teaspoons dried yeast
½ teaspoon granulated sugar
1 ¼ cups (300ml) lukewarm water
2 tablespoons extra-virgin olive oil
3 ¼ cups (455g) all purpose flour
1 teaspoon salt

Filling:
¾ cup (105g) finely diced chorizo
2 large garlic cloves
2 cups (120g) fresh spinach leaves, packed
salt and freshly ground black pepper
2 cups (200g) coarsely ground yellow mozzarella*
extra virgin olive oil, for brushing the calzones

Start with the dough: in the bowl of an electric mixer fitted with the dough hook, mix the yeast, sugar and water with a fork. Set aside until foamy, about 5 minutes. Add the olive oil, flour and salt and mix for 6-8 minutes or until a soft and elastic dough forms. Shape dough into a ball and transfer to a lightly oiled bowl. Cover with plastic wrap and set aside to proof in a warm place for about 1 hour or until doubled in size.

In the meantime, make the filling: heat a large nonstick frying pan over high heat. Add the chorizo and cook stirring occasionally until the pieces are golden and crispy. Add the garlic and cook for 1 minute or until fragrant – do not let it burn or it will get bitter. Stir in the spinach leaves and cook until wilted. Season with salt and pepper – go easy on the salt for the chorizo is usually salty. Cool, then stir in the cheese.

Preheat the oven to 400°F/200°F. Line a large baking sheet with foil and brush it lightly with olive oil.
Divide the dough into 8 equal parts – each will be around 100g (3 ½ oz.). Roll out each portion of dough on a lightly floured surface until you get a rough 25cm (10in) circle. Place some of the filling on one side of the dough and fold the other half over, pinching the seams well to keep the filling inside. Repeat the process with the remaining dough and filling. Place the calzones onto the prepared sheet and brush them lightly with olive oil. Bake for 25-30 minutes or until golden. Serve immediately.

* the yellow mozzarella I used is not like fresh mozzarella balls, therefore it does not release too much liquid. Replace by cheddar or something similar texture wise.

Makes 8

Thursday, September 28, 2017

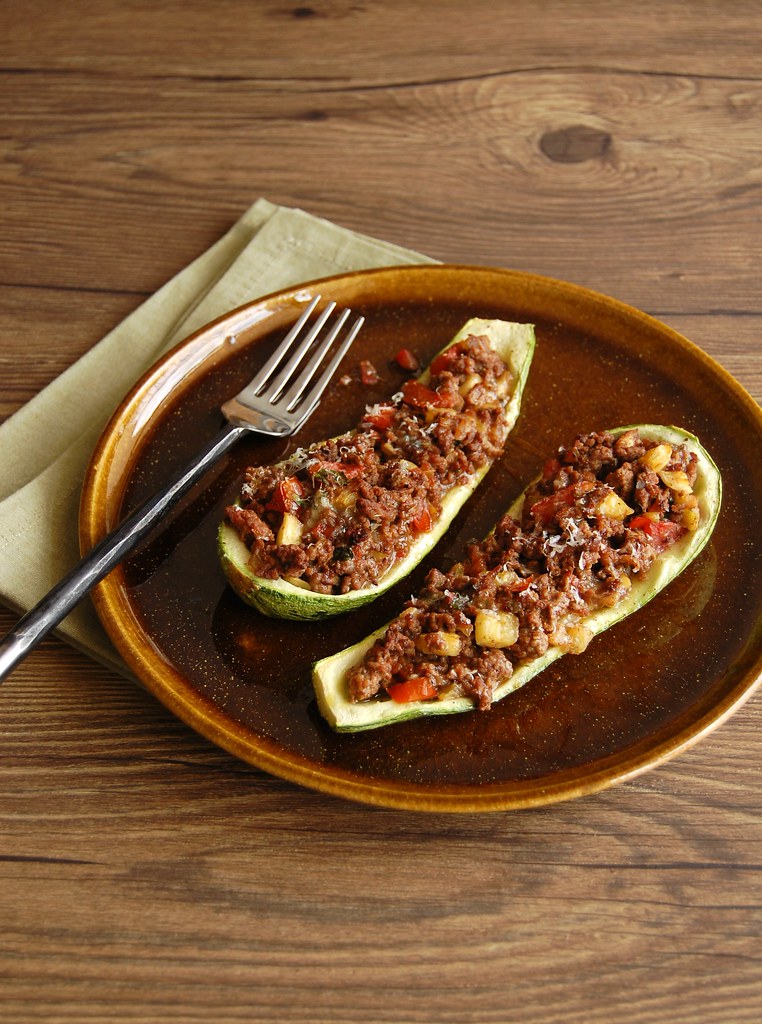
Stuffed zucchini, not like my grandma's

Stuffed zucchini / Barquinhas de abobrinha

One of the dishes that remind me of my grandmother the most is stuffed zucchini: she would make these quite often when she lived with us because my father liked it a lot.

I did not like meat growing up and back then I did not understand why my grandma would make this dish so often, but now that I am all grown up it makes a lot of sense to me: it is delicious – when prepared properly – and it makes things quite easier for the cook, since you only need a green salad on the side to call it a complete meal.

This is my version of stuffed zucchini: out with the mushy rice mixed with pale beef, in with with wine, tomatoes, fresh marjoram and gorgonzola – absolutely delicious (sorry, grandma). :)

Stuffed zucchini / Barquinhas de abobrinha

Stuffed zucchini
own recipe

4 zucchini, about 250g/8oz each
3 tablespoons extra virgin olive oil
1 onion, finely diced
3 garlic cloves, minced
400g (14oz) beef mince
salt and freshly ground black pepper
¼ cup (60ml) dry white wine
2 tablespoons tomato paste
2 ripe tomatoes, deseeded and chopped
handful of fresh marjoram leaves
150g (5oz) gorgonzola, coarsely grated or crumbled
finely ground parmesan, for serving

Preheat the oven to 200°C/400°F. Line a large baking sheet with foil and brush it with some of the olive oil.

Cut the zucchini in half lengthwise – you should then get 8 halves that look like little boats. With a small spoon, scrape some of the flesh – do not carve the zucchini halves too much or they will be too flimsy. Chop the flesh and set aside. Place the zucchini on the prepared sheet and brush the inside of each half with some of the olive oil.

Bake for 20 minutes – in the meantime, make the filling: heat the remaining olive oil in a large nonstick frying pan over high heat. Add the onion and cook, stirring occasionally, until translucent. Stir in the garlic and cook for 1 minute or until fragrant – do not let the garlic burn or it will turn bitter. Stir in the mince and cook, stirring occasionally, until golden. Season with salt and pepper – go easy on the salt since the cheeses can be salty. Stir in the wine and cook again for 2-3 minutes or until wine is reduced – using a wooden spoon, scrape the brown bits in the bottom of the saucepan for extra flavor. Stir in the tomato paste, chopped tomatoes, ¾ cup of the reserved zucchini flesh (you can freeze the remaining flesh and use it to make vegetable stock) and the marjoram. Cook for about 5 minutes or until tomatoes are soft. Remove from the heat, stir in the gorgonzola and divide the meat filling among the zucchini halves. Bake for 15 minutes. Sprinkle with the parmesan and serve immediately.

Serves 4

Wednesday, September 13, 2017

Asparagus and gorgonzola galette with corn flour pastry and creative days

Asparagus and gorgonzola galette with corn flour pastry / Galette de aspargo e gorgonzola com massa de fubá

I could start several posts with “when I was still working on the book project” because during that time I exercised my creativity almost on a daily basis. Everything I saw was a source of inspiration, and a trip to the grocery store or the farmers’ market would turn into an idea, that turned into a recipe, that turned into several tests in my kitchen. Several times my husband and I ate the tests for lunch, and whoever came to my house would be served cake or cookies I had been working on – everyone became my guinea pigs. :)

I was at the grocery store with my husband one day when I saw beautiful asparagus – I brought them home with the idea of making a frittata, but I decided for a galette instead: I love galettes, they are my favorite kind of tart – they are easy to put together (no blind baking involved) and they always look stunning.

We ate this galette for lunch 3 times – I was going to make it a few times anyway to test the recipe in different occasions, however it tasted so delicious that making it again never felt like a chore.

Asparagus and gorgonzola galette with corn flour pastry
own recipe

Pastry:
1 cup + 1 tablespoon (150g) all purpose flour
¼ cup (35g) corn flour (finely ground cornmeal, not corn starch)
¼ teaspoon table salt
100g unsalted butter, very cold and diced
¼ cup (60ml) sour cream*, very cold
2 tablespoons iced water

Filling:
100g fresh ricotta – I use homemade
50g gorgonzola, coarsely grated or crumbled
1 tablespoon sour cream
salt and freshly ground black pepper
200g fresh asparagus, already trimmed

Egg wash:
1 egg yolk whisked with 1 teaspoon sour cream

Start by making the pastry: in a food processor, pulse all purpose flour, corn flour and salt until well combined. Add the butter and pulse a few times until mixture resemble coarse breadcrumbs. Mix sour cream and water in a small bowl, then with the motor running, gradually add the mixture and process just until a dough forms. Form dough into a ball, wrap in plastic wrap and refrigerate for 1 hour.

Place the dough onto large piece of baking paper, cover with another piece of paper and roll into a rough 20x35cm (8x14in) rectangle. Slide the paper with pastry into a baking sheet and remove the paper from the top. In a medium bowl, whisk together the ricotta, gorgonzola, heavy cream until a paste forms. Season with salt and pepper (go easy on the salt since gongonzola can be salty). Spread the dough with the filling leaving a 2.5cm (1in) border. Arrange the asparagus on top of the filling, pressing them slightly to adhere. Carefully fold one edge in towards the center of the filling and continue folding all the way round, bringing the edge of the pastry towards and over the filling/asparagus. Freeze the galette for 15 minutes – in the meantime, preheat the oven to 200°C/400°F.

Brush the pastry with the egg wash and bake for 30-40 minutes or until pastry is golden. Serve warm.

* homemade sour cream: to make 1 cup of sour cream, mix 1 cup (240ml) heavy cream with 2-3 teaspoons lemon juice in a bowl. Whisk until it starts to thicken. Cover with plastic wrap and leave at room temperature for 1 hour or until thicker (I usually leave mine on the counter overnight – except on very warm nights – and it turns out thick and silky in the following morning; refrigerate for a creamier texture)

Serves 4 with a green salad on the side

Tuesday, September 5, 2017

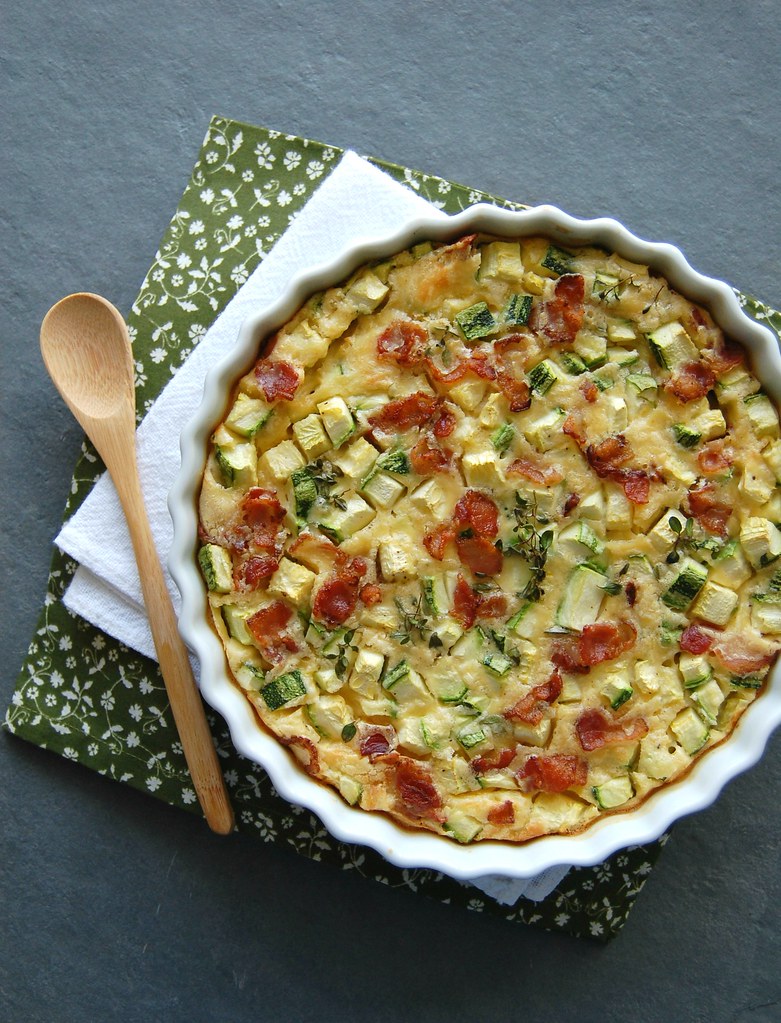
Zucchini, bacon and cheese clafoutis

Zucchini, bacon and cheese clafoutis / Clafoutis de abobrinha, queijo e bacon

Those of you around here for a while know that the other habitant of my house used to be a very picky eater until he spent (precious) days in China - one of the things he did not eat back then was heavy cream (!).

That has luckily changed and many times in the warmer months, when we wanted something light but still delicious I made savory clafoutis for lunch and served with a big salad. Joao’s favorite mix of flavors is the one I bring you today: the salty bits of bacon pair wonderfully well with the cheese and the zucchini. My favorite clafoutis is the one made exactly like this, however swapping the zucchini for a handlful of button mushrooms that get browned in a drizzle of the leftover bacon fat before being added to the batter. If you ever try any of the versions I will love to hear your comments about it.

Zucchini, bacon and cheese clafoutis
own creation

2 slices of bacon, chopped
2 large eggs, room temperature
1/3 cup (80ml) heavy cream
1/3 cup (80ml) whole milk, room temperature
½ cup (70g) all purpose flour
1/3 cup gruyere cheese, coarsely grated
1 medium zucchini (about 200g/7oz), in small dice
2 sprigs of fresh thyme, leaves only
salt and freshly ground black pepper

Preheat the oven to 190°C/375°F. Set aside a 1-liter capacity heatproof baking dish – the one on the photo is 20cm (8in) wide and 3.5cm (1 1/3in) deep.

Heat a small nonstick frying pan over high heat and cook the bacon, stirring occasionally so the pieces brown evenly. As soon as they are crispy, remove them from the saucepan using a slotted spoon and transfer to a plate lined with paper towels. Use some of the rendered fat to grease the insides of the baking dish.

In a medium bowl, whisk the eggs, cream and milk until smooth. Add the flour and whisk until smooth again. Stir in the cheese, zucchini and thyme leaves, then season with salt and pepper. Pour into the prepared baking dish and sprinkle with the bacon bits.
Bake for 35-40 minutes or until puffed and golden. Serve immediately.

Serves 2-3 (depending on what is served with it)

Thursday, August 31, 2017

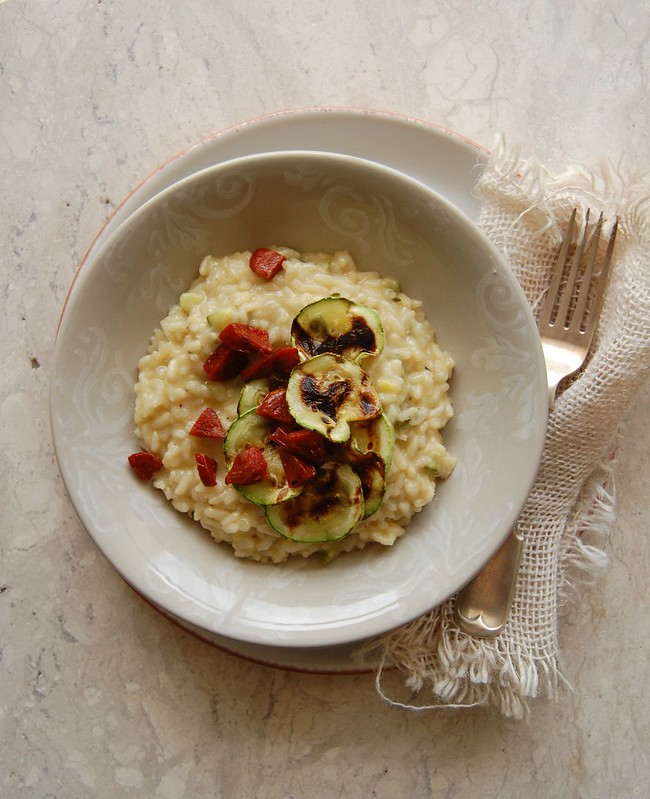
Zucchini and chorizo risotto - a truly delicious recipe

Zucchini and chorizo risotto / Risoto de abobrinha e chorizo

You might think that I obsess over sweet ingredients only – and taking a look at the blog, who can blame you? :) – but some savory ingredients make me so happy I want to include them in just about anything. Chorizo is one of them: ever since I tried it for the first time I have been using it in several dishes, always with delicious results.

I make risottos often and it was only a matter of time before I added chorizo to them, however, I was trying to play with different textures and wanted to add layers to my risotto. Adding the crunchy bits of chorizo on top was one of the ideas, which turned out to be a win/win situation, since I used the fat rendered from the chorizo to coat the rice and removing it from the saucepan before adding the liquid I avoided it from going soft. I also wanted two different textures for the zucchini, so half of it was thinly sliced and grilled – which added a nice smoky flavor – and the other half was incorporated in the risotto. I do not mean to brag, but this is one of the most delicious dishes I have ever cooked.

Zucchini and chorizo risotto
own recipe

Grilled zucchini:
1 large zucchini (about 200g/7oz)
olive oil
salt

For the risotto:
50g (2oz) chorizo sausage, in small cubes
1 ½ tablespoons unsalted butter – divided use
½ small onion, finely diced
1 sprig of fresh thyme
¾ cup (165g) Arborio or Carnaroli rice
¼ cup (60ml) dry white wine
3 cups (720ml) hot vegetable stock
salt and freshly ground black pepper
50g (2oz) Canastra cheese, coarsely grated*
2 tablespoons finely grated parmesan cheese

Slice half the zucchini into thin slices and dice the remaining in to small cubes. Set the cubes aside (they will go in the risotto). Drizzle the zucchini slices with just a bit of oil and season with salt. Heat a large nonstick skillet or frying pan over medium-high heat and grill the zucchini slices for 1-2 minutes each side or just until golden. Set aside on a plate.

Heat the chorizo cubes in a medium saucepan over medium-high heat, stirring occasionally so the pieces brown evenly. As soon as they are crispy, remove them from the saucepan using a slotted spoon and transfer to a plate lined with paper towels. Add ½ tablespoon of the butter to the saucepan , followed by the onions and sprinkle with a little salt. Cook, stirring occasionally, until onion is translucent. Add the zucchini cubes and the thyme sprig and cook for 2 minutes. Add the rice and cook for 2-3 minutes, stirring, until rice is nicely coated in the fat. Stir in the wine and cook until it evaporates. Stir in the hot stock, 1 ladleful at a time, and continue to cook, stirring until all the stock is absorbed, before adding more stock.

Repeat this until all the stock has been used, the rice is al dente and the risotto is thick and glossy – about 20 minutes (you might not use all the stock). Season with salt and pepper, but go easy on the salt since chorizo and parmesan might be salty.
When the rice is al dente, remove the thyme sprig and stir in the cheeses and the remaining 1 tablespoon of butter. Check the seasoning, put the lid on and wait 2 minutes. Transfer the risotto to the serving plates, top each with the grilled zucchini slices and the crispy chorizo and serve immediately.

* for this recipe I used a kind of cheese typical from Brazil called Canastra cheese. Feel free to replace it with Grana Padano, more parmesan or any other cheese you like – just keep in mind that chorizo can be salty, so very salty cheeses might not go well in this recipe

Serves 2

Friday, August 25, 2017

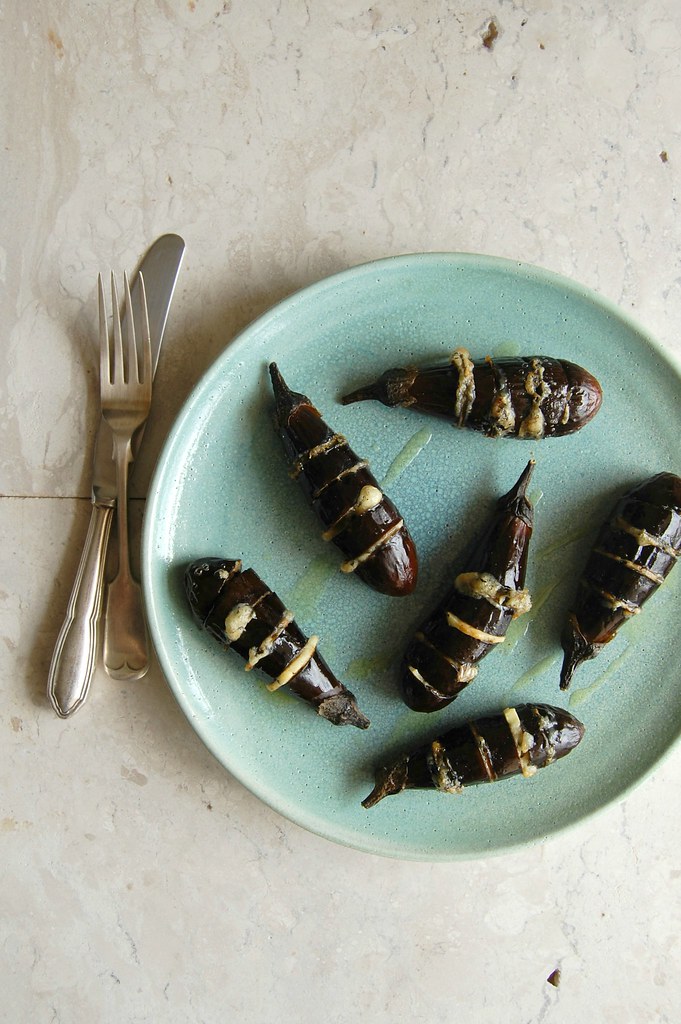
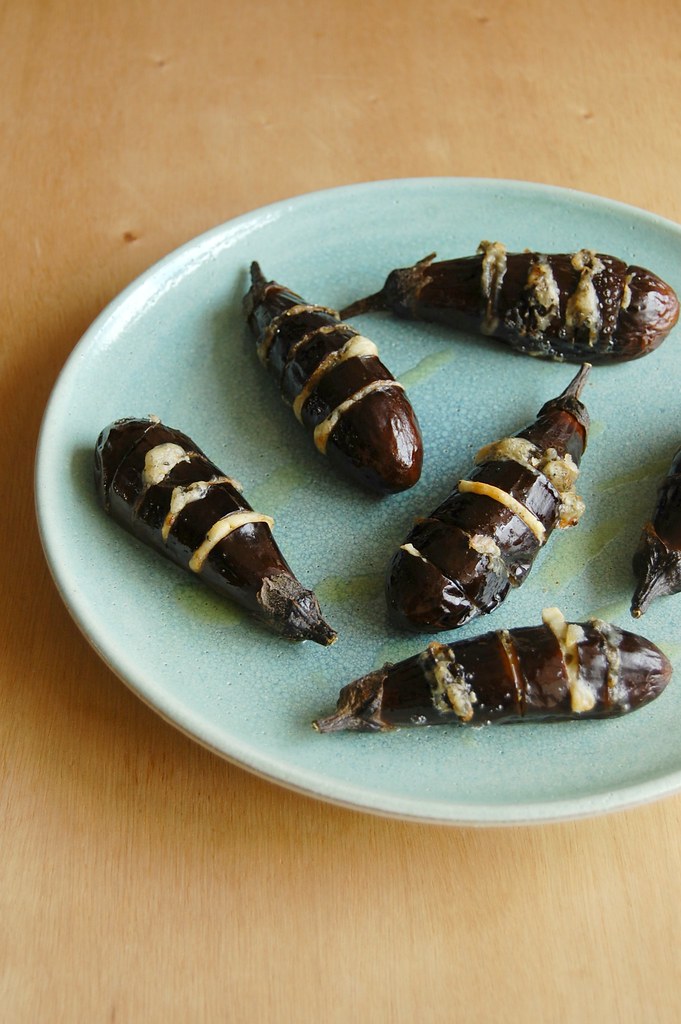
Hasselback baby eggplants

Hasselback baby eggplants / Mini berinjelas Hasselback

If you have been reading me for a while now you probably know that I am a huge fan of Nigella Lawson – I was lucky enough to meet her a few years ago and got one of my books autographed. She is the one who, ages ago, introduced me to Hasselback potatoes, a recipe I find not only delicious but also really pretty.

When I was still working on the book project, I thought one day: “why not Hasselback other veggies, too?”. One day, at the farmer’s market, I saw these beautiful baby eggplants and the Hasselback feeling came back to my mind. To make things more interesting, there had to be cheese, of course, but a strong flavored one. A drizzle of garlic oil turned everything into a delicious and perfumed side dish – if my husband saw this post he would strike the word “perfumed” off, for that and “gorgonzola” cannot be in the same sentence as far as he is concerned. :D

Hasselback baby eggplants / Mini berinjelas Hasselback

Hasselback baby eggplants
own creation

12 baby eggplants (about 600g/little less than 1 ½ pounds)
4 ½ tablespoons extra virgin olive oil
1 large garlic clove
salt and freshly ground black pepper
75g gorgonzola cheese, firm enough to be sliced

Preheat the oven to 200°C/400°F. Tear 12 pieces of foil, about 20x20cm (8x8in) each, then crumple each one of them formatting into little nests – they will be the support for each eggplant, that way they don’t roll around the baking sheet.
Place the foil nests on a large baking sheet and brush their cavities with a little of the olive oil. Set aside.

In a mortar and pestle, place the garlic and salt and pound until a paste forms. Add the black pepper and the remaining olive oil and mix well.

Place each eggplant on a wooden spoon and cut into slices without going through the end – you want the eggplant to remain whole. Cut the gorgonzola into thin slices and place them inside the slits in the eggplants – make sure the cheese slices are thin enough to fit into the eggplants. Place the eggplants into the foil nests and drizzle with the garlic oil. Bake for about 25 minutes or until eggplants are tender.

Serves 4 as a side dish

Related Posts with Thumbnails