Showing posts with label Nigella. Show all posts

Tuesday, March 31, 2015

Chocohotopots - quick, easy and delicious

Chocohotopots

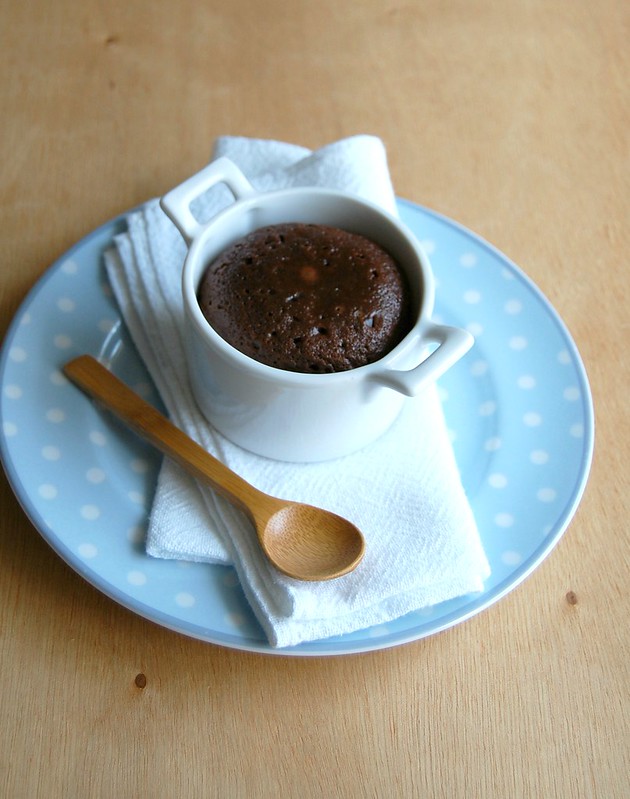
Sometimes it takes me forever to share certain recipes with you here because they’re gone before I can take any pictures – these chocolate pots, from the lovely Nigella Lawson, are one of those recipes: they are so easy to put together (you probably have all the ingredients at hand) and are ready in a matter of moments, so it is the perfect dessert for me to share with you here, but they are always gone so quickly that I was able to bring the recipe to you only now only now.

Last time I made them, I stashed one of the pots in the fridge, tightly covered with plastic wrap. Two days later I baked it and managed to take the picture before I gladly ate it. :)

So next time you have people over for a meal, make these for dessert: prep them in advance and stash them in the fridge, then take them out for 30 minutes and pop them in the oven for 15-20 – I am sure your guests will love it (and so will you). ;)

Chocohotopots
slightly adapted from the wonderful and foolproof Feast: Food to Celebrate Life

100g unsalted butter, chopped
100g dark chocolate – 53% cocoa solids – finely chopped
2 eggs
½ cup (100g) granulated sugar
3 tablespoons all-purpose flour
pinch of salt
1 teaspoon vanilla extract

Preheat to 200°C/400°F.Lightly butter four ¾-cup (180ml) ovenproof ramekins.

Place butter and chocolate in a heatproof bowl over a saucepan of simmering water and stir until melted. Cool.

In another bowl, whisk together the eggs, sugar, flour, salt and vanilla. Beat in the cooled butter and chocolate mixture. Divide the mixture between the prepared ramekins. Bake for about 15 minutes, by which time the tops will be cooked and cracked and the chocolate gooey underneath (I don't wait for the top to crack, I underbake it a little for more fluid centers).

Place each ramekin on a small plate with a teaspoon and serve. Make sure to warn people that these desserts will be HOT!

Serves 4

Wednesday, November 5, 2014

Lemon and coconut Bakewell bars and wondering about my food

Lemon and coconut Bakewell bars / Barrinhas de limão siciliano e coco

Sometimes I wonder what my cooking would be like if it wasn’t for the Internet: my food would certainly be different, I would not have this blog and I would not probably own all the cookbooks and food magazines I own today.

I have learned a lot about cooking and baking by reading all sorts of materials (maybe someday I’ll have the time and money to actually study the wonderful world of food), and I’ve come across many things I’d never heard of and those were things I doubt I would know today if it weren’t for all the reading.

For instance, before I had a blog I had no idea of what fruit curds were, and now they are such favorites of mine, lemon curd being #1 (though passion fruit curd easily gives lemon a run for its money). If the Internet did not exist, I would probably not know about curds and how delicious they are.

That sounds very silly, and I am probably in a very silly mood right now giving curds such huge importance; all I know is that they are yummy and the lemon one goes incredibly good with coconut, like in these irresistible Bakewell bars.

Lemon and coconut Bakewell bars / Barrinhas de limão siciliano e coco

Lemon and coconut Bakewell bars
adapted from the wonderful Feast: Food to Celebrate Life, inspired by the delicious John Whaite Bakes: Recipes for Every Day and Every Mood

Base:
145g all purpose flour
30g icing sugar
pinch of salt
150g unsalted butter, cold and chopped

Filling:
100g unsalted butter
2 eggs
100g granulated sugar
finely grated zest of 1 large lemon
½ teaspoon vanilla extract
100g unsweetened coconut
2/3 cup lemon curd

Preheat the oven to 180°C/350°F. Lightly butter a square 20cm (8in) baking pan, line with foil, leaving an overhang in two opposite sides. Butter the foil as well.

Start with the base: put the flour, icing sugar and salt into a food processor and blitz to combine and remove any lumps. Add the butter and process again to get a crumbly mixture that’s beginning to come together. Transfer mixture to the prepared pan and press into the base of the pan. Bake for 20 minutes or until lightly golden.

Make the topping: melt the butter and set aside. Put the eggs, sugar, lemon zest, vanilla and coconut into the bowl of the food processor. Process until smooth.

When the base is cooked, remove it from the oven and let cool for 5 minutes. Spread the curd evenly over the base. With the processor motor running, pour the slightly cooled melted butter down the funnel into the other ingredients and process until smooth. Pour it over the curd layer. Bake for 25-30 minutes or until golden and a skewer inserted in the center comes out clean. Cool in the pan, over a wire rack. Cut into slices to serve – it’s best warm, but it tastes delicious at room temperature as well.

Makes 16

Monday, September 22, 2014

Granola muffins

Granola muffins / Muffins de granola

And since we were talking about food waste the other day, let me tell you that the granola saga did not end with the cookies I posted the other day: even after a large batch of cookies I still had two handfuls of granola left and no intention of eating it with milk or yogurt. :(

I was saved by the wonderful Nigella Lawson and her granola muffins recipe: it was easy and quick, and in her recipes I trust completely. When I weighed my granola, I had exactly 252g of it – I turned the oven on immediately. :D

The muffins turned out tender and tasted delicious – it was a great way to use up the unwanted granola. I think that a bit of cinnamon would have done wonders for them – just a hint to any of you who might have a jar of granola begging to be used, too.

Granola muffins
from the always delicious Feast: Food That Celebrates Life

1 ½ cups (210g) all-purpose flour
1 teaspoon baking soda
1/8 teaspoon table salt
1 cup (240ml) buttermilk*
1 large egg
¾ cup (130g) light brown sugar, packed
⅓ cup (80ml) canola oil
1 teaspoon vanilla extract
250g granola

Preheat oven to 200°C/400°F. Line a 12-cup muffin pan with paper liners.
In a large bowl combine the flour, baking soda and salt. In a small bowl whisk together the buttermilk, egg, sugar, oil and vanilla. Pour liquid mixture into dry mixture and stir just until combined; do not overmix. Add granola and stir just until blended.
Divide batter evenly among muffin cups. Bake until risen and golden brown, about 25 minutes. Carefully remove muffins from pan and place on a rack until cool enough to handle. Serve warm or at room temperature.

* homemade buttermilk: to make 1 cup buttermilk place 1 tablespoon lemon juice in a 240ml-capacity measuring cup and complete with whole milk (room temperature). Wait 10 minutes for it to thicken slightly, then use the whole mixture in your recipe

Makes 12

Monday, May 19, 2014

Chocolate stout cake and a disappointing trailer

Chocolate stout cake / Bolo de chocolate e cerveja stout

Interstellar got announced last November, exactly one year before its release, and it being a Christopher Nolan movie I got immediately interested – there wasn’t much to read about the movie and the teaser did not reveal much, either, so my curiosity went through the roof.

Cut to months later – six, to be more precise – when the official trailer is finally out and for the first time, ever since I watched the amazing Memento, I don’t feel like running to the theaters to watch a Christopher Nolan movie – the trailer just didn’t do it for me. I don’t know if it was Mr. McConaughey, the cheesy family scenes, or that after what Alfonso Cuarón did with Gravity it will be pretty hard for someone else to get to that level when it comes to outer space movies, I just wasn’t thrilled after the trailer, Michael Caine and all.

As far as 2014 goes, Foxcatcher and Gone Girl have been keeping me pretty curious, and before the Interstellar trailer I thought that Nolan would be easily on that list, but no, not this time.

Favorites can be disappointing, even if it’s once in a thousand times, except for Nigella: this super moist, dense and delicious cake – one of the best chocolate cakes I’ve ever made or tried – goes to the list of great recipes only adds to the list of great recipes Ms. Lawson has brought us over the years. And if that wasn’t enough, the tangy icing is irresistible, too, and it complements the flavor of the cake perfectly.

Chocolate stout cake
slightly adapted from the delicious Feast: Food to Celebrate Life

Cake:
1 cup (240ml) stout beer
250g unsalted butter, room temperature, chopped
75g cocoa powder
2 cups (400g) granulated sugar
150ml sour cream*
2 large eggs
1 tablespoon vanilla extract
275g all purpose flour
2 ½ teaspoons baking soda
pinch of salt

Topping:
220g cream cheese, room temperature
100g icing sugar
1 teaspoon vanilla extract
1/3 cup (80ml) double cream (or whipping cream)

Preheat the oven to 180°C/350°F. Butter a 23cm (9in) springform pan and line the bottom with a circle of baking paper, buttering it as well (I used one with a removable bottom).
Pour the beer and butter into a large wide saucepan and heat until the butter's melted. Cool for a couple of minutes, then whisk in the cocoa and sugar. Beat the sour cream with the eggs and vanilla and then pour into saucepan. Whisk in the flour, baking soda and salt.
Pour into the prepared pan bake for 45-60 minutes (a skewer inserted in the center should come out clean). Cool completely in the pan over a wire rack.
Carefully unmold the cake, remove the paper and transfer to a serving plate.

Make the icing: using an electric mixer, whip the cream cheese until smooth, sieve over the icing sugar, add the vanilla and then beat them both together until creamy. Add the cream and beat again until it makes a spreadable consistency. Ice the top of the cake.

* homemade sour cream: to make 1 cup of sour cream, mix 1 cup (240ml) heavy cream with 2-3 teaspoons lemon juice in a bowl. Whisk until it starts to thicken. Cover with plastic wrap and leave at room temperature for 1 hour or until thicker (I usually leave mine on the counter overnight – except on very warm nights – and it turns out thick and silky in the following morning; refrigerate for a creamier texture)

Serves 10-12

Monday, April 7, 2014

Iced berries with limoncello white chocolate sauce and "Noah"

Iced berries with limoncello white chocolate sauce / Frutas vermelhas com calda de chocolate branco e limoncello

What makes an atheist go to the movies to watch a movie based on a biblical story? In my case, Darren Aronofsky – he’s one of my favorite directors and I’ll watch anything the man does, even if it involves something I don’t believe in.

I find it incredible that Aronofsky did a movie about a character from the bible and yet he doesn’t paint it with heavy religious tones – his Noah is human, and because of that he is flawed (and played to perfection by Russell Crowe). It is interesting to see traces of Aronofsky’s previous movies in Noah, such as the visual of Noah’s dreams, the many times suffocating music and, my favorite part in the whole movie, when he tells his family about how the world was created – that was extremely beautiful and by the end of the scene I had tears in my eyes.

I don’t think Noah is Aronofsky’s best film so far and it’s definitely not my favorite – Requiem for a Dream is – but it is still much better than many films I’ve seen lately. I can trust him to make something unusual and interesting every time, even if not a favorite of mine – I know he’ll deliver something to be talked about, something to be discussed, and that’s more than I can say about many directors out there. He created something beautiful even when he had the money drastically reduced (and to think that Brad Pitt left the project to be in the insignificant Troy – how lame is that?).

The same way I can trust Aronofsky when it comes to films, I know I can trust Nigella when it comes to food – I would probably have ignored this recipe if it wasn’t for her; it might not be my all-time favorite dessert but it is certainly a good idea for unexpected, last-minute cravings (or guests).

Iced berries with limoncello white chocolate sauce
from the wonderful Nigellissima: Instant Italian Inspiration

500g frozen mixed berries (unthawed)
4 tablespoons limoncello – I used homemade
1 cup (240ml) heavy cream
200g white chocolate, finely chopped

Take the berries out of the freezer and arrange them in a single layer in a dish or plate that has a small lip (so that the sauce doesn’t drip off later). Sprinkle with two tablespoons of limoncello and leave for five minutes – while that goes on, put the cream and the remaining two tablespoons of the limoncello in a small saucepan and heat it until just about to come to the boil, but not actually boiling. Take the pan off the heat and add the white chocolate, then swirl the pan about so that it is all submerged. Swirl the saucepan once again to make sure the chocolate melts.
Using a rubber spatula, gently stir the chocolate-cream mixture until smooth, then pour it over the berries and serve immediately.

Serves 4-6

Wednesday, February 12, 2014

Sicilian pasta with tomatoes, garlic and almonds and "Her"

Sicilian pasta with tomatoes, garlic and almonds / Espaguete siciliano com tomates, alho e amêndoas

As I continue my marathon to watch this year’s Oscar nominated movies, I was extremely surprised by how moved I was by Her – though genius sometimes, Spike Jonze’s style to me is on the verge of crazy (right there with Michel Gondry), therefore I really did not expect to love the movie as much as I did.

Joaquin Phoenix is an amazing actor – the Academy should have cut the trophy in half back in 2001 for him and Benicio to share it – and his performance in Her is so sublime it’s difficult to find words to describe it. I could have easily squeezed him in for Best Actor this year, and I could also vote for the film for Best Movie (despite my love for Gravity) and most definitely for Best Writing, Original Screenplay. After I read the film synopsis I kept thinking of how it would be possible for Jonze to find a decent way to end it, but he did and to me it was perfect.

Also surprising, to me, was this recipe: when I saw Nigella cooking it on TV I had no idea that something that simple could be so good – all you have to do is cook some pasta and whiz all the sauce ingredients in food processor. The sauce is not cooked and that makes this dish perfect for the insanely hot days we’ve been having here (less time in front of the stove).

Sicilian pasta with tomatoes, garlic and almonds
slightly adapted from the wonderful Nigellissima: Easy Italian-Inspired Recipes

200g spaghetti (or other pasta of your choice)
100g cherry tomatoes
2 tablespoons finely grated parmesan
10g golden sultanas
1 small garlic clove
1 tablespoon capers (drained)
25g blanched almonds
1 ½ tablespoons extra virgin olive oil
handful fresh basil

Put abundant water on to boil for the pasta, waiting for it to come to the boil before salting it. Add the pasta and cook according to packet instructions.
While the pasta is cooking, make the sauce by putting all the remaining ingredients, bar the basil, into a processor and blitzing until you have a nubbly-textured sauce.
Just before draining the pasta, remove ½ cup of pasta-cooking water and add ½ tablespoon of it down the funnel of the processor, pulsing as you go.
Return the drained pasta to the hot saucepan, pour over the sauce and toss to coat (add a little more pasta-cooking water if you need it). Sprinkle with the basil and serve.

Serves 2

Wednesday, January 8, 2014

Plum and amaretti crumble - 33°C and all

Plum and amaretti crumble / Crumble de ameixa e amaretti

One resolution I’m keeping in 2014 is to continue using the inventory idea (thank you, Martha!) – it’s worked fine so far and avoided lots of waste. However, I’m not perfect (the Internet seems to make us all look very neat and tidy and put together all the time, doesn’t it? I don’t like that at all) and I do deviate from my plan now and then, and that is what happened when I bought a small bag of amaretti for my Christmas rocky road and ended up using Turkish delight instead.

Stone fruits are in season here right now and I’ve been enjoying cherries, plums and peaches like there’s no tomorrow – I would love to bake with them, too, but the problem is I usually eat them all before turning the oven on (which has been hard to do lately here because of the awful heat). Days ago, 33°C (91°F) and all, I decided to make Nigella’s plum crumble, that way using some of the amaretti left from the Christmas baking. It was really delicious: the flavor of the cookies paired beautifully with the ripe, juicy plums, and a small jug of very cold cream helped bring down the temperature a little (that and a cold shower right after dessert). :D

Plum and amaretti crumble
slightly adapted from the super delicious Nigellissima: Instant Italian Inspiration

Fruit:
35g amaretti biscuits (crunchy, not morbidi) - I used these
½ tablespoon unsalted butter
250g ripe red plums, quartered if large, halved if small, stones removed
½ tablespoon granulated sugar
finely grated zest and juice of ½ lemon

Crumble topping:
50g all-purpose flour
¼ teaspoon baking powder
pinch of salt
1 tablespoon granulated sugar
30g cold unsalted butter, cut into small dice

Preheat the oven to 190°C/375°F. Have ready a 1 ½ cup (360ml) capacity ovenproof dish. Crush the amaretti with your hands and set aside.
Fruit: melt the butter in a small saucepan (that has a lid), add the plums, sprinkle in the sugar, add the lemon zest and juice and shake the pan over the heat, cooking for two minutes without a lid and two further minutes with the lid on. Transfer the plums to the dish and sprinkle with half the crushed amaretti.

Topping: put the flour, baking powder, salt and sugar in a small bowl and mix to combine. Add the butter and rub the ingredients with your fingertips until you get a mixture that resembles coarse crumbs. With a fork, mix in the remaining amaretti crumbs. Spread mixture over plums, then bake for about 20 minutes or until topping is golden and fruit is bubbling around the edges. Set aside for 10 minutes, then serve with cream or ice cream.

Serves 1

Thursday, January 2, 2014

Quinoa fritters with harissa mayo - starting 2014 in a healthy way

Quinoa fritters with harissa mayo / Bolinhos de quinua com maionese de harissa

Happy New Year everyone! :)

I hope you all had an amazing holiday period, full of great food and great people. The husband and I indulged a little – or should I be honest and say a lot? :) – during the holidays, and now it’s time to start eating properly again: less alcohol, more healthy grains and greens. These quinoa fritters are super easy to make and they’re good for you, while the harissa mayo gives them a bit of a kick – I’ve become addicted to this spiced mayo since it tastes delicious with other things, too (it turns a regular burger into a mean one, for example).

Thank you for your comments and emails, I’ll be answering them soon. xx

Quinoa fritters with harissa mayo
slightly adapted from Bill Granger (fritters) and Nigella (mayo)

Fritters:
100g quinoa (I used red quinoa)
1 spring onion, thinly sliced
2 tablespoons chopped parsley
1 tablespoon chopped fresh oregano
30g freshly grated parmesan
3 tablespoons all purpose flour
salt and freshly ground black pepper
finely grated zest of ½ lemon
1 large egg
canola oil, for frying

Harissa mayo:
5 tablespoons mayonnaise
1 teaspoon harissa paste (or to taste)
1 teaspoon lemon juice

arugula leaves and extra-virgin olive oil, to serve

Fritters: place the quinoa and 200ml water in a small saucepan, cover and bring to a boil over high heat. Reduce the heat to low and simmer gently for about 12 minutes, or until the water has been absorbed and the quinoa is tender. Cool. In a medium bowl, combine the quinoa, spring onion, parsley, oregano and parmesan. Add flour, salt and pepper, lemon zest and egg. Stir well to combine.
Heat a drizzle of oil in a large, nonstick frying pan over medium-high heat and 2 tablespoons of mixture per fritter (cook them in batches). Cook for 2-3 minutes each side, or until browned. Repeat with the remaining mixture.
Mayo: place all the ingredients in a small bowl and mix to combine.

To serve, top each fritter with a dollop of mayo, arugula leaves and a drizzle of olive oil.

Makes about 10

Monday, June 17, 2013

Easy almond cake for Nigella

Easy almond cake / Bolo fácil de amêndoa

Yesterday morning, while editing some of my photos, I read the shocking news that Nigella had been abused by her husband at a restaurant – that made me angry and sad. If that douche bag feels comfortable enough to do such things in public, I wonder what he does to her inside their home, when no one is watching. I felt so sorry for Nigella, for her kids. My heart goes out to them, and I hope she is able to get out of this terrible situation soon. I try to be a balanced person and I know that violence is not the answer, but a guy that grabs his wife by the neck four times and then say that it was just a “playful tiff” deserves a lesson – I very painful one.

Because the lovely British cook is on my thoughts today I bring you this delicious cake, so simple and easy, from one of Nigella’s cookbooks, the wonderful "How to Be a Domestic Goddess".

Easy almond cake
from the always delicious and foolproof How to Be a Domestic Goddess: Baking and the Art of Comfort Cooking

250g unsalted butter, softened
250g marzipan, softened – I used homemade
¾ cup (150g) granulated sugar
¼ teaspoon almond extract (optional)
½ teaspoon vanilla extract
6 large eggs
1 cup + 1 tablespoon (150g) all purpose flour
1 teaspoon baking powder
pinch of salt

Preheat oven to 180°C/350°F. Butter a round 20cm (8in) cake pan (with high sides), line the bottom with a circle of baking paper and butter the paper as well.
In a food processor, process the marzipan, butter and sugar together until smooth. Add the almond and vanilla extracts and process again. Add the eggs, one at a time, down the funnel, processing after each addition. Add the flour, baking powder and salt and process until incorporated. Transfer to the prepared pan and smooth the surface. Bake for 50 minutes (checking from 40) or until golden and risen and a skewer inserted in the center comes out clean. Cool completely in the pan over a wire rack, then carefully unmold. Dust with icing sugar and serve.

Serves 8-10

Monday, May 6, 2013

Coconut and cherry banana bread and meeting Nigella

Coconut and cherry banana bread / Bolo de banana, coco e cerejas secas

Something I never imagined possible happened a couple of days ago: I met Nigella Lawson! :) No, I wasn’t dreaming – she actually came to Brazil to promote her book "Nigella Kitchen" and I went to the book signing held in Sao Paulo. I had to stand in line for four hours – my legs hurt like hell up to this moment – but it was all worth it: the woman is a goddess. Beautiful beyond words, she greeted me with a kind smile and we talked for a couple of minutes before she signed my book – I was so smitten that I told her she was wonderful twice. :)

Nigella

While leaving the bookshop I told my sister (who was with me the whole time, even though she did not quite know who Nigella was) that I felt really inspired to cook and bake after meeting Nigella. She told me that I should make one of Nigella’s recipes, and I did: a moist, perfumed banana loaf that lighten up my kitchen the same way Ms. Lawson lightened up my Friday. <3

Nigella's autograph / Autógrafo Nigella

Coconut and cherry banana bread
from the beautiful, always delicious and now autographed Nigella Kitchen: Recipes from the Heart of the Home

125g soft unsalted butter
4 small-medium bananas (450g/1 pound unpeeled), mashed
¾ cup (150g) granulated sugar
2 eggs
1 teaspoon vanilla extract
1 cup + 2 tablespoons (160g) plain flour
2 teaspoon baking powder
½ teaspoon baking soda
pinch of salt
2/3 cup dried cherries – mine were really big, so I coarsely chopped them
1 1/3 cups (133g) desiccated coconut – I used sweetened shredded coconut

Preheat the oven to 160°C/325°F*. Lightly butter a 900g (2lb) loaf pan, line it with baking paper and butter the paper as well – I used a 21x11xcm (8½x4½in) loaf pan.
Melt the butter in a large saucepan, and take it off the heat. Cool. In a medium bowl, whisk together the flour, baking powder, baking soda and salt. Beat the sugar into the cooled, melted butter, then beat in the mashed bananas, eggs and vanilla. Fold in the flour mixture. Finally, add the dried cherries and coconut. Fold well so that everything is incorporated, then pour into the prepared pan and smooth the top.
Bake for about 50 minutes, but start checking after 45 – a skewer inserted in the center of the cake should come out clean.
Cool in the pan for 10 minutes, then carefully remove it from the pan and cool completely over a wire rack.

* out of distraction I ended up baking my bread at 180°C/350°F

Serves 8-10

Wednesday, March 27, 2013

Toblerone brownies for Easter

Toblerone brownies / Brownies de Toblerone

One of the things I remember the most from going to the supermarket with my mom as a kid are Toblerone bars: they were not easy to find and were really expensive back in the early 80s, and for that reason they were a treat we never ate. Things have changed and now I find them everywhere for a couple of R$ only – maybe that is why nowadays I seldom remember they exist. :D However, I did buy a couple of bars last week and they were transformed into really delicious brownies: these are fudgy and moist – as every brownie should be – and the nougat pieces spread throughout the batter make them very special; in my humble opinion these brownies would make a much more interesting Easter gift then regular chocolate eggs.

Toblerone brownies
slightly adapted from the gorgeous and delicious Nigella Kitchen

¾ cup (68g) unsweetened cocoa powder, sifted
1 cup (140g) all-purpose flour
1 teaspoon baking soda
pinch of salt
10 tablespoons (1 ¼ sticks/140g) unsalted butter
1 ¾ cups (306g) packed light brown sugar
4 large eggs
1 teaspoon vanilla extract
2 Toblerone bars, 100g each, chopped – I used one Toblerone milk chocolate and one Toblerone dark chocolate

Preheat the oven to 190°C/375°F; lightly butter a 32.5x22.5cm (13x9in) baking pan, line with foil leaving an overhang in two opposite sites then butter the foil as well*. Whisk together the cocoa powder, flour, baking soda and pinch of salt in a bowl; set aside.
Melt the butter over a gentle heat in a medium-sized saucepan. Add the sugar, stirring with a wooden spoon (still over a low heat) to help it blend with the melted butter. Stir in the flour mixture - when mixed (this will be a very dry mixture, and not wholly blended at this stage), remove from the heat. Add the eggs, one at a time, beating well after each addition. Beat in the vanilla. Spread the batter in the prepared pan and top with the Toblerone pieces. Bake for about 20 minutes –it will look set, dark and dry on top, but when you feel the surface, you will sense it is still wibbly underneath and a cake tester will come out gungy. This is desirable.
Transfer the pan to a rack and cool completely before cutting.

The brownies can be made up to 3 days ahead and stored in airtight container (will keep for total of 5 days).

* I made the exact recipe above using a 20x30cm (8x12in) pan

Makes 20

Sunday, January 27, 2013

No churn dulce de leche ice cream

No churn dulce de leche ice cream / Sorvete de doce de leite (sem sorveteira)

Besides being a cookbook junkie, I'm also addicted to kitchen gadgets (in my defence, I use them all the time, both the books and the gadgets). :) One of my favorite gadgets is my ice cream maker, which I keep in the freezer for whenever the feel for ice cream strikes, but knowing that not everyone has one I decided to try this recipe found in Nigella's latest book; not only was it dead easy to make but I think you can go wild and adapt it accordingly to your taste - for instance, Nigella used chestnut purée but I went for dulce de leche instead.

No churn dulce de leche ice cream
adapted from the gorgeous Nigellissima: Easy Italian-Inspired Recipes (I bought mine here)

300ml heavy cream
200g dulce de leche + a bit extra swirl into the ice cream (optional)
pinch of salt
1 tablespoon dark rum

Whip the cream until soft peaks form. Fold in the dulce de leche, salt and rum. Transfer to an airtight container and swirl in the extra dulce de leche (if using). Freeze for at least 6 hours.

Serves 6-8

Friday, September 28, 2012

Apple kuchen

Apple kuchen / Kuchen de maçã

The idea was to make Nigella’s apple and blackberry kuchen, but my stash of frozen blackberries was long gone (and to be honest I don’t even remember what I used the berries for). Therefore I made an apple and only apple kuchen, with a sprinkling of slivered almonds, which turned out delicious, moist and tender, adjectives very commonly associated to Ms. Lawson’s recipes; I hope the mail is nice to me and delivers her new cookbook as quick as possible. :D

Apple kuchen
from a cookbook I love and should use more often

Dough:
2 ¼ to 3 cups (315g to 420g) all purpose flour
¼ teaspoon salt
2 tablespoons granulated sugar
1 ½ teaspoons dried yeast
2 large eggs
½ teaspoon vanilla extract
finely grated of ½ lemon
good grating fresh nutmeg
½ cup (120ml) whole milk, lukewarm
¼ cup (56g) unsalted butter, softened

Topping:
2 Granny Smith apples
1 large egg
1 tablespoon cream
grating of fresh nutmeg
1 tablespoon demerara sugar
1 tablespoon granulated sugar
¼ teaspoon allspice
2 tablespoons slivered almonds

Icing:
1/3 cup (46g) confectioners’ sugar, sifted
1 tablespoon hot water

Lightly butter a 20x30cm (12x8in) baking sheet. Set aside.
Put 2 ¼ cups (315g) flour into a bowl with the salt, sugar and yeast and mix together. Beat the eggs and add them, with the vanilla, zest and nutmeg to the lukewarm milk. Stir the liquid ingredients into the dry ingredients to make a sticky medium-soft dough, being prepared to add more flour if necessary. Work in the butter and knead by hand for about 10 minutes or half the time by machine. The dough should be smoother and springier when done. Put into a lightly oiled large bowl, cover with plastic wrap and leave to double somewhere warm for 1 hour-1 hour30min. When ready, punch down and stretch out to fit the prepared sheet. Leave to prove for 15-20 minutes – in the meantime, preheat the oven to 200°C/400°F.
Peel, core and chop the apples finely. Beat the egg, cream and nutmeg together and brush over the proved dough, then spread the apples over the top. Mix the sugars and allspice then sprinkle over the fruit. Top with the flaked almonds and bake for 15 minutes; reduce the oven to 180°C/350°F and bake for another 10-15 minutes or until golden and cooked within.
Make a runny paste with the topping ingredients and drizzle over the kuchen after you remove it from the oven.

Serves 8

Sunday, July 22, 2012

Chocolate peanut butter cheesecake bars + "Man of Steel"

Chocolate peanut butter cheesecake squares / Quadradinhos de cheesecake de manteiga de amendoim e chocolate

I've just had a delightful surprise during my daily visit to "Awards Daily": the lovely Sasha Stone posted not one, but two versions of the "Man of Steel" teaser, one voiced over by Kevin Costner (Jonathan Kent) and the other by the always amazing Russel Crowe, who will be playing Jor-El - if that isn't reason enough to anxiously wait for that movie I do not know what is. :)

The beautiful teaser comes with some cheesecake, a delicious peanut butter version by the always amazing Nigella Lawson.
To me, the chocolate glaze was unnecessary on the dulce de leche cheesecake bars I made a while ago, but here it’s perfect: the peanut butter has a slightly salty flavor and the milk chocolate compliments it beautifully.

Chocolate peanut butter cheesecake bars
adapted from the magnificent Nigella Kitchen: Recipes from the Heart of the Home

Base:
140g digestive biscuits
2 ½ tablespoons (35g) unsalted butter, softened

Filling:
300g cream cheese
2 eggs
2 egg yolks
2/3 cup (133g) granulated sugar
1/3 cup (80ml) sour cream*
2/3 cup smooth peanut butter

Topping:
2/3 cup (160ml) sour cream
2/3 cup (120g) milk chocolate chips
1 ½ tablespoons brown sugar

Preheat the oven to 160°C/325°F. Lightly butter a 20cm (8in) square baking pan then line the bottom and sides with 2 pieces of foil, leaving a 5cm (2in) overhang on two opposite sides. Butter the foil as well.
Base: process the biscuits until ground then add the butter; process again until mixture resembles wet sand. Turn it out into the prepared pan and press into the bottom to make the crust. Put in the fridge while you make the filling.
Filing: place the cream cheese, eggs, egg yolks, sugar, sour cream, peanut butter and vanilla in the clean bowl of the food processor and process until very smooth. Pour into the base bake for 1 hour, though check after 50 minutes: the top – only – should feel set and dry.
Take the cheesecake out of the oven while you make the topping.
Warm the sour cream and chocolate with the brown sugar gently in a small saucepan over a low heat, whisking to blend in the chocolate as it melts, and then take off the heat. Spoon and spread the topping very gently over the top of the cheesecake, then put it back in the oven for a final 10 minutes**.
Once out of the oven, let the cheesecake cool completely in the pan over a wire rack, then cover and refrigerate overnight.
Carefully lift cheesecake from pan using foil overhangs and cut into 16 squares.

* homemade sour cream: to make 1 cup of sour cream, mix 1 cup (240ml) heavy cream with 2-3 teaspoons lemon juice in a bowl. Whisk until it starts to thicken. Cover with plastic wrap and leave at room temperature for 1 hour or until thicker (I usually leave mine on the counter overnight – except on very warm nights – and it turns out thick and silky in the following morning; refrigerate for a creamier texture)

** mine looked exactly the same after 10 minutes, so I baked it for 22 (until matte and firmer)

Makes 16

Thursday, March 15, 2012

Salmon with hot, sweet and sour Asian sauce + a new favorite TV show

Salmon with hot, sweet and sour Asian sauce / Salmão com molho oriental

Joao was watching TV the other day and discovered, completely unintentionally, Martin Dorey’s “One Man and His Campervan” – he rushed me to the living room and I instantly fell in love with the show: not only the places he visits are beautiful but he also cooks delicious recipes in a very small space, using just a few utensils – I wish the people who tell me that they don’t cook because their kitchen is too tiny could watch this show, too. :)
After watching a handful of episodes I placed his cookbook on my wish list – let’s see how long it will take me to buy it (heaven knows I have no sense of self control when it comes to cookbooks). :)

From a very new TV favorite of mine to the eternal #1: Nigella. This salmon is so quick to prepare and tastes so amazing that I am sure you’ll get addicted to it as I have. Make the rice way before starting with the salmon because it will take you less than 10 minutes to take it from the fridge to the table.

Salmon with hot, sweet and sour Asian sauce
slightly adapted from the fantastic Nigella Kitchen: Recipes from the Heart of the Home

2 cloves garlic, peeled and minced
2 red or green chilies, deseeded and finely chopped
2 tablespoons minced ginger
2 spring onions, white part only, finely sliced
¼ cup (60ml) fish sauce
2 tablespoons sake
2 tablespoons mirin
2 tablespoons lime juice
2 tablespoons water
1 x 600g skinless salmon fillet

Make the sauce: place the garlic, chilies, ginger, spring onion, fish sauce, sake, mirin, lime juice and water in a bowl and mix to combine. Set aside.
Sear the salmon on a flat griddle or frying pan over medium heat for 4-5 minutes on one side and 1-2 minutes on the other. The salmon should be opaque and cooked in the center. Remove from heat and transfer the fish to a plate. Flake the fish slightly and drizzle with some of the sauce.
Serve at once, with the remaining sauce on the side.

Serves 4

Friday, February 3, 2012

Chewy macaroons + "J. Edgar"

Chewy macaroons / Macaroons de amêndoa

The first time I saw Leonardo DiCaprio was in his – and mine – teenage years: I’d rented "This Boy's Life" expecting to watch another great performance by Robert DeNiro (back in the day when he was a wonderful actor) but what really took me by storm was this boy’s performance, this boy I’d never heard of before, whose face or name I did not recognize (that was way before the whole “Romeo and Juliet” hysteria). I started to pay attention to that talented boy and I wasn’t the only one: after "What's Eating Gilbert Grape" everyone was talking about Leonardo, and I knew for sure that he would become one of the greatest. Ever since, he’s portrayed several fantastic characters and I’ve become a huge fan – that is why I watched "J. Edgar" last night (spoilers below for the ones who haven’t watched the movie yet).

Let’s forget, at least for 5 minutes, the bizarre makeup – it really pisses me off that the minute the movie is mentioned everyone starts talking about the makeup and how bad it looked; yes, it looked awful, but I cannot understand how people can focus on that – and only that – while both DiCaprio and the always fantastic Judi Dench kick some serious ass onscreen – I mean, really? Give me a break.
The way DiCaprio moves around, always holding so much within – especially around his mother – made me claustrophobic; it must be so hard to hide your true essence all the time, so tiring. We all have been there somewhere in our lives, haven’t we? The herculean effort to please our parents, the fear of disappointing them. Throughout the film we see his need to hide behind a façade and the responsibility that comes with it; the power his mother had over him and how he reacts to that – the scene where she tells him that she’d rather have a dead son than a homosexual son and then insists on teaching him how to dance brought tears to my eyes: only a talented actor could portray feelings like those without being exaggerated or sappy, and that kind of subtlety is really hard to find. I haven’t watched "Moneyball" yet but to me Brad Pitt stole DiCaprio’s Oscar nomination – in my world Pitt would never, EVER, be superior to DiCaprio.

From one favorite to another: Nigella Lawson. I’m a huge, huge fan. And if you make these cookies – which are as simple and easy as they’re addictively delicious – you’ll understand why I like her so much. :)

Chewy macaroons
from the always gorgeous and delicious Feast: Food to Celebrate Life

2 cups (200g) almond meal
1 cup (200g) superfine sugar – I used granulated
¼ teaspoon finely ground cardamom
2 egg whites
1-2 tablespoons rosewater
about 28 whole blanched almonds

Preheat oven to 200°C/400°F and line two baking sheets with baking parchment*.
Mix together the ground almonds, sugar, ground cardamom and egg whites and knead with your hands or use the flat beater in a freestanding mixer until you have a coherent paste – the dough is very thick, that is why I recommend using the mixer.

Sprinkle some rose water onto your hands and roll the dough into little balls, about the size of smallish walnuts. Place onto prepared sheets 2.5cm (1in) apart and squish them down slightly so they are no longer balls but fat patties – sprinkle more rose water on your palms throughout the process of rolling the dough balls. Stud the center of each disc with a blanched almond and bake for 10-12 minutes or until lightly golden at the edges. Cool completely on the baking sheets over a wire rack.
When cooled, store in an airtight container at room temperature for up to 1 week.

* some of the cookies stuck to the paper – I think foil would be a better alternative here

Makes about 28 – I made the exact recipe above, used 1 leveled tablespoon of dough per cookie and got 24

Friday, January 6, 2012

Nigella's crustless pizza

Nigella's crustless pizza / Pizza sem massa da Nigella

I went to the movies the other day to watch "Immortals" just because of Tarsem Singh; his work is so visually unique and fantastic that even if I hadn’t known he was the director I would have guessed it just by watching the very first scene of the movie. I did not like “Immortals” that much – bad casting (except for the fabulous John Hurt) and bad script; but again, visually striking.

Now, tell me: crustless pizza – doesn’t it have “Nigella” written all over it? The recipe comes from the beautiful and delicious "Nigella Kitchen" and it’s very easy, tastes great and you can go wild with the toppings. Perfect quick meal.

Nigella's crustless pizza
from the marvelous "Nigella Kitchen"

1 egg
2/3 cup (94g) all-purpose flour
salt
freshly ground black pepper (optional)
1 cup (240ml) whole milk
1 cup grated Cheddar – I used a different kind of cheese and it worked fine
5-6 chorizo or pepperoni slices, optional
dried oregano, to taste

Preheat the oven to 200°C/400°F. Butter a round ovenproof pie dish, 20 or 22cm (8 or 9 in) in diameter.
In a small bowl, beat the egg with the flour, salt, pepper (if using) and milk to make a smooth batter. Stir in half the grated cheese into the batter, then pour it into the prepared dish.
Bake for 30 minutes or until golden around the edges. Take the dish out of the oven, sprinkle with the remaining cheese, and add the chorizo or pepperoni, if using. Sprinkle with the oregano. Return the dish to the oven and cook for another 2 or 3 minutes to make sure the topping is heated through and the cheese is melted.
Serve, cut into slices (with a salad, if you wish).

Serves 2

Related Posts with Thumbnails