Friday, December 28, 2007

Dark chocolate madeleines

Dark chocolate madeleines

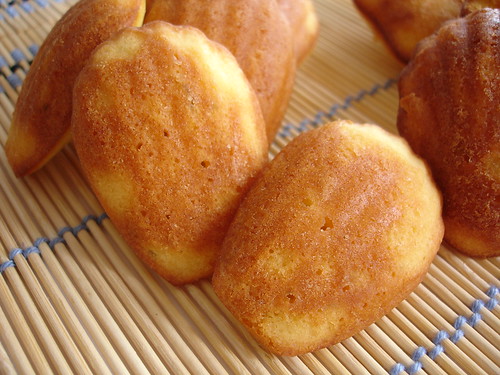
These madeleines were especially made for a person I hold very dear. A woman who has been a friend for a while now. We talk about a million things, laugh together and sometimes cry together too.
C., I adore you and wish you all the best not only in 2008 but always!

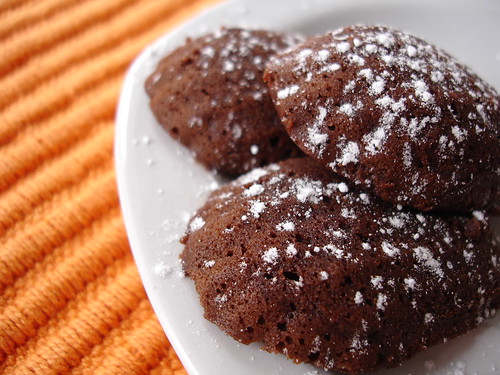
I made the madeleines using one of the hundreds of wonderful recipes at Bake or Break and the lovely Jennifer was kind enough to let me post it here on my blog as well.

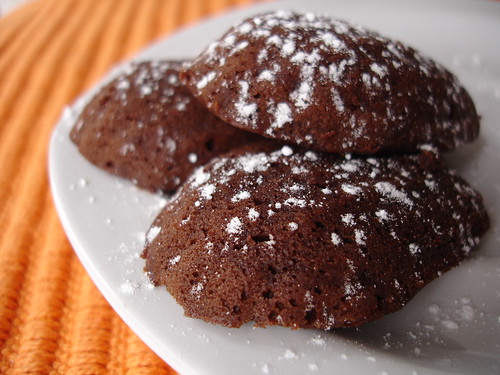
The madeleines were delicious and quite moist on the inside – the flavor and texture reminded me of those luxurious chocolate cakes that call for little or no flour at all, like the Suzy’s cake by Pierre Hermé.

Dark chocolate madeleines

Dark chocolate madeleines

1 tablespoon unsalted butter, melted (for coating madeleine pans)
85g (3 ounces) bittersweet chocolate, finely chopped
85g (3 ounces/6 tablespoons) unsalted butter, cut into small pieces
1 teaspoon vanilla extract
2 extra large eggs*, at room temperature
1/3 cup (65g) superfine sugar
½ cup (70g) all-purpose flour, sifted
¼ teaspoon salt

Preheat oven to 175ºC/350ºF. Using a paper towel or pastry brush, coat the insides of madeleine pan with melted butter.

Melt the chocolate and butter in a microwave-safe bowl. Melt on low microwave power, stirring every 30 seconds until melted. Add vanilla extract and combine.

Using the whisk attachment of a stand mixer or hand mixer, beat the eggs on medium speed until frothy (about 1 minute). Add the sugar and mix until mixture is very thick and pale (about 5 minutes). The mixture should hold a slowly dissolving ribbon when the beater is lifted.

In a separate bowl, combine flour and salt. Add to the egg mixture in three stages, mixing well on low speed after each addition. Mixture should be smooth. Pour the chocolate mixture into the batter and mix well.

Pour or pipe (very tightly) the batter into the madeleine pan, filling them ¾ full (I was a bad girl and poured a little bit more batter). Place the pan on a baking sheet. Bake for 10 minutes. If baking two pans at once, bake 6-7 minutes, then switch the position of the pans and bake another 6-7 minutes. Madeleines are done when the tops spring back lightly when touched.

Can be stored at room temperature in an airtight container between layers of waxed paper for 3 days.

*Large eggs and extra-large eggs are interchangeable until you need more than 4 eggs.

Makes 15 small madeleines and 6 bigger ones (the scallop pan I have)

Dark chocolate madeleines

Saturday, December 22, 2007

Ginger chewies

Ginger chewies

The lovely Susan is hosting a beautiful event called “Christmas Cookies from Around the World” – if you want to bake cookies and need inspiration that is the place to go!

Food+Blogga+Cookie+Logo

I have been meaning to bake something for the event ever since she announced it but had a hard time choosing the recipe. I have posted lots of cookies lately, but I wanted something more Christmassy for the event. And I think these fit the bill.

I’m a huge fan of spices so this cookie has become one of my all-time favorites. I hope you like them too!

Happy Holidays!

Ginger chewies

Ginger chewies
another one from Big Fat Cookies

2 ¼ cups (315g) unbleached all purpose flour
2 teaspoons baking soda
¼ teaspoon salt
1 teaspoon ground cinnamon
1 teaspoon ground ginger
½ teaspoon ground cloves – I used a little less
¾ cup (1 ½ sticks/170g) unsalted butter, at room temperature
1 cup (160g) packed light brown sugar
1 large egg
¼ cup (60ml) molasses
about ¼ cup (55g) granulated sugar

Position a rack in the middle of the oven. Preheat the oven to 175ºC/350ºF. Line two baking sheets with parchment paper.

Sift the flour, baking soda, salt, cinnamon, ginger and cloves into a medium bowl and set aside. In a large bowl, using an electric mixer on medium speed, beat the butter and brown sugar until smoothly blended, about 1 minute. Stop the mixer and scrape the sides of the bowl as needed during mixing. Add the egg and molasses and mix until blended and an even light brown color, about 1 minute. On low speed, add the flour mixture, mixing just to incorporate it.

Spread the granulated sugar in a large piece of waxed/parchment paper or in a plate. Roll 1 leveled tablespoon of dough between the palms of your hands and form a ball. Roll the ball in the sugar and place on the prepared baking sheets. Continue making cookies, spacing them 2 inches (5cm) apart.

Bake the cookies one sheet at a time until the tops feel firm but they are still soft in the center and there are several large cracks on top, about 14 minutes. Cool the cookies on the baking sheets for 5 minutes, then use a wide metal spatula to transfer the cookies to a wire rack to cool completely.

The cookies can be stored in a tightly covered container at room temperature for up to 4 days.

Ginger chewies

Makes 45 - if you want to make giant cookies like the ones in the book, use ¼ cup of dough per ball; you should get 14 cookies.

Ginger chewies

Cookies ready to be delivered!

Thursday, December 20, 2007

Chocolate chip (sort of) whoppers

Chocolate chip (sort of) whoppers

I made chocottones again this year (gifts to my coworkers) and after baking them for an entire afternoon I had no eggs left in my pantry. Zero. Nada.
I wanted to bake cookies but was too lazy to go to the grocery store… Luckily I found a recipe for a crisp chocolate chip cookie that did not call for eggs.

The dough is super easy to put together and I baked the cookies in a heartbeat. I didn’t want giant cookies, so I used a tablespoon to measure the dough - and still got big cookies (the size of the palm of my hand, a bit less than 3 inches).

The recipe calls for 2 cups (12 ounces) of chocolate chips, but I thought that 9 ounces were enough.

Next time you feel like baking and there are no eggs in your pantry, try these – and feel free to add more chocolate chips if you want.

Chocolate chip (sort of) whoppers

Chocolate chip (sort of) whoppers
from Big Fat Cookies

2 cups (280g) unbleached all purpose flour
1 teaspoon baking soda
¾ teaspoon salt
1 cup (2 sticks/226g) unsalted butter, melted and cooled slightly
1 cup (220g) granulated sugar
½ cup (80g) packed dark brown sugar*
1 teaspoon vanilla extract
3 tablespoons water
250g (9 ounces) semisweet chocolate chips – I used mini chips

Position a rack in the middle of the oven. Preheat the oven to 175ºC/350ºF. Line 2 baking sheets with parchment paper.

Sift the flour, baking soda and salt into a medium bowl and set aside. In a large bowl, using an electric mixer on low speed, mix the melted butter, granulated sugar, brown sugar and vanilla until smooth, about 30 seconds. Stop the mixer and scrape the sides of the bowl as needed during mixing. Add the flour mixture, mixing just until incorporated. The dough will look crumbly. Mix in the water. The dough will become soft and smooth. Stir in the chocolate chips.

Using an ice-cream scoop or measuring cup with a ¼ cup capacity, scoop mounds of dough onto the prepared baking sheets, spacing the cookies at least 3 inches (7.5cm) apart. Gently press the cookies to flatten them slightly, to about ¾ inch (1.9cm) thick (mine were a bit thinner)

Bake the cookies one sheet at a time until the tops are evenly lightly browned and have a few cracks, about 17 minutes. Cool the cookies for 5 minutes on the baking sheets, then use a wide metal spatula to transfer them to a wire rack to cool thoroughly.

The cookies can be stored in a tightly covered container at room temperature for up to 4 days.

* the original recipe calls for ¾ cup light brown sugar and ¾ granulated sugar – since the brown sugar I had at home was dark, I changed the proportions a little bit.

Makes 15 cookies – I used 1 tablespoon of dough per cookie and got 33

Chocolate chip (sort of) whoppers

Monday, December 17, 2007

Oooops, I made these again... Jessica's super chocolate cookies

Jessica's super chocolate cookies

I must be going crazy. Or senile.

Valentina posted a cookie recipe on her blog in Portuguese especially for my sister. They looked super tasty and Jessica and I baked them in one of the days she spent at my house.

I was completely surprised to realize, more than a month later, when I was about to post the cookies, that I had already baked them

I didn’t notice it. Not even for a moment. They looked a bit different, too – and I’m not trying to justify myself here. :)

These cookies are so delicious they are worth being posted again – it was a good thing that Jessica had the idea of using white chocolate chips, too, so they (sort of) have a new look. :)

Jessica's super chocolate cookies

Super chocolate cookies with dark and white chocolate chips

125g dark chocolate, minimum 70% cocoa – I used 60%
150g flour
30g cocoa powder
1 generous teaspoon baking soda
½ teaspoon salt
125g unsalted butter, room temperature
75g brown sugar
50g caster (superfine) sugar
1 teaspoon vanilla extract
1 large cold egg
100g semisweet chocolate chips
100g white chocolate chips

Position a rack in the middle of the oven. Preheat the oven to 165ºC/325ºF.
Line 2 baking sheets with parchment paper.

Put the dark chocolate in a heatproof container or the top of a double boiler and place it over, but not touching, a saucepan of barely simmering water (or the bottom of the double boiler). Stir the chocolate until melted and smooth. Remove from the water and set aside.

Sift the flour, cocoa powder, baking soda and salt into a medium bowl and set aside. In a large bowl, using an electric mixer on medium speed beat the butter, brown sugar and sugar until smoothly blended, about 1 minute.
Stop the mixer and scrape the sides of the bowl as needed during mixing. On low speed, mix in the melted chocolate until blended. Add the egg and vanilla, mixing until blended, about 1 minute. Add the flour mixture, mixing just until it is incorporated. Mix in the chocolate chips (both semisweet and white).

Using an ice cream scoop or measuring cup with a ¼-cup capacity*, scoop mounds of dough onto the prepared baking sheets, spacing the cookies 3 inches apart.

Bake the cookies one sheet at a time until they crack slightly on top and a toothpick inserted in the center of a cookie comes out with moist crumbs, not wet batter, about 18 minutes (if the toothpick penetrates a chocolate chip, test another spot).
Cool the cookies on the baking sheet for 5 minutes, then use a wide metal spatula to transfer them to a wire rack to cool completely. The outsides of the cookies will become crisp as the cookies cool.

The cookies can be stored in a tightly covered container at room temperature for up to 4 days.

* We used 1 ½ tablespoon of dough for each cookie and got 24

Friday, December 14, 2007

Savory herb, black pepper and parmesan shortbread

Savory herb, black pepper and parmesan shortbread

I think you all may have already noticed that I really like baking. I do. I used to be a Daring Baker, for crying out loud. But I had never baked savory cookies before.

I tagged this recipe after seeing it on L.’s blog, Bake or Shake. Her cookies looked delicious and one just can’t go wrong with cheese and herbs. Oh, and butter. That’s just impossible. :)

I made these to give as a gift and to be honest I almost gave up on sending them – they were so good! They’re a great snack and go perfectly with ice cold beer. Or caipirinha

Savory herb, black pepper and parmesan shortbread

Savory herb, black pepper and parmesan shortbread

½ cup (113g/1 stick) salted butter, softened – I used unsalted
¼ (heaping) cup (35g) ground parmesan cheese
1 teaspoon freshly cracked/ground black pepper
½ teaspoon salt
1 teaspoon dried basil (or use the dried herb you like the most)
1 ¼ cups (175g) all purpose flour

Line a light-colored baking sheet with parchment paper. Set aside.

In a mixing bowl, mix together the butter, salt, parmesan, black pepper and basil until creamy and speckled. Slowly add the flour, and mix until dough holds together when pinched. If dough is still too crumbly, add up to 1 tablespoon of ice water – I didn’t need to. Turn out onto a floured counter top, roll into a ball and then into an elongated log, around 30 to 35cm (12 to 14 in) long, depending on how large you want your crackers. Try to make sure the log is an even length, and wrap in tinfoil or plastic and freeze for at least half an hour, or longer if you don't want to serve them today. If you do, preheat your oven to 175ºC/350ºF.

Remove from the freezer, and slice into rounds: the original recipe (by Ina Garten) yields nearly 36, L. got 24 or so and I got 35. Arrange in rows on the baking sheet, with at least a little space between them - they won't spread like normal cookies or biscuits. Bake for 15-25 minutes, checking after 15, until golden brown around the edges and smelling delicious (so true!! The smell is intoxicating).
Remove and cool completely, or serve slightly warm.

Makes 35-36

Savory herb, black pepper and parmesan shortbread

Wednesday, December 12, 2007

Chocolate Sandwich Cookies with Vanilla-Cream Filling (Homemade Oreos)

Chocolate Sandwich Cookies with Vanilla-Cream Filling (Homemade Oreos)

There are certain things that we know are great way before we even see/hear them.

Take Kanye West, for instance; I knew who he was (after Katrina and his TV statement) even though I did not know any of his songs. The minute I read that he had recorded a song featuring Daft Punk I knew it would be amazing – and I wasn’t wrong. To make things even better, the guys are on the video, too! How cool is that?

The same thing happened with this recipe. When I read that these cookies were a homemade version of Oreos I knew I had to try them. They had to be good. I mean, Oreos are delicious – I absolutely love them – and Adrienne says on her post that the cookies were BETTER than the store-bought ones… I have to tell you that she was right. Oh, so right. These are FANTASTIC.

The cream I made was a tad too sweet because I ended up using more confectioners’ sugar than it was necessary; but please, don’t mind me and my stupid conversion mistakes - go ahead and bake these cookies (I’m posting the correct amount).

One last thing: has anyone watched this? It’s on my wish list and I’d love to hear your opinion about it.

Chocolate Sandwich Cookies with Vanilla-Cream Filling (Homemade Oreos)

Chocolate Sandwich Cookies with Vanilla-Cream Filling (Homemade Oreos)

Chocolate Wafers:
1 ¼ cups (175g) all-purpose flour
½ cup (45g) unsweetened Dutch process cocoa
1 teaspoon baking soda
¼ teaspoon baking powder
¼ teaspoon salt
1 ½ cups (300g) sugar
½ cup + 2 tablespoons (141g/1 ¼ sticks) room-temperature, unsalted butter
1 large egg

Vanilla-Cream Filling:
¼ cup (57g/½ stick) room-temperature, unsalted butter
¼ cup (57g) vegetable shortening
2 cups (280g) sifted confectioners' sugar
2 teaspoons vanilla extract

Set two racks in the middle of the oven. Preheat to 190ºC/375ºF.

In a food processor, or bowl of an electric mixer, thoroughly mix the flour, cocoa, baking soda and powder, salt, and sugar. While pulsing, or on low speed, add the butter, and then the egg. Continue processing or mixing until dough comes together in a mass.

Take rounded teaspoons of batter and place on a parchment paper-lined baking sheet approximately 5cm (2in) apart. With moistened hands, slightly flatten the dough. Bake for 9 minutes (I baked mine for 10), rotating once for even baking. Set baking sheets on a rack to cool.

To make the cream, place butter and shortening in a mixing bowl, and at low speed, gradually beat in the sugar and vanilla. Turn the mixer on high and beat for 2-3 minutes until filling is light and fluffy.

To assemble the cookies, in a pastry bag with a 1.25cm (½ in) round tip, pipe teaspoon-size blobs of cream into the center of one cookie. Place another cookie, equal in size to the first, on top of the cream. Lightly press, to work the filling evenly to the outsides of the cookie. Continue process until all the cookies have been sandwiched with cream.

Makes 30 sandwich cookies – I got 37

Chocolate Sandwich Cookies with Vanilla-Cream Filling (Homemade Oreos)

Monday, December 10, 2007

Spaghetti with basil, smoked ricotta and roast bell pepper

Spaghetti with basil, smoked ricotta and roast bell pepper

I’m always interested in new ways of cooking pasta.
Don’t get me wrong, I absolutely love fresh tomato sauce (I only use homemade) but pasta gives you so many possibilities that it’s almost a sin not to try other sauces and ingredient combinations.

If you are in a hurry and have to put dinner together quickly, this is a really good recipe: you can take a shower while the peppers are roasting and boil the water/cook the pasta while they’re cooling down.

The original recipe calls for feta, but I decided to use some delicious smoked ricotta I had in the fridge. The sweet flavor of the peppers played wonderfully with the saltiness of the cheese.

aaWeekendHerbBlogging

This is my entry for the Weekend Herb Blogging, this time hosted by Astrid, from Paulchen's Food Blog.

Spaghetti with basil, smoked ricotta and roast bell peppers
adapted from Kitchen: The Best of the Best

4 red bell peppers
3 tablespoons extra virgin olive oil
1 teaspoon balsamic vinegar
125g (4½ oz/1 bunch) basil
400g (14oz) spaghetti
150g (5½ oz) smoked ricotta (ricotta affumicata)

Preheat the oven to 200ºC/400ºF. Rub the peppers with a little oil, slice them in half lengthways and put them, skin-side up, on a baking dish. Bake for 20 minutes, or until the skin blackens and blisters. Put the peppers in a plastic bag or bowl covered with plastic wrap, allow them to cool, then remove the skin and seeds. Put the pepper flesh into a blender with the vinegar ad 10 basil leaves, season and blend. Add the strained liquid from the baking dish (if there’s any) and a little olive oil to make a sauce consistency. Put the sauce in a large saucepan over low heat to keep it warm.

Cook the spaghetti until it is al dente, then drain the pasta and add it to the warm pepper sauce. Crumble half the ricotta over the pasta and gently toss the ingredients together. Serve garnished with the remaining basil leaves and the rest of the ricotta crumbled on top.

Serves 4

Friday, December 7, 2007

Double Chocolate Cookies

Double Chocolate Cookies

Holiday baking is quite new to me – it’s not something we do here in Brazil, but from the moment I started reading foodblogs – and then blogging – I thought that it would be a lovely tradition for me to adopt.
Last year I made a couple of cookies and some truffles to give as gifts and it was such a great experience that I intend to do that again this year. And the next. And the next.

I saved these cookies on my del.icio.us on Nov, 24 and immediately printed the recipe – I thought it was really worth trying. I made up my mind a couple of days later, when I saw that Jenjen had baked them too – and her cookies looked even more beautiful and delicious than the ones I’d seen on Martha’s website!!

The recipe is not difficult to follow; the only problem was that I started shaping the dough using the ice cream scoop I have – and that is definitely NOT a good ice cream scoop to shape cookie dough with. The cookies were too big and I did not like them. I shaped the remaining dough using a 1 ½ tablespoon and they were still big, but good-for-holding-without-breaking-in-half big.

I baked my cookies for 2 minutes longer than the time stated in the recipe – they were sort of fudgy in the middle and slightly crispy on the edges. Really, really good. :)

Double Chocolate Cookies

Double Chocolate Cookies

1 cup (140g) all-purpose flour
½ cup (45g) unsweetened Dutch-process cocoa powder
½ teaspoon baking soda
½ teaspoon coarse salt – I used Maldon
224g (½ pound) good-quality milk chocolate, 112g (4 ounces) coarsely chopped and 112g (4 ounces) cut into 0.60cm (¼-in) chunks
½ cup (113g/1 stick) unsalted butter
1 ½ cups (300g) sugar
2 large eggs
1 teaspoon pure vanilla extract

Preheat oven to 165ºC/325ºF. Whisk together flour, cocoa powder, baking soda, and salt; set aside. Melt 112g (4 ounces) coarsely chopped chocolate with the butter in a small heatproof bowl set over a pan of simmering water; let cool slightly.

Put chocolate mixture, sugar, eggs, and vanilla in the bowl of an electric mixer fitted with the paddle attachment. Mix on medium speed until combined. Reduce speed to low; gradually mix in flour mixture. Fold in chocolate chunks.

Using a 1 ½-inch ice cream scoop, drop dough onto parchment-lined baking sheets, spacing 5cm (2 inches) apart. Bake until cookies are flat and surfaces crack, about 15 minutes (cookies should be soft). Let cool on parchment on wire racks. Cookies can be stored between layers of parchment in airtight containers at room temperature up to 3 days.

Makes about 3 dozen – I got 6 giant cookies and 24 large ones.

Double Chocolate Cookies

Tuesday, December 4, 2007

Lime honey madeleines

Lime honey madeleines

These delicate madeleines are a simple homage to a friend of mine who lives on the other side of the planet. She’s a tremendously talented cook/baker and I have used many of her recipes here.
A generous and sensitive friend, who sent, all the way from Japan, a box addressed to Brazil – a box full of beautiful and adorable things. And these were among the gifts:

It took me forever to first use the pans – every time I decided to make the madeleines, I remembered that the batter had to be refrigerated for at least a while. And as Murphy is also a friend of mine (sometimes) the idea of baking these beauties would only occur to me when there would be no time for batter-resting.

Of course I used a recipe from the person who sent me the pans – the madeleines were fantastic! I had never tried these famous miniature cakes – can I call them this way? – and it was a new and delicious thing to learn. The smell of the lime is contagious and the flavor… Well, I don’t need to tell these are highly addictive – can’t wait to try different recipes.

Akemi, my dear, you are a very, very special person. I’m so lucky to have you as a friend!! Thank you for sharing such amazing things with me! xoxo

Lime honey madeleines

Lime honey madeleines

100g unsalted butter
100g all purpose flour
½ teaspoon baking powder
2 eggs
60g sugar
30g honey – I used orange blossom honey
2 tablespoons lime juice
pinch of grated lime zest – this is optional; I’m a citrus sucker so I used the grated zest of 1 large lime

Brush molds with melted butter and sprinkle with flour to coat; tap the pans to remove excess flour.
Sift together flour and baking powder into a bowl.

In another bowl, whisk eggs and sugar until well combined. Add the juice, zest and the flour mixture. Mix only until flour is incorporated.
Melt butter and honey in the microwave oven or in a small bowl over lightly simmering water – I did this step before starting the recipe itself and set the liquid aside to cool a bit.
Add melted butter + honey to batter and mix well.

Cover the bowl with plastic or cling film and place in the refrigerator for at least 1 hour – I left it overnight.

Preheat the oven to 180ºC/355ºF. Pour batter onto prepared pans – it’s not necessary to level it up, since the batter will spread in the oven.

Bake for 20 minutes or until a skewer inserted into the cakes comes out clean.

Lime honey madeleines

Makes 12 madeleines – I got 15 small + 5 large ones

Lime honey madeleines

The bumps were pretty small... I think I have to keep making madeleines until I get bigger bumps. :)

Friday, November 30, 2007

Crispy goat’s cheese, tomato and basil salad

Crispy goat’s cheese, tomato and basil salad

Another recipe by Donna Hay – from her magazine, issue #35, to be more specific.

I’m a huge fan of hers and those of you who have been around my blog for a while already know that – Joey and I go hand in hand in our love for Donna’s recipes! :)

I tried goat’s cheese for the first time while on vacation last September and can’t imagine how I had lived without it till then. I tried it on salads, quiche, sandwiches, pasta… And love everything. “Gotta start using it in my cooking”, I thought.

Joao brought it from the grocery store one day – I didn’t even know they had started selling it there – and I knew exactly where to look for a good recipe: Donna’s books and magazines.

What a delicious salad! I know that doesn’t sound much modest, but this is one of the best dishes I have ever cooked. The cheese was so good after the shallow-frying process: crispy on the outside and gooey on the inside. The tomato + basil combination is always a winner and the dressing worked perfectly with all the ingredients – I was amazed by how great everything was together.

I don’t like to repeat recipes – there are so many new things to be tried, right? – but this is a salad I can see myself eating again, and again, and again…

aaWeekendHerbBlogging

This is my entry for the Weekend Herb Blogging, this time hosted by Simona, from Briciole.

Crispy goat’s cheese, tomato and basil salad

Crispy goat’s cheese, tomato and basil salad
from Donna Hay magazine

all-purpose flour for dusting
1 cup (110g/3 ¾oz) store-bought breadcrumbs
240g (8 ½oz) goat’s cheese, sliced
2 eggs, lightly beaten
2 tablespoons olive oil
2 vine-ripened tomatoes, sliced
1 cup basil leaves
1 bunch (100g/3 ½oz) rocket (arugula), trimmed

Balsamic dressing:
¼ cup (2fl oz) olive oil
1 tablespoon balsamic vinegar
1 teaspoon caster sugar

To make the balsamic dressing, place the olive oil, vinegar and sugar in a bowl and stir to combine. Set aside.

Place the flour and breadcrumbs on separate plates. Press the goat’s cheese slices into the flour, dip in the egg and press into the breadcrumbs. Heat the oil in a large non-stick frying pan over high heat. Cook the cheese for 1-2 minutes each side or until golden and crispy. Divide the cheese, tomatoes, basil and rocket between plates and drizzle over the balsamic dressing.

Serves 4

Tuesday, November 27, 2007

Chocolate pots de crème

Chocolate pots de crème

Peabody has recently moved to a beautiful new house and to celebrate that she’s throwing a Housewarming Party, pot luck style.
She’s such a lovely person, so talented and generous, and one of my all-time favorite cooks/bakers - I had to take part in her event!

I thought of many dishes to “bring” to her party and decided that dessert would be a good choice - we rarely have dessert at home. Also, I had been meaning to make something with the fantastic Green & Black’s bars Valentina gave me when she came to Brazil. So, there you have it: a silky, smooth and delicious dessert (recipe taken from this book). Excellent for when you have people over – it can be made in advance.

I decorated the pots of crème with some whipped cream and lemon rind, but feel free to use your imagination - my first thought was to use raspberries, but couldn’t find any that day. I did find some beautiful and shiny blackberries, but they were so tart I had tears in my eyes after tasting one.

Pea, I hope you like my contribution to your party. May you have wonderful moments and lots of love in your new home!

Chocolate pots de crème

Chocolate pots de crème
from The Williams-Sonoma Collection: Dessert

1 1/3 cups (11fl oz/340ml) heavy cream
1 1/3 cups (11fl oz/340ml) whole milk
185g (6oz) bittersweet chocolate, finely chopped – I used 72% cocoa solids
1 tablespoon instant espresso powder or instant coffee powder – I used the latter
6 large egg yolks
¼ cup (1 ¾ oz/50g) sugar

Preheat the oven to 150ºC/300ºF. Have ready 6 size ¾-cup (6fl oz/180ml) ramekins and a shallow roasting pan.

In a saucepan over medium-low heat, combine the cream, milk, chopped chocolate and espresso powder and cook, whisking frequently, until the chocolate is melted and the liquid is hot – do not allow to boil. Remove from heat.

In a bowl, whisk together the egg yolks and sugar until well blended. While whisking constantly, gradually pour the hot chocolate mixture into the yolk mixture. Pour the custard through a sieve place over a 4-cup (32fl oz/1l) glass measuring pitcher. Using a large spoon, skim off any foam and bubbles from the top*.

Divide the custard evenly among the ramekins. Place the ramekins in the roasting pan and pour very hot water into the pan to come halfway up the sides of the cups. Cover the pan with foil.

Bake the custards until they are set but the centers still jiggle slightly when a cup is gently shaken, 55-60 minutes. Remove the pan from the oven and leave the ramekins in the water until cool enough to handle. Cover and refrigerate until well chilled, at least 2 hours or up to overnight. Serve chilled.

* I completely forgot the sieving/skimming thing. :S

Makes 6 servings

Chocolate pots de crème

Monday, November 26, 2007

Butternut squash compote – doce de abóbora (updated post)

Doce de abóbora com coco / Butternut squash compote


One more recipe I cooked especially for Joao - one of his crazy out of the blue requests. :)

I had never made butternut squash compote before – we call it doce de abóbora and it’s such a traditional dessert here (not to mention easy to find) I guess I just took it for granted.
Luckily Google was there for me. I found many, many different recipes online but the minute I saw one of my dear friend Clarice’s post among the other links I knew my search was over.
After reading it, I found out she had gotten the recipe from another talented blogger friend of ours, Silvia – one more reason for me to try it. What a wonderful surprise it was: the compote was absolutely delicious!

While I was in the kitchen cooking the butternut squash, Joao kept telling me from the living room “wow, it already smells like doce de abóbora!”.
I hadn’t eaten this sweet in many, many years and honestly I can’t remember eating one as good as the one I made – I just hope my grandmother doesn’t read this! :)

aaWeekendHerbBlogging

This is my entry for the Weekend Herb Blogging, this time hosted by its own creator, the adorable Kalyn, from Kalyn’s Kitchen.

UPDATE: during these quarantine days I have been making this recipe quite often. It goes great with cheese and also for dessert. We like to have cheese and wine dinner on Friday nights, and this compote is a great addition to the chese board.

Butternut squash compote – doce de abóbora

Butternut squash compote – doce de abóbora

500g butternut squash – peel it and remove the seeds before measuring – cut in 2cm cubes
250g sugar
5-6 cloves
½ cup unsweetened desiccated coconut

Place the butternut squash, sugar and cloves in heavy-bottom saucepan and mix well; cook over medium heat, stirring occasionally, until the squash is soft.
After it is cooked and tender, mash it with a potato masher until you get an even looking paste – there will be a bit of liquid still.
Keep cooking until the liquid is gone – make sure you stir occasionally so the compote won’t stick to the pan. It takes a while for this to happen, but it is worth it, I promise. :)
Remove from heat, mix in the coconut and set aside to cool. Keep it in an airtight container in the refrigerator for up to 4 days.

Serve it on its own – it also goes really well with soft flavored cheeses.

Thursday, November 22, 2007

Nic’s Lime Sugar Cookies

Nic's lime cookies

Isn’t it curious how much our taste for things changes over the years?

I was thinking about it the other day, while watching “Friends”. I used to love that sitcom, wouldn’t miss it for the world. Now, I don’t find it funny anymore. I watched two episodes, one right after the other – not a single laugh.

As a kid, my favorite flavor was chocolate. I loved chocolate cake, chocolate cookies, chocolate ice cream… A while later, back in my teenage years, I started my love affair with citrus flavors. And that love has grown stronger and stronger.

These cookies were on my "to try" list forever and I’m glad I finally made them – they’re irresistible! Believe me, you won’t be able to have only one, no matter how hard you try.

I borrowed Nicole’s recipe and used lime instead of lemon - the result was really good. I want to make them again, next time using lemons like she did.

Nic, thank you for such a wonderful recipe, sweetie!

Nic's lime cookies

Nic’s Lime Sugar Cookies

2 cups (400g) sugar, divided
grated zest of 2 large limes
1 cup (226g) unsalted butter, softened
2 large eggs, at room temperature
1 teaspoon vanilla
1 tablespoon lime juice
2 ¾ cups (385g) flour
¼ teaspoon salt
2 teaspoons cream of tartar
1 teaspoon baking soda

Prepare lemon sugar: In a mini food processor, blend ½ cup (100g) sugar with 1 teaspoon lime zest. Pulse several times until the zest is incorporated into the sugar. Put sugar mixture in a shallow bowl and stir lightly with a fork to break up any clumps. Set aside.

Prepare cookie dough: In a medium bowl, sift together flour, salt, cream of tartar and baking soda. Set aside.

In a large mixing bowl, cream together butter and remaining 1 ½ cups (300g) sugar. Blend in eggs, one at a time then add vanilla, lime juice, and remaining lime zest. Add flour mixture, one cup at a time, blending well after each addition, until all flour is incorporated.

Refrigerate dough for one hour.

Preheat oven to 175ºC/350ºF and line 2 baking sheets with waxed or baking paper.

Shape the cookies: Shape one tablespoonful* of dough into a ball and roll in lime sugar. Place ball of dough on cookie sheet and press down lightly with the bottom of a glass until cookie is about 1.25cm (½ in) thick (mine were thinner) – it might help to press the glass first in the sugar then onto the dough, then it won’t stick. Repeat.

Bake cookies for 10-12 minutes at 175ºC/350ºF – I baked mine for 14 minutes.

Makes: 55 large cookies

* Nicole made giant cookies and used 2 tablespoons of dough into each cookie – she got 24.

Wednesday, November 21, 2007

Lemon Pasta

Lemon pasta

Thank you all for your lovely comments on my last post – you sure do know how to put a smile on a girl’s face!

There were two different holidays here in Sao Paulo and I didn’t go to work for 6 days in a row – how great is that? :)

I had a wonderful time at home, friends over for dinner, my sister spent a day with me (we played Super Mario Bros. a hundred times). I took care of my herbs and cooked some new recipes.

aaWeekendHerbBlogging

I’m pretty sure this pasta sauce is known by everyone, but since it was the first time I had lemon pasta and it tasted really good (without the addition of cream, which was a plus in my opinion), I decided to post it. And it will also be my post for the Weekend Herb Blogging, this week hosted by the dear Truffle, from What’s on my Plate.

Lemon Pasta
from Kitchen: The Best of the Best

400g spaghetti
3 lemons
1 handful chopped flat-leaf parsley
10 basil leaves, torn
100g (3 ½ oz/1 cup) grated Parmesan cheese
3-4 tablespoons extra virgin olive oil
salt and freshly ground black pepper

Finely grate the zest of the lemons into a bowl. Add the juice of 2 of the lemons to the bowl and add the juice of the other lemon to the cooking water for the pasta. Cook the pasta until al dente.
Add the parsley, basil, parmesan, olive oil, salt and pepper to the lemon zest/juice. Mix together well.
Drain the pasta and immediately toss it through the sauce. Serve at once.

Serves 4

Saturday, November 17, 2007

My blog turns 1!

Technicolor Kitchen cake

Today is this blog’s birthday and I’m glad for having had the time to prepare a cake to celebrate!

It has been a great thing in my life to be able to share my passion for food with so many others who love cooking and baking like I do – and I want to thank you all for being constant inspiration and for supporting my blog. You really mean the world to me!

Technicolor Kitchen cake

Technicolor Kitchen cake
white cake recipe from here;
chocolate glaze recipe from here


Cake:
120ml milk room temperature
3 egg whites
½ teaspoon almond extract
½ teaspoon vanilla extract
158g cake flour
175g sugar
2 teaspoons baking powder
½ teaspoon salt
85g butter, softened

Filling:
¼ cup dulce de leche

Icing:
58g unsalted butter, softened
140g dark chocolate, chopped – I used 60% cocoa

Make the cake: preheat oven to 175ºC/350ºF.
Grease two 15cm cake pans with butter, line the bottom with parchment paper, grease the parchment paper and flour the pans.
Combine milk, eggs whites and extracts in a small bowl with a fork. Set aside.
Combine flour, sugar, baking powder and salt in an electric mixer and mix at slow speed with a paddle attachment – I have done it with regular hand mixer beaters and it worked fine.
Add butter. Continue beating at slow speed until mixture looks like wet sand (If you're doing this by hand, sift the dry ingredients together and rub in butter).
Add all but 60ml (¼ cup) of milk mixture and beat at medium speed for 1 ½ minutes. Add remaining milk mixture and beat for an additional 30 seconds, scraping the sides of the bowl if necessary. Do not overmix.
Divide batter evenly between prepared pans and gently shake to smooth batter. Bake 30-35 minutes, until toothpick inserted into the center comes out clean.
Let cakes cool in the pans for 15 minutes then invert onto racks to cool completely before frosting.
Unfrosted cakes can be frozen for 1-2 weeks.

Assemble the cake before making the icing: place one cake on a plate and spread the filling. Place the other cake on top. Chill the cake for a couple of hours to make icing easier.

Prepare the icing: place chocolate and butter in a heatproof bowl over gently simmering water and melt. Mix well to combine.
Spread it over the cake immediately because it hardens pretty fast.

Serves 8-10

Technicolor Kitchen cake

Related Posts with Thumbnails