Friday, April 29, 2011

Peanut butter brownies + your comments on a certain post

Peanut butter brownie / Brownies com manteiga de amendoim

I’ve been thinking about the comments you left on my post about Gwyneth Paltrow’s cookbook and thought I might have been misunderstood by some: I agree with the fact that some people are naturally thin and can eat tons of food without gaining 1 single pound – I have cousins and friends that way. Nothing against those people – I wish I were one of them! :D
And I don’t think that one has to be chubby to be a good cook, either - I was joking about the skinny cooks/cookies thing. I don’t buy GP as a cook/baker, but I adore Sophie Dahl, for instance. Something completely personal, I know.

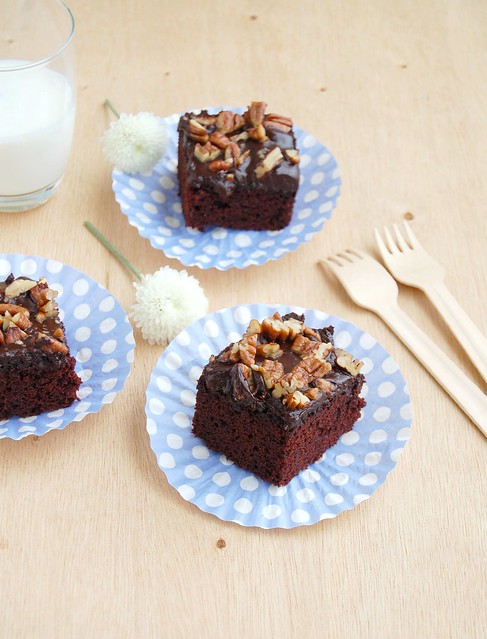
And since I’m not part of the blessed group of people who can eat all the sweets they want, I made these brownies, had one – it was delicious – and sent the other squares to my nephew; he plays a lot of sports and will burn these calories in no time. :D

Peanut butter brownies
slightly adapted from DamGoodSweet: Desserts to Satisfy Your Sweet Tooth, New Orleans Style

½ cup (113g/1 stick) unsalted butter, chopped
252g (9oz) bittersweet chocolate (66-72% cacao), finely chopped
2 large eggs
1 cup (175g) light brown sugar, packed
2 teaspoons vanilla extract
¼ teaspoon salt
1/3 cup (47g) all purpose flour
½ cup chunky peanut butter

Preheat the oven to 160°C/320°F. Lightly butter a 20cm (8in) square baking pan, line with foil leaving an overhang in two opposite sides, then butter the foil as well.
Combine the chocolate and butter in a large heatproof bowl and place it over a saucepan of simmering water (do not let the bottom of the bowl touch the water). Stir constantly until melted and smooth. Remove from the heat and stir in the eggs, sugar, vanilla and salt, mixing well until completely incorporated. Stir in the flour, mix well, then transfer the batter to the prepared pan. Smooth the top.
Place teaspoonfuls of peanut butter on the surface of the batter, then swirl the peanut butter into the batter using a fork until it looks marbled. Bake for about 30 minutes or until the brownie has a smooth sheen and looks dry (the peanut butter portions will be tacky). Let cool completely in the pan over a wire rack. Cut into squares to serve.

Makes 16

Wednesday, April 27, 2011

Nibby financiers

Nibby financiers / Financiers de baunilha com sementes de cacau

Certain smells, movies, songs – or even certain words – automatically remind us of certain people. In today’s case, it’s food that brings me two lovely friends of mine to mind – it’s impossible for me to bake financiers without thinking of @liliantrigo and Paula. :D

Nibby financiers / Financiers de baunilha com sementes de cacau

Nibby financiers
adapted from Rose's Heavenly Cakes

2/3 cup (66g) almond meal
1/3 cup + ½ tablespoon (51g) all purpose flour
¾ teaspoon baking powder
pinch of salt
¾ cup (150g) caster (superfine) sugar
4 egg whites
1 teaspoon vanilla extract
¼ cup (56g) unsalted butter, melted and still warm
½ cup cacao nibs, combined in a small bowl with 1 teaspoon all purpose flour

Lightly butter and flour twelve ¼ cup (60ml) capacity muffin or financier pans. Set aside.
In a large bowl, mix together almond meal, flour, baking powder, salt and caster sugar. Add the egg whites, vanilla and melted butter and mix to combine. Stir in the cacao nibs. Cover the bowl with plastic wrap and refrigerate the batter for 30 minutes.
Preheat the oven to 180°C/350°F. Divide the batter evenly among the prepared pans, place onto a baking sheet and bake for 15-20 minutes or until golden and a skewer inserted in the center of a financier comes out clean.
Remove from the oven, let cool in the pans for 5-7 minutes, then carefully unmold onto a wire rack. Cool completely.
Dust with icing sugar before serving.

Makes 12 – I halved the recipe above, used 2-tablespoon capacity pans and got 12 tiny financiers

Nibby financiers / Financiers de baunilha com sementes de cacau

Monday, April 25, 2011

Chocolate lime pie + popsicles on the side

Chocolate lime pie / Torta de limão e chocolate

A couple of days after talking to you about intuition I had an insight while making this pie: since the tart pan I was using was a bit smaller than the one called for on the recipe, there was some filling left. I stared at the velvety cream and thought it would taste amazing as some sort of frozen dessert – I immediately poured the cream into my popsicle molds and ended up with totally addictive treats; I think they were even better than the tart itself, but please do not tell Ms. Lawson I said so. ;)

Chocolate lime pie
again from the wonderful Nigella Kitchen

Base:
3 cups Graham-crackers or digestive cookies crumbs
1 tablespoon unsweetened cocoa powder
4 tablespoons (56g) unsalted butter, softened
¼ cup bittersweet chocolate chips

Filling:
1 x 395g (14oz) can sweetened condensed milk, better if chilled
4-5 limes, to give approximately 2 tablespoons finely grated zest + ¾ cup (180ml) juice
1 ¼ cups (300ml) heavy cream
1 square bittersweet chocolate

Lightly butter a 23cm (9in) fluted tart pan, 5cm (2in) deep, with a removable bottom.
Put the crackers, cocoa powder, butter and chocolate chips in the bowl of a food processor and process until a sandy mixture forms. Transfer to the prepared tart pan and press onto the base and sides. Refrigerate while you make the filling.
Pour the condensed milk into the large bowl of an electric mixer. Zest the limes into a bowl, tightly cover with plastic wrap and set aside for decorating the tart later. Squeeze the juice of the limes until you get the required amount. Add the juice to the condensed milk and mix to combine.
Pour the heavy cream into the mixture and whisk in medium-high speed until thick. Spread over the tart base and refrigerate again for 4 hours or until filling is very firm (refrigerate for longer if your condensed milk was not chilled).
Before serving, grate the chocolate over the filling and sprinkle with the lime zest. Serve immediately – do not keep the pie out of the refrigerator for long.

Serves 6-8 – my tart pan wasn’t very deep, so there was some filling left; I made popsicles with it and they turned out delicious. :D

Saturday, April 23, 2011

Chicken teriyaki

Chicken teriyaki / Frango teriyaki

I’ve been cooking for as long as I can remember and in certain periods of my life I did not have much time to spend in the kitchen – I needed delicious yet quick meals for weeknights.
On my days as a single lady I used to make lots of pasta – both my dad and my sister are crazy for it and dinner would be on the table in less than half an hour.

Recently I’ve been trying my hand at Asian recipes and some of them are absolutely delicious – and equally fast. This chicken teriyaki is a great example: it has instantly become a favorite of my husband’s – a.k.a. "the picky eater" – and it took me moments to put it together.

Let me tell you something: if my husband liked it, picky people everywhere will probably like it, too. :D

Chicken teriyaki
slightly adapted from the wonderful Nigella Kitchen

2 tablespoons sake
¼ cup mirin (sweet Japanese Rice wine)
¼ cup soy sauce
2 tablespoons light brown sugar
2 teaspoons grated fresh ginger
4 spring onions, white part only, sliced
splash of sesame oil
800g (1¾ pounds) chicken thigh fillets (no skin or bones), cut into bite-sized pieces
½ tablespoon neutral vegetable oil
freshly ground black pepper
handful of parsley leaves, chopped
rice, to serve

In a bowl large enough to hold all the chicken pieces, mix together the sake, mirin, soy sauce, sugar, ginger, spring onions and sesame oil. Add the chicken pieces and turn to coat each one of them in the sauce. Leave for 15-20 minutes.
Heat the oil in a large, shallow frying pan (with a lid) and, using a perforated spoon, transfer the chicken pieces to the pan and sauté until they look cooked on the outside.
Pour the marinade over the chicken, bring to a boil, then cover and turn down the heat, cooking for 5-10 minutes or until chicken is cooked through and sauce is thick.
Stir in with freshly ground black pepper and the parsley. Serve immediately with rice.

Serves 4-6 – I halved the recipe above and Joao and I ate every little bit of it. :)

Thursday, April 21, 2011

Double chocolate chip cookies - from skinny cooks to skinny cookies

Double chocolate chip cookies / Cookies com gotas de chocolate amargo e branco

A while ago I was talking to Fezoca (via Twitter) about Gwyneth Paltrow’s cookbook – I have to say I wasn’t (and still am not) all that excited about it. I think she’s a beautiful woman, can sing really well, but would never make it to my list of favorite actresses – I find her really limited as far as acting is concerned. Anyway, that has nothing to do with the cookbook thing – what doesn’t get me going for it is the fact that she does not look like she actually eats. I feel the same about Giada, for instance.

When it comes to cookies, my opinion is pretty much the same: I’m more inclined to the chubby kinds. That is why these do not rank so high on my best-ever-cookies list – they are delish, but too thin for my taste. :)

Double chocolate chip cookies / Cookies com gotas de chocolate amargo e branco

Double chocolate chip cookies
slightly adapted from Chewy Gooey Crispy Crunchy

2 cups + ½ tablespoon (285g) all purpose flour
1 teaspoon baking soda
1 cup (226g/2 sticks) unsalted butter, melted and still warm
¾ cup (150g) granulated sugar
¾ cup (132g) light brown sugar, packed
1 teaspoon vanilla extract
1 teaspoon salt
2 large eggs
1 cup (170g) dark chocolate chips
1 cup (170g) white chocolate chips

Mix the flour and baking soda in a medium bowl. Set aside.
In a large bowl, combine the butter with the sugars, vanilla and salt. Mix in the eggs. Stir in the flour mixture just until incorporated. Stir in the chocolate chips. Cover with plastic wrap and refrigerate for 2 hours (or overnight).
Preheat the oven to 190°C/375°F; line two large baking sheets with baking paper.
Remove the dough from the refrigerator (let is soften a bit if left in the refrigerator for more than 2 hours). Place 1 slightly rounded tablespoon of dough per cookie onto prepared pans, 7.5cm (3in) apart. Bake for 9-11 minutes or until cookies are golden brown at the edges and no longer look wet on top. Remove from the oven and cool in the pan for 1-2 minutes. Slide the paper off the sheets onto a wire rack and cool completely.
Cookies can be stored in an airtight container, at room temperature, for 4-6 days.

Makes about 60 cookies – I halved the recipe above and got 33 cookies

Tuesday, April 19, 2011

Vanilla flan with gingerbread crumbs

Vanilla flan with gingerbread crumbs / Flan de baunilha com farofinha de gingerbread

Those of you who – sometimes – devour lunch with an eye on dessert, please, raise your hand. 0/

I made a beautiful, delicious salad with tuna – from this book – for lunch and, even though I happily savored each bite of it, I was really interested in trying this flan. :)

And since I know you are all so dear and won’t judge me, there goes the recipe. :D

Vanilla flan with gingerbread crumbs / Flan de baunilha com farofinha de gingerbread

Vanilla flan with gingerbread crumbs
adapted from the wonderful Bon Appetit Desserts and the beautiful Australian Gourmet Traveller

Gingerbread cookies:
1 cup (140g) all purpose flour
½ teaspoon unsweetened cocoa powder
¼ teaspoon baking soda
1 teaspoon ground cloves
2 teaspoons ground ginger
1 teaspoon ground cinnamon
pinch of salt
¼ cup (56g) unsalted butter, softened
¼ cup (50g) caster (superfine) sugar
1 large egg yolk
¼ cup molasses

Flan:
1 ¾ cups (420ml) heavy cream
1 cup (240ml) whole milk
pinch of salt
1 vanilla bean, split lengthwise, seeds removed with the back of the knife
1 cup (200g) + 7 tablespoons (84g) caster (superfine) sugar, divided
1/3 cup (80ml) water
3 large eggs
2 large egg yolks

Start with the gingerbread: in a medium bowl, sift together the flour, cocoa, baking powder, cloves, ginger, cinnamon and salt. Using an electric mixer, beat butter and sugar until pale and creamy, add egg yolk and beat until combined. Add molasses, beat to combine, then add sifted ingredients and stir until just combined. Place dough on a large piece of parchment paper; shape dough into a log. Fold parchment over dough; using a ruler, roll and press into a 4cm log – like Martha does here. Wrap in parchment. Refrigerate for 3 hours.
Preheat oven to 180°C/350°F; line a large baking sheets with baking paper.
Unwrap log. Cut into 6mm (¼in) thick rounds; space 5cm (2in) apart onto prepared sheets. Bake until golden, 15-17 minutes. Let cookies cool completely on the sheet over a wire rack.
Store cookies in airtight containers at room temperature for up to 1 week.
Makes 20

Now, the flans: place cream, milk and salt in a heavy medium saucepan and mix to combine. Add the vanilla seeds and bean and bring to a simmer over medium heat. Remove from heat, cover and let infuse for 30 minutes.
Meanwhile, combine 1 cup (200g) sugar and water in a heavy medium saucepan. Stir over low heat until sugar is dissolved. Increase heat to high and cook without stirring until syrup is deep amber color, swirling the pan a couple of times. Occasionally brushing down the sides of the pan with a wet pastry brush. Immediately pour caramel into six ¾ cup (180ml) capacity ramekins. Using oven mitts, tilt each ramekin to coat sides with caramel. Place ramekins in a 20x30cm metal baking pan.
In a medium bowl, whisk eggs, egg yolks and remaining 7 tablespoons sugar. Gradually add the cream mixture, whisking without creating a lot of foam. Pour custard through a small sieve into the prepared ramekins. Add enough hot water to the baking pan to come halfway up the sides of the ramekins.
Bake flans until center is gently set, about 40 minutes – do not overbake. Carefully remove from the oven, transfer ramekins to a wire rack and cool completely. Refrigerate, lightly covered, overnight.
When ready to serve, place some of the gingerbread cookies in a bag and crush with a rolling pin (or use a food processor). Sprinkle each flan with some of the gingerbread crumbs and serve.

Serves 6

Sunday, April 17, 2011

Wholemeal apple and marmalade cake

Wholemeal apple and marmalade cake / Bolo integral de maçã e geléia de laranja

Back in 2009 my dear friend Valentina introduced me to Nigel Slater – it was love at first sight. His delicious recipes, beautiful garden and passionate way of speaking about food – clear without being patronizing – were a perfect combination.

I really do not know why it took me so long to buy one of his books, but I certainly started with a wonderful one. This cake is absurdly tender – despite being made entirely with whole wheat flour – and the apples go really well with the marmalade. Great with a cup of tea.

Take a look at Nigel’s website and I’m sure you’ll instantly become a fan, too. :D

Wholemeal apple and marmalade cake / Bolo integral de maçã e geléia de laranja

Wholemeal apple and marmalade cake
slightly adapted from the gorgeous Tender Volume II

1 cup (226g/2 sticks) unsalted butter, room temperature
1 ¼ cups (218g) light brown sugar, packed
4 large eggs
1 ¾ cups + ½ tablespoon (250g) whole wheat flour
1 ¼ teaspoons baking powder
½ teaspoon ground cinnamon
220g apples – I used Gala apples
125g orange marmalade
1 teaspoon vanilla extract
demerara sugar, for sprinkling (about 2 tablespoons)

Preheat the oven to 180°C/350°F. Lightly butter a 20cm round cake pan*, line the bottom with baking paper and butter the paper as well.
In the large bowl of an electric mixer, using the paddle attachment, beat the butter and brown sugar until light and fluffy. Meanwhile, sift together the flour, baking powder, cinnamon and salt, and pour back into the bowl any bits of grain that may remain in the sifter. Peel, core and roughly chop the apples (about 1cm). In a small bowl, mix the apples, marmalade and vanilla.
Add the eggs, one at a time, to the butter mixture, beating well after each addition – add 1 tablespoon of the flour mixture if the batter starts to curdle. Scrape the sides of the bowl. In low speed, add the sifted ingredients and mix only until incorporated. With a rubber spatula, fold in the apple mixture. Spoon into the prepared pan – batter will be thick. Sprinkle with the demerara sugar and bake for 1 hour and 15 minutes or until risen and golden and a skewer inserted in the center comes out clean. Cool completely in the pan.

* I used a high pan (8cm) – less than that and it won’t be large enough to hold the batter

Serves 8-10

Friday, April 15, 2011

Mini raspberry cheesecakes and trusting your instincts

Mini raspberry cheesecakes / Mini cheesecakes de framboesa

Something I’ve been trying to do more often is to trust my instincts, but sometimes I fail miserably at doing so – and deeply regret it afterwards.

Take this recipe, for instance: the mini cheesecakes looked adorable on the book, but after reading the recipe I wasn’t so keen on the idea of making the batter using an electric mixer – it would add too much air to the mixture, so a food processor would be a better choice. I decided to trust Bill Granger instead of my instincts and the result was that the cheesecakes, while in the oven, puffed up and looked beautiful, but after cooling they sort of collapsed – too much air in the batter.

Let’s hope the cheesecakes teach me a lesson. :)
Anyway, they tasted delicious, that’s why I’m posting the recipe here.

Mini raspberry cheesecakes
adapted from Feed Me Now

Base:
100g digestive or shortbread cookies
½ cup (50g) ground almonds
¼ cup (56g) unsalted butter, melted

Filling:
400g cream cheese, room temperature
½ cup (120ml) sour cream*
½ cup + 1 tablespoon (112g) caster (superfine) sugar
1 egg
1 egg yolk
½ teaspoon vanilla extract
finely grated zest of 1 lemon
120g raspberries, fresh or frozen – I used frozen, unthawed
icing sugar, for dusting

Preheat the oven to 180°C/350°F. Line a 12-hole, 125ml capacity muffin pan with paper cases.
Process the cookies in a food processor until you have fine crumbs. Transfer the crumbs to a medium bowl, add the ground almonds and melted butter and stir to combine. Press 1 tablespoon of the mixture into the base of each paper case. Refrigerate.
Make the filling: beat the cream cheese, sour cream and caster sugar until light and fluffy. Add the egg, then the egg yolk, vanilla and lemon zest, beating well after each addition. Spoon the mixture over the bases, then divide the raspberries on top.
Bake for 20 minutes or until puffed and starting to color. Cool completely then refrigerate.
Carefully remove the cheesecakes from the paper cases, sprinkle with icing sugar and serve.

* homemade sour cream: mix ½ cup (120ml) heavy cream with 2 teaspoons lemon juice in a bowl. Cover with plastic wrap and leave in room temperature for 1 hour or until it thickens

Makes 12 – I halved the recipe above, used 1/3-cup (80ml) capacity muffins pans and got 9 mini cheesecakes

Wednesday, April 13, 2011

Pecan, coconut and lemon bars

Pecan, coconut and lemon bars / Barrinhas de pecã, coco e limão siciliano

I’m a creature of habits, and I’m OK with that.

Going through Amanda Hasser’s amazing compilation of recipes, my heart stood still when I read the words “lemon” and “bars”; I immediately thought that you’ve already seen enough lemon bars around here, but I went on and read the recipe anyway. I’m so glad I did: these were not regular lemon bars. These were a match made in heaven of a chewy, nutty filling – packed with pecans and coconut – and a delicious, lemony icing – the one I love spreading over cakes and such. Did I tell you there is a buttery, shortbread-like base, too? :)

I grabbed one of the bars and munched away while watching “Rope” – too bad I was so tired I fell asleep in the middle of the movie. :(

Pecan, coconut and lemon bars / Barrinhas de pecã, coco e limão siciliano

Pecan, coconut and lemon bars
slightly adapted from the amazing The Essential New York Times Cookbook

1 cup + 1 tablespoon (150g) all purpose flour
2 tablespoons caster (superfine) sugar
pinch of salt
½ cup (113g/1 stick) unsalted butter, cold and chopped
2 large eggs
1 cup (175g) light brown sugar, packed
½ cup (55) pecans, finely chopped
½ cup (50g) shredded, unsweetened coconut
1 teaspoon vanilla extract
1 ¾ cups + 2 tablespoons (261g) confectioners’ sugar, sifted
grated zest of 1 lemon
¼ cup (60ml) fresh lemon juice

Preheat the oven to 180°C/350°F. Lightly butter a 20x30cm (8x12in) baking pan, line the bottom and the sides with foil, leaving an overhang on two opposite sites; butter the foil as well.
In the large bowl of an electric mixer, using the paddle attachment, mix the flour, sugar and salt. Add the butter and mix in low speed until the mixture resembles coarse meal.
Press the mixture into the base of the prepared pan. Bake for 15-20 minutes or until lightly golden.
In a large bowl, mix together the brown sugar, pecans, coconut, vanilla and eggs until smooth. Pour over the partially baked base and spread it evenly. Bake for 20-25 minutes or until the topping is firm. Remove from the oven.
Mix together the confectioners’ sugar, lemon zest and juice until smooth. Spread it evenly over the topping, then let cool completely. Carefully remove from the pan using the foil handles. Cut into bars.

Makes 16

Monday, April 11, 2011

Texas sheet cake

Texas sheet cake / Bolo de chocolate com cobertura de chocolate e pecãs

Grandma-style-cake again – but this time, there’s chocolate involved. ;)

I needed a large cake – the idea was to share it with 12 of my coworkers – and the Texas sheet cake recipe I found at "Bon Appétit Desserts" seemed perfect [yes, I am obsessed with this book, and I know how understanding you all are]. ;)

Both the cake and the icing were delicious and were wonderful together – a day after taking the cake to the office I heard rumors one of the boys had had cake – for lunch. :D

Texas sheet cake / Bolo de chocolate com cobertura de chocolate e pecãs

Texas sheet cake
from the fantastic Bon Appétit Desserts

Cake:
1 2/3 cups (233g) all purpose flour
2/3 cup (60g) cocoa powder
¾ teaspoon baking soda
½ teaspoon salt
1 ½ cups (300g) caster (superfine) sugar
¾ cup (170g) unsalted butter, room temperature
2 large eggs
1 teaspoon vanilla extract
1 cup (240ml) hot water

Glaze:
2/3 cup (160ml) heavy whipping cream
2 tablespoons caster (superfine) sugar
170g (6oz) semisweet chocolate (do not exceed 61% cocoa solids), chopped
2 tablespoons (28g) unsalted butter, chopped, room temperature
1 ¼ cups (140g) pecans, toasted and coarsely chopped

Start by making the cake: preheat the oven to 180°C/350°F. Butter and flour a 22x32x5cm (9x13x2in) metal cake pan.
Whisk flour, cocoa, baking soda and salt in a medium bowl. Using an electric mixer, beat sugar and butter until light and fluffy. Add the eggs, one at a time, beating well after each addition. Mix in vanilla. Beat in half the dry ingredients, then the hot water, then remaining dry ingredients. Pour batter into prepared pan and bake until risen and a skewer inserted in the center of the cake comes out clean, about 25 minutes.
Cool the cake in the pan over a wire rack.

Make the glaze: bring cream and sugar to a boil in a heavy medium saucepan over medium heat, stirring until sugar is dissolved. Remove from heat, add chocolate and butter and let stand for 5 minutes. Whisk until smooth. Pour the icing over the cooled cake and sprinkle with the pecans. Set aside until glaze is set.

Serves 15 – I made the exact recipe above and used a 20x30cm (8x12in) cake pan

Saturday, April 9, 2011

Flourless peanut butter and chocolate chip cookies

Flourless peanut butter and chocolate chip cookies / Cookies de manteiga de amendoim e gotas de chocolate (sem farinha)

Flour – an ingredient always present in my pantry, essential for someone who loves baking like I do. But sometimes we can go on perfectly well without it and it’s not necessary at all – like Renée Zellweger in “Cold Mountain”. :)

My peanut butter cookie recipe hunt started with this amazing book, but I was really after a flourless version, which I found on Epicurious.
The cookies turned out delicious and tender and were a hit with my little sister, who apparently did not like peanut butter. :) Just be careful when transporting the cookies, because the lack of flour makes them a bit fragile.

Flourless peanut butter and chocolate chip cookies / Cookies de manteiga de amendoim e gotas de chocolate (sem farinha)

Flourless peanut butter and chocolate chip cookies
from Epicurious

1 cup chunky peanut butter
1 cup (175g) light brown sugar, packed
1 large egg
1 teaspoon baking soda
½ teaspoon vanilla extract
1 cup (170g/6oz) semisweet chocolate chips – I used 70% cocoa solids

Preheat oven to 180°C/350°F; line two baking sheets with baking paper.
Mix first 5 ingredients in medium bowl. Mix in chocolate chips. Using moistened hands, form generous 1 tablespoon dough for each cookie into ball. Place onto prepared sheets, 5cm (2in) apart.

Bake cookies until puffed, golden on bottom and still soft to touch in center, about 12 minutes. Cool on sheets over a wire rack for 5 minutes. Transfer to racks; cool completely.

Makes about 24 cookies – I made the exact recipe above, used 1 leveled tablespoon of dough per cookie and got 38

Thursday, April 7, 2011

Lemon molasses marble cake - a cake with a workout

Lemon molasses marble cake / Bolo mármore de limão siciliano e melado

This cake was the first recipe I tried from this book, which is full of amazing recipes and perfect for a sweet tooth like me; lemon cake, no surprise there, but the idea of marbling it with a molasses cake sounded too good not to try.

Indeed the flavor combo is delicious and the cake is very tender; do not be put off by the different steps of preparation – think of them as a great workout, which will allow you to have an extra cake slice at the end. :)

And don’t forget to nominate your favorite blog on Saveur’s 2011 Food Blog Awards! ;)

Lemon molasses marble cake
slightly adapted from the delicious Classic Home Desserts

Molasses batter:
1 2/3 cups (233g) all purpose flour
½ teaspoon baking soda
½ teaspoon cream of tartar
½ teaspoon ground cinnamon
¼ teaspoon freshly ground nutmeg
¼ teaspoon ground cloves
6 tablespoons (84g) unsalted butter, softened
¼ cup + 2 tablespoons (60g) light or dark brown sugar, packed
3 large egg yolks
¾ cup (180ml) molasses
¼ cup + 2 tablespoons (105g) plain yogurt

Lemon batter:
1 2/3 cups (233g) all purpose flour
½ teaspoon baking soda
½ teaspoon cream of tartar
6 tablespoons (84g) unsalted butter, softened
1 cup (200g) granulated sugar
grated zest of 1 large lemon
1 tablespoon freshly squeezed lemon juice
¾ cup (195g) plain yogurt
3 large egg whites
pinch of salt

confectioners’ sugar, for sprinkling

Preheat the oven to 180°C/350°F. Butter and flour a 22-25cm (9-10in) Bundt or tube pan.
Start by making the molasses batter: sift the flour, baking soda, cream of tartar, cinnamon, nutmeg and cloves into a small bowl and set aside.
In a large bowl, cream butter and brown sugar with an electric mixer until very light. Beat in the egg yolks, one at a time, then beat in the molasses. Add the sifted ingredients to the batter alternately with the yogurt, beginning and ending with the dry ingredients. Do not overmix.
Now, make the lemon batter: sift the flour, baking soda and cream of tartar into a small bowl and set aside. In a large bowl, using an electric mixer, cream butter, sugar and lemon zest until very light. Add the lemon juice. Add the sifted ingredients to the batter alternately with the yogurt, beginning and ending with the dry ingredients. Do not overmix. Beat the egg whites with the salt until nearly stiff. Gently fold into the lemon batter.
Drop 3-4 large dollops of the lemon batter into the prepared pan. Top with 3-4 dollops of the molasses batter (give it a nice stir for it was sitting around while you were making the lemon batter). Continue layering the batters. With a butter knife, swirl the batters together a couple of times to get the marbled effect – don’t mix them much.
Bake for about 1 hour or until the cake is risen and golden and a skewer inserted in the center comes out clean.
Cool the cake in the pan over a wire rack for 20 minutes, and then carefully unmold it onto the rack. Let cool completely. Sprinkle the cake with icing sugar to serve.

Serves about 12 – I made 2/3 of the recipe above and used an 8-cup capacity ring pan

Tuesday, April 5, 2011

Peaches and cream ice pops - updated

Peaches and cream ice pops / Picolés de pêssego com chantilly

My summer issue of the DH mag has finally arrived, but unfortunately summer is already gone. I could not resist the ice pops spread, though – each and every flavor looked so good I would have to make at least one. :)
My initial idea was making the raspberry yogurt popsicles, but I’d used my raspberries in other recipes. Luckily I still had a couple of peaches – the last ones of the season – and a bottle of heavy cream in the fridge.

The popsicles turned out so delicious that I don’t think they will last until next weekend – and yes, there were 12 of them. :)

UPDATE: Don't forget to nominate your favorite blogs on Saveur's 2011 Best Food Blog Awards!

Peaches and cream ice pops
from Donna Hay magazine

Sugar syrup:
½ cup + ½ tablespoon (106g) caster (superfine) sugar
¾ cup (180ml) water

Cream layer:
½ cup (120ml) heavy cream, lightly whipped
1 ½ tablespoons icing sugar, sifted
½ vanilla bean, halved lengthwise, seeds scraped with the back of the knife

Peach layer:
300g peaches, peeled, pitted and chopped
sugar syrup, cool

Start by making the sugar syrup: place sugar and water in a small saucepan over medium heat and stir until the sugar is dissolved. Let come to a boil, boil for 1 minute then remove from heat and cool completely.
Place the cream, icing sugar and vanilla seeds in a bowl and fold gently to combine. Spoon the mixture into twelve ¼ cup (60ml) capacity popsicle molds and place in the freezer for 10-15 minutes, or just until they start to firm. Insert a stick in each mold and freeze for 1 ½ hours.
Place the peach and sugar syrup in a blender and process until very smooth. Divide the peach mixture between the popsicle molds, topping the cream layer. Freeze for 4 hours or until completely frozen.
To unmold the pops, remove the molds from the freezer 5 minutes before serving and run the bottoms under some cold water. Remove carefully for the cream layer is very creamy and might break.

Makes 12

Related Posts with Thumbnails