Thursday, November 29, 2012

Gingerbread chocolate chip muffins - it's Christmas time around here!

Gingerbread chocolate chip muffins / Muffins de gingerbread com gotas de chocolate

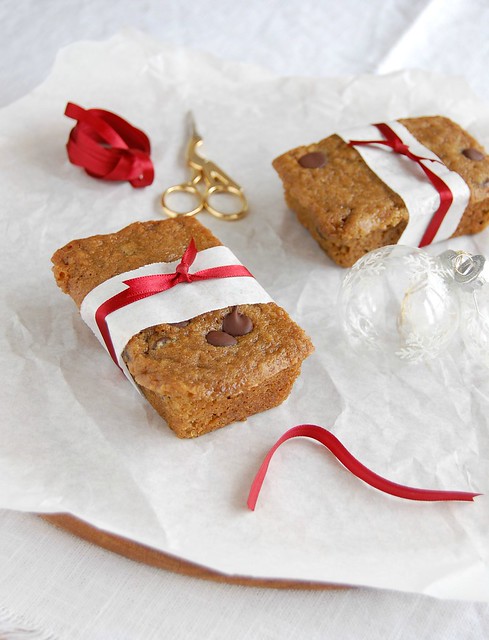
Spices are ingredients I love – to the point of buying a cookbook devoted to them – and I use them throughout the year, but this time of the year is when I reach for them the most: lots of ginger, cinnamon and cloves to set the mood for Christmas. My holiday series starts now, with super tender muffins perfumed with ginger, both fresh and ground – and to make everything even more delicious, there’s chocolate, too.

Gingerbread chocolate chip muffins
slightly adapted from the super beautiful More from Macrina: New Favorites from Seattle's Popular Neighborhood Bakery

1 cup dark chocolate chips
1 ½ cups (210g) all purpose flour
¾ teaspoon baking powder
¾ teaspoon baking soda
1/8 teaspoon salt
½ teaspoon ground ginger
¼ teaspoon ground cinnamon
1/8 teaspoon ground cloves
½ cup (113g/1 stick) unsalted butter, room temperature
1/3 cup (58g) brown sugar, packed
1 teaspoon peeled, grated fresh ginger
1 large egg
1 large egg yolk
1 teaspoon vanilla extract
½ cup molasses
¾ cup (180ml) buttermilk*

Preheat the oven to 165°C/325°F (I baked my muffins at 180°C/350°F). Line 8 cups of standard muffin pan with paper cases.
Toss the chocolate chips with 1 tablespoon of the flour. Set aside.
In a medium bowl, sift together the remaining flour, baking powder, baking soda, salt, ground ginger, cinnamon and cloves. In the large bowl of an electric mixer, cream butter, sugar and fresh ginger until light and fluffy. Add the egg, beat well, then add the yolk, beating well – if the mixture looks curdled, beat in ¼ cup of the dry ingredients. Scrape the sides of the bowl. Beat in the vanilla.
At low speed, drizzle in the molasses and mix until combined. With a spatula, fold in the dry ingredients in three additions alternating with the buttermilk – do not overmix. Fold in the chocolate chips. Divide the batter among the prepared pans. Bake for 20-30 minutes or until risen and golden and a skewer inserted in the center comes out clean. Cool in the pan for 5 minutes then transfer to a wire rack to cool completely.

* homemade buttermilk: to make 1 cup buttermilk place 1 tablespoon lemon juice in a 240ml-capacity measuring cup and complete with whole milk (room temperature). Wait 10 minutes for it to thicken slightly, then use the whole mixture in your recipe

Makes 8 – I made the exact recipe above using this pan and got 8 muffins

Tuesday, November 27, 2012

Amaretto butter cakes + "Argo"

Amaretto butter cakes / Bolinhos de Amaretto

Years ago I watched a good movie called “Gone Baby Gone” which to my surprise had been directed by Mr. Ben Affleck; he’d never been one of my favorite actors, but since I’d been pleased with his directorial debut and had also liked his performance in “Hollywoodland” I thought that watching “The Town” was mandatory – and what a great film that turned out to be, with an insanely good performance by Jeremy Renner, an actor I like a lot (and those who think of him just as Hawkeye should watch this movie, “North Country” and “The Hurt Locker”).

Two weeks ago I watched “Argo” and understood all the fuss about Affleck’s new movie: it really is an excellent film, with a great story I believe not many people knew about (I certainly did not). Affleck’s abilities as a filmmaker have been improving and he continues to let the actors shine – to me something that every director should do; the clothes, the hair and makeup, the places, the music, everything seems so perfectly crafted. And to top it all off he gives the movie a frantic rhythm, one in which every scene has a purpose and nothing is wasted, one that will get the muscles on your body tense with anticipation and without noticing you’ll be holding your breath (I speak from experience). :)
The awards season starts soon and I would be very glad to see “Argo” receive the recognition it deserves – and I hope Affleck continues to work as a director for many years to come.

***
Ever since using Amaretto in baking for the first time I’ve been looking for excuses to do it again and again: I’ve used it to replace almond extract a couple of times with really good results and it goes well with chocolate, too. That is why I was so curious about these cakes and they did not disappoint: you can really feel the liqueur flavor in them and they are very tender, with a crunchy touch given by the almonds. They’re delicious plain, with no icing at all – and especially moreish still warm from the oven – but I wanted more Amaretto flavor and topped them with a simple glaze made with the liqueur.

Amaretto butter cakes
slightly adapted from CakeLove in the Morning: Recipes for Muffins, Scones, Pancakes, Waffles, Biscuits, Frittatas, and Other Breakfast Treats

Cakes:
1 ¼ cups (175g) all purpose flour
1/8 teaspoon baking soda
pinch of salt
pinch of ground cinnamon
½ cup sour cream*
1 cup (200g) granulated sugar
85g (¾ stick) unsalted butter, softened
2 ½ tablespoons Amaretto
1 teaspoon vanilla extract
½ cup whole almonds, toasted, cooled and coarsely chopped
2 eggs
1 egg yolk

Glaze:
1 cup (140g) confectioners’ sugar
1 tablespoon Amaretto
1 tablespoon water, more if necessary

Preheat the oven to 180°C/350°F. Butter and flour twelve 1/3-cup capacity brioche or muffin pans.
In a medium bowl, whisk together the flour, baking soda, salt and cinnamon.
In the large bowl of an electric mixer, cream butter and sugar until light and fluffy. Add the eggs, one at a time, followed by the yolk – beat well after each addition and scrape the sides of the bowl. Beat in the Amaretto and vanilla.
At low speed, alternately add the dry ingredients and the sour cream, beginning and ending with the dry ingredients. Fold in the almonds.
Divide the batter among the prepared pans. Bake for 20-25 minutes or until risen and golden and a skewer inserted in the center comes out clean. Cool in the pans for 2 minutes then unmold onto a wire rack – do not wait longer than that or the cakes might stick. Cool completely.

Glaze: sift the confectioners’ sugar into a small bowl. Add the Amaretto and mix to combine. Gradually add the water and stir until desired consistency. Pour icing over cakes. Set aside until set, about 20 minutes.

* homemade sour cream: to make 1 cup of sour cream, mix 1 cup (240ml) heavy cream with 2-3 teaspoons lemon juice in a bowl. Whisk until it starts to thicken. Cover with plastic wrap and leave at room temperature for 1 hour or until thicker (I usually leave mine on the counter overnight – except on very warm nights – and it turns out thick and silky in the following morning; refrigerate for a creamier texture)

Makes 12

Sunday, November 25, 2012

Chocolate peanut butter biscotti

Chocolate peanut butter biscotti / Biscotti de chocolate e manteiga de amendoim

The biscotti-craze doesn't seem to be going anywhere, therefore it was not so difficult for me to choose which recipe to make first from the oh, so beautiful "Tea With Bea": the cheesecakes looked amazing and I felt tempted to start with one of them, but since I did not have any cream cheese in the fridge I went for the chocolate pb biscotti. I have to honest with you: the dough needed some adjustment and enclosing the peanut butter inside it was less fun than I'd expected, but in the end it was all worth it, because the biscotti turned out absolutely delicious.

Chocolate peanut butter biscotti
slightly adapted from the oh, so beautiful Tea With Bea: Recipes from Bea's of Bloomsbury

2 cups + 2 tablespoons (300g) all-purpose flour
1 ½ teaspoons baking powder
½ teaspoon salt
½ cup (45g) cocoa powder
100g light brown sugar
2 tablespoons golden syrup – I used corn syrup
3 tablespoons canola oil
2 large eggs
2 teaspoons water
1 teaspoon vanilla extract
80g roasted, salted peanuts
80g dark chocolate chips
granulated sugar, for sprinkling
generous 1/3 cup peanut butter (crunchy or smooth)

In a large bowl, mix together the flour, baking powder, salt, cocoa and sugar. Set aside.
Put the golden syrup, oil, eggs, water and vanilla in another bowl and whisk to combine. Add t the dry mixture and stir until just combined (my dough here was very dry and crumbly, so I added another egg and 1 tablespoon oil).
Add the peanuts and chocolate and mix until evenly distributed. Form the dough into a ball, wrap in plastic wrap and refrigerate for 1 hour before proceeding.
Preheat the oven to 145°C/290°F. Line a large baking sheet with baking paper.
Sprinkle a work surface liberally with sugar. Place the dough onto the sugar and flatten roughly with your hands. Dot spoonfuls of peanut butter all over the dough and lightly roll the dough into a log about 6cm (2½in) wide and 2cm (1in) high. Try to encase the peanut butter inside the log to avoid it from burning.
Transfer the dough log to the prepared baking sheet. Bake it for 25-40 minutes until the top is completely hardened, and when tapped, feels sturdy and not squishy inside. Remove from the oven and let cool for 20 minutes.
Turn the oven to 135°C/265°C. Line a large baking sheet with baking paper.
Slice the cooled log, diagonally, into 1cm (½in) slices. Lay all the slices flat on the prepared sheet and bake for 10-15 minutes until nice and dry, turn all the biscotti over bake for another 10-15 minutes on that side. Cool completely on the sheet.
Store in an airtight container. The biscotti will keep for up to 1 month.

Makes about 30 – I made the exact recipe above and got 22


Friday, November 23, 2012

Lemon and almond buns + Dragonette

Lemon and almond buns / Pãezinhos de limão siciliano e amêndoa

I have many favorite TV shows and one of them is “Chuck’s Day Off” – not only because the food looks delicious but also because to me it has the best soundtrack among the cooking shows. After watching several episodes, I noticed that one album cover kept appearing at the end of the show, and after listening to some of the tracks I completely fell in love with Dragonette’s “Fixin To Thrill”. My favorite tracks are “Don’t Be Funny”, “Pick Up the Phone” and “Easy” – impossible not to love a song that starts with that beat and the words “you love me like a bull in a china shop”. :)

I sometimes have the feeling that I get addicted to certain things much too easily, like I did to Dragonette’s album and to Paul Hollywood’s marzipan – I have used it yet again, this time as a filling to Dan Lepard’s insanely tender and delicious lemon buns.

Lemon and almond buns
slightly adapted from Dan Lepard’s column at The Guardian

400g strong white flour – I used all purpose flour
½ teaspoon table salt
finely grated zest of 2 lemons
2 teaspoons dried yeast
3 tablespoons granulated sugar
100g unsalted butter
1 cup (240ml) whole milk
1 large egg
250g marzipan – I used homemade
melted butter, toasted slivered almonds and icing sugar, to finish

Start the night before: in a large bowl, mix together the flour, salt, lemon zest, yeast and sugar. Melt the butter and beat with the milk and egg. Pour into the dry ingredients and mix everything together until a soft, sticky dough forms – I used the Kitchen Aid with the dough hook for that. Mix thoroughly, scrape any remaining dough from your fingers, cover the bowl tightly and leave in the refrigerator until morning.
Remove dough from the refrigerator and set aside at room temperature for 30 minutes. Line a 25cm (10in) square baking pan with foil, leaving two overhangs on opposite sides, and butter the foil – I used a 20x30cm (8x12in) baking pan.
Lightly flour a work surface, knead the dough until smooth (again, the Kitchen Aid), then roll to a long rectangle about 70x10cm (28x4in). Roll the marzipan into a 70cm (28in) cylinder, place along the centre of the dough, then roll the dough around it to seal*. Leave the dough to relax for 10 minutes, then cut into nine slices and place in three rows, without turning them on end, into the prepared pan. Leave to rise for 1 ½ hours or until doubled in volume.
Preheat the oven to 200°C/400°F. Bake the buns for about 35 minutes or until golden. Cool in the pan then brush with melted butter, sprinkle with the almonds and dust with the icing sugar.

* the buns turned out great, but if I were to make them again I would finely chop the marzipan and spread them all over the dough rectangle (as if making cinnamon rolls) then roll it – that way the marzipan flavor would be more dispersed in the dough

Makes 9

Wednesday, November 21, 2012

Apple, berry, almond and chocolate crumble

Apple, berry, almond and chocolate crumble / Crumble de maçã, frutas vermelhas, amêndoa e chocolate

Since almonds, berries and apple worked so beautifully in tart form, I could not wait to try this crumble: all those flavors combined without the need of making pastry – not that I don’t like making pastry, I actually enjoying it very much, but when the need for something sweet is urgent there’s no time for chilling pastry. :D

I was also very intrigued by the addition of chocolate to the crumble topping but have to say I don’t think it was a nice idea here: if you want to see it for yourself go ahead and try it, but when I make this crumble again it will be sans chocolate – and with more almonds to boot.

Apple, berry, almond and chocolate crumble
from the always glorious Delicious - Australia

1kg Granny Smith apples (about 5)
1 tablespoon lemon juice
200g frozen mixed berries
100g brown sugar
½ teaspoon ground ginger
200g marzipan, chopped – I used homemade
custard or ice cream to serve

Almond crumble:
200g unsalted butter, cold and chopped
250g all purpose flour
50g brown sugar
pinch of salt
1/3 cup almonds, chopped
½ teaspoon ground cinnamon
75g dark chocolate, chips or chunks

Preheat the oven to 200°C/400°F. For the crumble, place the butter and flour in a large bowl and rub together with your fingertips to form coarse crumbs. Using a fork, gently stir in the sugar, salt, almonds, cinnamon and chocolate. Set aside.
Peel and roughly chop the apples, then place in an 8-cup capacity ovenproof dish. Toss with lemon juice, then carefully stir in berries, sugar and ginger. Dot with marzipan then top with the crumble.
Place the dish on a baking tray and bake for 45 minutes until the topping is golden and the fruit is tender. Stand for five minutes, then spoon into bowls and serve with custard or ice cream.

Serves 6-8

Monday, November 19, 2012

Lemon-frosted pistachio cake

Lemon-frosted pistachio cake / Bolo de pistache com cobertura de limão siciliano

Hollywood is dominated by men, or better, by white men, so I am always glad to watch women deliver great work. Not many directors are women - some of them are really, really talented and responsible for masterpieces, like Jane Campion and Susanne Bier. Now Vera Farmiga, an actress I'm very fond of, has stepped into directing shoes and brings the beautiful and so sensitive "Higher Ground" - a movie that discusses religion and faith very openly and honestly; even though I don't believe in anything, I felt touched by Farmiga's movie because I was once the girl who sought answers for so many questions, the girl who thought that everything in life happened because a certain being wanted it that way. I liked the movie a lot and hope that Vera Farmiga continues to work behind the camera.

***

This cake is not the super tender type of cake I usually bake, but it's so delicious I cannot wait to buy more pistachios to make it again.

Lemon-frosted pistachio cake
from the always delicious Delicious - Australia

Cake:
¾ cup (105g) all purpose flour
1 teaspoon baking powder
pinch of salt
1 ½ cups (195g) pistachio kernels, ground*
1 cup (100g) almond meal
1 ¼ cups (250g) granulated sugar
3 eggs, lightly beaten
½ cup (120ml) extra virgin olive oil
finely grated zest of 1 orange
100g unsalted butter, melted, cooled
½ teaspoon vanilla extract
1 teaspoon rosewater

Icing:
1 cup (140g) icing sugar
1-2 tablespoons lemon juice
1-2 teaspoons hot water, if necessary

Preheat the oven to 180°C/350°F.
Butter and line the base of a 23cm (9in) springform cake pan with baking paper**.
Sift the flour, baking powder and salt into a bowl and stir in the pistachio and almond. Place sugar and whole eggs in the bowl of an electric mixer and beat for 4-5 minutes until thick and pale. Beat in the olive oil, zest, butter, vanilla and rosewater, then fold in the flour mixture. Spread into the prepared pan and bake for 35-40 minutes until a skewer inserted into the centre comes out clean. Allow to cool slightly, then remove from the pan and transfer to a wire rack to cool completely.
Icing: sift the icing sugar into a medium bowl and gradually add the lemon juice and enough hot water to make a smooth dropping consistency.
When the cake is cool, pour the icing over the cake, allowing some to drip down the sides. Set aside until firm, about 20 minutes.

* if you’re grinding the pistachios at home, add part of the flour to the food processor to avoid turning the nuts into a paste

** I used a regular 23cm (9in) cake pan (no removable bottom); I cooled the cake in the pan over a wire rack for 25 minutes, then carefully inverted in onto a plate, removed the paper, then inverted it again (top side up) onto the rack to cool completely

Serves 6-8

Saturday, November 17, 2012

Orange cardamom madeleines with Cointreau glaze

Orange cardamom madeleines with Cointreau glaze / Madeleines de laranja e cardamomo com casquinha de Cointreau

These madeleines were a sort of a baking accident: I grabbed Martha's gorgeous book to pick a Christmas cookie (to start off this year's Christmas series) but when I started flipping through it the first recipe I saw was the one for these madeleines: they looked so beautiful! I had all the ingredients at home so to the kitchen I went to make the madeleines, and since the batter needed some time in the fridge I had time to bake other cookie recipe.

Orange cardamom madeleines with Cointreau glaze
slightly adapted from the wonderful Martha Stewart's Cookies (with inspiration from the beautiful Scandilicious Baking, too)

Madeleines:
¼ cup (56g) unsalted butter + melted butter extra, for the pan
1 tablespoon good-quality honey
1 teaspoon pure vanilla extract
finely grated zest of 1 small orange
¾ cup (105g) all-purpose flour
1 teaspoon baking powder
¾ teaspoon ground cardamom
1/8 teaspoon salt
¼ cup (50g) granulated sugar
2 large eggs

Glaze:
¾ cup (105g) confectioners' sugar
1 tablespoon Cointreau – or to taste
½ tablespoon hot water, more if necessary

Batter: melt butter in a small saucepan over low heat. Remove from heat, and stir in honey, vanilla and orange zest. Let cool 10 minutes.
Whisk flour, baking powder, cardamom, and salt in a small bowl; set aside.
Stir together sugar and eggs in a medium bowl. Gently fold in flour mixture until combined. Add butter mixture, and fold until combined. Cover with plastic wrap, and refrigerate for at least 2 hours (up to overnight).
Preheat the oven to 190°C/375°F. Brush molds of a madeleine pan with the extra melted butter, then refrigerate for 10 minutes.
Spoon batter into prepared pan, filling each mold halfway. Bake until cookies are puffed and edges are golden, 7 to 8 minutes. Transfer pan to a wire rack, cool for 1 minute. Unmold madeleines onto rack, and let cool completely.
Make the glaze: sift the sugar into a small bowl. Stir in the Cointreau and water, mixing until you get a pourable consistency. Using a small pastry brush, coat ridged side of each cookie with glaze. Let set 15 minutes. Cookies can be stored in a single layer in an airtight container up to 3 days.

Makes 2 dozen – I used a pan with ½ tablespoon capacity cavities and got 48

Thursday, November 15, 2012

Double chocolate cookies (made with sweetened condensed milk)

Double chocolate cookies (made with sweetened condensed milk) / Cookies duplos de chocolate (feitos com leite condensado)

After a time consuming cake I thought you deserved an easy recipe, and these cookies are very, very easy; I have made tons of chocolate chip cookies so far but what made me curious about these was the sweetened condensed milk based dough - I'll just warn you that it is going to be very difficult not to eat the dough right out of the fridge by spoonful. :D

Double chocolate cookies (made with sweetened condensed milk)
from the great Delicious Magazine

200g good quality dark chocolate (minimum 50% cocoa solids)
50g unsalted butter
397g can sweetened condensed milk
1 teaspoon vanilla extract
225g all purpose flour
1½ teaspoons baking powder
pinch of salt
100g white chocolate chips or chunks

Break up the chocolate and gently melt it along with the butter in a bowl set over a pan of simmering water, stirring occasionally. Stir in the condensed milk and vanilla, remove from the heat and cool completely. Mix in the flour, baking powder, salt and chocolate buttons and chill the mixture until firm enough to handle*.
Preheat the oven to 180°C/350°F. Line two large baking sheets with baking paper.
Place leveled tablespoons of the mixture 5cm (2in) apart onto prepared sheets. Bake for 12-15 minutes – the cookies should still look soft and will glisten. Don't overbake them as they soon become very hard. Cool in the sheets over a wire rack for 5 minutes, then carefully remove the cookies with a palette knife and cool on the rack.

* do not let it get too stiff – my dough was so hard it broke my cookie scoop :(

Makes about 45

Tuesday, November 13, 2012

Maple pecan chiffon cake with brown butter icing

Maple pecan chiffon cake with brown butter icing / Bolo chiffon de pecã e xarope de bordo com cobertura de manteiga queimada

Much the same way I bought Alissa Huntsman's latest cookbook because of her beautiful previous one, I could not wait to get my hands on Julie Richardson's new cookbook since I adore her "Rustic Fruit Desserts" so much - a book full of cake recipes? You know I like that a lot. :D
I first thought of making an angel food cake - because of the insane amount of egg whites in my freezer - but when I saw this chiffon cake I had to make it: after all, it's not everyday I'll find a cake as freckled as myself. :D

The icing is super rich and delicious - the brown butter tastes like caramel here - but if you are not in the mood for all that sugar and butter the cake tastes delicious on its own, too.

Maple pecan chiffon cake with brown butter icing
from the absolutely beautiful Vintage Cakes: Timeless Recipes for Cupcakes, Flips, Rolls, Layer, Angel, Bundt, Chiffon, and Icebox Cakes for Today's Sweet Tooth

Cake:
2 ¼ cups (270g) cake flour (homemade: measure 270g of all purpose flour, remove 4 tablespoons and complete with corn starch)
2 teaspoons baking powder
½ teaspoon table salt
¾ cup (132g) brown sugar, packed
6 egg yolks, room temperature
½ cup (120ml) canola oil
½ cup (120ml) pure maple syrup
¼ cup (60ml) water
1 tablespoon pure vanilla extract
8 egg whites, room temperature
½ teaspoon cream of tartar
½ cup (100g) granulated sugar
½ cup (55g) toasted pecans, cooled and finely chopped

Icing:
450g (1 pound) confectioners’ sugar, sifted
1 cup (226g/2 sticks) unsalted butter, cut into small cubes
½ cup (120ml) heavy cream
1 tablespoon vanilla extract
pinch of salt

Preheat the oven to 165°C/325°F. Have ready an ungreased 25cm (10in) tube pan with a removable bottom, bottom lined with a circle of baking paper (this is the pan I used).
In a large bowl, sift together the cake flour, baking powder, and salt. Add the brown sugar and whisk to combine.
In a small bowl, whisk together the yolks, oil, maple syrup, water, and vanilla. Add the liquid ingredients to the dry mixture and briskly stir with a rubber spatula until just smooth. Do not overmix.
In the clean bowl of a stand mixer fitted with the whisk attachment, whip the egg whites on medium speed until foamy. Add the cream of tartar and whip on high speed until soft peaks form. Turn the mixer down to medium speed and gradually add the granulated sugar in a steady stream. Kick the mixer up to high speed and whip until the whites just hold firm (not stiff!) glossy peaks.
Fold a third of the whites into the batter using as few strokes as possible. Add the remaining whites, folding only until evenly incorporated. Lightly fold in the pecans during the last few strokes. Gently pour the batter into the prepared pan and bake until the top springs back when touched or a toothpick inserted in the middle comes out with a few crumbs attached, 50 to 55 minutes.
Remove the cake from the oven and let it cool upside down by inverting the cake pan onto its legs. To remove the cooled cake from the pan, slide a long thin knife or spatula along the sides to loosen and knock the pan sharply on a hard surface until the cake drops out. Remove all the crumbs of the cake sides and top before icing it.

Icing: put the confectioners' sugar in a medium mixing bowl and set aside. Melt the butter in a small saucepan over medium heat. Using a pan with a light-colored bottom will help you keep track of the color. Let the color of the butter darken from lemony to golden brown (swirl the pan occasionally to ensure even heating). Once the butter is dark brown and you begin to smell a nutty aroma, remove the pan from the heat. Pour the butter over the confectioners’ sugar and add the cream, vanilla, and salt. Whisk until smooth. As the butter cools, the icing will become firmer. If using the icing as a glaze, use it immediately. If you plan to use the icing as a frosting, allow it to cool to a good spreading consistency (I refrigerated it for 15 minutes).
Frost the top and sides with the icing. Store in an airtight container for up to 3 days.

Serves 10-12

Sunday, November 11, 2012

Roast tomato and goats cheese frittata

Roast tomato and goats cheese frittata / Frittata de tomates assados e queijo de cabra

Another great idea for a quick and easy dinner or lunch, this frittata recipe can work as a blank canvas: I went for roast tomatoes, which I love, and goats cheese, which I also love and had to use up before it went bad, but you can use other types of cheese, vegetables and herbs (zucchini, feta and mint come to my mind right now, yum!). And as Jamie's tart, the frittata tastes great either hot or cold, which makes it perfect for picnics and/or a brown bag lunch at the office.

Roast tomato and goats cheese frittata / Frittata de tomates assados e queijo de cabra

Roast tomato and goats cheese frittata
adapted from the wonderful Vegetarian Cooking for Everyone

180g cherry tomatoes, halved lengthwise
a few thyme sprigs
extra virgin olive oil, for drizzling
salt and freshly ground black pepper
5 eggs
2 spring onions, finely sliced
1 garlic clove, minced
handful of chopped parsley
handful of basil leaves
1 tablespoon unsalted butter
56g (2oz) creamy goat’s cheese

Preheat the oven to 200°C/400°F. Grab an ovenproof dish or baking sheet that can hold the tomatoes without overlapping them and lightly brush it with olive oil. Place the tomatoes onto the dish, cut side up, and drizzle with olive oil. Season with salt and pepper and scatter with the thyme sprigs. Roast for about 25 minutes or until tomatoes are tender. Set aside. Preheat the broiler.
Beat the eggs with a few pinches of salt, then add the scallions, garlic, and herbs.
Heat the butter in a 20cm (8in) frying pan. Pour in the eggs, lower the heat, and distribute the tomatoes and cheese evenly over the top. Cook until the eggs are set, then slide the pan under the broiler and cook until the top of the frittata puffs up and is golden.

Serves 2

Roast tomato and goats cheese frittata / Frittata de tomates assados e queijo de cabra

Friday, November 9, 2012

Santa Lucia sour cherry and saffron buns

Santa Lucia sour cherry and saffron buns / Pãezinhos de Santa Luzia

Usually it takes me some time to consider a cookbook a top favorite – I love beautiful books and they certainly get my instant attention, but I like to try some of the recipes first to be sure they actually work. However, Signe Johansen’s Scandilicious Baking is so pretty and everything in it sounds so delicious I came to the conclusion that it was the best cookbook I purchased in the last 11 months. Absolutely gorgeous.
Picking the first recipe to try was hard – I actually feel like making all the recipes in this book! – so I settled for one that reminded me of my mom: when I was little, she had a small statue of St. Lucy at home, and I was very intrigued and even a bit scared by the image of a woman holding a tray with two eyes in it. Later on in life, when I was 8 or so, I found out that my dad had had an accident in the late 70s and lost one of his eyes in it – that is why mom had St. Lucy around the house.
I don’t believe in God or in saints but could not resist making these buns just because of my mom.

Santa Lucia sour cherry and saffron buns
from the absolutely beautiful Scandilicious Baking

375ml whole milk
pinch of saffron threads
2¼ teaspoons (7g) dried yeast
¼ cup (56g) unsalted butter, melted and warm
350g all purpose flour
150g whole wheat flour
1 teaspoon ground cardamom
4 tablespoons granulated sugar
½ teaspoon salt
1 large egg
1 teaspoon vanilla extract
24 dried cherries (double the amount if they’re too small)
1 egg, extra, lightly beaten with a fork, for brushing the buns

In a small saucepan, heat the milk with the saffron strands until it starts to come to a boil. Remove from the heat and set aside until lukewarm. Sprinkle the yeast in a large bowl, pour over the milk and mix with a fork. Stir through the melted butter. Add the flours, cardamom, sugar, salt, egg and vanilla to the milk mixture and mix with a spoon until a sticky dough forms. Turn the dough onto a lightly floured surface and knead for 5 minutes until the dough starts to feel smooth and elastic – the dough is quite wet so you may want to use a dough scraper during the early stages of kneading (I used the Kitchen Aid with the dough hook and added 1 tablespoon of all purpose flour to the dough because it was too liquid). Transfer the dough to a lightly buttered large bowl, cover with plastic wrap and put in a warm place to rise. Leave it for about 1-1½ hours until it has doubled in size.
Line a large baking sheet with foil. Punch the dough to remove the excess air then transfer it to a lightly floured surface. Knead it in to a log and then slice into 12 pieces of roughly equal size. Shape these into balls and then splay your hands to roll the bun into a sausage shape, then fold the ends into an S shape and carefully place them onto the prepared sheet. Cover with a clean tea towel and leave in a warm place to prove and double in size again. This should take 20-30 minutes – in the meantime, preheat the oven to 200°C/400°F.
Once the buns have risen, stuff each crevice of the S shaped bun with a dried cherry (two each if they’re too small). Poke them into the dough so they don’t pop up during proving or baking. Lightly glaze each bun with a little beaten egg and bake for 20-30 minutes or until they’re golden and sound hollow when tapped on the bottom.

Makes 12

Wednesday, November 7, 2012

St. Clement’s drizzle cake

St. Clement's cake / Bolo de São Clemente

Not everything in life turns out the way we expect it be and to me understanding that is part of growing up – learning to deal with deception and disappointment may not be a pleasant thing to do but it is certainly necessary. And exactly because of that I find it wonderful when something I expected to be great actually is, even little things like a good movie or a good book. My hopes were high for “Skyfall” and the movie fit the bill perfectly – Daniel Craig has proved once more that he can play the part infinitely better than Brosnan, Javier Bardem delivers another great villain (Joel and Ethan Coen knew what they were doing!) and Sam Mendes is as talented directing an action movie as he is directing drama.

Coincidently, a couple of days before I watched “Skyfall” Rachel Allen’s gorgeous book on cakes arrived, and that was another highlight of my week: the book is absolutely beautiful, packed with delicious recipes, and this citrusy and very moist cake is one of them.

St. Clement’s drizzle cake
slightly adapted from the beautiful Cake (mine was bought here)

Cake:
175g unsalted butter, softened
175g granulated sugar
1 teaspoon vanilla extract
finely grated zest of 1 lemon (you’ll use the juice for the syrup)
finely grated zest of 1 orange (you’ll use the juice for the syrup)
2 large eggs
¼ cup (60ml) whole milk, room temperature
1 ¼ cups (175g) all purpose flour
1 ¼ teaspoons baking powder
pinch of salt

Syrup:
juice of the lemon and orange
½ cup (100g) granulated sugar

Preheat the oven to 180°C/350°F. Butter a 1.5l loaf pan, line with baking paper and butter the paper as well.
In the large bowl of an electric mixer, beat butter, sugar, vanilla and lemon and orange zest until light and fluffy. Beat in the eggs, one at a time, beating well after each addition. Scrape the sides of the bowl occasionally. In low speed, beat in the milk (batter may seem curdled, don’t worry). Sift the flour, baking powder and salt over the batter and fold in. Transfer to the prepared pan and smooth the top.
Bake for about 45 minutes or until risen and golden and a skewer inserted into the center of the cake comes out clean.
In the final minutes of the baking time, make the syrup: in a small bowl, mix together the ingredients. As soon as the cake comes out of the oven, prick several times with a skewer or dried spaghetti, then slowly pour the syrup all over the top, letting it soak into the cake. Leave to cool completely in the pan.

Serves 8-10

Monday, November 5, 2012

Almond and rosewater shortbread

Almond and rosewater shortbread / Amanteigados de amêndoa e água de rosas

I might love baking cookies but I usually shy away from rolled out kind – yes, I’m lazy and yes, I’ve turned several rolled out cookie recipes into slice and bake cookies out of sheer laziness. Not a very nice thing to admit, I know, but true. So months ago, on a cool day – which because of the temperatures we’ve been having here lately seems even more distant – I decided to make roll out cookies, and the combo almond and rosewater seemed perfect: not only because I thought it would taste delicious (and it was, indeed) but also because all those almond pieces dispersed throughout the dough would definitely stop me from turning the cookies into the slice and bake kind. :D

Almond and rosewater shortbread
slightly adapted from the always beautiful Australian Gourmet Traveller

120g whole almonds
220g unsalted butter, room temperature
½ cup + ½ tablespoon (75g) icing sugar, sifted
2 teaspoons vanilla extract
2 teaspoons rosewater
1 egg yolk
2 tablespoons Amaretto
330g all purpose flour
3½ teaspoons baking powder
pinch of salt

Assembling:
2-3 tablespoons rosewater, or to taste
1½ cups (210g) icing sugar, for rolling the cookies

Preheat oven to 180°C/350°F. Spread almonds on an oven tray and roast, stirring occasionally, until golden (5-6 minutes). Cool completely, then coarsely chop and set aside.
Beat butter, icing sugar, vanilla and rosewater in an electric mixer until creamy. Beat in the yolk, then Amaretto, occasionally scraping down sides of bowl. Sift in flour, baking powder and salt, add almonds and stir to form a stiff dough, then turn onto a lightly floured surface. Shape into a disc, wrap in plastic wrap and refrigerate for 2 hours.
Preheat oven to 180°C/350°F. Line two large baking sheets with baking paper. Roll out dough between two pieces of lightly floured baking paper to 1.5cm-thick. Cut into your desired shape using any 5cm (2in) diameter cutter and place onto prepared sheets. Reroll scraps once. Bake until light golden on the edges (18-20 minutes), cool on sheets for 5 minutes, then sprinkle with rosewater. Carefully roll the warm cookies in the icing sugar, then cool over a wire rack.
Cookies will keep, stored in an airtight container, for 1 week (dust with icing sugar between layers).

Makes about 60

Saturday, November 3, 2012

Molasses and caraway apple muffins

Molasses and caraway apple muffins

New ingredients always intrigue me: I love trying new flavors in my kitchen. I got even more interested in baking with different flours after making Alice Medrich's fabulous chestnut pound cake and also after purchasing Kim Boyce's fantastic cookbook; Kim's carrot muffins turned out delicious, so when I saw a new recipe for muffins made with a bit of spelt flour I had to try them - these are made with molasses and apples and come from Dan Lepard's delicious column at The Guardian.

Molasses and caraway apple muffins
from Dan Lepard’s column at The Guardian

100g unsalted butter, melted
50ml canola oil
50g molasses
1 cup (175g) light brown sugar, packed
3 medium eggs
3 teaspoon vanilla extract
3 teaspoon caraway seeds
150g all purpose flour
150g spelt flour
2 teaspoon baking powder
pinch of salt
3 small apples, peeled, cored and diced
flaked almonds, to finish

Preheat the oven to 190°C/375°F; butter a 12-hole muffin pan or line it with paper cases.
Whisk the butter, oil, molasses and sugar until smooth, then beat in the eggs one at a time, until evenly mixed. Add the vanilla and caraway, mix well, then add the flours, baking powder and salt, and stir just to combine. Fold in the apples, divide the mixture between the cases, filling them almost to the top, and scatter almonds on top. Bake for 25 minutes, or until a skewer comes out clean.
Remove from the oven, cool in the pan over a wire rack for 5 minutes then carefully remove the muffins from the pan and transfer to the wire rack.

Makes 12 – I halved the recipe above using 1 ridiculously large egg and 1 ridiculously large apple; I used a muffin pan with 1/3 cup (80ml) capacity cavities and got 7 muffins

Thursday, November 1, 2012

White chocolate cake with passion fruit icing

White chocolate cake with passion fruit glaze / Bolo de chocolate branco com glacê de maracujá

I know, I know, white chocolate and passion fruit combined again – since I had passion fruits galore in my fridge and the flavor combo had worked so beautifully in cheesecake form, I thought that using it again as a cake would be a great idea – and indeed it was; but don’t worry: if you’re not into sour flavors as I am, just glaze the cake with a simple dark chocolate ganache – that is what Donna does in her book.

White chocolate cake with passion fruit icing
slightly adapted from the always delicious and foolproof Modern Classics Book 2

Cake:
185g unsalted butter, chopped
1 cup (240ml) whole milk
1 ½ cups (300g) granulated sugar
150g white chocolate, finely chopped
2 cups + 2 tablespoons (300g) all purpose flour
1 ½ teaspoons baking powder
1/8 teaspoon salt
1 teaspoon vanilla extract
2 large eggs

Glaze:
1 cup (140g) icing sugar
1 to 1½ tablespoons passion fruit pulp – with or without the seeds

Cake: preheat the oven to 180°C. Butter a 23cm (9in) round cake pan, line the bottom with a circle of baking paper and butter the paper as well.
Place butter, milk, sugar and chocolate in a medium saucepan over low heat and stir until melted and smooth. Set aside.
Sift flour, baking powder and salt into a large bowl. Add the eggs, vanilla and the chocolate mixture and whisk until smooth. Pour into the prepared pan and smooth the top. Bake for about 50 minutes or until risen and golden and a skewer inserted in the center of the cake comes out clean. Cool in the pan for 25 minutes, then carefully unmold into a wire rack. Remove the paper then invert the cake right side up on the rack. Cool completely.
Icing: sift the icing sugar into a medium bowl. Gradually add the passion fruit pulp and mix until pourable consistency. Pour over the cake. Set aside until glaze is set, about 15 minutes.

Serves 8-10

Related Posts with Thumbnails