Wednesday, June 29, 2011

Olive and herb focaccia

Olive and herb focaccia / Focaccia de azeitonas e ervas frescas

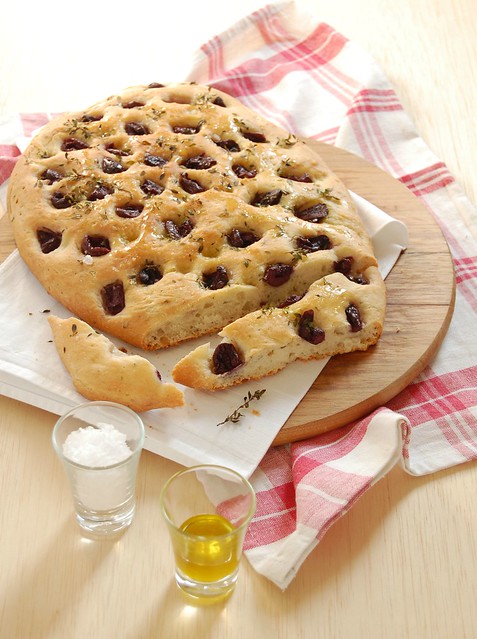
I do not understand people who don’t like olives – don’t get me wrong, I have my own food pet peeves (won’t eat liver for the life of me), but olives are so juicy, so meaty and tender... I find them completely irresistible. ;)

That is why, while setting up the ingredients for this delicious bread, I pulled 20 olives out of the jar. :D

Olive and herb focaccia
slightly adapted from The Weekend Baker

Dough:
3 cups + 1 tablespoon (430g) all purpose flour
1 tablespoon minced fresh oregano or thyme
2 ¼ teaspoons (7g) dried yeast
2 teaspoons table salt
1 teaspoon superfine sugar
1 ¼ cups (300ml) warm water
1 tablespoon olive oil

Topping:
12-15 black olives, pitted and roughly chopped
1 ½ tablespoons olive oil
2 teaspoons fresh oregano or thyme leaves
1 teaspoon coarse salt – I used Maldon

In a large bowl, combine flour, oregano, yeast, salt and sugar. Stir to combine. Drizzle with the water and the olive oil and stir with a wooden spoon until a shaggy dough forms. Transfer to a lightly floured surface and knead until smooth and no longer sticky, about 10 minutes – resist the urge to add more flour; the dough is really soft so I preferred to use my Kitchen Aid with the dough hook to knead the dough.
Shape the dough into a ball and place into a lightly oiled large bowl. Cover with plastic wrap and let the dough rise in a warm spot until doubled in size, about 45 minutes.
Lightly oil a heavy cookie sheet. Turn the dough onto it and press gently to deflate. Shape into an oval about 2cm thick - the oval will be about 25cm (10in) long. Lightly brush the dough with olive oil and loosely cover the surface directly with plastic wrap. Let the dough rise again in a warm spot until puffed and almost double, about 20 minutes.
Preheat the oven to 220°C/428°F. Remove the plastic wrap from the dough. Lightly coat your middle 3 fingertips with flour and press into the dough down (but not through) the bottom. Repeat this dimpling all over the dough. Scatter the olive pieces over the surface, pressing them into the dimples. Drizzle the dough evenly with 1 tablespoon olive oil and sprinkle with the oregano and the coarse salt.
Bake until the top of the focaccia is golden and browned, 25-30 minutes. Remove from the pan and, using a large metal spatula, transfer the focaccia to a wire rack, drizzle with the remaining ½ tablespoon of olive oil. Serve warm (I found it delicious cold, too).

Makes 1 large focaccia

Monday, June 27, 2011

Pear gingerbread cakes

Pear gingerbread cakes / Bolinhos de gingerbread e pêra

On the couch, trying to find something nice on TV the other day, the hubby asks: “have you watched ‘The Painted Veil’?” – “Yes, four times already. But I would not mind watching it again if you’re in the mood”. What can I say? When I like something, I really like it. That’s just me. ;)

Not only did I learn to love ginger, I also bought a whole book devoted to this ingredient. That’s just me. ;)

Pear gingerbread cakes
adapted from the beautiful Gingerbread

1 1/3 cups (186g) all purpose flour
¼ teaspoon salt
2 teaspoons baking powder
¼ teaspoon baking soda
1 ½ teaspoons ground ginger
1 ½ teaspoons ground cinnamon
6 tablespoons (84g) unsalted butter, room temperature
1/3 cup (58g) packed brown sugar
½ cup (120ml) molasses
1 large egg
½ cup (120ml) whole milk, room temperature
2 pears

Preheat the oven to 180°C/350°F; line eight 1/3 cup (80ml) capacity muffin pans with high paper cases*.
Whisk together the flour, salt, baking powder, baking soda, ginger and cinnamon in a large bowl.
Put the butter in the bowl of an electric mixer and beat until smooth. Add the sugar and beat until light and fluffy. Pour in the molasses and beat until smooth. Add the egg and mix until incorporated, stopping at least once to scrape the bowl. Reduce the mixing speed to medium-low and alternately incorporate the flour mixture and the milk, beginning and ending with the flour. Increase to medium speed and beat until smooth.
Divide each pear lengthwise into quarters and remove the seeds. Divide the batter among the prepared pan and place ¼ of pear into each, sinking the pear pieces a little into the batter. Before placing the pan in the oven, fill the empty cavities halfway with water.
Bake for 20-25 minutes or until risen and golden and a skewer inserted in the center comes out clean. Cool in the pan for 5 minutes then carefully remove and transfer to a wire rack. Cool completely.

* if using regular paper cases you’ll probably get 12 cakes (and will need an extra pear)

Makes 8

Friday, June 24, 2011

Lemon, lime and coconut bars and good/bad additions

Lemon, lime and coconut bars / Barrinhas de limão, limão siciliano e coco

I know, I know, I’ve made lemon lime bars before (and those were delicious, by the way). But there’s a special addition to these: coconut in the crust, which works beautifully combined with the lemon/lime filling.

While some additions are wonderful – in the case of these bars – some are disastrous: who would have thought that a simple mustache could do that much harm? ;)

Lemon, lime and coconut bars
slightly adapted from the always wonderful Donna Hay magazine

Base:
2/3 cup (65g) shredded sweetened coconut
1 1/3 cups (185g) all purpose flour
1/3 cup + 2 tablespoons (90g) superfine sugar
1 teaspoon vanilla extract
½ cup + 1 tablespoon (127g) unsalted butter, cold and chopped

Lemon filling:
4 eggs
2 egg yolks
2 cups + 3 tablespoons (436g) superfine sugar
1/3 cup + ½ tablespoon (50g) all purpose flour
finely grated zest of 2 lemons
finely grated zest of 1 lime
½ cup (120ml) freshly squeezed lemon juice
½ cup (120ml) freshly squeezed lime juice
icing sugar, to serve

Start by making the base: preheat the oven to 200°C/400°F; lightly butter a 20x30cm (8x12in) baking pan, line with foil, leaving an overhang in two opposite sides, and butter the foil as well.
Place the coconut in the bowl of a food processor and process to chop the threads into smaller bits. Add the flour, superfine sugar, vanilla and butter and process until mixture comes together. Press in the base of the prepared pan and bake for 20-25 minutes or until golden. Set aside.
Reduce the oven temperature to 180°C/350°F. Make the lemon filling: place the eggs and yolks in a large bowl and whisk to combine. Add the superfine sugar, flour, lemon and lime zest and juices and whisk until smooth. Pour over the base and bake for 20-25 minutes or until just set. Remove from the oven, let cool completely in the pan over a wire rack then refrigerate for at least 2 hours (or until firm). Dust with icing sugar, cut into bars or squares and serve.

Makes 16

Wednesday, June 22, 2011

Chocolate-orange truffles with almonds - flavor combos that never tire

Chocolate, orange and almond truffles / Trufas de chocolate, laranja e amêndoa

Since you already know that I obsess over things from time to time it will come as no surprise to you that I’ve put chocolate and orange together in ganache form again – it worked so well as tart filling I thought it would be delicious as truffles, too (and the almonds add a wonderful texture element here – do not omit them).

That way, I know you won’t find it weird that I’ve already finished the first book (644 pages!), have begun the second and bought the third. ;)

Chocolate-orange truffles with almonds
slightly adapted from the amazing, out-of-this-world Bon Appetit Desserts

1/3 cup + 1 tablespoon (90ml) heavy cream
170g (6oz) dark chocolate, finely chopped (do not exceed 61% cacao)
finely grated zest of 1 small orange
1 teaspoon Cointreau or Grand Marnier – or to taste
½ cup flaked almonds, lightly toasted, cooled and finely chopped

Place chocolate and cream in a heatproof bowl and melt over a saucepan of simmering water, stirring until creamy and smooth. Remove from the heat, add the orange zest and the Cointreau and mix to combine. Cover the bowl with plastic wrap and refrigerate until firm, about 2 hours or overnight. Using a small cookie-scoop or a spoon, make truffles with 1 slightly rounded teaspoon of ganache per truffle and roll into the chopped almonds. Place in fluted paper cases and serve.
Truffles can be refrigerated for up to 5 days.

Makes about 25 truffles

Monday, June 20, 2011

Summer blueberry tart and nice surprises

Summer blueberry tart / Torta de mirtilos

Isn’t it great to find good things unexpectedly? Surfing the net I accidentally discovered that Camera Obscura is the band responsible for a song I adore. Nice surprise. Like the one I had the other day while buying fruit at a supermarket near the office: fresh blueberries. They’re not easy to find near my house so I decided to buy a couple of punnets (despite their not-very-friendly price). Some were devoured plain – Joao thought they tasted a lot like pitangas – and some were used in the panna cotta and in this tart. Please do not ask me to pick favorites. ;)

Summer blueberry tart / Torta de mirtilos

Summer blueberry tart
slightly adapted from the wonderful Martha Stewart's Baking Handbook

Tart dough:
6 tablespoons (84g) unsalted butter, room temperature
½ cup (70g) confectioners’ sugar
2 large egg yolks
1 ½ cups (210g) all purpose flour
¼ teaspoon salt
1 tablespoon heavy cream

Pastry cream:
1 cup (240ml) whole milk
¼ cup (50g) superfine sugar
½ vanilla bean, split lengthwise, seeds removed with the back of a knife
pinch of salt
2 large egg yolks
2 tablespoons corn starch
1 tablespoon (14g) unsalted butter, room temperature, chopped

To assemble:
250g fresh blueberries

Start by making the tart dough: in the bowl of an electric mixer, fitted with the paddle attachment, combine butter and confectioners’ sugar. Mix on low speed until combined, about 2 minutes. Add the egg yolks and mix until incorporated, about 1 minute, scraping the sides of the bowl as necessary. Add ¾ cup (105g) flour, and mix on low speed just until the flour is incorporated, about 30 seconds. Add remaining ¾ cup (105g) flour along with the salt and cream and mix just until flour is no longer visible, about 1 minute.
Turn out the dough onto a piece of plastic wrap and shape into a flattened rectangular. Wrap in plastic and refrigerate for at least 2 hours or overnight. Dough can be frozen for up to 1 month; thaw overnight in the refrigerator before using.
Make the pastry cream: in a small saucepan, combine the milk, 2 tablespoons (24g) sugar, vanilla bean and seeds and salt. Cook over medium heat until mixture comes to a simmer.
In a small bowl, whisk together the egg yolks, cornstarch and remaining sugar. Whisking constantly, slowly pour the hot milk mixture, gradually, into the egg yolks mixture. Continue adding the hot mixture and whisking. Pour it all back to the saucepan and cook over medium-high heat, whisking constantly, until it thickens and registers 71°C/160°F on a thermometer. Remove from the heat and pass mixture through a fine sieve into the bowl of an electric mixer. Add the butter to the cream and, using the mixer, fitted with the paddle attachment, beat in medium speed until butter melts and cream cools, about 5 minutes.
Cover with plastic wrap pressing it directly onto the surface of the pastry cream to prevent a skin from forming. Refrigerate until chilled, at least 2 hours or overnight. Just before using, beat on low speed until smooth (or by hand).
Bake the crust: roll out the pastry between two large pieces of lightly floured baking paper until you get a 40x15cm (16x6in) rectangle, about 6mm (¼ in) thick. Fit dough into a 35x10cm (14x4in) lightly buttered tart pan with a removable bottom, pressing into corners. Trim the excess pastry and prick the pastry all over with a fork. Freeze for 40 minutes.
Preheat the oven to 190°C/375°F. Line the chilled tart shell with a buttered piece of foil and fill it with pie weights or dried beans. Bake until edges are golden, 15-17 minutes. Carefully remove weights/beans and foil and bake for 20 minutes longer or until crust is golden brown all over. Cool completely in the pan on a wire rack.

Assemble the tart: spread the pastry cream into the tart shell and freeze for 20 minutes (it will firm the filling a bit so the berries do not sink into it). Arrange the blueberries on top of the cream and serve (you might want to wait for the cream to become silkier before serving).

Serves 6-8

Saturday, June 18, 2011

Berry and almond cake

Berry and almond cake / Bolo de amêndoas e frutas vermelhas

After making the devilish angel food cake several times and not having much time to play around with macarons, I decided to use my frozen egg whites in something new – and found this cake. It tastes delicious – people at work have been talking about it for two weeks now – looks beautiful right out of the oven and is packed with almonds (yum!) and berries (yum, yum!). The texture is very tender. Not convinced yet? You can feed a crowd with that many slices – or have seconds and thirds yourself. ;)

Berry and almond cake
from here

2/3 cup + ½ tablespoon (98g) plain flour
1 cup (100g) ground almonds
1 ½ cups (300g) superfine sugar
1 teaspoon vanilla extract
8 egg whites (224g)
pinch of salt
150g unsalted butter, melted, cooled
120g raspberries – I used frozen
150g blueberries – I used frozen
50g flaked almonds
icing sugar, for dusting

Preheat oven to 180°C/350°F. Butter and line a 20x30cm (8x12in) metal pan with baking paper, leaving an overhang on two opposite sides. Butter the paper as well.
Place flour, ground almonds, sugar and vanilla in a large bowl and mix well to combine. Using an electric mixer, beat egg whites and salt in a large bowl until stiff peaks form. Fold egg whites into almond mixture then gently stir in butter.
Spoon batter into prepared pan and smooth the surface. Scatter with combined berries, followed by flaked almonds. Bake for 50-55 minutes or until golden and a skewer inserted into the centre comes out clean. Cool completely in the pan over a wire rack. Dust with icing sugar just before serving.
Cake is best made on day of eating.

Serves 12-15

Thursday, June 16, 2011

Onion soup – a classic dish for a chilly fall

Onion soup / Sopa de cebola

Classics don’t become classics for nothing: there must be something special, different, unusual about them to be considered as such; I’m particularly fond of some: movies, music bands, wardrobe items, and for that reason I do not know why it took me so long to try a classic dish like this soup; it is delicious, rich and comforting, not to mention simple and easy to make – everything classic food should be.

Onion soup
adapted from the great Feed Me Now and Jamie at Home

¼ cup (60ml) olive oil
3 garlic cloves, crushed
6 large onions, halved lengthwise then thinly sliced in half-moons
salt
15 sage leaves, chopped
3 tablespoons balsamic vinegar
1 liter vegetable, chicken or beef stock
4 slices sturdy bread (ciabatta, sourdough, etc.)
unsalted butter, to taste
150g fontina, cheddar or gruyère cheese, grated

Heat the olive oil in a large heavy-based saucepan* over high heat. Add the garlic and cook for 30 seconds or until fragrant. Add the onions with a little salt and the sage leaves and cook for 7 minutes, stirring constantly. Reduce the heat to medium and continue to cook for 25 minutes or until onions are golden brown, stirring occasionally.
Add the balsamic vinegar and cook until the vinegar has evaporated. Pour in the stock and simmer for 10 minutes.
Preheat the oven to 200C. Lightly butter each bread slice and place onto a baking sheet. Toast in the oven for 5-7 minutes or until golden. Remove from the oven, spread the cheese over the bread slices and bake for another 2-3 minutes or until the cheese melts.
Ladle the soup into individual bowls, top each with a slice of cheesy toast and serve.

* I halved the recipe and had to use a very large saucepan to hold so many onion slices; make sure to use a very big saucepan if you’re making the recipe as it is printed here

Serves 4

Tuesday, June 14, 2011

Rose water panna cotta with baked blueberry jam

Rose water panna cotta with baked blueberry jam / Panna cotta de água de rosas com geléia de mirtilos feita no forno

Anyone who listens to my Ipod or my CDs will notice that most of the music I love is old – I’m not interested in the music enjoyed by most people nowadays (with a few exceptions). My favorite songs have been favorites for the last 20 years or so. Does that make me an old fart? You can be honest and tell me. ;)

To balance the situation, I’ve brought you today four “things” relatively new to me – things I tried for the first time in the past 4-5 years: panna cotta, buttermilk, rose water and blueberries (what a delicious combo they make, my goodness). :D

Rose water panna cotta with baked blueberry jam
from Donna Hay magazine

Panna cotta:
1/3 cup (80ml) water
1 tablespoon gelatin powder
2 cups (480ml) buttermilk*
2 cups (480ml) heavy cream
1 cup + 2 tablespoons (156g) icing sugar
1 tablespoon rose water

Blueberry jam**:
125g fresh blueberries
¼ cup (50g) superfine sugar
2 tablespoons lemon juice

Start with the panna cotta: place the water in a small bowl and sprinkle the gelatin on top. Set aside for 5 minutes or until gelatin absorbs the water. Combine the buttermilk, cream, icing sugar and rose water in a saucepan over medium heat and stir until sugar has just dissolved. Add the gelatin mixture and cook, stirring, for further 1-2 minutes or until gelatin is dissolved. Strain into a jug and allow cooling. Divide mixture into six 2/3 cup (160ml) capacity glasses or ramekins and refrigerate for 2-3 hours or until set.
Make the jam: preheat the oven to 180°/350°F. Place the blueberries, sugar and lemon juice in a small ovenproof dish and mix to combine. Bake for 15 minutes or until berries release their juices and mixture is bubbling. Cool completely.
Top each panna cotta with the jam and serve.

* homemade buttermilk: place 1 tablespoon lemon juice in a 240ml-capacity measuring cup and complete with whole milk. Wait 10 minutes for it to thicken, and then use the entire mixture in your recipe

** this jam is absolutely delicious with vanilla ice cream, too.

Serves 6

Sunday, June 12, 2011

Ginger cookies with lemon icing and acquired tastes in life

Ginger cookies with lemon icing / Biscoitinhos de gengibre com cobertura de lmão siciliano

Certain things we learn to love really early in life, while others are an acquired taste. I remember going crazy for Scorsese right after watching “Goodfellas” (the first of his movies I ever watched), but not until I was a young woman I fully appreciated the beauty of “The Godfather”. Go figure.

Not a ginger fan until my late twenties, I can eat a bag of crystallized ginger in no time nowadays – its striking flavor became such a favorite of mine. Go figure. ;)

Ginger cookies with lemon icing
from the beautiful Holiday

Cookies:
1 ¾ cups + ½ tablespoon (250g) all purpose flour
1 teaspoon baking powder
pinch of salt
1 teaspoon ground ginger
5 tablespoons (40g) icing sugar
70g crystallized ginger, finely chopped
200g unsalted butter, melted and cooled
1 teaspoon vanilla extract

Icing:
¾ cup (105g) icing sugar, sifted
1 tablespoon lemon juice, more if necessary

Preheat the oven to 180°C/350°; line two large baking sheets with baking paper.

Sift the flour, baking powder, salt, ground ginger and icing sugar into a large bowl. Add the crystallized ginger and stir to combine. Add the melted butter and vanilla extract and, using a wooden spoon or silicone spatula, stir until everything is well combined.
Roll 1 leveled tablespoon of dough per cookie into a ball, squeezing so you have a compact ball. Place onto prepared sheets, 5cm (2in) apart, and lightly flatten with a fork dipped in flour. Repeat with remaining dough. Bake for 12-15 minutes or until cookies are lightly golden. Cool on the pans over a wire rack.
Make the icing: mix the icing sugar and lemon juice in a small bowl until smooth and glossy. Add a bit of water if necessary. Drizzle over the completely cooled cookies.

Makes about 35

Thursday, June 9, 2011

Plum and frangipane tartlets and controlling anxiety

Plum and frangipane tartlets / Tortinhas de frangipane e ameixa

I have the terrible habit of watching movie trailers way before they premiere only to get anxious for months (depending on the movie it arrives here in Brazil months after their premiere in the U.S.). I know it’s self- inflicted pain, but I cannot help it. Luckily there are times when things can be done to ease the anxiety a little: I got so blown away by “The Girl with the Dragon Tattoo” trailer that I began reading the book the day after that.
Just like these tartlets: I saw the recipe last Friday and baked them on Saturday morning. :)

Plum and frangipane tartlets
slightly adapted from here

Pastry:
2 2/3 cups (374g) all purpose flour
1 tablespoon superfine sugar
1 cup (2 sticks/226g) unsalted butter, cold, cut into cubes
1 large egg
4 tablespoons ice-cold water

Frangipane:
200g unsalted butter, room temperature
1 cup (200g) superfine sugar
2 large eggs
2 cups (200g) ground almonds

Filling:
5-6 ripe plums, each cut into eighths*, stones removed

To serve:
icing sugar, for dusting
whipped cream

For the pastry, place the flour and sugar into the bowl of a food processor. Add the butter and process in short bursts until mixture resembles fine breadcrumbs. In a small bowl, whisk together the egg and the water. With the motor running, add egg water mixture and process just until the dough comes together.
Turn it onto a large piece of plastic wrap, form into a disk and wrap well. Refrigerate until firm, at least 30 minutes.
For the frangipane, beat the butter and sugar together in a bowl until light and fluffy. Crack the eggs into the bowl one at a time, beating well after each addition. Add the ground almonds and mix well until combined. Set aside.
Preheat the oven to 180°C/350°F; lightly butter eight 8cm tartlet pans with removable bottoms. Roll dough thinly between two sheets of lightly floured baking paper – if dough gets too soft, refrigerate for 5 minutes. Line each tartlet pan with the dough and trim away any excess; prick the dough all over with a small fork and place the pans on a baking sheet.
Spoon the frangipane into the tart cases so that it comes about halfway up the sides**. Smooth over the surface with a spatula and cover the frangipane evenly with the plums.
Bake for 20-25minutes or until the pastry is crisp, filling is golden and the fruit is tender.
Remove the tartlets from the oven and transfer to a wire rack. Dust with icing sugar and serve warm with whipped cream.

* I sliced each plum into sixteenths, so the slices would be thinner and more delicate; 3 plums were enough for 2/3 of this recipe
** there was ¼ cup of frangipane left, and I was very generous filling the tartlet cases with it

Makes 8 tartlets – I made 2/3 of the recipe above, used 9cm tartlet pans and got 12 tartlets

Monday, June 6, 2011

Papaya-lime sorbet for a day of bad news

Papaya lime sorbet / Sorbet de papaia e limão

So I’ve read that my #2 all time favorite band has come to an end and Detective Stabler is leaving “Law & Order: SVU”, not to mention they’re adding Jennifer Love Hewitt to the cast (the show will be dead to me then) – all that on the same day. Poor me. :(

After such bad news one really needs something sweet to lighten up their day; even better if it’s a dessert with a minimum amount of guilt. :)

Papaya-lime sorbet
from the fantastic ice cream bible The Perfect Scoop

1 kg (2 pounds) papayas
2/3 cup (133g) superfine sugar*
¼ cup (60ml) water
¼ cup (60ml) freshly squeezed lime juice
pinch of salt

Cut the papayas in half and remove the seeds with a spoon. Still with a spoon, remove the flesh and place into a blender. Add the sugar, water, lime juice and salt and blend until a smooth purée forms. Chill the mixture thoroughly then freeze it in your ice cream maker according to the manufacturer’s instructions.
Transfer to an airtight container and freeze.

* the papayas I used were very sweet, so I used only ½ cup (100g) sugar; use less than the amount required and adjust according to the sweetness of the fruit

Makes about 1 liter (1 quart)

Saturday, June 4, 2011

Cashew blondies

Cashew blondies / Blondies de castanha de caju

“Videodrome” was on TV the other day and I was dying to watch it again – I saw it when I was a teenage girl – but I was so sleepy I could barely watch the first 5 minutes. One thing I did not recall about the movie was Debbie Harry as part of the cast, and that made me curious.

Speaking of Ms. Harry, I have blondies for you today. ;)

Cashew blondies / Blondies de castanha de caju

Cashew blondies
from here

½ cup (113g/1 stick) unsalted butter, softened
1 cup (175g) light brown sugar, packed
2 large eggs, room temperature
1 teaspoon vanilla extract
1 cup (140g) all purpose flour
¼ teaspoon baking powder
¼ teaspoon salt
2/3 cup unsalted cashew nuts, coarsely chopped
½ cup (92g) white chocolate chips or chunks

Preheat the oven to 180°C/350°F. Lightly butter a 20cm (8in) square pan, line with aluminum foil, letting it hang about 5cm (2in) over the sides. Butter the foil generously.
Place butter in the bowl of an electric stand mixer. Use the flat beater to beat the butter until fluffy, about 2 minutes. Add the sugar and cream well, another 2 minutes.
With a fork, beat the eggs in a small bowl and mix in the vanilla extract. Add to the butter mixture and blend well.
Sift the flour with the baking powder and salt. In three stages, add to the butter mixture, blending well after each addition. Use a rubber spatula to scrape down the sides of the bowl. Add the nuts and white chocolate and stir with a rubber spatula to distribute evenly.
Scrape the batter into the prepared pan and use the rubber spatula to spread it evenly into the corners. Bake the blondies for 28-30 minutes or until a cake tester or toothpick inserted into the center comes out with no crumbs clinging to it. Remove the pan from the oven and cool completely on a rack.
Lift the blondies from the pan with the aluminum foil. Carefully peel the foil away. Cut into squares.

Makes 16

Thursday, June 2, 2011

Marmalade and almond tart and being persistent

Marmalade and almond tart / Torta de amêndoa e geléia de laranja

Some people say I'm stubborn – myself included, sometimes – but this time I’ll choose the term “persistent”. :)

Remember those silly pastry strips from the other day? The ones that almost ruined my Saturday morning? Here they are, in this beautiful – and delicious – tart. Or did you think I was going to give up on this recipe just like that? ;)

This tart is for marmalade fans – and I am definitely part of that group; if you’re not into bitter flavors go for apricot or other kind of preserves/jam.

Marmalade and almond tart
slightly adapted from the always wonderful Australian Gourmet Traveller

300g sweet pastry*
¼ cup (56g) unsalted butter, softened
1/3 cup + 1 tablespoon (78g) superfine sugar
finely grated zest of ½ orange
1 large egg
1 tablespoon Cointreau
1 cup (100g) almond meal (ground almonds)
220g marmalade
1 lightly beaten egg, for brushing – I used heavy cream

Roll out two-thirds of the pastry between two pieces of lightly floured baking paper to 3mm thick. Line a lightly buttered 30x10cm (12x4in) tart pan (with a removable bottom), trim edges, prick all over with a fork and refrigerate for 1 hour. Roll out remaining pastry to 3mm thick, cut into 1cm strips and refrigerate on a tray for 1 hour.
Preheat oven to 180°C/350°F; beat butter, sugar and orange zest until light and fluffy (1-2 minutes). Beat in eggs, one at a time, and liqueur. Scrape the sides of the bowl, then beat in the almond meal. Spread in the pastry case and bake until filling just sets (12-15 minutes). In the meantime, remove the pastry strips from the fridge. Remove tart from oven, stand for 5 minutes, then very carefully spread the marmalade over the almond filling – be gentle so the jam doesn’t sink in the filling. Arrange pastry strips in a lattice pattern over the top and brush lattice with egg wash/heavy cream, bake until pastry is golden (15 minutes) and filling is bubbly. Remove from the oven and cool the tart in the pan over a wire rack. Dust with icing sugar to serve.

* I doubled this recipe, which gave me 800g pastry; I used 300g for this tart and froze the remaining pastry for another use

Serves 6

Related Posts with Thumbnails