Friday, March 30, 2007

Raspberry cake with almond icing

Raspberry cake with almond icing

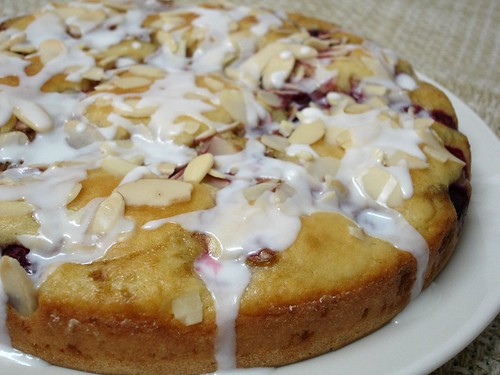
I’d had an eye – ok, maybe both eyes – on this recipe for months! When my friend posted this cake I was immediately hypnotized by the photo.
Those spots of cake trying to cover the filling and the delicious raspberries fighting to show on the surface gave the cake a wonderful look.
Since I love raspberries and almonds I had to give it a try.

It is delicious!! If you have raspberries on your freezer, go to your kitchen and bake this cake now – and then be brave enough to wait for it to cool down a bit before drizzling the icing AND taking a big, big slice.

Lucky me João thought the cake was beautiful and asked if he could take some to his mother – otherwise, I would have eaten the whole thing by myself. :D

Raspberry cake with almond icing

120g all purpose flour
1 teaspoon baking powder
¼ teaspoon baking soda
1 large egg
120g sour cream - I used thick plain yogurt
60g granulated sugar
30g unsalted butter, melted and cooled
130g frozen raspberries
2 tablespoons brown sugar
30g almonds, slivered

*Syrup:
60g icing sugar
1 teaspoon lime juice
1 teaspoon water – you may need a little more
a few drops almond extract

Preheat the oven to 180ºC/355ºF. Grease and flour a round 20cm baking pan.
Sift the flour, baking powder and baking soda in a bowl and set aside.
Beat the sour cream and sugar until creamy. Add the egg and beat well. Beat in butter. Add the flour mixture and mix well.
Pour 2/3 batter in the prepared pan. Sprinkle the raspberries evenly on top of batter. Sprinkle brown sugar on top of berries.
Spoon the remaining batter in different places, making sure you don’t cover the raspberries completely. Slightly level it and sprinkle with the almonds.
Bake for 30-35 minutes or until golden. Leave in the pan until warm then unmold it.

Make the syrup: mix all the ingredients, adding water a few drops at a time, until desired consistency – it shouldn’t be too runny.

After the cake is completely cool, drizzle it with the syrup.

*I used only half the amount of syrup.

Serves 8 (as long as they're not like me). :D

Wednesday, March 28, 2007

Waiter There’s Something In My… Easter Basket! Chocolate heart filled with beijinho

Chocolate heart filled with beijinho

When I saw this month’s “Waiter There’s Something In My… Easter Basket”, hosted by Johanna the Passionate Cook I knew I had to participate – I thought of making a special chocolate egg like the ones I made last year. The egg shells were filled with the most delicious fillings – brigadeiro, beijinho, creamy truffles, dulce de leche, Nutella…
Unfortunately, with the hot weather we’ve been having here lately – 32ºC – it’s almost impossible to work with chocolate.
I tried making a chocolate egg on the weekend but it was a nightmare. Too hot. Last night I decided to try again with something smaller – a chocolate heart.
It wasn’t perfect but at least I could take a couple of photos to show the idea of filled Easter chocolate eggs.

For the following amounts I used an 8cm plastic heart shaped mold – you may adjust the ingredients to make larger hearts or eggs. As I mentioned above, you can use many kinds of fillings – just be careful not to use something too runny, otherwise it will be hard to encase it and cover it with chocolate to seal the egg.

Chocolate heart filled with beijinho

Chocolate heart filled with beijinho

200g chocolate – choose the one you love: milk, bittersweet, semisweet or white

Beijinho:
½ can sweetened condensed milk (197g)
½ tablespoon unsalted butter
4 tablespoons unsweetened desiccated coconut

Make the filling: mix the condensed milk, coconut and butter in a small saucepan and cook over low heat, stirring constantly – when the bottom of the pan starts to show, remove from heat, pour in a greased plate, set aside to cool. Don’t use it unless it’s completely cool.

Chop the chocolate and place in a glass bowl. Melt it either using the double-boiler process or the microwave.
You have to temper the chocolate – it has to be done properly, otherwise your coating won’t dry correctly and won’t be glossy and resistant to temperature changes. Click here to learn how to temper chocolate correctly.
The other way to temper chocolate is to pour it over a piece of granite and, using a plastic or metal spatula, spread the chocolate over the stone making continuous movements – the granite will cool down the chocolate very quickly. Dip the end of a toothpick in the chocolate and put it against your lip – if it feels cold, it’s ready to mold. Using the same spatula, quickly remove the chocolate from the granite back into the bowl. Start molding it.
That’s the way I make it because I have a granite piece that’s used ONLY for this. Otherwise, chocolate will be contaminated and will never be in perfect conditions.
Spread chocolate with a brush or spoon on the molds to form the first layer. Refrigerate until chocolate sets, making sure that mold cavity is turned upwards. Repeat the procedure twice - each layer must be thin. Remove from refrigerator when chocolate is set.
To fill each half of the heart use the back of a spoon to spread filling evenly (the chocolate layers must be very hard when applying filling). Leave 1 cm at the edges without filling for better adherence of the last chocolate layer. Refrigerate again for 5 minutes.
Spread chocolate all over the filling until thoroughly covered. Scrape mold edge with a spatula to eliminate chocolate excess. Refrigerate again until chocolate hardens – it will loose from the mold. Never “force” this step and never touch the mold – the heat of your hands will stain the chocolate. Always hold the molds by their edges.

Click here to see step-by-step photos of how to make different kinds of chocolate eggs.

Unmold the chocolate heart on a piece of waxed paper and leave it for 4 hours before wrapping.
Wrap it with candy foil – never use regular foil because it may increase the temperature around the chocolate and cause it to melt.
Place the chocolate in beautiful paper boxes, wrap it in cellophane... Use your imagination to
decorate it!

Makes one 420g chocolate heart (approx.), without candies inside*

* to make all your chocolate Easter eggs with the same weight, you must consider the following proportion: 80% of the total weight of the egg is formed by both shells; 20% is formed by the candies inside the eggs. For example: in a 500g egg, 400g are shells (200g each) and 100g are candies.
To make each shell the proper weight, use a precise kitchen scale.

To you make chocolate eggs with filled shells use a mold with less capacity than the weight you are aiming. For example: to make a 750g filled egg, use a 500g mold.
Be careful with the amount of filling you use, otherwise there won’t be any space inside the egg to place the candies.

Saturday, March 24, 2007

Pasta with lemony broccoli, walnuts and toasted breadcrumbs

Pasta with lemony broccoli, walnuts and toasted breadcrumbs

Want a delicious dish that is put together in no time? Try this recipe.

Susan’s pasta is one of those recipes you’ll cook once, twice, 15 times - and will always feel like cooking again.
I made just 2 changes: onions instead of garlic + shallots and parmesan instead of Grana Padano.
I also made my own breadcrumbs using stale homemade white bread.

Click here and check her post – just be careful not to bite your monitor. ;D

Pasta with lemony broccoli, walnuts and toasted breadcrumbs

2 tablespoons olive oil
1 large onion, chopped
2 teaspoons fresh lemon juice
zest of 1 lemon
230g short pasta – I used penne
1 bunch broccoli (just the florets)
60g (½ cup) walnuts
55g (½ cup) breadcrumbs
crushed black pepper
salt
a good portion of parmesan, grated
a handful of chopped fresh parsley for garnish
extra virgin olive oil to drizzle on top

Preheat oven to 165ºC/325ºF. Layer walnuts on a baking sheet, and bake for 10 minutes, until slightly golden and aromatic. Remove from oven and place the walnuts on a clean kitchen towel. Once they’re cold, roughly chop them.
To toast the breadcrumbs, place in a skillet on the stovetop; slightly shake until golden and evenly toasty, just a couple of minutes. Remove from pan, so that the heat won’t continue to toast them.

Cook pasta in salted water according to directions.

Add olive oil to a skillet. Over medium heat, sauté onion until golden. Add the broccoli, lemon juice and zest, red pepper flakes, and salt. Cook for 3-4 minutes or until the broccoli turns a brilliant green and remains firm to the touch. Add your cooked pasta to the skillet with the broccoli mixture, and toss in the toasted walnuts and breadcrumbs.
Plate the pasta; sprinkle with parmesan and some fresh parsley. Finish it off with a drizzle of extra virgin olive oil.

Makes 4 servings.

Friday, March 23, 2007

Cardamom yogurt pudding with grapefruit and cardamom honey syrup

Cardamom yogurt pudding with grapefruit and cardamom honey syrup

I’d never tasted anything with cardamom – seen in many recipes, it made me curious a bunch of times but not enough for me to buy it.
The event on “Colher de Tacho” (the blog with events for blogs written in Portuguese) was the perfect excuse for me to try it. And the conclusion is: I shouldn’t have waited that long. :D

This dessert is fabulous: a few ingredients, simple to make and a visually rich result. Not to mention the flavor – delicious.

The original recipe called for orange and cinnamon for the syrup. I decided to use cardamom for both the pudding and the syrup and grapefruit instead of orange.
The grapefruit was a bit bitter so next time I’ll definitely use orange.

Cardamom yogurt pudding with grapefruit and cardamom honey syrup

Cardamom yogurt pudding with grapefruit and cardamom honey syrup

130g (½ cup) plain whole-milk yogurt
1 ½ tablespoons sugar
¼ teaspoon vanilla
2 teaspoons water
½ teaspoon unflavored gelatin
pinch ground cardamom
1 grapefruit
1 tablespoon mild honey (preferably orange blossom)
Small pinch cardamom

Whisk together yogurt, sugar, and vanilla in a small bowl until sugar is dissolved. Put water in a very small saucepan and tilt pan so that water is on one side, then sprinkle gelatin and cardamom evenly over water. Let stand 1 minute to soften. Heat mixture over low heat, stirring, until gelatin is dissolved, about 30 seconds – be careful not to boil gelatin or it won’t solidify the pudding. Whisk hot gelatin into yogurt until combined well. Pour yogurt into a 240ml (1 cup) ramekin and chill, covered, until set, about 1 ½ hours.

While yogurt is chilling, cut peel and white pith from grapefruit with a sharp knife. Working over a small bowl, cut segments free from membranes from half of grapefruit, letting segments fall into bowl, then squeeze 1 tablespoon juice from remaining half of orange and, if necessary, from membranes.

Bring grapefruit juice, honey, and cardamom into a simmer in cleaned very small saucepan, stirring, then simmer until reduced to about 1 tablespoon, about 1 minute. Add grapefruit segments to syrup, gently stirring to coat. Cool to room temperature, about 10 minutes.
Run a thin knife around edge of ramekin to loosen pudding, then dip ramekin into a bowl of hot water 30 seconds and invert pudding onto a plate.
Spoon syrup over pudding and arrange grapefruit around side.

Yogurt pudding can be chilled up to 1 day.

Serves 1

Wednesday, March 21, 2007

Salt-baked fish stuffed with onion farofa

Salt-baked fish stuffed with onion farofa

I’ve posted several beef recipes because those are the dishes I usually cook for João. This time I’ll post a delicious recipe of something I love so much – fish.
My mom cooked fish at least once a week – she used to say that it was good for the brain. :D

Flipping through a cookbook I found this beautiful fish, made in a very unusual way – I immediately knew I had to try it. I know my grandmother roasts rump this way, using this huge amount of salt, but doing the same with fish was something totally new to me.

On the original recipe, sprigs of dill are placed inside the fish before baking it. I went for a Brazilian touch and filled the fish with farofa. You can use dill if you want to.

I knew I had achieved tremendous success when my beef-and-potato eating husband asked me when I would make this recipe again. ;)

UPDATE: Many of my dear readers asked my about farofa - it's a very traditional Brazilian dish. It may have different flavors and sometimes it's great to use leftovers that have been around for a while. Click here to know more about farofa and here to see the delicious carrot farofa I made a while ago.

Salt-baked fish stuffed with onion farofa
from Kitchen: The Best of the Best

1.5kg whole snapper, gutted but not scaled - I used "namorado", a fish with a firm and white flesh
1.5kg coarse-grained sea salt

Farofa:
1 large onion, finely sliced
3 tablespoons olive oil
2 tablespoons parsley, chopped
50-70g manioc flour
salt
freshly ground pepper

Start with the farofa: heat olive oil in a medium saucepan, over medium heat. Add the onion and cook until golden – stir every now and then so it won’t burn.
Add the parsley and the manioc flour, mix well. Season with salt and pepper and remove from heat. Set aside to cool – the farofa has to be completely cool before you fill the fish with it.

Prepare the fish: Pre-heat the oven to 200ºC/400ºF. Rinse the fish and pat dry with paper towels. Open the cavity and gently start to stuf the fish with the farofa:

Secure with string or toothpicks.
Put approximately 1/3 of the salt on the bottom of a roasting pan to just cover the metal. Carefully put the fish on the salt and then pack the remaining salt around and over it. Using your hands, sprinkle some water over the salt, just enough to lightly dampen it. Press the damp salt with your hands to firm the packing around the fish.

Bake the fish for 30 minutes (I baked mine for 50).

Remove the pan from the oven and crack the salt encasing the fish. Carefully remove the salt from the fish, using a pastry brush to brush off any loose salt. Using a sharp knife, cut the skin down the center of the fish and pull it away from the flesh. With a spatula or large knife gently remove the flesh from the fish and place on a serving platter. Serve with a baby leaf salad, lemon wedges and lemon sauce or lemon mayonnaise.

*The scales prevent the fish from absorbing the salt so it’s essential that your fish isn’t scaled when you purchase it.

Serves 4.

Monday, March 19, 2007

Asparagus risotto

Asparagus risotto

When I cook beef for João, I always choose another recipe to cook for myself – and most of times I end up making risotto.
It’s my favorite dish and I’ll gladly have a big plate of it.
I should be ashamed to tell you that, but there it goes: on my honeymoon I ate so much that I had a hard time trying to get dressed for work on the following week. I literally tried almost every outfit I had back then, with little success.
Among all that spectacular food, I ate an asparagus risotto that was superb. So delicious I hadn’t forgotten about it, even 2 years later.
It was such a great week that I tried to relive it a little by making this recipe. I hope you all enjoy it as much as I did.

Asparagus risotto
from Kitchen: The Best of the Best

1 liter vegetable stock
50g (3 ½ tablespoons) butter
1 onion, finely diced
275g (1 ¼ cups) risotto rice – I used Arborio
175g (1 bunch) asparagus
2 tablespoons lemon juice
85g (heaped ¾ cup) parmesan, grated
salt and black pepper

Heat the stock and keep it gently simmering.
Melt the butter in a large heavy-based saucepan over medium heat. Add the onion and sauté until it’s soft and transparent.
Add the rice and stir for 1 minute or until the grains are glossy and well coated in the butter. Add 240ml (1 cup) stock, simmer and stir until it is absorbed. Continue to add the stock, 1 ladle at a time, stirring continuously until the stock is absorbed and the rice is al dente.
Bring a saucepan of water quickly to a boil and blanch the asparagus until bright green. Drain and slice into bite-sized pieces.
Fold the lemon juice and the parmesan through the risotto and season with salt and freshly ground pepper.
Spoon onto warm serving plates and top with the asparagus.

Serves 4

Friday, March 16, 2007

Nigella’s vanilla cupcakes

Nigella’s vanilla cupcakes

I made these cupcakes a while ago, as part of an “experiment” – I’d seen lovely cupcakes decorated with rolled fondant on the Internet and felt like making them at home.
It was my first attempt at cupcakes and I really liked the result!!

The flavor was wonderful!! The cupcakes were so delicious I had 2 right out of the oven… I’m not the one to blame – the smell was so tempting, I couldn’t resist!! :D

Recipe taken from Nigella’s website.

UPDATE: I forgot to write that I used dulce de leche to as "glue" to stick the rolled fondant to the cupcakes.

Nigella’s vanilla cupcakes

Nigella’s vanilla cupcakes

125g self-raising flour
125g caster sugar
125g soft unsalted butter
2 eggs
½ teaspoon real vanilla extract
2 tablespoons milk, approximately

Preheat the oven to 200ºC/ and line a 12-muffin pan with paper cases. In a medium bowl, cream the butter and sugar, beat in the eggs one at a time with a little of the flour. Then add the vanilla extract and fold in the rest of the flour, adding the milk to get a dropping consistency. It will look as if the scant mixture is not enough to make 12 cupcakes, but it is. Bake for 15-20 minutes or until the cupcakes are cooked and golden on top. As soon as bearable, take the cupcakes in their cases out of the tin and let cool, right way up, on a wire rack. Decorate the cupcakes after they’re completely cool.

Makes 12

Thursday, March 15, 2007

Big, Fat, Chewy Chocolate Chip Cookies

Big, Fat, Chewy Chocolate Chip Cookies

Joao’s nieces are the cutest things ever: they’re 3 and 2 and they call me “aunt Patricia” – I love it! :)

I wanted to bake them some cookies and used a recipe from this blog.
The cookies turned out delicious but they were so huge the girls could barely hold them with their tiny little hands…

I used a 1 ½ tablespoon to drop the dough on the baking sheets and got 8cm cookies – you can bake them smaller if you want.

Big, Fat, Chewy Chocolate Chip Cookies

280g (2 cups) all-purpose flour
½ teaspoon baking soda
½ teaspoon salt
170g (3/4 cup) unsalted butter, melted
220g (1 cup) packed brown sugar - mine was dark, the original cookies look a lot better
100g (½ cup) white sugar
1 tablespoon vanilla extract
1 egg
1 egg yolk
340g (2 cups) semisweet chocolate chips or chunks

Preheat the oven to 165ºC/325ºF. Grease cookie sheets or line with parchment paper.
Sift together the flour, baking soda and salt; set aside.
In a medium bowl, cream together the melted butter, brown sugar and white sugar until well blended. Beat in the vanilla, egg, and egg yolk until light and creamy. Mix in the sifted ingredients until just blended. Stir in the chocolate chips by hand using a wooden spoon.
Drop cookie dough 1/4 cup at a time onto the prepared cookie sheets. Cookies should be about 7cm apart.
Bake for 15 to 17 minutes or until the edges are lightly toasted.
Cool on baking sheets for a few minutes before transferring to wire racks to cool completely.

Makes 38-40 cookies

Big, Fat, Chewy Chocolate Chip Cookies

Wednesday, March 14, 2007

White cake

I made this cake last year for my mother-in-law’s birthday party. Since she used to work as a seamstress, the cake was a pillow with sewing gadgets and a small rose.

I used Nic's white cake recipe, which is just fantastic. When I took the cakes out of the oven I felt like taking a big bite of them. Seriously – the smell was wonderful!

The recipe is perfect: the cake is delicious and firm enough to be covered with rolled fondant. I’ve made it several times with different fillings/icings and the results have been great.

The cake was lightly brushed with my traditional sugar syrup and filled with dulce de leche beaten with a dash of heavy cream - I do this to make it a bit less sweet and also to spread it more easily.

It was a hit at the party and the kids ate all the sugar decorations. :D

White cake

240ml (1 cup milk) room temperature
6 egg whites
1 teaspoon almond extract
1 teaspoon vanilla extract
315g (2 ¼ cups) cake flour
350g (1 ¾ cups) sugar
4 teaspoons baking powder
1 teaspoon salt
170g (3/4 cup) butter, softened

Preheat oven to 175ºC/350ºF.
Grease two 22cm cake pans with butter, line the bottom with parchment paper, grease the parchment paper and flour the pans.
Combine milk, eggs whites and extracts in a small bowl with a fork. Set aside.
Combine flour, sugar, baking powder and salt in an electric mixer and mix at slow speed with a paddle attachment – since I don’t have it, I used the regular beaters of my mixer.
Add butter. Continue beating at slow speed until mixture looks like wet sand (If you're doing this by hand, sift the dry ingredients together and rub in butter).
Add all but 120ml (½ cup) of milk mixture and beat at medium speed for 1 ½ minutes. Add remaining milk mixture and beat for an additional 30 seconds, scraping the sides of the bowl if necessary. Do not overmix.
Divide batter evenly between prepared pans and gently shake to smooth batter. Bake 30-35 minutes, until toothpick inserted into the center comes out clean.
Let cakes cool in the pans for 15 minutes then invert onto racks to cool completely before frosting.
Unfrosted cakes can be frozen for 1-2 weeks.

Serves 16-18

This recipe was posted on the Portuguese version of my blog on Sep. 27, 2006.

Monday, March 12, 2007

Steak with maître d’hotel butter and roasted new potatoes

Steak with maître d’hotel butter and roasted new potatoes

Jeff once wrote in one comment that you can’t beat meat and potatoes – João totally agrees with that. :)

I saw this steak recipe and then the new potatoes recipe on the same book - 140 pages apart - and decided to make both and serve them together.

João loved it so much I’ve made it twice already.

Steak with maître d’hotel butter and roasted new potatoes
from Family Food

90g (6 ½ tablespoons) unsalted butter, softened
2 teaspoons finely chopped parsley
lemon juice
4 steaks, about 1,3cm thick – I used 2cm thick tenderloin steaks
1 tablespoon olive oil
salt
ground black pepper

Potatoes:
600g new potatoes
1 ½ tablespoons olive oil
2 teaspoons thyme leaves – I used rosemary
2 teaspoons coarse salt

Cream the butter in a bowl, using a wooden spoon, then beat in a pinch of salt, a pinch of pepper and the parsley. Add about 2 teaspoons of lemon juice, a few drops at a time. Let the butter harden in the refrigerator a little, then form it into a log shape by rolling it up in waxed paper. Put it in the refrigerator until you need it.

Make the potatoes: Pre-heat the oven to 205ºC/400ºF. Cut the potatoes in half and place them in a roasting pan. Add the oil, thyme/rosemary and salt and mix well all the potatoes are coated.
Roast for 30-40 minutes or until they’re golden and cooked through.

Season the steaks with salt and pepper on both sides. Heat the oil in a large frying pan and, when it is very hot, add the steaks - here, I added one small red chili finely sliced; it's totally optional. Cook them for 2 minutes on each side for medium, and 4 minutes on each side for well done. The cooking times may very depending on the thickness of your steaks – if they are thin, give them a slightly shorter time and if they are thick, cook them for longer.
Cut the butter into slices and put a couple of slices on top of each steak. The heat of the steaks will melt down the butter.
Serve with the potatoes, vegetables or salad.

Serves 4.

Wednesday, March 7, 2007

Cooked cornmeal cake

Cooked cornmeal cake

I’d promised my dad to bake him a cornmeal cake ages ago – and he’d ask me about the cake every chance he got.

I have a good friend who knows all about Brazilian cornmeal cakes – she’s baked several different recipes, all of them with beautiful results. I used one of her recipes.
What a delicious cake! Since the cornmeal is cooked with the sugar, milk and oil, the result is a very moist cake.

In my opinion, the only difficult thing in this recipe is being able to resist and not eat the whole bowl of cooked, sweetened cornmeal. :)

My father loved it and said that he can’t wait for me to bake and send him more cakes like this.

Cooked cornmeal cake

320g fine cornmeal – polenta works wonderfully as well
250g sugar
400ml milk
150ml vegetable oil – I used canola
pinch of salt
3 large eggs
1 tablespoon baking powder
1 ½-2 tablespoons cornmeal – extra, to prepare the pan

Pre-heat the oven to 180ºC/355ºF.
Grease a 24cm ring pan and sprinkle with cornmeal, shaking well to coat the whole pan. Shake it to remove any excess. You can bake this recipe in muffin pans, if you wish.
Place the cornmeal, sugar, milk, oil and salt in a large saucepan and mix well until the ingredients are dissolved. Cook this mixture over medium/high heat, stirring constantly so there aren’t any lumps, until thick and creamy – it will resemble soft polenta.
If lumps are formed, stir quickly clockwise and then the opposite way – I used a whisk and it worked really well. Pour the mixture in a bowl and set aside to cool.
When it’s cool, add the eggs, one at a time, and mix well after each addition. Add the baking powder and mix well.
Pour the mixture into prepared pan and bake for 40-45 minutes or until a skewer comes out clean.
Let it cool in the pan before unmolding it.

Serves 10

Cooked cornmeal cake

Monday, March 5, 2007

Cinnamon pancakes

Cinnamon pancakes

Valentina has created a new blog in which she wants to gather foodblogs that are written in Portuguese.
Every fortnight, a special ingredient will take the stage in an event called “The king of the fortnight” - her readers are supposed to cook something using that ingredient.
Her first choice was cinnamon – I can’t tell you how excited I was about that! :)

I’m willing to participate with more than one recipe, so here’s the first I’ve made: cinnamon pancakes.
They’re delicious but I must warn you: they’re only for cinnamon lovers. I used Nic’s recipe – she tells us to serve these with maple syrup; I had them with honey and they tasted fantastic, too.

Cinnamon pancakes

140g (1 cup) all-purpose flour
1 teaspoon baking powder
¼ teaspoon salt
1 tablespoon sugar
1 teaspoon cinnamon
240ml (1 cup) milk – I used low-fat
1 egg
1 tablespoon butter, melted – optional, I used it

In a medium bowl, sift together flour and baking powder, add cinnamon, salt and sugar.
In a separate small bowl, whisk together milk, egg and butter (if using). Pour wet ingredients into dry ingredients and stir until well combined, with only a few lumps.
Heat a griddle or nonstick pan over medium/high heat – I prefer to use low heat. Drop batter to form 7,5cm pancakes – I used my 1 ½ tablespoon measuring tablespoon for that. Cook for about 2 minutes, until pancake bubbles and looks slightly dry around the edges. Flip and cook until golden brown.
Serve immediately with maple syrup.

Makes about 12 x 7,5cm pancakes.

Cinnamon pancakes

Watercress and parmesan flatbread salad

Watercress and parmesan flatbread salad

This dish is a combination of two ideas: my decision to make – and post – more salads and also my first participation in the “Weekend Cookbook Challenge”, which is being hosted by Tami.

My salad is slightly different from the one in the book – I felt the need to change some ingredients – but I was happy with the result. It was refreshing and very tasty.

Watercress and parmesan flatbread salad
adapted from Entertaining

200g watercress leaves
2 tablespoons balsamic vinegar
2 oranges, peeled and segmented
50-75g (½ – 3/4 cup) shaved parmesan cheese
cracked black pepper

Parmesan flatbread:
2 large pita breads – you can use lavash bread, if you wish
35g (1/3 cup) finely grated parmesan cheese
60ml (¼ cup) olive oil

Combine the watercress, balsamic vinegar, oranges, parmesan and pepper in a bowl.
To make the parmesan flatbread, cut the pita breads in half, lengthwise, and then into strips. Combine the parmesan and oil, and brush over on side of the bread strips. Place under a preheated hot grill (broiler) and cook for 1 minute or until golden.
Cross 4 bread strips on each plate. Top with the watercress and serve.

Serves 4 as a starter or as a salad with a char-grilled meat or fish mean meal.

Friday, March 2, 2007

Apple coffee cake

Apple coffee cake

Joao and I were watching TV during Carnival and the following dialogue took place:
“I want to cook something.”
“But we’ve already eaten.”
“I know, so maybe I’ll bake something. Maybe a cake.”
“Sure, honey, if you feel like it, go ahead”

I searched for something to inspire me and found a single apple in the fridge, so “lonely”, begging to be used – it was going to become a smoothie for Joao’s breakfast the next morning anyway. So I made this delicious cake, full of cinnamon and sugar on top.

I baked the cake in a removable bottom pan and it was easier to unmold it without ruining the apple topping.
Dip the slices in cold water containing lemon or lime juice to prevent browning.

I had a huge slice, hot from the oven, and it was hard not to devour the whole thing at once – it wouldn’t have been good to me to eat more, since it was 1:10am… :)

Apple coffee cake
from Sweet Food

Cake:
115g (½ cup) unsalted butter
150g (3/4 cup) caster sugar
2 eggs, lightly beaten
1 teaspoon vanilla extract
210g (1 ½ cups) self-rising flour, sifted
185g (3/4 cup) vanilla yogurt – I used plain skim yogurt

Topping:
1 Granny Smith apple, peeled, cored and thinly sliced – I used one Fuji apple
35g (2 ½ tablespoons) unsalted butter
50g (¼ cup) sugar
1 teaspoon ground cinnamon

Pre-heat the oven to 175ºC/350ºF. Grease a deep, 20cm round cake pan and line the bottom with waxed paper.

For the cake: beat butter and sugar until light and creamy. Gradually add the beaten egg, beating well after each addition. Add the vanilla extract.
Fold in the flour, then the yogurt, and stir until smooth. Spoon the batter into prepared pan and smooth the surface.
Arrange the apple slices evenly over the mixture in a circular pattern, starting in the center. Sprinkle with the cinnamon and the sugar (the topping ingredients). Melt the butter and drizzle over the top.
Bake for 1 hour or until skewer comes out clean when inserted into the center of the cake. Leave in the pan for 30 minutes before unmolding – set on a wire track to cool.
If desired, combine a little extra sugar and cinnamon and sprinkle over the apples.

Serves 8-10.

Thursday, March 1, 2007

Spaghetti marinara

João loves seafood but I’d never made anything aside from pasta with shrimp
I felt a little reticent when he asked me for spaghetti marinara – I wondered if I could pull that off…
Luckily, I was able to find the seafood medley mentioned on the recipe, so it was a nice first time. Everything was clean, chopped and frozen – no traumatic contact with slimy stuff. :D

I made ¼ recipe and added king shrimp, seasoned with salt, pepper and lime juice and grilled with olive oil.

There was a thunder storm going on during our lunch, so I didn't have much light to photograph our food. :(

Spaghetti marinara
from Quick Food

2 tablespoons extra-virgin olive oil
1 onion, finely chopped
2 cloves garlic, crushed
2 cans tomatoes, diced (395g each)
65g (¼ cup) tomato paste – I omitted
450g spaghetti
450g seafood medley – see note
8 mussels, beards removed, scrubbed – I omitted because there were mussels in the seafood medley I used
2 tablespoons shredded fresh basil
salt
cracked black pepper

Heat the oil in a saucepan over medium heat, add the onion, and cook for 5 minutes or until soft and golden. Add the garlic and stir for 1 minute of until aromatic. Add the tomatoes and tomato paste and bring to a boil, then reduce the heat and simmer for 20-25 minutes or until the sauce becomes rich and pulpy. Stir the sauce occasionally during cooking.
Season with salt and pepper. Meanwhile, cook the spaghetti in a large saucepan of rapidly boiling water until al dente. Drain well, return to the saucepan and keep warm.
Add the seafood mix and the mussels to the tomato sauce, and cook for 2-3 minutes or until the seafood is cooked and the mussels are open – I had to trust the cooking time specified on the recipe because I couldn’t taste the food.
Discard any mussels that don’t open.
Stir in the basil. Toss the sauce through the warm pasta and serve.

Serves 4-6

Note: Seafood medley – mixed seafood – is available in many supermarkets. Alternatively, make your own by buying different types of seafood, such as octopus, fish fillets, and squid, and chopping each into bite-sized pieces.

Related Posts with Thumbnails