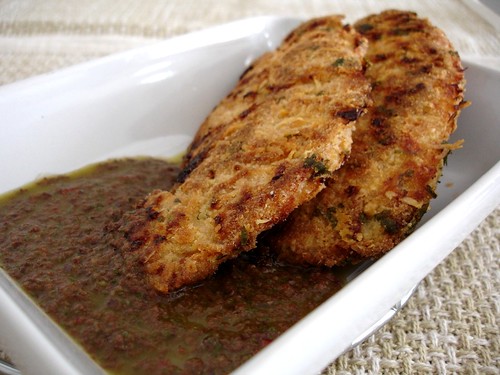
I printed this recipe the minute my dear friend Valentina posted it - but it took me a good 4 months to make it. I shouldn’t have waited that long – this dish is delicious!
I love to try new chicken recipes and this one won my heart when I saw it called for Parmesan cheese.
The crust is very crunchy and I like the idea of baking instead of deep-frying.
Valentina doesn’t mention how she seasoned the chicken, so I marinated it in lime juice, smashed garlic and salt. You can season it as you prefer.
The sauce is delicious and Joao (a.k.a. “picky eater”) loved it – I made tenderloin medallions for him and served with the same sauce. The only change was adding chilli pepper to the sauce – my husband’s idea.
Parmesan chicken
1 tablespoon flour
2 eggs, lightly beaten
80g breadcrumbs
20g grated Parmesan cheese
2 tablespoons chopped parsley
4 chicken breasts
pinch of salt
Sauce:
12g basil leaves or parsley – I used basil
120ml olive oil
60ml lime juice
1 clove garlic
80g black olives, pitted
1 large red chilli pepper - optional
Cover the chicken breasts with plastic wrap and gently flat them with a mallet, then slice them into 3 or 4 large strips – I asked my butcher to prepare the fillets for me, so I skipped this part. Season the chicken accordingly to your taste.
Preheat the oven to 220ºC (430ºF). Brush a baking dish with olive oil and set aside.
In a bowl, combine the eggs and flour. In another bowl mix breadcrumbs, Parmesan, parsley and salt. Dip the chicken fillets into the egg mixture then into crumb mixture to coat – I pressed it hard to get a thick crust.
Place the chicken pieces in the prepared baking dish. Do not overlap the pieces – they should remain separated. Bake for 15-20 minutes or until golden brown – turn the pieces upside down in half the time. Do it carefully not to tear the crumb.
For the sauce, combine all the ingredients in a food processor and blend well.
Serves 4

Monday, January 15, 2007
Parmesan chicken
Thursday, January 11, 2007
Chocolate truffle cake
This is the third – and last – dessert from the Christmas series. I must confess it’s my favorite...It was a pretty chocolate-y Christmas, as you can see. :D
Chocolate truffle cake
from Modern Classics Book 2
Cake:
68g all-purpose flour
2 tablespoons cocoa powder
75g caster sugar
4 eggs
80g butter, melted
Truffle filling:
450g dark couverture chocolate – I used semisweet Callebaut that’s made in Brazil with Belgian cocoa mass
480ml cream
6 egg yolks
75g caster sugar
Preheat the oven to 180ºC (350ºF).
Sift the flour and the cocoa three times and set aside. Place the sugar and eggs in the bowl of an electric mixer and beat for 8-10 minutes or until pale and thick and triple in volume.
Gently fold through the flour and cocoa and then the butter.
Line the base of a 20cm (8in) round springform tin with non-stick baking paper - I don’t have one, so I used a tin with a removable bottom, greased it, lined the base with paper, then greased it again and floured everything, just in case.
Pour the mixture and bake for 25 minutes or until the cake comes away from the side of the tin. Cool in the tin.
While the cake is baking, make the truffle filling:
Place the chocolate and cream in a saucepan over low heat and stir until melted and smooth. Place the egg yolks and sugar in a heatproof bowl over a saucepan of simmering water and beat for 6 minutes or until thick and creamy. Fold the chocolate mixture through the egg mixture and beat for 6 minutes or until cold. Refrigerate for 30 minutes.
To assemble, remove the cake from the tin and cut in half horizontally. Place the bottom layer back in the tin and pour over half of the truffle filling. Place the top layer on the cake and cover with the remaining filling. Refrigerate for 5 hours or until set.
To serve, place a warm tea towel around the tin, which will help ease the cake away from the side. Carefully remove the cake from the tin and use a heated palette knife to smooth the edge – I wasn’t able to do it, but I highly recommend it because the cake would look a lot nicer.
Serves 10-12.
During cooking the cake will shrink away from the side of the tin so that when you pour the truffle filling over the top, it will spread down the side of the cake and create a great smooth and glossy coating. To smooth the edge after removing the cake from the tin, dip a palette knife into hot water, dry it quickly with a tea towel and run the blade around the edge.
Tuesday, January 9, 2007
Bûche de Noël
I had decided not to post this recipe because of its horrendous presentation – but this cake is so good that I thought I should share it with you.It’s a very traditional recipe and maybe you already have your favorite version for it. I liked the cake a lot and I have thought about making it again as a jelly roll – Joao (my husband) loves jelly rolls.
I’ll make a dulce de leche roll as well – I’ll keep you posted. :D
Bûche de Noël
from The Williams-Sonoma Collection: Dessert
Cake:
140g all-purpose flour, plus extra for dusting
¾ teaspoon baking powder
¼ teaspoon salt
4 large eggs
145g granulated sugar – I used caster sugar
1 ¼ teaspoons vanilla extract
confectioner’s sugar for dusting
*Syrup:
60ml water
50g granulated sugar – I used caster sugar
2 or 3 tablespoons dark rum or coffee-flavored liqueur – I used vanilla extract, just a little
Frosting:
315g bittersweet chocolate, finely chopped – I used semisweet
560ml heavy cream
1 teaspoon vanilla extract
pinch of salt
Preheat the oven to 180ºC (350ºF). Grease a 40 x 28cm rimmed baking sheet pan and line the bottom with parchment paper. Grease and flour the paper and the pan sides.
For the cake: whisk the flour, baking powder and salt in a bowl. In a large bowl, using a mixer on medium-high speed, beat the eggs until pale and thick. Add the sugar and vanilla and continue beating until tripled in volume. Sprinkle the flour over the mix and, with a rubber spatula, fold gently until just blended.
Pour the batter into the prepared pan and spread evenly. Bake until the cake springs back when touched, 13-15 minutes.
While the cake is baking, lay a clean kitchen towel on the counter and sift confectioner’s sugar generously onto it, covering it evenly.
When the cake is ready, remove it from the oven and immediately run a knife around the inside of the pan to loosen the cake. Invert the cake onto the prepared towel and remove the paper carefully. Beginning on a long edge, roll up the cake and towel together. Set aside to cool.
To make the syrup, combine water and sugar in a small saucepan over medium heat and stir until the sugar dissolves. Bring to a boil and remove from heat. Stir in the rum and set aside to cool.
To make the frosting, combine the chocolate and cream in the top of a double boiler, set over barely simmering water and melt the chocolate, then whisk until blended – I used a regular pan and melted chocolate and cream over low heat, stirring constantly.
Refrigerate the mixture for about 2 hours; you can use an ice bath to speed the process.
When the mixture is cold, add vanilla and salt and, using a mixer on medium-high speed, beat it until firm enough to hold a soft dollop.
To assemble the bûche, unroll the cake and brush it with the syrup. Spread one-third of the ganache over the cake and gently reroll it. Place seamed side down on a plate and frost the cake with the remaining ganache, using firm and rough strokes – you need to make it look like a log. Trim ends with a serrated knife – I covered the ends with ganache as well.
Garnish with chocolate curls, confectioner’s sugar – I replaced it with cocoa powder - and meringue mushrooms.
I wouldn’t have time to prepare meringue mushrooms so I made mine with sugarpaste/rolled fondant. Just be careful because not to place sugarpaste/rolled fondant in the fridge.
Serves 12-16
* There was too much syrup left. I think half the amount is enough.
Friday, January 5, 2007
Ebony & Ivory "Pavê"
The pictures are awful because we arrived there very late (it was 11:40pm), there was no room for the desserts and my camera battery would die any minute. It's like the old saying, haste makes waste. :S
This is a very popular dessert here in Brazil, called "pavê". It's similar to a trifle, but the recipe calls for ladyfinger cookies instead of sponge cake. You can use savoiardis, as well. Click here to check Haalo's beautiful savoiardis.
The preparation of this dessert resembles the way tiramisu is prepared.
I don't listen to Beatles or Paul McCartney - I'm a Smiths kind of gal - but the song came to my mind the minute I finished making the "pavê". So I decided that the original name - two-toned pavê - was not as nice and changed it.
Recipe from here - there's not an English version for this recipe there, but this site is worth visiting since there are other delicious recipes, too.
Ebony & Ivory "Pavê"
5 egg yolks
160g sugar
3 tablespoons cornstarch
500ml hot milk
1 teaspoon vanilla extract
1 tablespoon Cointreau or Grand Marnier - I had neither so I used the zest of 1 large orange
1 tablespoon butter
2 tablespoons cocoa powder
180g ladyfinger cookies
250ml orange juice
100g semisweet chocolate
100g white chocolate
Prepare the "custard": beat the egg yolks and sugar and add the cornstarch. Start adding the milk gradually. Beat well. Transfer the mixture to a saucepan and cook over low heat, stirring constantly until it thickens. Add the butter and cook for another minute, still stirring. Remove from heat, add Cointreau and vanilla and divide this cream in half: add cocoa powder to one half. Set aside to cool down.
To assemble the dessert, soak the cookies quickly in the orange juice and make layers: light custard, 8 cookies, dark custard, 8 cookies, and so on.
Make chocolate shavings and place them on top of the finished dessert.
Keep it in the fridge until serving.
Serves 8 - I doubled the recipe, that's why my "pavê" is so big!
Wednesday, January 3, 2007
Pizza
Last week I invited my father and my brother over for dinner. The menu was... homemade pizza!I got the recipe from Dough: Simple Contemporary Breads
I got 3 big pizzas with the dough - each one around 30cm large.
I had already made this recipe before, but I used all purpose flour and had to add more flour to get it right (something against the author's technique). But this time I used a special bread flour that was released here in Brazil and it worked perfectly!
The idea of posting pictures of the entire preparation process was my husband's, who also worked as the photographer. :D
Pizza
510g bread flour
15g fresh yeast
2 teaspoons salt
360ml water, room temperature
62ml olive oil
Place the flour in a large bowl. Add the yeast and rub it with the flour using your fingertips. Add the salt, water and olive oil and mix until you have a mixture that resembles porridge.
You won't knead the dough the way you are used to - instead, you'll use your fingers as if they were "forks" and lift the dough, swing it upwards and then slap it back down, away from you, onto the counter. It will be sticky, but go ahead. Have no fear. :D
Stretch the front of the dough towards you, then lift it back over itself to form an arc - this will trap the air - still stretching it forwards and sideways and tucking it in around the edges. Repeat this sequence until the dough is not sticky anymore.
Place the dough in a lightly floured bowl, cover and let it rest for 70 minutes or overnight in the freezer, for better crust and taste - mine rose for 3 hours.
Pre-heat the oven to 250ºC (475ºF)
Turn the dough onto a lightly floured surface, shape into a ball and let it rest for 10 minutes.
Divide the ball into three even parts.
Continue to work on an evenly floured surface so your dough won't stick to it.
Place the heel of your hand in the center of each ball and push it away from you to stretch the dough out. Keep stretching until you have a large round pizza - the book says 20-22cm, but mine were 30cm:
Spread some tomato sauce on the dough - I was inspired that day so I made my own tomato sauce:
Sprinkle with mozzarella, parmesan, basil leaves or whatever your imagination calls for - I made one with broccoli, olives, cheese and onions: 

Makes 3 large pizzas

