I love puff pastry. I have to admit it. I know it’s not light or healthy and not good at all for my waistline, but the thing is delicious.
I never buy puff pastry exactly because I’m not that kind of moderate lady who knows when to stop eating something unless I’m at a party or having lunch with my bosses – that’s when I pretend to be that kind of lady.
There was some puff pastry left because of this recipe and since I’m not into wasting food – even when it’s fattening as hell - I used it to make a quick lunch. It was great because I needed to be back in the kitchen to finish the gateau.
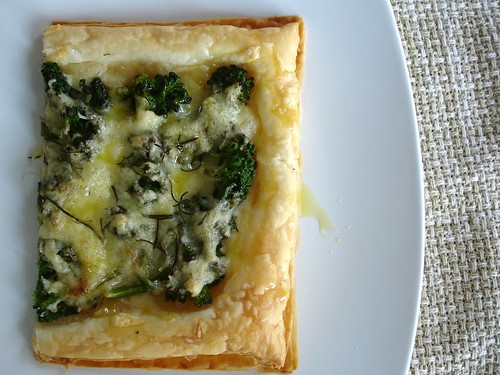
I got the idea from this book – it was a potato, goat’s cheese and rosemary tart. My tart was made with the cheese and the broccolini left from our Saturday night pizza.

I liked it so much that I decided to use it as my entry for this Weekend Herb Blogging, this time hosted by Kalyn, the great mind behind this great event.
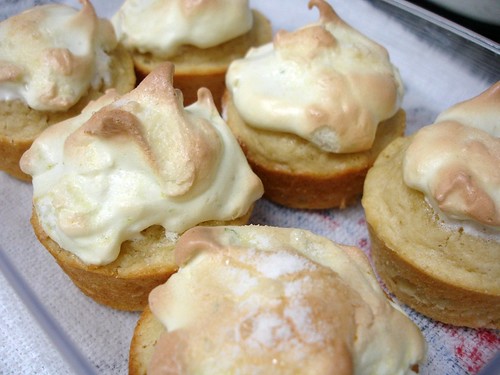
Broccolini, cheese and rosemary tart
adapted from Modern Classics Book 1
1 cup grated yellow mozzarella
½ cup grated parmesan
2 heaping cups broccolini florets
1 tablespoon rosemary leaves
puff pastry
salt
freshly ground black pepper
Preheat the oven to 205ºC/400ºF.
Cut the broccolini florets into bite-sized portions and quickly steam or blanch them – I prefer to steam because they remain firmer and greener. Set aside to cool.
Mix the two types of cheese in a small bowl.
Cut a 25x20cm rectangle on your puff pastry and place it on a lined baking sheet. Spread the broccolini florets on top, leaving the borders without filling (2.5cm should work).
Season with salt and pepper.
Spread the cheese over the broccolini and then top with the rosemary leaves.
Bake for 20-25 minutes or until golden and puffed.
Serve with a drizzle of extra virgin olive oil.
I think it can serve 2 with something on the side – I had ¾ of the tart and nothing else. João didn’t want tart but when he saw me eating it he kept asking for bites (he was having spaghetti, for crying out loud).

 I bravely managed not to be devoured by my own ego - after that, who can blame me?? – and now it’s my turn to choose 5 bloggers who make me think.