My love for roast chicken is so notorious that when I tell my husband I have no idea what to cook on the weekend he always says “how about roast chicken?” :D
If I’m not feeling very inspired, I just make Donna Hay’s chicken with chorizo because I know it’s delicious and my husband and I love it, but most of the times I like to vary because there are several great recipes out there just waiting to be prepared (and devoured).
When I saw that Amanda Hessler’s recipe for barbecued chicken included a marinade made with cashew nuts I got immediately curious, especially because I could not imagine how it would turn out – some recipes feel familiar to me, and with others I try to imagine how they would taste even if I hadn’t tried them before, but not this one: I kept wondering how the nuts would flavor the chicken, and how they would behave combined with the cilantro and the soy sauce.
The only way to find that out was cooking the recipe, and that’s what I did.
(if someone tells you that Scorpios are curious, believe them). :)
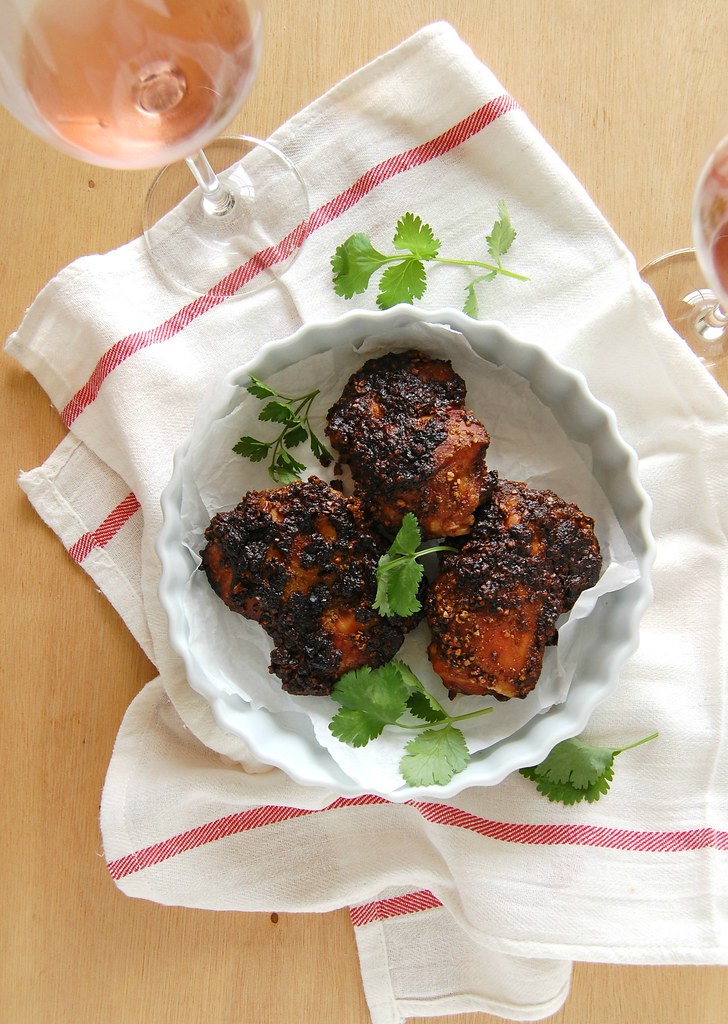
The cashew nuts make the marinade very creamy and also make the chicken moist and golden without the need of too much oil. The cilantro and soy sauce add great flavor (don’t go overboard with the salt because both the soy sauce and the nuts are already salty). Would I make this chicken again? Yes, it tasted delicious, but I would add a bit more garlic next time – despite the name, it was not garlicky enough for me.
My husband still prefers Donna Hay’s chicken, though. :)
Garlicky cashew chicken
slightly adapted from the wonderful The Essential New York Times Cookbook: Classic Recipes for a New Century
1/3 cup roasted, salted cashew nuts
handful fresh cilantro leaves + a bit extra for serving
1 tablespoon canola oil
2 garlic cloves, roughly chopped
½ tablespoon soy sauce
½ teaspoon brown sugar, packed
juice of 1 large lime
salt and freshly ground black pepper
4 chicken pieces – use your favorites
In a blender or food processor, combine nuts, cilantro, oil, garlic, soy sauce, sugar and lime juice. Blend until smooth, scraping down sides as necessary. Taste and season with salt and pepper if desired.
Smear the chicken generously with the marinade. Cover with plastic and refrigerate for at least 3 hours (overnight is best).
Preheat the oven to 200°C/400°C. Line a roasting pan with a double layer of foil and brush it lightly with oil. Place the chicken onto the foil and drizzle with the remaining marinade.
Roast for about 1 hour or until cooked to your liking.
Serve sprinkled with fresh cilantro leaves.
Serves 2
Friday, August 8, 2014
Garlicky cashew chicken and curiosity
Thursday, August 7, 2014
Banana almond cake - simple yet delicious
After posting a recipe that calls for homemade vegetable stock, homemade tomato sauce and homemade ricotta I had to bring you something simpler, but equally good: a no-fuss banana cake with part of the all purpose flour replaced by almond meal, which gives it a delicious almond flavor and combined with the sour cream and the mashed bananas makes the cake moist and tender.
In my defense, it could’ve been worse: I could have told you to make your own sprinkles. :D
Banana cakes are favorites of mine and I always have a couple of ripe bananas in the freezer, just waiting to be transformed into something delicious – it’s too cold now for banana sorbet, so cake was my decision and it was a no-brainer, really.
The cake sunk a bit in the middle and years ago that would have stopped me from posting it here, but with time I’ve learned to dial down my perfectionism at least a bit, and I try to do that whenever possible because as much as people parade it as a “quality” I don’t think that’s true – it is actually a cage we build around ourselves and from which it gets harder and harder to escape.
The cake sunk, yes, but it tasted amazing, so I photographed it to share it with you – I hope you like it as much as I did.
Banana almond cake
slightly adapted from the delicious World Class Cakes: 250 Classic Recipes from Boston Cream Pie to Madeleines and Muffins
1 ¼ cups (175g) all purpose flour
pinch of salt
1 teaspoon baking soda
1 teaspoon baking powder
¼ teaspoon ground cinnamon
2/3 cup (65g) almond meal
2/3 cup (150g) unsalted butter, softened
1 cup (200g) granulated sugar
2 eggs
1 teaspoon vanilla extract
½ cup sour cream*
2 very ripe bananas, mashed
icing sugar, for dusting
Preheat the oven to 180°C/350°F. Lightly butter a 20x10cm (8x4in) cup loaf pan, line it with paper and butter the paper as well.
In a medium bowl, whisk together the all purpose flour, salt, baking soda, baking powder , cinnamon and almond meal.
In a large bowl, using an electric mixer, cream butter and sugar until light and fluffy. Beat in the eggs, one at a time, beating well after each addition. Scrape the sides of the bowl. Beat in the vanilla.
Add the sour cream and the banana and mix on low just until combined. Add the dry ingredients in and mix on low just until incorporated.
Transfer batter to prepared pan and bake for about 45 minutes or until golden and risen and a skewer inserted in the center comes out clean. Cool in the pan over a wire rack for 15 minutes, then carefully unmold onto the rack and cool completely. Peel off the paper, dust with icing sugar and serve.
* homemade sour cream: to make 1 cup of sour cream, mix 1 cup (240ml) heavy cream with 2-3 teaspoons lemon juice in a bowl. Whisk until it starts to thicken. Cover with plastic wrap and leave at room temperature for 1 hour or until thicker (I usually leave mine on the counter overnight – except on very warm nights – and it turns out thick and silky in the following morning; refrigerate for a creamier texture)
Serves 8
Wednesday, August 6, 2014
Polenta and ricotta chips and cooking from scratch
As I told you yesterday, I love making things from scratch if and when I have time for that, and the recipe I bring you today is a good example of that: in these delicious polenta and ricotta chips, I used homemade vegetable stock, homemade ricotta and homemade tomato sauce.
The vegetable stock is a precious hint I got from a good friend of mine: she makes her stock with the skins peeled off the vegetables (carrots and potatoes, for example), mushroom stems, parsley and basil stalks, the green end of leeks, that is, all the tidbits that would end up in the garbage. I’ve been making stock her way for a long time and always have some stashed in the freezer, and that is the one I used to cook this polenta.
The tomato sauce is the one I make over and over again, with canned tomatoes and lots of fresh basil, oregano and thyme, and it’s the one my husband eats by the spoonful if left to his own devices – if there’s bread in the house I have to make sure he doesn’t eat the whole batch of sauce with it before I even have the chance to proceed with whatever I was making in the first place. :D
And the ricotta is a recipe from the wonderful Donna Hay magazine I got years ago, 2009 to be more precise, and from that moment on I’ve never used store-bought ricotta again – I’ve been using this homemade ricotta for all sorts of things, always with amazing results. It has great texture and flavor and it is quick to make. Back then I used to line the colander with fine muslin, but a while ago I bought a fine mesh strainer and it does the job perfectly without the cloth.
This post might sound like a nightmare for those of you who don’t like making things from scratch, and I’m not here to preach, but believe me when I say that besides tasting a lot better than the store-bought versions they’re all easy to make – not to mention they’re very budget friendly, especially the vegetable stock.
I know it may seem like a bore to turn each polenta chip after their first 20 minutes in the oven, but that was the way I found to make them crisp and golden without frying (which was called for in the original recipe) – please don’t hate me. :)
Polenta and ricotta chips
slightly adapted from the always wonderful Donna Hay magazine
2 cups (500ml) vegetable stock
1 cup (170g) instant polenta
1 cup (80g) finely grated parmesan
25g butter
salt and freshly ground black pepper
200g ricotta*
canola oil, for brushing
tomato sauce, for serving
Place the stock in a large saucepan over medium heat and bring to the boil. Gradually add the polenta, whisking continuously for 2–3 minutes. Remove from the heat and stir through the parmesan, butter, salt and pepper. Allow to cool for 5 minutes. Add the ricotta and fold through to combine. Spoon and press the polenta into a lightly buttered 20cm (8in) square cake pan and refrigerate until set, about 1 hour.
Preheat the oven to 200°C/400°F. Line a large baking sheet with foil and brush it lightly with oil.
Remove the polenta from the pan and slice into thick chips. Arrange them on the prepared sheet 1cm apart. Bake for 20 minutes, then carefully turn each chip and bake for another 20 minutes or until golden and crisp.
Serve immediately with the tomato sauce.
* I used homemade ricotta: 3 cups (720ml) whole milk = 200g ricotta
Serves 4
Tuesday, August 5, 2014
Cardamom, lemon and olive oil madeleines
Madeleines are small cakes, therefore I guess it was just a matter of time until I went for a version made with olive oil after using the ingredient in so many cakes.
I found some recipes online (I’ve told you I love the Internet, haven’t I?), but what really caught my attention was the combination of cardamom and lemon: it sounded delicious and Russell’s madeleines looked super cute.
Cardamom and lemon are indeed great together, and madeleines made with olive oil are as fantastic as the ones made with butter (and they stay moist and tender on the following day).
I do like making things from scratch but I’m all for shortcuts when they’re good and feasible; however, one thing I don’t use is pre-ground cardamom – I bought it once, ages ago, but did not like it. I started buying the pods and grinding the seeds myself and I never looked back. If I may, I recommend you do the same, not only for these madeleines but for all sorts of cardamom recipes (click here for some inspiration).
For completely dairy-free madeleines, the molds should be brushed with oil instead of butter – I haven’t tried that yet, so if anyone tries it I would love to hear about it.
Cardamom, lemon and olive oil madeleines
slightly adapted from here
80g granulated sugar
finely grated zest of 1 large lemon
¼ teaspoon freshly ground cardamom
2 eggs
½ teaspoon vanilla extract
110g all purpose flour
½ teaspoon baking powder
pinch of salt
1/3 cup (80ml) extra-virgin olive oil
Place sugar, lemon zest and cardamom in a large bowl and rub together with your fingertips until sugar is fragrant. Add the eggs and vanilla and using an electric mixer fitted with the whisk attached, beat for 5 minutes until the mixture becomes light and thick.
Sift flour, baking powder and salt over mixture and fold to combine. Fold in the olive oil.
Cover with cling film and refrigerate for at least 3 hours or up to overnight.
Preheat oven to 200°C/400°F. Brush twenty 2-tablespoon capacity madeleine molds with melted butter and refrigerate for 10 minutes. Brush the molds again and refrigerate for another 10 minutes. Divide the mixture between the molds (do not spread it out). Bake until golden and cooked through (8-10 minutes), then immediately unmold onto a wire rack.
Dust with icing sugar. Serve warm or at room temperature.
Makes 20
Monday, August 4, 2014
Buckwheat thumbprints with fig preserves - food that looks pretty
I once took a test at college (given by one of the professors) and the result was that I was a synesthesic person. As I read about it and the professor explained it, the result actually felt right.
Most of my colleagues got "visual" as a result, meaning they were visual people. I'm not sure I would get the same result if I took the test today (that was seventeen years ago), but I believe that the percentage of my answers leaning towards "visual" would be higher, since I feel that really latent sometimes, especially when it comes to food. I go crazy with books, magazines and blogs packed with stunning photos and I sometimes I tend to choose a recipe because of how the food looks - that is why I love making thumbprint cookies, they always look so adorable! <3
These are made with a combination of all purpose flour and buckwheat flour, and the fig jam paired perfect with it. I believe that marmalade would be an interesting choice for the buckwheat flavor too, but I'll have to try that next time. :)
Buckwheat thumbprints with fig preserves
adapted from the great Great Cookies: Secrets to Sensational Sweets
1 ½ cups (210g) all-purpose flour
½ cup (70g) buckwheat flour
1/8 teaspoon salt
200g unsalted butter, slightly firm
½ cup (100g) granulated sugar
2 large egg yolks
1 teaspoon vanilla extract
fig preserves, or use the flavor you like the most
Preheat the oven to 180°C/350°F. Line two large baking sheets with baking paper.
Mix together the flours and salt in a large bowl. In the bowl of an electric mixer fitted with the paddle attachment, mix the butter on medium-low speed until smooth. Pour in the sugar and mix just until incorporated. Add the egg yolks and vanilla, mixing only until blended. Using a rubber spatula, stir in the dry ingredients in two additions, mixing just to combine after each addition. Do not overmix or this dough will become oily.
Roll 1 leveled tablespoon of dough into balls and place 5cm (2in) apart on a lined cookie sheet. Using a wooden spoon with a rounded handle no wider than 1cm (½in), make a deep indentation with the tip of the handle in the center of each cookie. Place the cookies in the oven. After 10 minutes, remove the cookies from the oven and re-press each indentation. Then fill the centers with preserves. Do not overfill these or the preserves will run over.
Return the cookies to the oven, rotating the pans top to bottom and front to back. Bake for 5-7 minutes longer until the cookies are golden brown around the edges. Cool in the sheets for 2 minutes, then slice the paper with the cookies to a wire rack and cool completely.
Makes about 45 cookies