Wednesday, May 30, 2007

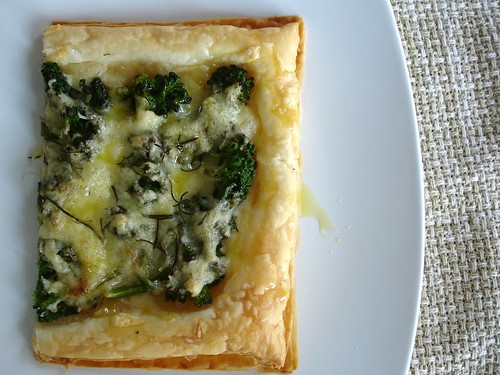
Broccolini, cheese and rosemary tart

Broccolini, cheese and rosemary tart

I love puff pastry. I have to admit it. I know it’s not light or healthy and not good at all for my waistline, but the thing is delicious.
I never buy puff pastry exactly because I’m not that kind of moderate lady who knows when to stop eating something unless I’m at a party or having lunch with my bosses – that’s when I pretend to be that kind of lady.

There was some puff pastry left because of this recipe and since I’m not into wasting food – even when it’s fattening as hell - I used it to make a quick lunch. It was great because I needed to be back in the kitchen to finish the gateau.

I got the idea from this book – it was a potato, goat’s cheese and rosemary tart. My tart was made with the cheese and the broccolini left from our Saturday night pizza.

aaWeekendHerbBlogging

I liked it so much that I decided to use it as my entry for this Weekend Herb Blogging, this time hosted by Kalyn, the great mind behind this great event.

Broccolini, cheese and rosemary tart
adapted from Modern Classics Book 1

1 cup grated yellow mozzarella
½ cup grated parmesan
2 heaping cups broccolini florets
1 tablespoon rosemary leaves
puff pastry
salt
freshly ground black pepper

Preheat the oven to 205ºC/400ºF.
Cut the broccolini florets into bite-sized portions and quickly steam or blanch them – I prefer to steam because they remain firmer and greener. Set aside to cool.
Mix the two types of cheese in a small bowl.
Cut a 25x20cm rectangle on your puff pastry and place it on a lined baking sheet. Spread the broccolini florets on top, leaving the borders without filling (2.5cm should work).
Season with salt and pepper.
Spread the cheese over the broccolini and then top with the rosemary leaves.
Bake for 20-25 minutes or until golden and puffed.
Serve with a drizzle of extra virgin olive oil.

I think it can serve 2 with something on the side – I had ¾ of the tart and nothing else. João didn’t want tart but when he saw me eating it he kept asking for bites (he was having spaghetti, for crying out loud).

Sunday, May 27, 2007

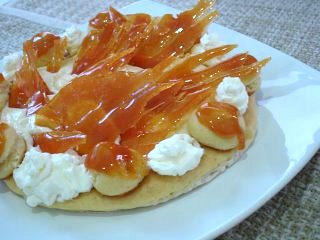
Gateau Saint Honore

Gateau Saint Honore

I'm having a slice of the cake while I type this. It is good, but I can’t say it’s my cup of tea…
I love puff pastry and even used the amount I had left to make lunch today. The Saint Honore cream is so delicious that I was afraid there was not going to be enough to assemble the cake – I kept reaching for spoons in my drawer and dipping them into the smooth mixture, promising that it would be the last time I was going to do that. Caramel is caramel – the word itself makes my mouth water. Cream puffs are a classic – everybody likes them, even my-not--into-sweets husband. So, what’s wrong?

In my humble opinion, all these incredibly delicious things just don’t go well together – I know it sounds insane since this cake is such a big staple in patisserie and all, but for me it wasn’t all that.

I’m glad I could try making cream puffs for the first time – actually, João is way happier with it than me. :)
I still have a lot to learn and improve and I thank the two ladies behind this for making the opportunity I needed to start trying my hand on that.

I’m sure the other Daring Bakers have some interesting cakes and points of view to share – you can find their links on the sidebar.

Since I used store-bought puff pastry I’m not going to post the recipe for that – only for the rest of the cake.

Oh, and let's forget the fact that my caramel decorations suck.

Gateau Saint Honore

Pate a Choux – Cream Puffs Dough:
135g (4 ¾ oz) all purpose flour
240ml (1 cup) water
58g (2 oz) unsalted butter
¼ teaspoon salt
240ml (1 cup) eggs

Sift the flour and set aside.Heat the water, butter and salt to a full rolling boil, so that the fat is not just floating on the top but is dispersed throughout the liquid.Stir the flour into the liquid with a heavy wooden spoon, adding it as fast as it can be absorbed. Avoid adding it all at once or it will form clumps.
Cook, stirring constantly and breaking up the lumps if necessary, by pressing them against the side of the pan with the back of the spoon until the mixture comes away from the sides of the pan, about 2-3 minutes.Transfer the dough to a mixer bowl. Let the paste cool slightly so that the eggs will not cook when they are added. You can add and stir the eggs by hand but it requires some serious elbow grease.
Mix in the eggs, one at a time, using the paddle attachment on low or medium speed. Do not add all the eggs at once. Check after a few, the dough should have the consistency of thick mayonnaise – I ended up using only 4 out of 5 eggs.
Transfer the dough to a piping bag and use as desired.

Saint Honore Cream (Rapid Chiboust or Diplomat Cream):
7g (1 envelope) unflavored gelatin
60ml (¼ cup) cold water
130g (½ cup + 2 tablespoons) sugar
70g (½ cup) all-purpose flour
¼ teaspoon salt
5 egg yolks
480ml (2 cups) whole milk
1 tablespoon rum – I used vanilla extract
60ml (¼ cup) whipping cream
3 egg whites
dash of salt
100g (½ cup sugar)

Soak the gelatin in the ¼ cup of cold water.
Put the sugar, flour, and salt into a saucepan and stir together with a whisk. Add the yolks and enough milk to make a paste. Whisk in the remainder of the milk.Place over low heat and stirring constantly, cook until thick. Remove from heat and stir in the vanilla and the gelatin. Stir until the gelatin is completely dissolved.Stir in the whipping cream. Set the mixing bowl in cold water and stir until the cream is cool. Place the egg whites in a clean bowl and using clean beaters, whip them with the dash of salt. As soon as the whites begin to stiffen, gradually add the ½ cup of sugar and beat until they are very stiff.
Fold the egg whites into the cooled cream.

Caramel:
240g (8 oz) sugar

Decoration:
240ml (1 cup) heavy cream
1 teaspoon sugar - I used 1 tablespoon

Assembly the cake:
Roll the puff pastry out to 3mm (1/8 in) thick, 30xm (12 in) square. Place on a sheet pan lined with parchment paper. Refrigerate covered at least 20 minutes.While the puff pastry is resting, make the pate a choux and place it in a pastry bag with a #4 (8mm) plain tip. Reserve.Leaving the puff pastry on the sheet pan, cut a 27.5cm (11 in) circle from the dough and remove the scraps. (An easy way to cut it is to use an 11in tart pan as a “cookie cutter”). Prick the circle lightly with a fork.Pipe 4 concentric rings of pate a choux on the pastry circle – as I made a smaller cake, I piped only 2 circles. Pipe out 12 cream puffs the size of Bing cherries onto the paper around the cake – I used only 8 cream puffs.Bake the puff pastry circle and the cream puffs at 205ºC (400ºF) until the pate a choux has puffed, about 10 minutes. Reduce the heat to 190ºC (375ºF) and bake until everything is dry enough to hold its shape, about 35 minutes longer for the cake and 8 minutes longer for the cream puffs (just pick them up and take them out as they are done).
Place about 114g (4 oz) of the Saint Honore Cream in a pastry bag with a #2 (4mm) plain tip. Use the pastry bag tip or the tip of a paring knife to make a small hole in the bottom of each cream puff. Pipe the cream into the cream puffs to fill them. Refrigerate.Spread the remaining cream filling on the cake. Refrigerate for at least 2 hours to set the cream. Caramelize the 240g (8 oz) of sugar. Fill a bowl that is large enough to hold the pan used for cooking the sugar with enough cold water to reach halfway up the sides of the pan. Set the bowl aside. Place the sugar in a heavy bottomed pan and cook until the sugar until it has caramelized to just a shade lighter than the desired color.Remove from the heat and immediately place the bottom of the pan in the bowl of cold water to stop the cooking process. Dip the cream puffs into the hot caramel, using 2 forks or tongues to avoid burning your fingers. Place them on a sheet pan. The caramel must be hot enough to go on in a thin layer. Reheat if necessary as you are dipping, stirring constantly to avoid darkening the caramel any more than necessary. Also, avoid any Saint Honore cream to leak out of the puffs and get mixed in with the caramel while dipping as the cream can cause the sugar to recrystallize.
Whip the one cup of heavy cream and teaspoon of sugar to stiff peaks. Place the whipped cream in pastry bag fitted with a #5 (10mm) star tip. Pipe a border of whipped cream around the top of the cake. Arrange the cream puffs, evenly spaced, on top of the filling, next to the cream – I decided to secure them using caramel.

Option: Before filling the cake, take care of the cream puffs, dip them in more caramel, hook them up to the base. Fill with the cream filling and fill the holes with the whipped cream.
Wednesday, May 23, 2007

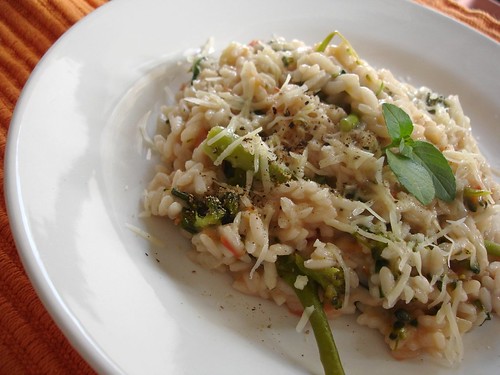
Tomato, broccolini and basil risotto

Tomato, broccolini and basil risotto

I was going through one of the editions of my Donna Hay magazines when I saw a delicious pasta dish* – I immediately thought of making it for our lazy Sunday lunch. The cold weather changed my mind – I knew then that I needed some risotto.

aaWeekendHerbBlogging

I’d seen a recipe for roasted tomato risotto and it sounded great – but the tomatoes I had at home were so beautiful and juicy I didn’t want to roast them. I decided to make the risotto my way (even using red wine instead of white).

There were some broccolini florets in my refrigerator and I used them too. The good thing is you don’t need to blanch them first – they’ll cook while the rice cooks.

The risotto turned out really good and this is my entry for the Weekend Herb Blogging, this time hosted by one of my favorite foodies ever, the sweet Ellie from Kitchen Wench.

Tomato, broccolini and basil risotto

1 liter vegetable stock – use a mild one otherwise it will be too overpowering
1 tablespoon butter
½ tablespoon olive oil
½ small onion, finely chopped
115g (a heaping ½ cup) risotto rice – I used Arborio
1 ½ tablespoons dry red wine
a heaping ½ cup broccolini florets, chopped in bite-sized pieces
1 tomato, plump but firm, finely diced
1 tablespoon cold butter – extra
¼ cup (not packed) basil leaves
50g (½ cup) parmesan, grated – reserve 1 tablespoon
freshly ground black pepper

Heat the stock and keep it gently simmering.
Place the butter and olive oil in a large heavy-based saucepan over high heat. Add the onion and sauté until it’s soft and transparent.
Add the rice and stir for 1 minute or until the grains are glossy and well coated in the butter/olive oil. Add the wine, mix well until the wine is absorbed, then add 1 ladle stock, simmer and stir until it is absorbed. Add the broccolini florets and continue to add the stock, 1 ladle at a time, stirring continuously until the stock is absorbed.
Before adding the last ladle of stock – the rice will be almost al dente - add the tomatoes then keep stirring.
When rice is al dente, fold in the butter, basil and parmesan through the risotto and season with freshly ground pepper – add salt if necessary.
Spoon onto warm serving plates, sprinkle with the reserved parmesan and top with an extra dash of pepper if desired.

Serves 2 with a very light appetite or 1 like me. ;)

* Joey posted the exact same recipe I intended to make – a delicious coincidence.

Tuesday, May 22, 2007

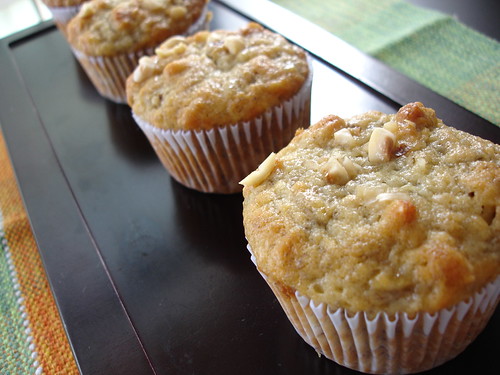
Banana hazelnut muffins

Banana hazelnut muffins

Searching for a new way to use my much too ripe bananas, I found a banana muffin recipe that called for walnuts too. That sounded great to me. I didn’t have walnuts at home but I did have some hazelnuts and I thought it would be a different twist to an already good recipe.

I made the muffins and they turned out really good. I was amazed by how tender they were, even on the following day. I immediately thought of posting them here but first I decided to ask Saffron, a foodie I didn’t know until then, if she was OK with that.

**** pause to clarify something ****

I’ve been blogging for a while now and up to this moment I’ve made and posted several recipes from foodies I admire - thank heavens I’ve never had a problem with that.
But I have a sort of rule I follow – if the blogger is someone closer I know they won’t mind. Much to the contrary – I know some of them actually like it.
I do – every time someone cooks something I posted (or gets inspired by my recipes) I get all smiley and I even talk to my computer, if there’s no one else to share the joy with.

Depending on the case, I sent the person an email just letting them know about the post or asking for their permission to post.

**** end of pause ****

She sent me a sweet, sweet email back and I was sure that I had found one more foodie to admire.

The only thing I’d have changed is the amount of sugar - I'd use a bit less because my bananas were really ripe and sweet.
Saffron, tks for sharing such a delicious recipe!

Banana hazelnut muffins

4 ripe bananas*
150g (¾ cup) sugar
75g (1/3 cup) unsalted butter, melted and cooled
1 teaspoon baking soda
1 teaspoon baking powder
½ teaspoon salt
210g (1 ½ cups) all-purpose flour
small handful of hazelnuts, toasted and peeled

Preheat oven to 190ºC/375ºF and line muffin pan with muffin paper cups.
Sift flour, baking soda, baking powder and salt and mix well. Set aside.
Chop the hazelnuts and reserve 1 tablespoon for sprinkling on top – I reserved 1 ½ tablespoons.
Place the bananas in a large bowl and mash well. Add the sugar and melted butter. Mix well.
Add the dry ingredients to the banana mixture and then add the hazelnuts - mix just enough to bring everything together. Don’t overmix.
Fill muffin cups about ¾ to the top and sprinkle with the reserved chopped nuts.
Bake for 20 minutes or till the muffins are golden brown.

* you can use 3 large bananas and 1 egg. I made them exactly like the original recipe and I can say that it worked beautifully without the egg.

Makes 12 large muffins – I got 14


Sunday, May 20, 2007

Corn fudge

Corn fudge

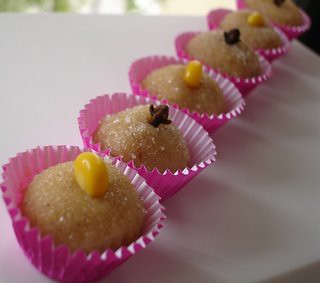
I had to make a recipe with corn to take part in one event for blogs written in Portuguese. You guys might think “Corn? So easy!” – but that’s the whole point: I wanted to make something different, unusual. Something new.

It took me forever to choose something but I finally did: this corn fudge, which I found at the Brazilian Nestlé website.

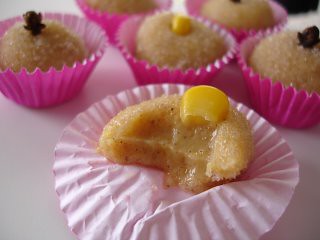
It’s similar to brigadeiro, but flavored with corn instead of chocolate. A pinch of cinnamon reminds us of curau – a sort of corn pudding I’ll be making soon to share with you here.

Different and new, indeed, and also delicious.

Corn fudge

1 can (200g) corn kernels, drained and rinsed
1 can (395g) sweetened condensed milk
1 ½ tablespoons milk – I used low fat
2 tablespoons unsalted butter
½ teaspoon ground cinnamon
butter, for greasing
granulated sugar, to coat the fudge balls

Place the corn kernels and the milk in a blender or food processor and purée them. Push the purée through a sieve and place it in a medium saucepan. Add the condensed milk, cinnamon and butter and mix well.
Cook over low heat, stirring constantly until the bottom of the pan starts to show – it will be thicker and bubbly (20 minutes). Remove from heat, pour in a greased plate and set aside to cool completely.
Grease your hands with a bit of butter and roll portions of fudge into balls – this will be easier if you refrigerate the fudge.
Roll them in the granulated sugar and place in small fluted paper cups.
Decorate them as you wish – I had some extra kernels so I used them (an idea I saw at the website, too) and I also used cloves.

Makes 40-45

Corn fudge

Related Posts with Thumbnails