Showing posts with label caramel. Show all posts

Tuesday, December 15, 2015

Gingerbread and peanut caramel bars

Gingerbread and peanut caramel bars / Barrinhas de gingerbread, caramelo e amendoim

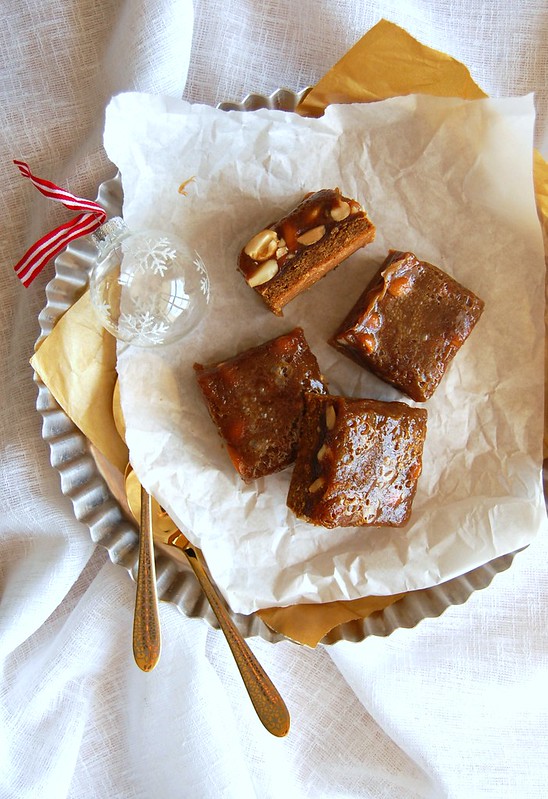
Having rediscovered the pleasure I used to feel in the kitchen I keep having ideas and imagining things to cook and bake – I can’t wait for the weekends, not only to get some rest but also to prepare something tasty. I made a broccolini pesto the other day that turned out wonderful – even my not-so-into-pesto husband liked it a lot. But right now we are in Christmas mode around here, therefore I bring you these bars: I saw them on the latest issue of Donna Hay magazine and since I am a sucker for gingerbread, caramel and peanuts I had to make them.

They might seem a bit time-consuming, but it is just a matter of respecting the fridge time for each layer – there is also a serious risk of eating the entire saucepan of caramel before pouring it over the gingerbread base, but that is a completely different matter. ;)

Gingerbread and peanut caramel bars
from the always delicious Donna Hay Magazine

Base:
125g unsalted butter, room temperature
90g light brown sugar
1/3 cup golden syrup – I used corn syrup
1/3 cup molasses
375g all purpose flour
1 teaspoon baking soda
2 teaspoons ground ginger
1 teaspoon ground cinnamon
¼ teaspoon ground cloves
pinch of salt
½ teaspoon vanilla extract

Topping:
175g unsalted butter, softened
220g light brown sugar
½ cup golden syrup
1 cup (240ml) heavy cream
200g unsalted toasted peanuts

Lightly butter a 20x30cm baking pan (use a deep pan, or make only 3/4 of the caramel recipe), line it with foil leaving an overhand on two opposite sides and butter the foil as well.
Place butter and sugar in the bowl of an electric mixer and beat until pale and creamy. Add the golden syrup, molasses, flour, baking soda, ginger, cinnamon, cloves, salt and vanilla and beat just until a dough starts to form. Press the mixture into the prepared pan, prick it all over with a fork and refrigerate for 30 minutes – in the meantime, preheat the oven to 180°C/350°F.
Bake the gingerbread for about 15 minutes or until golden – remove from the oven but keep it on.

Make the caramel: place butter, sugar and golden syrup in a medium saucepan and cook over medium heat, stirring until sugar is dissolved and butter is melted. Bring to the boil then cook for 8-10 minutes or until mixture reaches 140°C (285°F) on a sugar thermometer. Carefully add cream – mixture will spit furiously – and stir until dissolved, then cook for 2 more minutes. Stir in the peanuts, remove from the heat and pour over the gingerbread base. Bake for 15-18 minutes or until caramel is slightly set around the edges (caramel will set as it cools). Cool for 15 minutes, then refrigerate until firm. Cut into bars to serve. Keep the bars in an airtight container for up to 5 days in the refrigerator.

Makes 24

Sunday, July 12, 2015

Butterscotch blondies

Butterscotch blondies / Blondies de caramelo

The first time I ever heard of anything butterscotch was after I started blogging – I used to make caramel all the time for this dessert, but it was always the simple kind, the one made with sugar and water only: the caramel made with sugar, butter and cream was a revelation to me.

After that, I saw many recipes with butterscotch in their names, but it meant that they called for butterscotch chips, something one cannot find here. I can’t remember how many recipes for butterscotch blondies and cookies I’ve seen so far and most of them called for the chips, that is why I was really eager to make these blondies for they did not call for any chips at all: the caramel was part of the batter, and that sounded too good not to try.

Another thing that having a food blog has taught me is to trust my feelings: the recipe sounded good, indeed, but the amounts of sugar and flour looked way too much – I would end up having a sugar high or baking a stodge (or both). So I baked the blondies my way and they turned out not tooth achingly sweet, gooey and soft, the way I wanted them to be, and with a strong caramel flavor – delicious.

Butterscotch blondies
slightly adapted from the beautiful Home Baked Comfort (Williams-Sonoma) (revised): Featuring Mouthwatering Recipes and Tales of the Sweet Life with Favorites from Bakers Across the Country

½ cup (113g/1 stick) unsalted butter
300g light brown sugar
1 cup (240ml) heavy cream
2 teaspoons pure vanilla extract
2 tablespoons dark rum
½ teaspoon table salt
250g all-purpose flour
¾ teaspoon baking powder
2 large eggs

In a saucepan, melt the butter over medium heat. Using a heatproof rubber spatula, stir in the brown sugar and cook until the sugar starts bubbling like molten lava, about 4 minutes. Reduce the heat to medium-low, stir in the cream, and let it bubble away, stirring with a big whisk, until smooth and slightly thickened, about 10 minutes. Stir in the vanilla, rum, and salt. Let cool to room temperature.

Position a rack in the middle of the oven and preheat to 180°C/350°F. Butter a 20cm (8in) square baking pan, line it with foil leaving two overhangs on opposite sides and butter it as well.
In a bowl, whisk together the flour and baking powder. Stir the butterscotch mixture into dry ingredients, then whisk the eggs in, one at a time, beating well after each addition.
Spread the batter into the prepared dish and bake until a toothpick inserted in the center comes out relatively clean, 20-25 minutes. Let cool completely in the pan, then cut into squares.

Makes 16

Wednesday, March 11, 2015

Citrus caramel blondies

Citrus caramel blondies / Blondies cítricas com caramelo

I am not a very techie person but I love it when people teach me something new about computers or tell me about interesting apps – the same lovely friend who introduced me to Shazam told me about Spotify as well and now I cannot live without it any longer (thanks, C.!).

That happened ages ago, but you know how things are around here. :D

Something else I adore about technology: having loads of recipes to choose from and to get inspired by, even when I’m far from home and from my cookbooks. I was going through Food & Wine’s website while waiting on a very long line and found these unusual blondies – I made them as soon as I got home (melted butter, yay) and they turned out fantastic. The caramel is so delicious I had to keep it away from me while making the blondie batter – I advise you to do the same (or make a double batch). :D

Citrus caramel blondies
from Food & Wine magazine

Caramel:
¼ cup (50g) granulated sugar
3 tablespoons heavy cream
1 tablespoon (14g) cold unsalted butter
½ teaspoon Maldon sea salt or fleur de sel

Blondies:
1 cup (140g) all-purpose flour
¼ teaspoon table salt
½ teaspoon baking powder
½ cup (113g/1 stick) unsalted butter, melted
1 cup (175g) packed light brown sugar
2 large eggs
½ teaspoon vanilla extract
finely grated zest of 1 orange

Caramel: in a small saucepan, combine the granulated sugar with 1 tablespoon of water and bring to a boil. Using a wet pastry brush, wash down any crystals on the side of the pan. Boil the syrup over moderately high heat until a deep amber caramel forms, about 5 minutes. Remove from the heat and immediately whisk in the cream, butter and Maldon sea salt. Let the caramel cool to room temperature.

Blondies: preheat the oven to 180°C/350°F. Lightly butter a 20cm (8in) square metal baking pan, line it with foil leaving an overhang on 2 opposite sides; butter the foil as well.

In a small bowl, whisk the flour with the salt and baking powder. In a medium bowl, whisk the butter with the brown sugar until combined, then whisk in the eggs, vanilla and orange zest. Add the flour mixture and stir until just incorporated.
Spread the batter in the prepared pan in an even layer. Drizzle the caramel over the top in small portions, then swirl it decoratively using a toothpick. Bake the blondies for 25-30 minutes, until it is golden on top and a toothpick inserted in the center comes out with a few moist crumbs attached. Let cool completely. Cut into bars and serve.

The blondies can be stored in an airtight container at room temperature for up to 3 days.

Makes 16

Monday, November 17, 2014

Sticky toffee squares

Sticky toffee squares / Quadradinhos de caramelo

I have a sweet tooth and that’s not a secret, but there are sweets and desserts that have a special place in my heart for something other than their taste: they remind me of certain periods of my life, certain days and occasions, and that makes them extra special.

When I was a kid my grandmother would make dulce de leche at home every now and then, and it was one of my favorite things: it was delicious on its own, by the spoonful, spread on sliced of bread, with cheese… The thought of it makes my mouth water already – grandma used to make a big pot of dulce de leche at a time, but it never lasted long. :)

I still love dulce de leche, but I have never tried making it at home the way my grandmother used to – so far I’ve only made it by cooking a can of sweetened condensed milk in the pressure cooker, but nowadays it’s so easy to find Argentinean dulce de leche around here I don’t even do that anymore – all I do is open up a jar, and to stop myself from eating it all by myself I bake with it, too, making yummy things like these squares. :)

Sticky toffee squares
slightly adapted from the delicious Olive magazine

Cake:
175g all purpose flour
1 ¾ teaspoons baking powder
pinch of salt
2 tablespoons ground almonds
175g unsalted butter, softened
150g light brown sugar
1 teaspoon vanilla extract
3 eggs

Icing:
2/3 cup dulce de leche
2 tablespoons heavy cream

Preheat the oven to 180°C/350°F. Lightly butter a 20cm (8in) square baking pan, line the bottom with a square of baking paper and butter it as well.

In a medium bowl, whisk together the flour, baking powder, salt and almond meal. Using an electric mixer, beat the butter and sugar together until light and creamy. Beat in the vanilla.
Beat the flour mixture into the sugar and butter in 3 batches, adding an egg each time. Beat the mixture until smooth and then spoon it into the pan and level the top. Bake for about 30 minutes or until a skewer comes out clean. Cool in the pan for 30 minutes, then carefully unmold, peel off the paper and invert onto the rack to cool completely.

Icing: place dulce de leche and cream in a small bowl and mix to combine. Spread over the cooled cake. Cut into squares to serve.

Makes 16

Friday, November 8, 2013

Caramel and chocolate bars and turning things interesting for adults

Caramel and chocolate bars / Barrinhas de caramelo e chocolate

Long ago, many years before vampires were “in” (or were turned into creatures that walk around in broad day light), a very respected filmmaker made a masterpiece out of Bram Stoker’s book, and my favorite actor set the bar high for anyone else ever to play a vampire again.

Little over twenty years later a very interesting movie trailer gets released, in which Tilda Swinton and Tom Hiddleston play vampires – apparently dark ones, nothing covered in glitter, thank heavens. :D Both of them look absolutely amazing in Only Lovers Left Alive and now I cannot wait to watch the movie. I don’t think anyone will ever be able to match Gary Oldman playing a vampire, but I really believe that Tilda and Hiddles can seriously make those creatures of the night interesting again for us, adults. :)

I’m not a spokesperson for super healthy food – I do buy and eat processed food sometimes, and I am sure you remember my baked goods filled with chopped Oreos and Snickers. :) However, candy bars are not my cup of tea: I often find them too sweet, even the ones I used to love as a kid. Bill Granger’s bars, with layers of cookie, caramel and chocolate, are a great way to turn a certain candy bar interesting for us, adults – and the salt sprinkled on top makes all the difference in these addictive little morsels of deliciousness. :D

Caramel and chocolate bars
slightly adapted from the delicious and beautiful Holiday (I bought mine here)

Crust:
125g all-purpose flour
1 teaspoon baking powder
1 cup (90g) sweetened flaked coconut
½ cup (100g) granulated sugar
125g unsalted butter, melted

Filling:
100g unsalted butter
100g brown sugar
1 can (395g) sweetened condensed milk
2 tablespoons corn syrup
1 teaspoon vanilla extract

Topping:
150g dark chocolate – I used one with 53% cocoa solids
flaked sea salt, to taste (I used Maldon as suggested by Bill)

Preheat the oven to 180°C/350°F. Lightly butter a 20x30cm (12x8in) baking pan, line it with foil leaving an overhand in two opposite sides, then butter the foil as well.
Crust: in a large bowl, combine the flour, baking powder, coconut, sugar and melted butter and mix until a dough forms. Press this mixture into the bottom of the prepared pan and bake for 12-15 minutes or until lightly golden.
While the base is in the oven, prepare the filling by placing all the ingredients into a medium saucepan. Cook over a low heat while stirring, until all the sugar has dissolved. Turn up the heat, bring to the boil, then reduce the heat to low and cook for 5 minutes, constantly stirring, until it has turned a light golden color. Pour this evenly over the cooked base and bake for 10 minutes. Remove from the oven. Cool completely over a wire rack.

Melt the chocolate in a heatproof bowl over gently simmering water (do not let the bottom of the bowl touch the water). Once melted, pour onto the caramel and spread evenly. Allow the chocolate to set before sprinkling over the sea salt. Cut into squares or bars.

Makes 24

Friday, November 1, 2013

Maple banana cake with caramel drizzle + an amazing movie trailer

Maple banana cake with caramel drizzle / Bolo de banana e xarope de bordo com caldinha de caramelo

Weeks ago the trailer for Foxcatcher was released and my interest in the movie skyrocketed – I’d read about it and seen a couple of photos (in which both Mark Ruffalo and Steve Carell look unrecognizable) and the trailer just made me even more curious (oh, the joy of a perfectly put together movie trailer!).

I find it remarkable when an actor chooses a project that is completely different from everything he’d done up until then, which is what Carell is doing in Foxcatcher – for the little I’ve seen and read his performance will be one to watch next year. That reminds me of other actors who emerged from comedies and delivered great performances in dramas such as Jim Carrey in The Truman Show, Jamie Foxx in Collateral (before that movie I don’t think anyone would have thought the guy could win an Oscar) and, to me, the most fantastic one, Marlon Wayans in Requiem for a Dream (Darren Aronofsky did the impossible here, let’s be honest). I cannot wait to see Carell playing such a dark character, and it’s too bad the movie release has been postponed to 2014 (apparently no one wants to compete against Gravity and 12 Years a Slave in the award season).

***
I like having a handful of ingredients in my freezer for cooking and baking, like berries, peas, spinach and nuts, and two things I always have stashed there are egg whites and overripe bananas. A while ago the egg white amount was considerably low, but there were quite a lot of frozen bananas around, and they were transformed into this moist, delicious cake (the caramel drizzle makes it extra special, don’t skip it). The cake does taste fantastic with the addition of maple syrup, but I have made this recipe replacing the syrup with a mild flavored honey and it worked like a charm, too.

Maple banana cake with caramel drizzle
slightly adapted from the always gorgeous Delicious Autralia

Cake:
3 large eggs
125g unsalted butter, melted, cooled
1 cup (175g) light brown sugar, packed
¼ cup (60ml) maple syrup
1 teaspoon vanilla extract
4 overripe bananas, mashed
¼ cup sour cream*
225g all purpose flour
1 teaspoon baking powder
½ teaspoon ground cinnamon
1/8 teaspoon table salt
icing sugar, for dusting

Caramel drizzle:
2 tablespoons unsalted butter
1/3 cup (60g) light brown sugar, packed
2 tablespoons heavy cream

Cake: preheat the oven to 180°C/350°F. Grease an 8-cup capacity Bundt cake pan and dust with flour.
Beat eggs, butter, brown sugar, maple syrup and vanilla in an electric mixer for 5 minutes or until thick. Beat banana and sour cream into the batter. Sift in flour, baking powder, cinnamon and salt then mix until combined. Spread into the pan and bake for 40 minutes or until a skewer comes out clean. Cool for 10 minutes, then carefully unmold onto a wire rack. Cool completely.
Make the caramel drizzle: place butter and sugar in a small saucepan over low heat, stirring to dissolve the sugar. When it boils, whisk in the cream – carefully because the mixture will bubble – until incorporated then remove from heat.
Dust the cake with the icing sugar and drizzle with the caramel.

* homemade sour cream: to make 1 cup of sour cream, mix 1 cup (240ml) heavy cream with 2-3 teaspoons lemon juice in a bowl. Whisk until it starts to thicken. Cover with plastic wrap and leave at room temperature for 1 hour or until thicker (I usually leave mine on the counter overnight – except on very warm nights – and it turns out thick and silky in the following morning; refrigerate for a creamier texture)

Serves 8-10

Monday, August 26, 2013

Nib praliné brownies + a new band (at least new to me)

Nib nougatine brownies / Brownies com praliné de semente de cacau

Days ago, while looking for good haircuts for fine hair (something that would make me look like I have tons of hair, which unfortunately is not true) I ended up on this lovely website and watching one of the videos I was introduced to “Foster the People” – I got hooked and can’t stop listening to their songs, especially “Helena Beat” and “I Would Do Anything For You”. Such a nice discovery.

I’m not usually that good to remember where and when I first found things, but I am quite sure that cocoa nibs were introduced to me by Alice Medrich; here the nibs are turned into a delicious praliné and then folded into brownie batter, and that alone made me drool when I read the recipe. The praliné recipe, however, yielded twice as much as the amount called for to be used in the brownies, but I went on and used the whole batch anyway – some of the caramel melted and formed a layer on the bottom of the brownies and that made slicing a little bit harder. Now it’s up to you: you can either follow the recipe below and use only ½ cup total of praliné in your brownies or you can go crazy like I did and caramelize the heck out of your bars – just make sure you have a sharp knife around. :D

Nib praliné brownies
slightly adapted from the adorable Luscious Chocolate Desserts

Nib praliné:
1/3 cup (40g) cocoa nibs
¾ cup (150g) granulated sugar
1/3 cup (80ml) water
¼ cup light corn syrup
pinch of salt

Brownies:
1 cup (2 sticks/226g) unsalted butter
112g (4oz) dark chocolate, chopped – I used one with 53% cocoa solids
1 ½ cups (300g) granulated sugar
4 large eggs
2 teaspoons vanilla extract
½ cup (70g) all purpose flour
1/3 cup (33g) unsweetened cocoa powder
1/8 teaspoon table salt

Start with the praliné: line a large baking sheet with foil and butter the foil. Spread the cocoa nibs over the buttered foil.
Heat the sugar, water, corn syrup and salt in a small, heavy saucepan over medium heat until sugar is dissolved. Increase the heat to high and do not stir any longer. Cook the mixture until a dark golden brown caramel forms, washing the sides of the pan with a wet pastry brush to remove any sugar crystals – it should read 160-165°C (320-330°F) on a candy thermometer. Remove from the heat and immediately pour the caramel over the cocoa nibs. Set aside to cool completely, then break into pieces- for a finer texture, process in a food processor.

Makes about 1 cup (you’ll use half this amount in the brownies)

Brownies: preheat the oven to 180°C/350°F. Lightly butter a 20x30cm (8x12in) baking pan, line it with foil leaving an overhang on the two longest sides and butter the foil as well.
Melt the butter and chocolate together in a medium heatproof bowl over a saucepan of simmering water (don’t let the bottom of the bowl touch the water). Remove from the heat and cool for 5 minutes.
Beat sugar and eggs with an electric mixer until thick and pale, about 3 minutes. Beat in the vanilla. With a rubber spatula, fold in the chocolate mixture just until blended. Sift the flour, cocoa and salt over the mixture and fold gently. Fold in ¼ cup of the praliné.
Spread the batter into the prepared pan, then top with the remaining ¼ cup praliné. Bake for 30-35 minutes or until a toothpick inserted in the center of the brownie comes out sticky with just a few crumbs. Cool completely in the pan over a wire rack. Cut into squares to serve.

Makes 20

Tuesday, August 13, 2013

Caramel cake and my bookshelf is back

Caramel cake / Bolo de caramelo

I have told you before about my love for simple cakes: they’re good on their own, with a cup of tea in the winter or a glass of cold milk in warm days, and with the help of some poached fruit and vanilla ice cream or whipped cream they can be transformed into delicious desserts.

This is a very simple cake – just as I like it – but the caramel glaze turns it into something even more delicious: it might not look stunning but it does taste great. You’ll be tempted to lick the spoon after pouring the glaze over the cake, but wait a couple of minutes – trust me on this. :D

Oh, and my bookshelf has been reinstated by Blogger – they said they’d analyze my case in two business days but it took them sixteen. Pretty close, huh? #not

Caramel cake
from the delicious Gourmet Today: More than 1000 All-New Recipes for the Contemporary Kitchen

Cake:
2 cups + 2 tablespoons sifted cake flour (or 210g all purpose flour + 40g corn starch)
1 teaspoon baking powder
¾ teaspoon baking soda
¼ teaspoon table salt
½ cup (113g/1 stick) unsalted butter, softened
1 cup (200g) granulated sugar
1 teaspoon pure vanilla extract
2 large eggs, room temperature
1 cup (240ml) well-shaken buttermilk*

Caramel glaze:
1 cup (240ml) heavy cream
½ cup (88g) packed light brown sugar
1 tablespoon light corn syrup
1 teaspoon pure vanilla extract

Cake: preheat the oven to 180°C/350°F with rack in middle. Butter a 20cm (8in) square cake pan and line with a square of parchment paper, then butter parchment.
Sift together flour, baking powder, baking soda, and salt.
Beat butter and sugar in a large bowl with an electric mixer at medium speed until pale and fluffy, then beat in vanilla. Add eggs 1 at a time, beating well after each addition. At low speed, beat in buttermilk until just combined (mixture may look curdled). Add flour mixture in 3 batches, mixing until each addition is just incorporated.
Spread batter evenly in cake pan, then rap pan on counter several times to eliminate air bubbles (I forgot to do that). Bake until golden and a wooden pick inserted in center of cake comes out clean, 35-40 minutes. Cool in pan on a rack 10 minutes, then run a knife around edge of pan. Invert onto rack and discard parchment, then cool completely.

Glaze: bring cream, brown sugar, corn syrup, and a pinch of salt to a boil in a large heavy saucepan over medium heat, stirring until sugar has dissolved. Boil until glaze registers 98 to 100°C (210 to 212°F) on thermometer, 12 to 14 minutes, then stir in vanilla.
Put rack with cake in a shallow baking pan and pour hot glaze over top of cake, allowing it to run down sides. Cool until glaze is set, about 30 minutes.

* homemade buttermilk: to make 1 cup buttermilk place 1 tablespoon lemon juice in a 240ml-capacity measuring cup and complete with whole milk (room temperature). Wait 10 minutes for it to thicken slightly, then use the whole mixture in your recipe

Serves 8-10 – I made the exact cake recipe above using a round 20cm (8in) cake pan with tall sides; it was my second time making this cake and the first time there was a lot of glaze left, so I halved the recipe above and the mixture took almost no time at all to get to the temperature described on the recipe

Saturday, January 19, 2013

Lemon-and-cinnamon-scented flan

Lemon-and-cinnamon-scented flan / Flan perfumado com canela e limão siciliano

Some recipes catch my attention for its ingredients and/or an unusual combination of those, and this is one of them: the idea of mixing cinnamon and lemon to flavor a creamy dessert sounded delicious! But there was also something nostalgic involved in my decision to make this dessert: my mom used to make flans all the time when I was a kid. :)

Lemon-and-cinnamon-scented flan
from the always delicious Food & Wine

2 ½ cups (600ml) whole milk
peel of half a lemon (removed with a vegetable peeler – avoid the white pith)
1 medium cinnamon stick, broken
1 cup (200g) granulated sugar
¼ cup (60ml) water
5 large eggs

Preheat the oven to 150°C/300°F. Set six 150 to 180ml (5- to 6-ounce) ramekins or custard cups in a medium baking pan.
In a medium saucepan, combine the milk, lemon peel and cinnamon stick and bring to a boil. Remove from the heat, cover and let stand for 15 minutes; discard the lemon peel and cinnamon stick pieces.
Meanwhile, in a small saucepan, cook ½ cup (100g) of the sugar with the water over moderately high heat, stirring just until the sugar dissolves. Lower the heat to moderate and let the sugar syrup simmer, without stirring, until a deep amber caramel forms, about 15 minutes. Immediately pour the caramel into the ramekins, tilting them as necessary to evenly coat the bottoms.
Warm the milk mixture. In a large bowl, whisk the eggs with the remaining ½ cup of sugar. Slowly whisk in the warm milk, then strain through a fine sieve into a large measuring cup or a bowl. Pour the custard into the ramekins. Pour enough hot water into the baking pan to reach halfway up the sides of the ramekins. Bake for about 40 minutes, until a knife inserted into a flan comes out clean. Transfer the ramekins to a rack and let the flans cool to room temperature. Refrigerate the flans for at least 4 hours or overnight.
To serve, run a thin knife around each flan. Top each flan with an inverted dessert plate and unmold, letting the caramel run over the flans. Serve at once.

The flans can be refrigerated for up to 2 days in the ramekins.

Serves 6

Sunday, September 30, 2012

Toffee-glazed white chocolate mud cakes

Toffee-glazed white chocolate mud cakes / Bolinhos de chocolate branco com calda de caramelo

My vacation is over and tomorrow morning I'm back at work; I still have things to organize at home, therefore a quick post with an equally quick recipe (despite the steps), so delicious that will certainly put a smile on my face, even now that I no longer remember what it feels like waking up early. :D

Toffee-glazed white chocolate mud cakes
from the always delicious and oh, so beautiful Donna Hay Magazine

Cakes:
200g unsalted butter, chopped
200g white chocolate, chopped
1 cup (175g) brown sugar, packed
2 tablespoons water
1 ½ tablespoons corn syrup
1 teaspoon vanilla extract
3 eggs
1 cup + 1 tablespoon (150g) all purpose flour, sifted
1/2 cup + 1 tablespoon (58g) almond meal

Toffee glaze:
2 cups (400g) granulated sugar
½ cup (120ml) water
2/3 cup (150g) unsalted butter
½ cup (120ml) heavy cream

Preheat the oven to 180°C/350°F. Butter six 1 ¼ cup capacity (300ml) mini cake or muffin pans.
Place the butter, white chocolate, sugar, water, golden syrup and vanilla in a heavy saucepan over low heat and cook, stirring, until melted and smooth. Remove from the heat and cool for 10 minutes.
Add the eggs, one at a time, mixing well after each addition. Add the flour and almond meal and mix to combine. Pour batter into prepared pans and bake for 30-35 minutes or until golden and risen and a skewer inserted in the center comes out clean. Cool in the pans for 10 minutes, then carefully turn onto a wire rack. Cool completely, then transfer to the serving plates.
Make the glaze: place the sugar and water in a medium saucepan over low heat. Stir just until sugar is dissolved, turn heat to high then cook, without stirring, until golden and caramel forms (8 minutes or so). Remove from the heat and immediately add the butter and cream – carefully, mixture may spit – and stir until smooth. Spoon over the cakes and allow to set before serving. Transfer any remaining glaze to a small bowl to serve with the cakes (if glazes hardens, place it over a bowl of very hot water and stir until smooth).

Makes 6 – I made ¾ of the cake recipe above using ¾ cup (180ml) capacity pans and got 8 cakes; I halved the toffee glaze recipe and it was more than enough to glaze all the cakes

Friday, May 11, 2012

Banana blondies

Banana blondies / Blondies de banana

I don’t bake blondies very often, but so far the recipes I’ve made turned out delicious – Martha’s gingerbread blondies I made back in 2010 were just irresistible. When I saw Dan Lepard’s banana blondies I had to make them: not only because a blondie made of banana made me curious but also because I’d be able to use up some of my banana overload; oh, and before I forget to mention, there’s chopped praliné mixed in the batter. Praliné. In the batter. With banana and white chocolate.

Do you still need be convinced about this recipe? ;)

Banana blondies
slightly adapted from the absolutely glorious Short and Sweet (mine was bought here)

Pecan praliné:
1/3 cup + 1 tablespoon (78g) granulated sugar
2 tablespoons water
¾ cup (83g) pecans

Blondies:
1 cup (200g) granulated sugar
100g unsalted butter
200g white chocolate
1 egg
2 bananas, chopped
2 teaspoons vanilla extract
1 ¼ cups (175g) all purpose flour
¼ teaspoon baking powder
pinch of salt

Make the pecan praliné: lightly oil a small baking sheet. Put the sugar and water in a small heavy saucepan. Over medium heat, bring to the boil and let it bubble away, without stirring, until the sugar turns to golden caramel. Stir in the pecans and immediately spread onto prepared sheet. Cool completely, then finely chop.

Blondies: preheat the oven to 180°C/350°F. Line the base and sides of a 20cm (8in) square pan with foil, leaving an overhang in two opposite sides; butter the foil.
Combine the butter and white chocolate in a heatproof bowl and place over a saucepan of barely simmering water, stirring until melted and smooth. Remove from the heat and mix in the sugar. Beat in the egg and vanilla. Stir in the bananas. Sift the flour, baking powder and salt over mixture, then fold through with the chopped praliné. Spoon into the prepared pan and bake for 35 minutes or until wobbly-set and golden on top. Cool completely in the pan over a wire rack. Cut into squares.

Makes 16

Friday, March 30, 2012

Macadamia crunch ice cream + my favorite cookbooks

Macadamia crunch ice cream / Sorvete com praliné de macadâmia

Every other day I receive emails from the readers asking which are my favorite cookbooks; for each of those emails I reply two more arrive in my inbox – not a very practical thing. That is why you’ll find below the list with my all time favorite cookbooks – the ones I love the most (in no particular order):


This delicious ice cream – if you think I’ve become addicted to praliné, you’re right, how could I not? – comes the cookbook I’ve used the most so far: the one that comes to mind whenever I think of making something sweet – which, let’s be honest, is something that happens quite often. :D

Macadamia crunch ice cream
from the fantastic and always delicious Bon Appetit Desserts: The Cookbook for All Things Sweet and Wonderful

Toffee:
2/3 cup (94g) roasted salted macadamia nuts, coarsely chopped
¼ teaspoon baking soda
1/3 cup (67g) granulated sugar
2 tablespoons water
2 tablespoons (28g) unsalted butter

Ice cream:
1 ½ cups (360ml) heavy whipping cream
1 ½ cups (360ml) whole milk
pinch of salt
½ cup (100g) granulated sugar
6 large egg yolks
2 teaspoons vanilla extract

Toffee: butter small rimmed baking sheet. Combine nuts and baking soda in a small bowl. Stir sugar, water and butter in a heavy small saucepan over medium heat until sugar dissolves and butter melts, about 2 minutes. Increase heat to medium-high. Boil until dark amber colored, stirring constantly, about 3 minutes. Mix in nut mixture and immediately pour it onto buttered sheet, spreading it as much as possible. Cool completely, then chop with a sharp knife into small pieces.
Ice cream: bring cream, milk and salt to a simmer in a heavy large saucepan. Whisk sugar and egg yolks in a medium bowl. Gradually whisk hot cream mixture into yolk mixture. Return mixture to same saucepan. Stir over medium-low heat until custard thickens and leaves path on back of spoon when finger is drawn across – do not boil. Pass through a sieve into a medium bowl, stir in vanilla and refrigerate until very cold, 3-4 hours.
Process custard into ice cream maker according to manufactures’ instructions. Add toffee during last 5 minutes of churning. Transfer to an ice cream container, cover and freeze until firm.

Serves 8-10

Related Posts with Thumbnails