Showing posts with label sour cream. Show all posts

Thursday, September 3, 2020

Tangerine sour cream cake

Bolo de tangerina e creme azedo / Tangerine sour cream cake

After I started tweaking Epicuriou’s yogurt cake recipe for different cake flavors it took me a good while to make cake using butter again – every time I thought of it, I had to drop the idea for not having enough time for the butter to soften (I don’t have a microwave oven). 

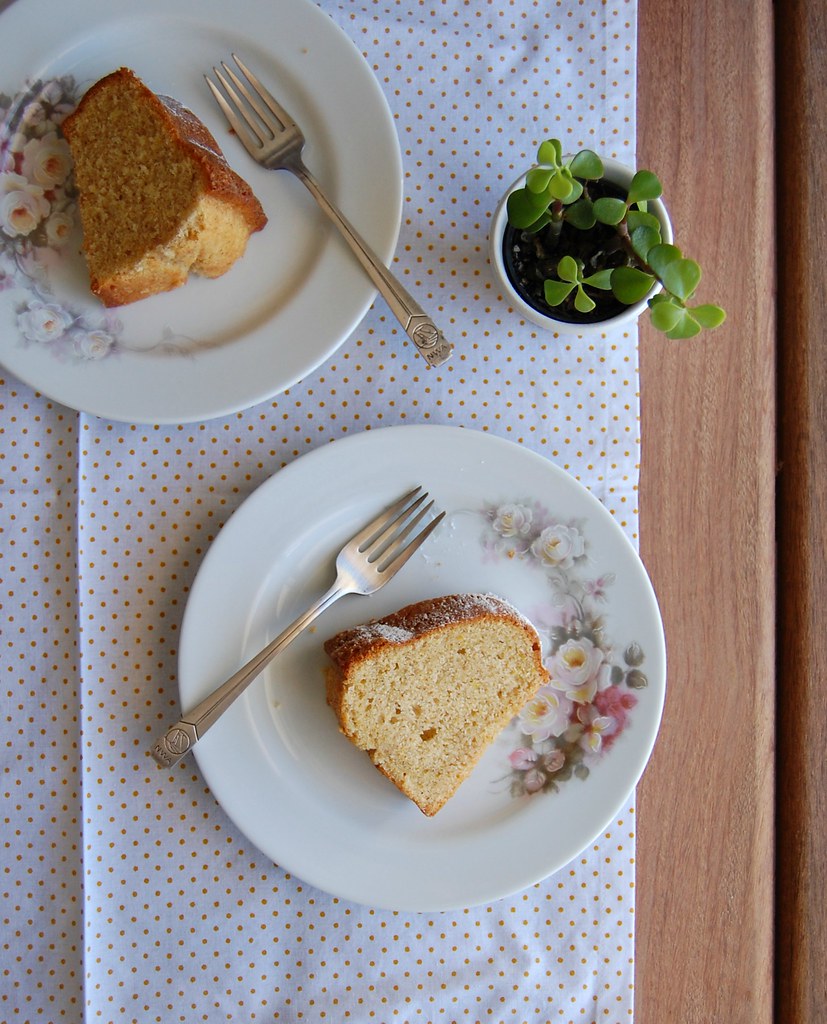
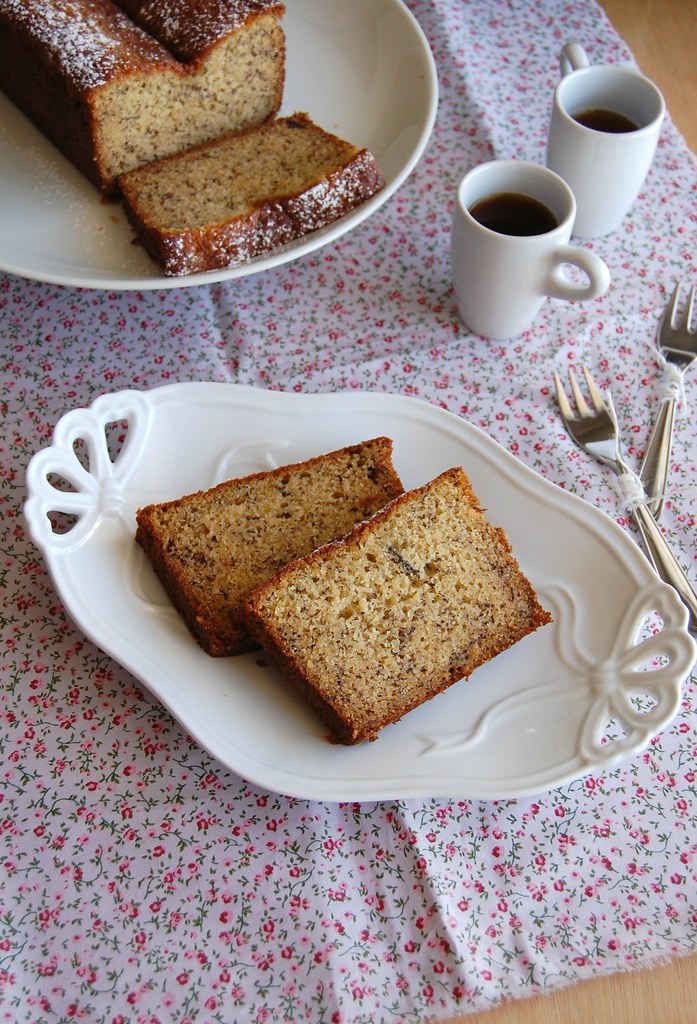
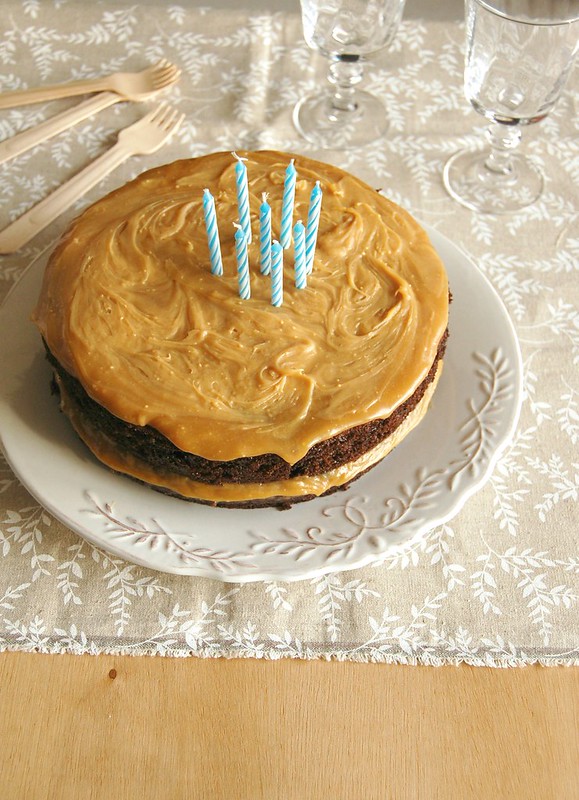
The day came when I had to use up some heavy cream sitting on the fridge before it went bad, and ended up making a sour cream cake that called for butter. It turned out very tender, perfumed with tangerines – both zest and juice – and delicious. My husband loved the cake with the glaze on top. 

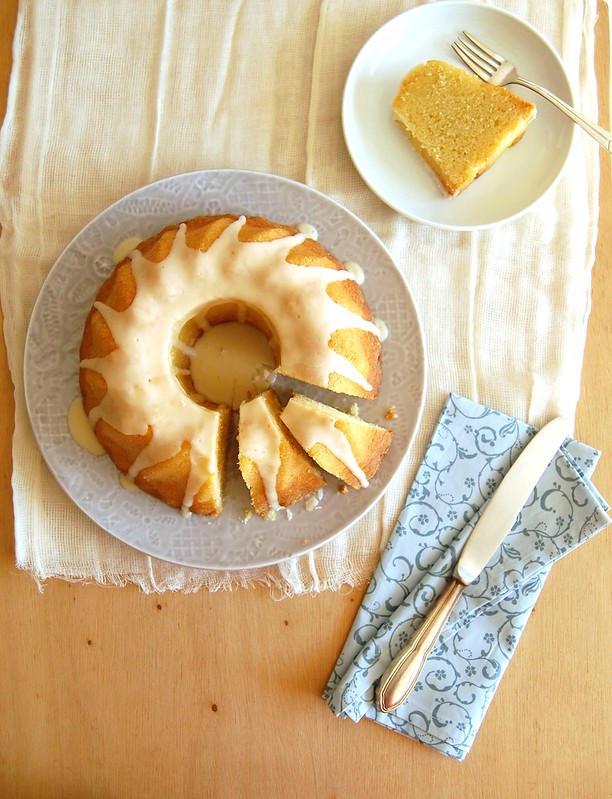
The cake is drenched in tangerine juice after being unmolded, which makes it wonderfully moist. Do try the recipe with oranges in case you don’t have tangerines around (the original recipe calls for lemon).

Bolo de tangerina e creme azedo / Tangerine sour cream cake

Tangerine sour cream cake

adapted from this recipe


Cake:

2 cups (280g) all-purpose flour

1 ½ teaspoons baking powder

¼ teaspoon table salt

1 ¼ cups (250g) granulated sugar

finely grated zest of 2 medium tangerines

180g unsalted butter, softened

3 large eggs, room temperature

½ teaspoon vanilla extract

2 teaspoons Cointreau - optional

1 cup sour cream*


To brush the cake:

3 tablespoons tangerine juice


Glaze:

½ cup (70g) icing sugar

2 tablespoons tangerine juice


Start with the cake: preheat the oven to 180°C/350°F. Butter and flour an 8-cup capacity Bundt pan.

In a medium bowl, whisk together flour, baking powder and salt. Set aside.

Place sugar and tangerine zest in the bowl of an electric mixer and rub them together with your fingertips until sugar is fragrant. Add the butter then beat until mixture is very light and fluffy – scrape the sides of the bowl with a rubber spatula several times throughout the making of the cake. Add the eggs, one at a time, beating well between each addition. Beat in the vanilla and Cointreau (if using).

On low speed, beat in the flour mixture in three additions, alternating with the sour cream in two additions. Beat until combined only – do not overmix.

Spoon into the prepared pan and smooth the top. Bake in the oven for 45-55 minutes or until golden and risen and a skewer inserted in the center of the cake comes out clean. Cool in the pan over a wire rack for 20 minutes, then carefully unmold onto the rack. Once cake is unmolded, brush it all over with the tangerine juice, until it is absorbed completely.

Make the glaze: gradually add the tangerine juice to the icing sugar, mixing until you get the desired consistency. Pour over the cooled cake.

*homemade sour cream: to make 1 cup of sour cream, mix 1 cup (240ml) heavy cream with 2-3 teaspoons lemon juice in a bowl. Whisk until it starts to thicken. Cover with plastic wrap and leave at room temperature for 1 hour or until thicker (I usually leave mine on the counter overnight – except on very warm nights – and it turns out thick and silky in the following morning; refrigerate for a creamier texture)

Serves 10-12

Friday, September 15, 2017

Orange, cinnamon and clove cake and the second recipe I ever learned

Orange, cinnamon and clove cake / Bolo de laranja, canela e cravo

Most people who know me or read the blog know that the first recipe I ever learned how to make was a Brazilian cornmeal cake, the one I published a while ago. I was 11 years old and right then and there a whole new world opened up in front of me: from that day on I engaged in a relationship with food and cooking that changed my life for good.

What not everyone knows is that the second recipe I learned how to make was an orange cake – very simple, yet so delicious, I can almost smell it if I close my eyes for a moment. For that reason (aside from the fact that I am a citrus nut) orange cakes have a special place in my heart and I am always looking for new ways to make them.

The one I bring you today is perfumed with both cinnamon and cloves and the inspiration for this combo of flavors came from the sablés I posted a couple of years ago, when I was saying goodbye to my dear Peggy Olson.

Orange, cinnamon and clove cake
own recipe

2 cups (280g) all purpose flour
2 teaspoons baking powder
1/8 teaspoon table salt
1 teaspoon ground cinnamon
¼ teaspoon ground cloves
1 cup (200g) granulated sugar
finely grated zest of 2 oranges
¾ cup (170g) unsalted butter, softened
2 large eggs, room temperature
½ teaspoon vanilla extract
1 cup (240ml) sour cream*
Icing sugar, for dusting the cake

Preheat the oven to 180°C/350°F. Butter and flour a 2-liter capacity Bundt pan.
In a medium bowl, whisk together the flour, baking powder, salt and spices. Set aside.
In the bowl of an electric mixer, combine granulated sugar and orange zest and rub them together until sugar is fragrant. Add the butter and using the mixer beat until creamy and light in color – scrape the sides of the bowl occasionally throughout the making of the recipe. Beat in the eggs, one at a time, beating well after each addition. Beat in the vanilla.

On slow speed, beat in the dry ingredients in three additions, alternating with the sour cream in two additions (start and end with the dry ingredients). Beat just until incorporated. Pour into prepared pan and smooth the top. Bake for 40-45 minutes or until cake is golden and risen and a skewer inserted in the center comes out clean. Cool in the pan over a wire rack for 20 minutes, then carefully unmold onto the rack and cool completely.
Dust with icing sugar before serving.

* homemade sour cream: to make 1 cup of sour cream, mix 1 cup (240ml) heavy cream with 2-3 teaspoons lemon juice in a bowl. Whisk until it starts to thicken. Cover with plastic wrap and leave at room temperature for 1 hour or until thicker (I usually leave mine on the counter overnight – except on very warm nights – and it turns out thick and silky in the following morning; refrigerate for a creamier texture)

Serves 8

Wednesday, September 13, 2017

Asparagus and gorgonzola galette with corn flour pastry and creative days

Asparagus and gorgonzola galette with corn flour pastry / Galette de aspargo e gorgonzola com massa de fubá

I could start several posts with “when I was still working on the book project” because during that time I exercised my creativity almost on a daily basis. Everything I saw was a source of inspiration, and a trip to the grocery store or the farmers’ market would turn into an idea, that turned into a recipe, that turned into several tests in my kitchen. Several times my husband and I ate the tests for lunch, and whoever came to my house would be served cake or cookies I had been working on – everyone became my guinea pigs. :)

I was at the grocery store with my husband one day when I saw beautiful asparagus – I brought them home with the idea of making a frittata, but I decided for a galette instead: I love galettes, they are my favorite kind of tart – they are easy to put together (no blind baking involved) and they always look stunning.

We ate this galette for lunch 3 times – I was going to make it a few times anyway to test the recipe in different occasions, however it tasted so delicious that making it again never felt like a chore.

Asparagus and gorgonzola galette with corn flour pastry
own recipe

Pastry:
1 cup + 1 tablespoon (150g) all purpose flour
¼ cup (35g) corn flour (finely ground cornmeal, not corn starch)
¼ teaspoon table salt
100g unsalted butter, very cold and diced
¼ cup (60ml) sour cream*, very cold
2 tablespoons iced water

Filling:
100g fresh ricotta – I use homemade
50g gorgonzola, coarsely grated or crumbled
1 tablespoon sour cream
salt and freshly ground black pepper
200g fresh asparagus, already trimmed

Egg wash:
1 egg yolk whisked with 1 teaspoon sour cream

Start by making the pastry: in a food processor, pulse all purpose flour, corn flour and salt until well combined. Add the butter and pulse a few times until mixture resemble coarse breadcrumbs. Mix sour cream and water in a small bowl, then with the motor running, gradually add the mixture and process just until a dough forms. Form dough into a ball, wrap in plastic wrap and refrigerate for 1 hour.

Place the dough onto large piece of baking paper, cover with another piece of paper and roll into a rough 20x35cm (8x14in) rectangle. Slide the paper with pastry into a baking sheet and remove the paper from the top. In a medium bowl, whisk together the ricotta, gorgonzola, heavy cream until a paste forms. Season with salt and pepper (go easy on the salt since gongonzola can be salty). Spread the dough with the filling leaving a 2.5cm (1in) border. Arrange the asparagus on top of the filling, pressing them slightly to adhere. Carefully fold one edge in towards the center of the filling and continue folding all the way round, bringing the edge of the pastry towards and over the filling/asparagus. Freeze the galette for 15 minutes – in the meantime, preheat the oven to 200°C/400°F.

Brush the pastry with the egg wash and bake for 30-40 minutes or until pastry is golden. Serve warm.

* homemade sour cream: to make 1 cup of sour cream, mix 1 cup (240ml) heavy cream with 2-3 teaspoons lemon juice in a bowl. Whisk until it starts to thicken. Cover with plastic wrap and leave at room temperature for 1 hour or until thicker (I usually leave mine on the counter overnight – except on very warm nights – and it turns out thick and silky in the following morning; refrigerate for a creamier texture)

Serves 4 with a green salad on the side

Wednesday, August 16, 2017

Coconut sour cream buns and polarizing flavors

Coconut sour cream buns / Pãezinhos de coco e creme azedo (sour cream)

I thought I was crazy for sweets until I started working at my current job, two years ago: my coworkers are addicted to all kinds of sweets, and being a Swiss company you can imagine the ridiculous amounts of chocolate coming every time someone travels from headquarters to Sao Paulo. :)

One of the executives at the office keeps a jar of candy on top of his desk, and the group is welcome to get some whenever a sugar high is needed. Everyone that travels brings candy for the jar, which I find very nice and generous. Last week we started a debate about flavors because of the jar: my boss reached out for some candy, and since she does not speak Portuguese I warned her that those were coconut-filled candy bars. She told me she loved coconut, and then someone else replied that they hated it, while another person said they loved it too, and my boss said she believed that coconut is one of those flavors that polarize people: you either love it or hate it – like cilantro. :)

I am part of the coconut fan club for I love it in absolutely anything, including savory dishes. For that reason I wanted to come up with a recipe for buns made with coconut, but no only in the filling, as most recipes I have seen – I wanted a double splash of coconut, both in the dough and in the filling. I came up with these delicious buns that look super cute by being baked in a muffin pan, and they taste oh, so good. The addition of both sour cream and butter to the dough makes them insanely tender.

Coconut sour cream buns
own recipe

Dough:
2 ¼ teaspoons dried yeast
¼ cup (50g) granulated sugar
½ cup (120ml) lukewarm water
½ cup (120ml) sour cream*
1 large egg yolk
2 ½ cups (350g) all purpose flour
pinch of salt
1/3 cup (33g) unsweetened desiccated coconut
½ teaspoon vanilla extract
¼ cup (56g) unsalted butter, very soft

Filling:
¼ cup (56g) unsalted butter, very soft
2/3 cup (66g) unsweetened flaked coconut
4 tablespoons demerara sugar

For the egg wash and sprinkling the buns:
1 egg, + 1 teaspoon water, lightly beaten with a fork
3 tablespoons unsweetened flaked coconut

Start by making the dough: in the large bowl of an electric mixer fitted with the dough attachment, mix yeast, pinch of the sugar and water with a fork. Set aside until foamy, about 5 minutes. Add the sour cream, yolk, remaining sugar, flour, salt, coconut and vanilla and mix for 8-10 minutes or until smooth and elastic. Gradually beat in the butter, 1 tablespoon at a time, mixing well after each addition – dough will be soft. Transfer to a lightly buttered large bowl and cover with plastic wrap. Set aside in a draft-free area until doubled in volume, about 1 ½ hours.

Generously butter a 12-hole nonstick muffin pan. Set aside.
Transfer the dough to a lightly floured surface and roll it into a 30x40cm (12x16in) rectangle. Spread the butter over the dough leaving a 1cm (½in) border. Sprinkle the butter with the sugar, then with the coconut. Starting from the longest side, roll the dough into a tight cylinder, then slice into 12 equal pieces. Place each piece into a cavity of the muffin pan. Cover loosely with a clean kitchen towel and set aside to prove again, 40-45 minutes – in the meantime, preheat the oven to 200°C/400°F.

Brush the rolls with the egg wash and sprinkle with the coconut. Bake for about 25 minutes or until risen and golden. Cool in the pan over a wire rack for 5 minutes, then carefully unmold the buns and transfer them to the rack to cool completely (they are delicious served warm, too).

* homemade sour cream: to make 1 cup of sour cream, mix 1 cup (240ml) heavy cream with 2-3 teaspoons lemon juice in a bowl. Whisk until it starts to thicken. Cover with plastic wrap and leave at room temperature for 1 hour or until thicker (I usually leave mine on the counter overnight – except on very warm nights – and it turns out thick and silky in the following morning; refrigerate for a creamier texture)

Makes 12

Friday, June 9, 2017

Soft rye bread with sardine rillette and more childhood memories

Soft rye bread with sardine rillette / Pão de centeio macio com rillette de sardinha

Many, many months ago, while I still had plans to write a book, I was reading about rillettes and found them very interesting – as I read recipes for pork rillettes, I instantly thought of my mother and her love for this kind of meat, which I link to her German heritage.

As I thought of how much she would love that kind of rustic pâté, I also remembered the sardine salad (which we call “patê” in Portuguese) she used to make for sandwiches when I was a kid – canned sardines were cheap (still are) and those sandwiches are part of my childhood memories (mom would always cut the crusts off mine). :)

Mixing everything in my head I thought of making the rillettes with sardines instead of the pork and a quick search online showed me some variations made with salmon, so I was on the right track. I ended up making this sardine rillette several times for both my husband and I went crazy for it.

After the third time, if I am not mistaken, I felt that the delicious mixture deserved a good homemade bread to go with it, and the strong flavor of rye seemed really right for it – Joao agreed, but asked me for a soft bread that we could have for breakfast on the following day as well. I made this rye bread, tender from the addition of milk but still flavorsome. The problem is that we ended up eating the whole thing with the rillette and there was nothing left for breakfast. :)

Soft rye bread
own creation

Bread:
150ml whole milk, lukewarm
200ml water, lukewarm
2 teaspoons dried yeast
1 teaspoon granulated sugar
½ tablespoon honey
2 cups (280g) all purpose flour
1 ¼ cups (175g) rye flour
1 ½ teaspoons table salt

For brushing the bread:
1 tablespoon whole milk, room temperature

Start with the bread: in the bowl of an electric mixer, place milk, water, sugar and yeast and mix with a fork. Set aside until foamy, about 5 minutes. Add the honey, flours and salt and mix using the hook attachment for about 8 minutes or until dough is elastic and smooth – if mixing by hand, 12-14 minutes should be enough. Form dough into a ball, transfer to a large lightly oiled bowl and cover with plastic wrap. Set aside in a draft-free area for 1 ½ hours or until doubled in volume.

Lightly brush a 6-cup loaf pan with oil or butter.
Punch the dough to remove the excess air. On a lightly floured surface, using a rolling pin, roll the dough nto a large rectangle, about 20x30cm (8x12in). Starting with one of the long sides, carefully pick up the dough and roll, forming a cylinder. Pinch the seams and place the dough into the prepared pan, seam side down. Cover with a clean kitchen towel and set aside in a draft-free area again for 40-45 minutes – in the meantime, preheat the oven to 200°C.

Brush the top of the bread with milk and bake for about 30 minutes or until golden and baked through – bread should sound hollow when tapped with your fingers. Cool in the pan over a wire rack for 5 minutes, then carefully unmold onto the rack to cool. Cool completely.

Serves 6-8

Sardine rillette
own creation

1 ½ tablespoons extra virgin olive oil, divided use
½ tablespoon unsalted butter
½ onion, finely diced
1 celery stalk, finely sliced – use a mandolin
1 garlic clove, minced
3 sprigs of fresh thyme, leaves only
pinch of smoked paprika
salt and freshly ground black pepper
350g canned sardines, drained and flaked – I used sardines packed in olive oil for better flavor
2 tablespoons dry white wine
2 tablespoons sour cream*
2 tablespoons finely chopped fresh parsley leaves

Place ½ tablespoon of the olive oil and the butter in a medium saucepan and cook over medium heat until butter is melted. Add the onion and celery and cook, stirring occasionally, until tender, 3-4 minutes. Stir in the garlic and cook until fragrant, about 1 minute. Stir in the thyme leaves and paprika, season with salt and pepper and cook, covered, on low heat for 2 minutes. Add the wine, turn the heat up and cook until wine evaporates. Remove from the heat, stir in the sardine and cool completely.
When mixture is cool, stir in the sour cream, the remaining 1 tablespoon of olive oil and the parsley. Check seasoning.

The rillette can be kept tightly covered in the fridge overnight, however it is best served at room temperature.

*homemade sour cream: to make 1 cup of sour cream, mix 1 cup (240ml) heavy cream with 2-3 teaspoons lemon juice in a bowl. Whisk until it starts to thicken. Cover with plastic wrap and leave at room temperature for 1 hour or until thicker (I usually leave mine on the counter overnight – except on very warm nights – and it turns out thick and silky in the following morning; refrigerate for a creamier texture)

Serves 2-3


Monday, December 21, 2015

Chocolate gingerbread bites

Chocolate gingerbread bites / Quadradinhos de chocolate e gingerbread

The Internet can be a great source of inspiration, I am sure you all agree with me – not only for food, obviously, but let’s focus on that now: there are so many great recipes out there it is hard to choose which one to make, but depending on what we see it gets easier to take our pick.

I saw these bars on Rebecca’s blog and immediately felt like baking them: chocolate, spices, and molasses beautifully combined. Very Christmassy, exactly what I wanted at the moment. When I wrote to her about it, she told me she’d gotten the recipe on another blog, and that person had gotten the recipe from Martha. I then remembered I’d seen the recipe on Martha’s website more than once and thought “well, Martha did not inspire me to make these, Rebecca did”. So these delicious bars, a sort of cake perfumed with spices and moist with the addition of sour cream, have become part of my repertoire of great recipes thanks to a search online – a beautiful blog inspired me to make them, and I hope my blog can inspire some of you to make them, too.

Chocolate gingerbread bites
from Rebecca's blog

¼ cup (56g/½ stick) unsalted butter, melted
¼ cup (22g) unsweetened cocoa powder + about ½ tablespoon for dusting the pan
¾ cup (105g) all purpose flour
1 ½ teaspoons ground ginger
½ teaspoon ground cinnamon
1/8 teaspoon freshly ground nutmeg
pinch of ground cloves
½ teaspoon baking soda
½ cup (88g) light brown sugar (packed)
¼ cup (60ml) unsulphured molasses
1 large egg
¼ cup (60ml) sour cream*
½ teaspoon vanilla extract
½ cup (85g) dark chocolate chips
icing sugar, for dusting

Preheat the oven to 180°C/350°F. Lightly butter a 20cm (8in) square pan, line it with foil and butter it as well. Dust it all with cocoa and tap out the excess.

In a medium bowl, whisk together the cocoa powder, flour, spices, baking soda and salt. In a separate bowl, mix together the brown sugar, butter, egg, molasses, sour cream and vanilla. Add the dry ingredients to the wet and mix until just combined. Stir in the chocolate chips and pour into the prepared pan. Smooth out the top and bake for 25-30 minutes, or until a toothpick inserted into the middle comes out clean. Cool completely in the pan over a wire rack.
Dust with icing sugar and cut into squares to serve.

* homemade sour cream: to make 1 cup of sour cream, mix 1 cup (240ml) heavy cream with 2-3 teaspoons lemon juice in a bowl. Whisk until it starts to thicken. Cover with plastic wrap and leave at room temperature for 1 hour or until thicker (I usually leave mine on the counter overnight – except on very warm nights – and it turns out thick and silky in the following morning; refrigerate for a creamier texture)

Makes 16

Wednesday, July 15, 2015

Stripy courgette, tomato and polenta tart

Stripy courgette, tomato and polenta tart / Torta de polenta, tomate e abobrinha

New cookbooks can be a lovely surprise, a big disappointment or something in between – even with the “Search Inside” feature at Amazon I’ve had my share of regret buying some of them.

My latest purchase, however, was an epic win: I got Annie Rigg’s beautiful cookbook on fruit and Georgina Fuggle’s Take One Veg, and they’re both insanely beautiful – I feel like making each and every recipe on both of them, for there is nothing tricky despite the deliciousness of everything.

I made one of Rigg’s recipes and it was wonderful, but more on that later on this week – Georgina’s idea of using polenta as a tart base was such a hit at home that I had to share it with you: even my husband ate it gladly, and that is certainly something not to be taken lightly. The tart was a cinch to make and served with a green salad it was a delicious meal, one that I plan on repeating with different vegetables.

Stripy courgette, tomato and polenta tart
slightly adapted from the absolutely delicious Take One Veg: Over 100 Tempting Veggie Recipes for Simple Suppers, Packed Lunches and Weekend Cooking

Crust:
500ml hot vegetable stock
140g polenta - since the recipe doesn't state what kind of polenta it is, I used this one (I was out of instant polenta)
1 tablespoon unsalted butter
50g Parmesan cheese, finely grated
1 egg, lightly beaten
salt and freshly ground black pepper

Filling:
2 tablespoons crème fraîche – I used homemade sour cream
1 small courgette, thinly sliced
2 tomatoes, sliced into thin slices
1 tablespoon fresh thyme leaves
50g Parmesan cheese, finely grated

Start by making the polenta crust: bring the vegetable stock to a simmer in a medium saucepan and pour the polenta into the water. Keep your pan over a low heat and, using a wooden spoon, stir the mixture constantly, thrashing out any lumps that try to form. Continue for around 6 minutes until the polenta is very thick.
Remove from the heat and add the butter and Parmesan and stir until they have disappeared. Cool for 5 minutes, then stir through the beaten egg and season with salt and pepper. Let cool slightly – in the meatime, preheat the oven to 200°C/400°F.

Lightly grease a square 21cm tart pan with olive oil (I used butter). Put the polenta in the centre and, using a spatula or oiled fingers, gently tease it up the sides of the pan to create the sides of the crust.
Smother a thin layer of crème fraîche over the base of your tart and top with half the Parmesan. On top of the cheese, alternate slices of courgette and tomato. Finish with the thyme leaves and the remaining Parmesan.

Bake on the middle shelf of the oven for 45 minutes, then reduce the temperature to 180°C/350°F and bake for a further 15 minutes. Remove and allow the tart to cool for 5-10 minutes to allow it to ‘come to’. Serve in slices.

Serves 4 – I made the recipe above using a 30x10cm (12x4in) tart pan – there was a bit of polenta left that I formed into pancake, grilled on both sides with a tiny bit of olive oil until golden and topped with cheese and dried oregano for a snack (there is a photo here).

The recipes says it serves 4, but the tart I made was polished off by 2 served with a green salad! :)

Friday, February 20, 2015

Toasted oat, cherry and hazelnut cookies, Michael Keaton again and the readers

Toasted oat, cherry and hazelnut cookies / Cookies de aveia e avelã tostadas e cerejas secas

I know I’ve told you several times already that I love having a food blog and I’ve given you lots of reasons for that, but what can I do if that is the absolute truth? My readers keep on giving me joy and I apologize for being sounding like a broken record. :)

Days ago I posted on the Facebook that I now that I have two baby nephews I started browsing baby clothes in department stores and got so mad because 90% of them are for girls – it was a matter of moments before many readers commented that they had boys, too, and agreed with me, and others even recommended websites in which I can find more options. How great is that? I mean, I have a food blog but I can write about anything I want and get a nice response from the readers.

Something else that I love is when they see something cool and think of me: today, for instance, a reader sent me this link because of my love for Birdman and I laughed so hard I had tears in my eyes – I am now, more than ever, hoping that Michael Keaton takes the award home next Sunday. Thank you, Andreza! I loved the video!

I get such nice messages and they surely make me want to go on writing on this blog and bringing you good, delicious recipes – the cookies I bring you today are like a tasty version of granola bars and they can be adapted to your liking: the hazelnuts and dried cherries can be replaced by other nuts and dried fruit, such as almonds, Brazil nuts, dried apricots, raisins… I even think that rye flour could be used here – its nuttiness would go beautifully well with the flavor of the hazelnuts.

Toasted oat, cherry and hazelnut cookies
slightly adapted from the oh, so beautiful Scandilicious Baking

150g rolled oats
50g flaked hazelnuts
100g all purpose flour
50g whole wheat flour
¾ teaspoon baking powder
¼ teaspoon baking soda
¼ teaspoon ground cinnamon
1/8 teaspoon table salt
125g unsalted butter, softened
100g light brown sugar
50g granulated sugar
1 egg
1 teaspoon vanilla extract
100g sour cream*
75g dried cherries, halved if too large

Preheat the oven to 180°C/350°F. Place the oats and hazelnuts in a medium baking pan and roast for 10 minutes, stirring halfway through. Cool (turn off the oven).

In a medium bowl, whisk together the flours, baking powder, baking soda, cinnamon and salt. Using an electric mixer, cream butter and sugars until light and creamy. Beat in the egg. Scrape the sides of the bowl. Beat in the vanilla. Using a rubber spatula, fold in the flour mixture, sour cream, oats and hazelnut and cherries and stir just until incorporated. Cover and refrigerate for 45 minutes.

Preheat the oven to 180°C/350°F. Line two large baking sheets with baking paper.
Using 2 leveled tablespoons of dough for each cookie, drop batter onto prepared sheets 5cm (2in) apart. Bake cookies until the edges are golden brown and the centers are still slightly soft, 12-14 minutes.
Let cookies cool for 5 minutes on the baking sheet, then slide the paper with the cookies onto a wire rack and cool completely.

* homemade sour cream: to make 1 cup of sour cream, mix 1 cup (240ml) heavy cream with 2-3 teaspoons lemon juice in a bowl. Whisk until it starts to thicken. Cover with plastic wrap and leave at room temperature for 1 hour or until thicker (I usually leave mine on the counter overnight – except on very warm nights – and it turns out thick and silky in the following morning; refrigerate for a creamier texture)

Makes 28

Tuesday, February 3, 2015

Maple cake - simple and delicious

Maple cake / Bolo de xarope de bordo

When I started blogging, a good eight years ago, there were several ingredients I saw in my foreign cookbooks that I could not find here in Brazil, and some were too expensive – so I kept some recipes in the back of my head for a long time, just waiting for an opportunity to try them someday.

Things have changed and now many ingredients have become available here, and some of the prices have dropped a bit, too. The two times I visited NYC I brought home huge bottles of maple syrup for it was very expensive here and not easy to find, but lately I’ve seen it everywhere for a more affordable price – I even brought home a small bottle since the ones from NY are long gone.

This cake is delicious and it was a great way of using my precious maple syrup – I wasn’t too keen on the icing, though, for I thought it was too sweet. I would definitely make this cake again, but I’d serve it with a dusting of icing sugar and nothing more.

Maple cake
from the delicious Martha Stewart's Cakes: Our First-Ever Book of Bundts, Loaves, Layers, Coffee Cakes, and more

Cake:
1 cup (2 sticks/226g) unsalted butter, room temperature
2 ½ cups (350g) all-purpose flour
2 teaspoons baking powder
½ teaspoon baking soda
¼ teaspoon table salt
¾ cup (180ml) maple syrup
½ cup (100g) granulated sugar
2 large eggs
1 teaspoon vanilla extract
¾ cup (180ml) sour cream*

Icing:
1/3 cup (80ml) pure maple syrup, plus more if needed
3 tablespoons unsalted butter, melted
2 ½ cups (350g) confectioners' sugar, plus more if needed

Make the cake: preheat oven to 180°C/350°F. Butter a 23cm (9in) round cake, line the bottom with a circle of baking paper and butter it as well.

In a medium bowl, whisk together flour, baking powder, baking soda, and salt.
With an electric mixer on medium speed, beat butter, maple syrup, and granulated sugar until pale and fluffy, 3-5 minutes. Add eggs, one at a time, beating well after each addition; mix in vanilla.
Reduce mixer speed to low. Add flour mixture in 3 batches, alternating with 2 batches of sour cream; beat until just combined. Transfer batter to prepared pan; smooth top with an offset spatula. Bake until a cake tester comes out clean, about 40 minutes. Transfer pan to a wire rack to cool 25 minutes. Turn out cake onto rack to cool completely.

Icing: combine maple syrup and butter in a bowl. Sift in confectioners’ sugar, and whisk until combined. Adjust consistency with more syrup or sugar, if necessary. Spread maple icing over top of cake. Let set, at least 15 minutes, before serving.

* homemade sour cream: to make 1 cup of sour cream, mix 1 cup (240ml) heavy cream with 2-3 teaspoons lemon juice in a bowl. Whisk until it starts to thicken. Cover with plastic wrap and leave at room temperature for 1 hour or until thicker (I usually leave mine on the counter overnight – except on very warm nights – and it turns out thick and silky in the following morning; refrigerate for a creamier texture)

Serves 8-10

Sunday, October 19, 2014

Lemon blackberry cake - perfect for spring

Lemon blackberry cake / Bolo de limão siciliano e amora

If it is a problem for me to make banana cakes, I could never say the same about lemon cakes, right? ;)

It is very rare for me to not have lemons around, especially because I use them for many things other than cakes, and I love them so much that my husband brings a couple of lemons home every time he goes grocery shopping.

Adding frozen berries to cakes is a great idea as we’ve seen here on the blog lately, and in this case the blackberries give a whole new dimension to a simple lemon drizzle cake – a moist, tangy cake as easy to eat as it is easy to make (mine was gone pretty fast). :)

Lemon blackberry cake
slightly adapted from the stunning and delicious Indulgent Cakes

Cake:
¾ cup (150g) granulated sugar
finely grated zest of 2 lemons
125g unsalted butter, softened
2 eggs
½ teaspoon vanilla extract
1 cup + 1 tablespoon (150g) all purpose flour
1 teaspoon baking powder
pinch of salt
½ cup (50g) almond meal
125g sour cream*
150g frozen blackberries, unthawed

Drizzle:
3 tablespoons granulated sugar
¼ cup (60ml) lemon juice
½ tablespoon water

Preheat the oven to 180°C/350°F. Lightly butter a 21.5x11.5cm (8.5x4.5in) loaf pan (6-cup capacity), line it with baking paper and lightly butter the paper as well.

In a large bowl, combine sugar and lemon zest and rub with your fingertips until sugar is fragrant. Add butter and using an electric mixer, cream the ingredients together until light and fluffy. Beat in the eggs, one at a time, and scrape the sides of the bowl. Beat in the vanilla. Fold in the flour, baking powder, salt, almond meal and sour cream. Pour half the batter into the prepared pan and sprinkle with half the berries. Cover with the remaining batter, smooth the surface then sprinkle with the remaining berries. Tap pan over surface to settle the mixture.

Bake for 50-60 minutes or until risen and golden and a skewer inserted in the center of the cake comes out clean. Set aside for 10 minutes and in the meantime make the drizzle: combine lemon juice, water and sugar in a small saucepan and cook over medium heat, stirring, until sugar is dissolved. Bring to the boil, then simmer for 2 minutes.
Pour the hot syrup over the cake, then cool completely in the pan. Carefully unmold, peel off the paper and serve.

Serves 8

Thursday, September 18, 2014

Lemon cheesecake tartlets - recipe with a video

Lemon cheesecake tartlets / Tortinhas de cheesecake de limão siciliano

Months ago, my sister told me she had to do a project for school: she and her colleagues would have to create a recipe video and she asked for my help. :)

The kids – they’re twenty years old, I call them kids – came to my house on a Saturday and we had an amazing afternoon together. We recorded the video – actually, they recorded me making tartlets – and it was a lot of fun (and a lot of work, too).

By the end of the session, I served cake and cookies to my guests and they told my sister that from that moment on they wanted to do all the future projects at my house. :D

So here it is: the video and the recipe right after it. I hope you enjoy watching my freckled hands in action! :)


Lemon cheesecake tartlets
slightly adapted from the always beautiful Donna Hay magazine

Base:
100g digestive cookies
30g unsalted butter, melted and cooled

Filling:
1 cup cream cheese, room temperature
1/3 cup granulated sugar
¼ cup sour cream*
pinch of salt
½ teaspoon vanilla extract
finely grated zest of 1 lemon
1 egg
100g raspberries

Butter six 8cm-tartlet pans (with removable bottoms). Place the cookies in a food processor and blitz until ground. Add the butter and process to combine. With your fingertips, press the mixture into the pans and refrigerate for 30 minutes.
Preheat the oven to 150°C/300°F. In a medium bowl, whisk together the cream cheese, sugar, sour cream, salt, vanilla and lemon zest. Whisk in the egg, then pour it over the base. Bake for 15 minutes or until slightly firm. Cool completely then refrigerate for 1 hour.
Dust with icing sugar, pop with the raspberries and serve.

* homemade sour cream: to make 1 cup of sour cream, mix 1 cup (240ml) heavy cream with 2-3 teaspoons lemon juice in a bowl. Whisk until it starts to thicken. Cover with plastic wrap and leave at room temperature for 1 hour or until thicker (I usually leave mine on the counter overnight – except on very warm nights – and it turns out thick and silky in the following morning; refrigerate for a creamier texture)

Makes 6

Wednesday, September 17, 2014

Back from vacation with apricot jam cake

Apricot jam cake / Bolo de geleia de damasco

Hello, everyone!

I am back after spending wonderful vacation days in Spain: beautiful places, delicious food and massive amounts of Cava. :D

I returned home very happy, but also a couple of pounds heavier, even though I walked around a lot while I was there – one can’t eat all that jamón and pan con tomate and get away with it, right? :) I intend to eat lots of vegetables and fruit in the weeks to come (there’s a huge pot of vegetable soup already in my fridge), but I know I can’t survive without a slice of cake on the weekend.

Moderation is my mantra. ;)

If you’re like me, may I suggest this jam cake? It tastes delicious and it is very tender – don’t worry if the center sinks a bit, it’s totally OK because of the weight of the jam added to the batter. I haven’t tried it with other jam flavors, but I believe it would work with something sharp, not too sweet.

Apricot jam cake
from one of my favorite cookbooks

1 ½ cups (210g) all purpose flour
1 teaspoon baking powder
½ teaspoon ground cinnamon
¼ teaspoon ground cloves
¼ teaspoon baking soda
1/8 teaspoon table salt
6 tablespoons (85g) unsalted butter, softened
150g light brown sugar
1 cup apricot jam
2 eggs, room temperature
2 tablespoons sour cream

Preheat the oven to 180°C/350°F. Butter a 20cm (8in) square cake pan, line the bottom with baking paper, butter the paper as well and flour everything, removing the excess.
In a medium bowl, whisk together the flour, baking powder, cinnamon, cloves, baking soda and salt.
In a large bowl, using an electric mixer, cream the butter and sugar until light and fluffy. Beat in the jam until smooth. Beat in the eggs, one at a time. Scrape the sides of the bowl occasionally.
Add the sour cream and mix until smooth. With the mixer on low speed, gradually add the flour mixture and beat just until combined.
Pour the batter into the prepared pan and bake for about 50 minutes or until golden, risen and a toothpick inserted in the center of the cake comes out clean.
Cool completely in the pan. Carefully unmold, remove the paper and invert onto a serving plate.

* homemade sour cream: to make 1 cup of sour cream, mix 1 cup (240ml) heavy cream with 2-3 teaspoons lemon juice in a bowl. Whisk until it starts to thicken. Cover with plastic wrap and leave at room temperature for 1 hour or until thicker (I usually leave mine on the counter overnight – except on very warm nights – and it turns out thick and silky in the following morning; refrigerate for a creamier texture)

Serves 8

Thursday, August 28, 2014

Apple, sour cream and cinnamon crunch muffins

Apple, sour cream and cinnamon crunch muffins / Muffins de maçã, creme azedo e canela

I have to be careful while cooking or baking with certain ingredients for the reason that I adore snacking on them! Cherry tomatoes, carrots, olives, cheese, nuts – I have to control myself not to eat everything before adding the ingredients to the recipe itself. :D

Depending on the ingredient, my husband does the same, and there goes dinner.

Add to that list roasted pumpkin seeds – they’re delicious and I have to avoid getting carried away by the fact that they’re healthy. While preparing these muffins, I set aside the 2 tablespoons needed for the recipe and measured out 2 more tablespoons so I could snack on while baking – they were gone in no time (I’d just whisked the dry ingredients together in the large bowl).

I told myself that it was better to eat a handful of pumpkin seeds than a handful of candy and stopped worrying about it. ;)

Feel free to use raw pumpkin seeds in these muffins – they’re the ones called for in the original recipe – I used roasted seeds because I had them in my pantry. The cinnamon, almonds and the apple make these muffins super tasty, while the sour cream makes them moist and tender.

Apple, sour cream and cinnamon crunch muffins
slightly adapted from Grains: 150 Recipes for Every Appetite

Topping:
70g almonds, roughly chopped
2 tablespoons pumpkin seeds – I used roasted seeds
45g light brown sugar
½ teaspoon ground cinnamon

Muffins:
100g whole wheat flour
100g all purpose flour
1 teaspoon baking powder
¼ teaspoon ground cinnamon
pinch of salt
75g unsalted butter, melted and cooled
75g light brown sugar
150g sour cream
1 egg, lightly beaten
1 tablespoon whole milk
1 large Gala apple (about 250g), peeled and chopped in small cubes

Preheat the oven to 180°C/350°F. Line a 12-hole muffin pan with paper cases.
Topping: in a small bowl, mix together the almonds, pumpkins seeds, brown sugar and cinnamon. Set aside.
Muffins: in a large bowl, whisk together the flours, baking powder, cinnamon and salt. In a medium bowl, whisk together the butter, brown sugar, sour cream, egg and milk. Pour this mixture into the dry ingredients and stir lightly – batter will be lumpy; do not overmix. Stir in the apple and divide the batter among the paper cases. Sprinkle with the topping and lightly press it down the batter to adhere.
Bake for 20-25 minutes or until golden and risen and a skewer inserted into the middle of a muffin comes out clean. Leave to rest in the pan for 5 minutes before lifting the muffins out.

* homemade sour cream: to make 1 cup of sour cream, mix 1 cup (240ml) heavy cream with 2-3 teaspoons lemon juice in a bowl. Whisk until it starts to thicken. Cover with plastic wrap and leave at room temperature for 1 hour or until thicker (I usually leave mine on the counter overnight – except on very warm nights – and it turns out thick and silky in the following morning; refrigerate for a creamier texture)

Makes 12

Thursday, August 7, 2014

Banana almond cake - simple yet delicious

Banana almond cake / Bolo de banana e amêndoa

After posting a recipe that calls for homemade vegetable stock, homemade tomato sauce and homemade ricotta I had to bring you something simpler, but equally good: a no-fuss banana cake with part of the all purpose flour replaced by almond meal, which gives it a delicious almond flavor and combined with the sour cream and the mashed bananas makes the cake moist and tender.

In my defense, it could’ve been worse: I could have told you to make your own sprinkles. :D

Banana cakes are favorites of mine and I always have a couple of ripe bananas in the freezer, just waiting to be transformed into something delicious – it’s too cold now for banana sorbet, so cake was my decision and it was a no-brainer, really.

The cake sunk a bit in the middle and years ago that would have stopped me from posting it here, but with time I’ve learned to dial down my perfectionism at least a bit, and I try to do that whenever possible because as much as people parade it as a “quality” I don’t think that’s true – it is actually a cage we build around ourselves and from which it gets harder and harder to escape.

The cake sunk, yes, but it tasted amazing, so I photographed it to share it with you – I hope you like it as much as I did.

Banana almond cake
slightly adapted from the delicious World Class Cakes: 250 Classic Recipes from Boston Cream Pie to Madeleines and Muffins

1 ¼ cups (175g) all purpose flour
pinch of salt
1 teaspoon baking soda
1 teaspoon baking powder
¼ teaspoon ground cinnamon
2/3 cup (65g) almond meal
2/3 cup (150g) unsalted butter, softened
1 cup (200g) granulated sugar
2 eggs
1 teaspoon vanilla extract
½ cup sour cream*
2 very ripe bananas, mashed
icing sugar, for dusting

Preheat the oven to 180°C/350°F. Lightly butter a 20x10cm (8x4in) cup loaf pan, line it with paper and butter the paper as well.
In a medium bowl, whisk together the all purpose flour, salt, baking soda, baking powder , cinnamon and almond meal.
In a large bowl, using an electric mixer, cream butter and sugar until light and fluffy. Beat in the eggs, one at a time, beating well after each addition. Scrape the sides of the bowl. Beat in the vanilla.
Add the sour cream and the banana and mix on low just until combined. Add the dry ingredients in and mix on low just until incorporated.
Transfer batter to prepared pan and bake for about 45 minutes or until golden and risen and a skewer inserted in the center comes out clean. Cool in the pan over a wire rack for 15 minutes, then carefully unmold onto the rack and cool completely. Peel off the paper, dust with icing sugar and serve.

* homemade sour cream: to make 1 cup of sour cream, mix 1 cup (240ml) heavy cream with 2-3 teaspoons lemon juice in a bowl. Whisk until it starts to thicken. Cover with plastic wrap and leave at room temperature for 1 hour or until thicker (I usually leave mine on the counter overnight – except on very warm nights – and it turns out thick and silky in the following morning; refrigerate for a creamier texture)

Serves 8

Friday, July 4, 2014

Sour cream-chocolate cake with caramelized white chocolate frosting and being predictable

Sour cream-chocolate cake with caramelized white chocolate frosting / Bolo de chocolate e sour cream com ganache de chocolate branco caramelizado

I am so predictable. I am, really.

As I told you last week, I put the mobsters and gangs aside for a while and started watching Downton Abbey – I thought a break from bad guys would be a nice change. Apparently, I was wrong: after spending some time in 1912 I went back to Tony’s arms and I did it in a hurry. :)

At first I thought the rhythm was the problem for me with Downton Abbey, but then I remembered that Rectify, for instance, has a very singular rhythm, and that never bothered me – much to the opposite, it’s part of what makes that show so sensational. So I’m still trying to figure out the reason why DA is not my cup of tea – and while I do that, I have some serious Hannibal catching up to do. :D

See, I told you I was predictable – I’m back in my criminal TV mood. But at least something has to be sweet, right? So there’s cake, and it’s just not any cake: it is a delicious chocolate cake – tender beyond words – with ganache made of something I’d never tried before: caramelized white chocolate. That scores big points with me not only for being scrumptious but also for being made in a very curious way: the chocolate gets caramelized in the oven – when I read the recipe I wasn’t very sure it would work, but decided to give it a go because I’d read about it in another cookbook. It does work – luckily – and I guarantee that you’ll be more than happy to lick the bowl after you assemble the cake. :D

Sour cream-chocolate cake with caramelized white chocolate frosting
cake adapted from the amazing Sky High, filling/frosting from the most beautiful cookbook I own

Cake:
185g all-purpose flour
300g granulated sugar
45g unsweetened cocoa powder, preferably Dutch process
1 ½ teaspoons baking soda
¼ teaspoon table salt
2/3 cup (160ml) canola oil
2/3 cup sour cream*
1 cup (240ml) water
1 ½ tablespoons white wine vinegar
1 teaspoon vanilla extract
2 small eggs

Filling/frosting:
450g white chocolate, finely chopped
¾ cup (180ml) heavy cream

Preheat the oven to 180°C/350°F. Butter the bottoms and sides of two 8-inch round cake pans. Line the bottom of each pan with a round of baking paper and butter the paper as well.
Cake: sift the flour, sugar, cocoa powder, baking soda, and salt into a large bowl. Whisk to combine. Add the oil and sour cream and whisk to blend. Gradually beat in the water. Blend in the vinegar and vanilla. Whisk in the eggs and beat until well blended. Scrape down the sides of the bowl and be sure the batter is well mixed. Divide among the prepared cake pans.
Bake for 25-35 minutes, or until a cake tester or wooden toothpick inserted in the center comes out almost clean. Let cool completely in the pans over a wire rack.

Frosting: preheat the oven to 160°C/325°F. Line a large baking sheet with foil and spread the chocolate over it. Bake for 8-10 minutes or until light golden. In the meantime, heat the cream in a medium saucepan over medium heat until very hot (but not boiling). Add the caramelized chocolate and stir until melted (reheat the mixture over low heat for a few seconds if necessary). Strain through a fine sieve, pushing down on solids, then discard solids. Let the ganache cool to room temperature, cover and refrigerate for 30 minutes or until spreadable.

Assembling the cake: I followed Deb’s precious tip and froze the cake layers for 30 minutes before assembling it (they are indeed very soft, so this step makes it easier to put the layers together).
Place one layer, flat side up, on a cake stand or large serving plate. Spread about half the ganache, then top with the other cake layer. Spread the remaining ganache over the top of the cake – just the top, not the sides.

* homemade sour cream: to make 1 cup of sour cream, mix 1 cup (240ml) heavy cream with 2-3 teaspoons lemon juice in a bowl. Whisk until it starts to thicken. Cover with plastic wrap and leave at room temperature for 1 hour or until thicker (I usually leave mine on the counter overnight – except on very warm nights – and it turns out thick and silky in the following morning; refrigerate for a creamier texture)

Serves 8-10

Monday, May 19, 2014

Chocolate stout cake and a disappointing trailer

Chocolate stout cake / Bolo de chocolate e cerveja stout

Interstellar got announced last November, exactly one year before its release, and it being a Christopher Nolan movie I got immediately interested – there wasn’t much to read about the movie and the teaser did not reveal much, either, so my curiosity went through the roof.

Cut to months later – six, to be more precise – when the official trailer is finally out and for the first time, ever since I watched the amazing Memento, I don’t feel like running to the theaters to watch a Christopher Nolan movie – the trailer just didn’t do it for me. I don’t know if it was Mr. McConaughey, the cheesy family scenes, or that after what Alfonso Cuarón did with Gravity it will be pretty hard for someone else to get to that level when it comes to outer space movies, I just wasn’t thrilled after the trailer, Michael Caine and all.

As far as 2014 goes, Foxcatcher and Gone Girl have been keeping me pretty curious, and before the Interstellar trailer I thought that Nolan would be easily on that list, but no, not this time.

Favorites can be disappointing, even if it’s once in a thousand times, except for Nigella: this super moist, dense and delicious cake – one of the best chocolate cakes I’ve ever made or tried – goes to the list of great recipes only adds to the list of great recipes Ms. Lawson has brought us over the years. And if that wasn’t enough, the tangy icing is irresistible, too, and it complements the flavor of the cake perfectly.

Chocolate stout cake
slightly adapted from the delicious Feast: Food to Celebrate Life

Cake:
1 cup (240ml) stout beer
250g unsalted butter, room temperature, chopped
75g cocoa powder
2 cups (400g) granulated sugar
150ml sour cream*
2 large eggs
1 tablespoon vanilla extract
275g all purpose flour
2 ½ teaspoons baking soda
pinch of salt

Topping:
220g cream cheese, room temperature
100g icing sugar
1 teaspoon vanilla extract
1/3 cup (80ml) double cream (or whipping cream)

Preheat the oven to 180°C/350°F. Butter a 23cm (9in) springform pan and line the bottom with a circle of baking paper, buttering it as well (I used one with a removable bottom).
Pour the beer and butter into a large wide saucepan and heat until the butter's melted. Cool for a couple of minutes, then whisk in the cocoa and sugar. Beat the sour cream with the eggs and vanilla and then pour into saucepan. Whisk in the flour, baking soda and salt.
Pour into the prepared pan bake for 45-60 minutes (a skewer inserted in the center should come out clean). Cool completely in the pan over a wire rack.
Carefully unmold the cake, remove the paper and transfer to a serving plate.

Make the icing: using an electric mixer, whip the cream cheese until smooth, sieve over the icing sugar, add the vanilla and then beat them both together until creamy. Add the cream and beat again until it makes a spreadable consistency. Ice the top of the cake.

* homemade sour cream: to make 1 cup of sour cream, mix 1 cup (240ml) heavy cream with 2-3 teaspoons lemon juice in a bowl. Whisk until it starts to thicken. Cover with plastic wrap and leave at room temperature for 1 hour or until thicker (I usually leave mine on the counter overnight – except on very warm nights – and it turns out thick and silky in the following morning; refrigerate for a creamier texture)

Serves 10-12

Friday, May 9, 2014

Linguine with porcini and vegetable bolognese, soothing simplicity and striking complexity

Linguine with porcini and vegetable bolognese / Linguine com bolonhesa de legumes e porcini

“Sweet Sixteen” is not the only song I listen to five, six times in a row – I have other old favorites, songs that are so perfect to me that I hit the repeat button as soon as they start playing.

However, not all of them are as simple as Billy Idol’s beautiful creation: there are times when the only thing I want to listen to is Marc Almond’s powerful vocals, backed up with those loud and vibrant arrangements.

“Loving You, Hating Me” is a song I deeply love (as some of you already know), and I think it gets even more fantastic in the last one and a half minutes, with the arrangement going wild and Marc’s voice doing the same – depending on my mood I have to be careful not to sing it at the top of my lungs (which can be tricky if there are other people nearby). :D

There are days for Billy’s soothing simplicity, and there are days for Marc’s striking complexity, just as there are days for good old bolognese sauce and days for this delicious vegetarian version – it took me nine years to convince my husband to eat mushrooms and this was how I managed to do it (for the record, he loved the sauce and could not believe how tasty it was even though there wasn’t one single gram of meat in it). :)

Linguine with porcini and vegetable bolognese
slightly adapted from the amazing Delicious Australia

15g dried porcini mushrooms
400g linguine
2 small carrots, roughly chopped
1 large onion, roughly chopped
200g button mushrooms
2 garlic cloves, roughly chopped
2 tablespoons olive oil
handful of fresh basil leaves, chopped
2 tablespoons fresh oregano leaves
½ cup tomato sauce – I used homemade
½ cup (120ml) red wine
3 tablespoons water
½ cup sour cream*
grated parmesan or pecorino, to serve

Soak porcini in ½ cup (120ml) boiling water for 10 minutes. Drain, reserving the liquid, and chop.
Whiz carrot, onion, mushrooms and garlic in a food processor to finely chop.
Heat the oil in a large saucepan over medium-high heat and add the finely chopped vegetables. Cook, stirring, for 3-4 minutes until softened. Add the herbs, tomato sauce and drained porcini, then cook, stirring, for 1 minute or until fragrant.
Add the wine, water and reserved porcini liquid. Season with salt and pepper, then reduce heat to low and simmer for 5 minutes or until slightly thickened. Stir through the sour cream and cook for 2 minutes.
In the meantime, cook linguine in a large saucepan of boiling, salted water according to the packet instructions.
Drain the linguine, reserving a little of the cooking water, and add it to the sauce. Toss to coat, adding the reserved water, if needed (I did not). Serve with the parmesan or pecorino (I used the latter).

*homemade sour cream: to make 1 cup of sour cream, mix 1 cup (240ml) heavy cream with 2-3 teaspoons lemon juice in a bowl. Whisk until it starts to thicken. Cover with plastic wrap and leave at room temperature for 1 hour or until thicker (I usually leave mine on the counter overnight – except on very warm nights – and it turns out thick and silky in the following morning; refrigerate for a creamier texture)

Serves 4

Friday, February 14, 2014

Orange sour cream Bundt cake, the Internet and high-waisted pants

Orange sour cream Bundt cake / Bolo de laranja e sour cream

Days ago, a friend of mine asked the following question on Facebook: “how was your life before the Internet”? I did not answer but have thought about it ever since. I love the Internet and not a day goes by without me using it, even if it is for 5 minutes: it’s great not having to go to the bank to pay a bill, being able to buy movie tickets ahead of time (no lines!), watching movies and TV shows that take forever to arrive here in Brazil (if they arrive at all), and well, I love writing a blog, too. :D

Of course there are horrendous things online, too, but that’s life, isn’t it? There are the good things and the bad things – it’s human nature, I guess (unfortunately).

I am unashamedly curious, so the Internet is a really useful tool; for instance, while I watched Her the other day I kept thinking about the high-waisted pants worn by the male characters of the movie – I was sure they meant something, and a couple of clicks helped me find out all about it (Spike Jonze’s said that the pants “'feel kinda like you're being hugged", and that has everything to do with the movie theme, which made me love it even more). <3

The Internet is also very helpful when I need to substitute ingredients: ages ago I read somewhere how to make sour cream at home (since not until recently was the product available here in Brazil). I’ve been using that precious hint in recipes for years now, such as the delicious, moist and irresistible orange cake you see on the photo – if you like cakes drenched in syrup that get even tastier the day after they are baked this recipe is for you (and if you’re a citrus freak like me, you’ll love it, too). :D


Orange sour cream Bundt cake
slightly adapted from here

Cake:
1 cup (226g/2 sticks) unsalted butter, softened
1 ¼ cups (250g) granulated sugar, divided use
4 eggs, separated
finely grated zest of 2 large oranges
1 teaspoon vanilla extract
2 cups (280g) all-purpose flour
1 ½ teaspoons baking powder
1 ½ teaspoons baking soda
¼ teaspoon table salt
1 ½ cups sour cream*

Syrup:
¼ cup (50g) granulated sugar
¼ cup (60ml) orange juice
2 tablespoons Cointreau or other orange-flavored liqueur

Glaze:
¾ cup (105g) icing sugar
3-4 teaspoons freshly squeezed orange juice

Preheat the oven to 180°C/350°F. Butter and flour a 10-cup capacity Bundt or tube pan.
Using an electric mixer, beat butter with 1 cup (200g) of the sugar until light and fluffy; beat in egg yolks, one at a time, beating well after each addition and scraping the sides of the bowl occasionally. Beat in orange zest and vanilla.
In separate bowl, whisk together flour, baking powder, baking soda and salt; on low speed, add to the butter mixture alternately with sour cream, making 3 additions of dry ingredients and 2 of sour cream. In separate bowl and with clean beaters, beat egg whites until frothy; gradually beat in remaining ¼ cup (50g) sugar, 1 tablespoon at a time, until stiff peaks form. Fold one-third into batter; fold in remainder. Scrape into prepared pan; smooth top.
Bake in center of the oven until risen and golden and a skewer inserted in center comes out clean, about 1 hour. Let cool in pan on rack for 20 minutes. Carefully turn out onto rack.

While the cake cools in the pan, make the syrup: in small saucepan, bring sugar, orange juice and liqueur to boil over medium heat; reduce heat to low and simmer until reduced to 1/3 cup (80ml), 3-4 minutes. Let cool for 5 minutes. Brush over warm cake. Let cool.

Glaze: in a small bowl, sift the icing sugar, then gradually add the juice, mixing until pourable (add a little more juice if necessary). Slowly pour over cooled cake. Let stand until glaze is dry, about 30 minutes.

*homemade sour cream: to make 1 cup of sour cream, mix 1 cup (240ml) heavy cream with 2-3 teaspoons lemon juice in a bowl. Whisk until it starts to thicken. Cover with plastic wrap and leave at room temperature for 1 hour or until thicker (I usually leave mine on the counter overnight – except on very warm nights – and it turns out thick and silky in the following morning; refrigerate for a creamier texture)

Serves 10-12

Wednesday, November 6, 2013

White chocolate and hazelnut pound cake and "Ray Donovan"

White chocolate hazelnut cake / Bolo de chocolate branco e avelã

Since Girls wasn’t bringing any joy to my days – much to the opposite – I decided to dedicate my precious time to a different TV show (aside from The Blacklist, which I watch with the hubby), and being a dark-drama-kind-of-gal I went for Ray Donovan; I’m halfway through the season and loving every minute of it – the performances are outstanding (how great are Liev Schreiber, Paula Malcomson and Jon Voight?) and the writing is really good, too. I haven’t read much about the show to avoid spoilers but it was nice to know that there is a second season coming next year – it’s so frustrating to get hooked on a TV show only to find out later it’s been cancelled. :S

Because the episodes of Ray Donovan are one-hour long there is plenty of time for a cake to be baked: therefore, I mixed this batter (which took me hardly any time, even with the melting of the chocolate), placed it in the oven and sat down to watch the show; being a large cake, once inverted onto the wire rack it would need a good hour to cool (or even more than that), and that was the perfect excuse for a TV junkie like me to watch another episode in a row. :D

White chocolate and hazelnut pound cake
slightly adapted from the delicious Better Homes and Gardens Baking: More than 350 Recipes Plus Tips and Techniques

Cake:
3 cups (420g) all-purpose flour
¼ cup (20g) hazelnut meal
1 teaspoon baking powder
½ teaspoon baking soda
¼ teaspoon table salt
1 cup (226g) unsalted butter, room temperature
2 cups (400g) granulated sugar*
6 eggs
1 tablespoon vanilla
112g (4oz) white chocolate, melted and cooled
1 cup sour cream**

Glaze:
112g (4oz) white chocolate, chopped
1 teaspoon canola oil

Preheat oven to 180°C/350°F. Butter and flour a 12-cup capacity Bundt pan.
In a medium bowl stir together flour, hazelnut meal, baking powder, baking soda, and salt; set aside. In a very large mixing bowl cream butter and sugar until light and fluffy. Add the eggs, one at a time, beating about 1 minute after each addition and scraping sides of bowl frequently. Add vanilla and the melted white chocolate; beat just until combined. Alternately add flour mixture and the sour cream to butter mixture, beating on low after each addition just until combined. Do not overmix. Pour batter into the prepared pan, spreading evenly. Bake for 55-60 minutes or until a wooden toothpick inserted near the center comes out clean. Cool in pan on a wire rack for 15 minutes. Remove cake from pan; cool thoroughly on wire rack.
Glaze: combine chocolate and oil in a small bowl set over a saucepan of simmering water, mixing until melted. Spoon over the cooled cake, then set aside to set.

The cake can be stored in an airtight container at room temperature for up to 3 days.

* the cake turned out delicious, but I found it a bit too sweet – I’d cut down 30g of the sugar if baking it again

** homemade sour cream: to make 1 cup of sour cream, mix 1 cup (240ml) heavy cream with 2-3 teaspoons lemon juice in a bowl. Whisk until it starts to thicken. Cover with plastic wrap and leave at room temperature for 1 hour or until thicker (I usually leave mine on the counter overnight – except on very warm nights – and it turns out thick and silky in the following morning; refrigerate for a creamier texture)

Serves 14-16

Friday, November 1, 2013

Maple banana cake with caramel drizzle + an amazing movie trailer

Maple banana cake with caramel drizzle / Bolo de banana e xarope de bordo com caldinha de caramelo

Weeks ago the trailer for Foxcatcher was released and my interest in the movie skyrocketed – I’d read about it and seen a couple of photos (in which both Mark Ruffalo and Steve Carell look unrecognizable) and the trailer just made me even more curious (oh, the joy of a perfectly put together movie trailer!).

I find it remarkable when an actor chooses a project that is completely different from everything he’d done up until then, which is what Carell is doing in Foxcatcher – for the little I’ve seen and read his performance will be one to watch next year. That reminds me of other actors who emerged from comedies and delivered great performances in dramas such as Jim Carrey in The Truman Show, Jamie Foxx in Collateral (before that movie I don’t think anyone would have thought the guy could win an Oscar) and, to me, the most fantastic one, Marlon Wayans in Requiem for a Dream (Darren Aronofsky did the impossible here, let’s be honest). I cannot wait to see Carell playing such a dark character, and it’s too bad the movie release has been postponed to 2014 (apparently no one wants to compete against Gravity and 12 Years a Slave in the award season).

***
I like having a handful of ingredients in my freezer for cooking and baking, like berries, peas, spinach and nuts, and two things I always have stashed there are egg whites and overripe bananas. A while ago the egg white amount was considerably low, but there were quite a lot of frozen bananas around, and they were transformed into this moist, delicious cake (the caramel drizzle makes it extra special, don’t skip it). The cake does taste fantastic with the addition of maple syrup, but I have made this recipe replacing the syrup with a mild flavored honey and it worked like a charm, too.

Maple banana cake with caramel drizzle
slightly adapted from the always gorgeous Delicious Autralia

Cake:
3 large eggs
125g unsalted butter, melted, cooled
1 cup (175g) light brown sugar, packed
¼ cup (60ml) maple syrup
1 teaspoon vanilla extract
4 overripe bananas, mashed
¼ cup sour cream*
225g all purpose flour
1 teaspoon baking powder
½ teaspoon ground cinnamon
1/8 teaspoon table salt
icing sugar, for dusting

Caramel drizzle:
2 tablespoons unsalted butter
1/3 cup (60g) light brown sugar, packed
2 tablespoons heavy cream

Cake: preheat the oven to 180°C/350°F. Grease an 8-cup capacity Bundt cake pan and dust with flour.
Beat eggs, butter, brown sugar, maple syrup and vanilla in an electric mixer for 5 minutes or until thick. Beat banana and sour cream into the batter. Sift in flour, baking powder, cinnamon and salt then mix until combined. Spread into the pan and bake for 40 minutes or until a skewer comes out clean. Cool for 10 minutes, then carefully unmold onto a wire rack. Cool completely.
Make the caramel drizzle: place butter and sugar in a small saucepan over low heat, stirring to dissolve the sugar. When it boils, whisk in the cream – carefully because the mixture will bubble – until incorporated then remove from heat.
Dust the cake with the icing sugar and drizzle with the caramel.

* homemade sour cream: to make 1 cup of sour cream, mix 1 cup (240ml) heavy cream with 2-3 teaspoons lemon juice in a bowl. Whisk until it starts to thicken. Cover with plastic wrap and leave at room temperature for 1 hour or until thicker (I usually leave mine on the counter overnight – except on very warm nights – and it turns out thick and silky in the following morning; refrigerate for a creamier texture)

Serves 8-10

Related Posts with Thumbnails