Showing posts with label preserves. Show all posts

Monday, April 11, 2016

Crumb cake with orange marmalade and "Girls"

Crumb cake with orange marmalade / Bolo com geleia de laranja e cobertura streusel

I am here today to make a confession: after trying a couple of times to watch Girls, I finally binge watched the show on a weekend while in bed with a cold. As I watched the episodes, it became clearer to me why I’d hated it in the past: I had a hard time believing that people could be that stupid. I tried to remember things from my twenties and I kept thinking that well, thank heavens I did nothing (or almost nothing) like those girls. I finally understood the reason why watching Girls made me suffer so much: it bothered me to watch people making one mistake after the other, making one bad choice after another.

Maybe that makes a bad person. I don’t know. :S

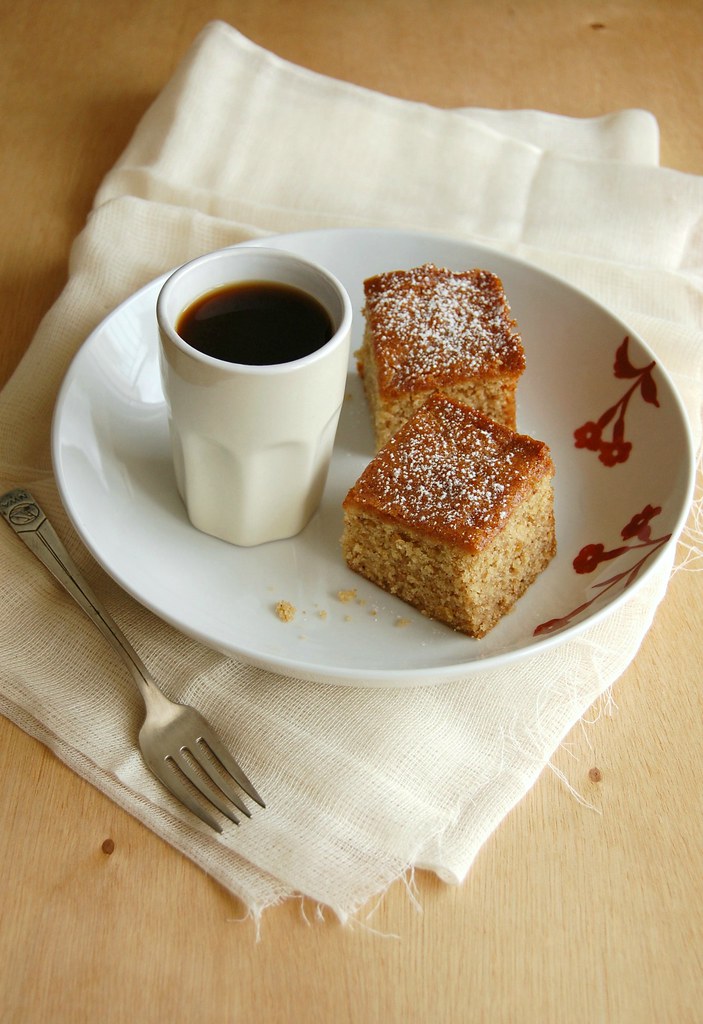
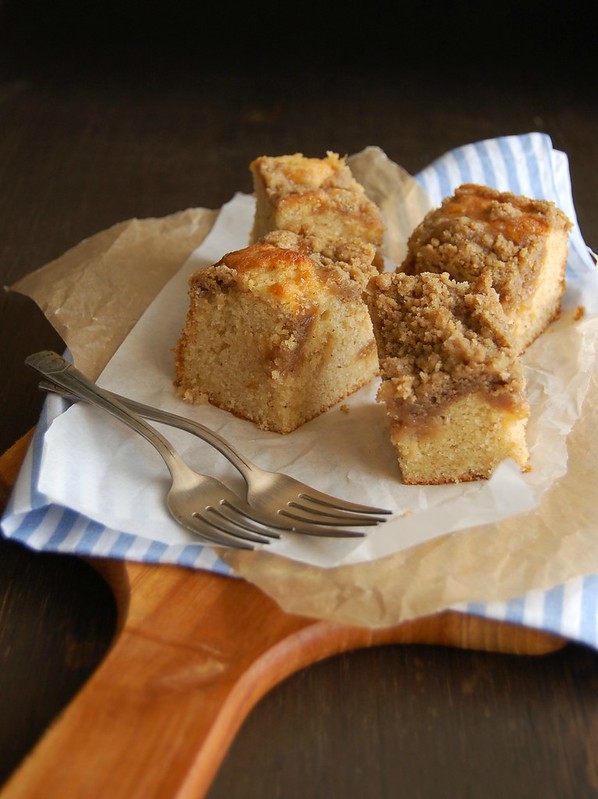
I hope that I can make up for that by sharing baked goods with the people I love, like I did with this cake: I used orange marmalade and found it that its bitter taste went really well with the sweet of the cake batter and the topping, but if you’re not into bitter flavors swap the marmalade for any other jam you prefer.

Crumb cake with orange marmalade
slightly adapted from the always wonderful Food & Wine magazine

Streusel topping:
½ cup (88g) light brown sugar, packed
½ cup (70g) all-purpose flour
½ teaspoon cinnamon
¼ teaspoon table salt
4 tablespoons (56g) unsalted butter, cold and diced

Cake:
2 cups (280g) all-purpose flour
2 teaspoons baking powder
½ teaspoon ground cinnamon
¼ teaspoon table salt
½ cup (113g/1 stick) unsalted butter, softened
1 cup (200g) granulated sugar
3 large eggs
¾ cup (180ml) whole milk
½ cup orange marmalade

Preheat the oven to 180°C/350°F and butter a deep 20cm (8in) square metal baking pan.

Topping: in a medium bowl, mix the brown sugar with the flour, cinnamon and salt. Add the 4 tablespoons of diced butter and, using your fingertips, rub the dry ingredients with the butter until evenly moistened, then press the mixture into clumps. Refrigerate the streusel until chilled, about 15 minutes.

Meanwhile, make the cake: in a medium bowl, whisk the flour with the baking powder, cinnamon and salt. In a large bowl, using an electric mixer, beat the butter with the sugar at medium speed until fluffy, 2 minutes. Beat in the eggs, one at a time. Scrape down the side of the bowl, then beat in the dry ingredients and milk in 3 alternating batches, starting and ending with the dry ingredients, until just incorporated. Don’t overmix.

Transfer the batter into the prepared pan, spreading it in an even layer. Dollop the orange marmalade evenly over the batter and sprinkle the streusel evenly on top. Bake for about 50 minutes, until a toothpick inserted in the center of the cake comes out clean. (Some of the streusel will sink into the cake.) Transfer the pan to a rack and let the cake cool completely in the pan. Cut into squares and serve.

Makes 16

Monday, May 4, 2015

Cardamom thumbprints for days when you're pressed for time

Cardamom thumbprints / Biscoitos thumbprint de cardamomo

As much as I love slice and bake cookies, there are times I’m in a hurry and in need of a cookie recipe that doesn’t call for time in the fridge or freezer – sometimes one just wants cookies ASAP.

I was in a situation like that last week, but every recipe I had seen lately needed to be made way in advance – don’t get me wrong, I understand that many cookies benefit from time in the fridge, but I rarely have that kind of time: I can’t wait 24 hours to bake a batch of cookies (that is why I haven’t, to this day, tried Jacques Torres’ super famous chocolate chip cookies).

I found these lovely thumbprint cookies on Food & Wine magazine and not only were they quick to make, but they were the perfect use for a delicious apple jelly I had in the fridge – the flavor of the jelly paired beautifully with the cardamom and the almond in the dough.

Cardamom thumbprints
from the always delicious Food & Wine magazine

1 cup (100g) fine almond meal
1 cup (140g) all-purpose flour
finely ground seeds of 10 cardamom pods
¼ teaspoon table salt
½ cup (113g/1 stick) unsalted butter, softened
½ cup (100g) granulated sugar
1 large egg
1 teaspoon pure vanilla extract
about ½ cup apple jelly – or use your favorite preserve/jam

Preheat the oven to 180°C/350°F. Line two baking sheets with baking paper.

In a small bowl, whisk the flours with the cardamom and salt. In a medium bowl, using an electric mixer, beat the butter with the sugar at medium speed until light and fluffy, about 3 minutes. Beat in the egg and vanilla. Turn off the mixer, add the dry ingredients, then turn the mixer on low speed and mix just until combined. Using a spatula, form dough into a ball – at this stage, my dough was a bit too soft, so I stirred in 2 ½ tablespoons (25g) all purpose flour.

Using 2 leveled teaspoons of dough per cookie, form dough into balls and place onto prepared sheets 2.5cm (1in) apart. Using the back of a teaspoon, make an indentation in the center of each ball. Bake the cookies for 10 minutes, until slightly firm. Remove the baking sheets from the oven and press the indentations again. Return the cookies to the oven and bake for 7-8 minutes longer, until lightly golden and dry but not hard. Remove from the oven and fill the indentations with the jelly. Cool completely on the sheets over a wire rack.

Makes about 38

Wednesday, September 17, 2014

Back from vacation with apricot jam cake

Apricot jam cake / Bolo de geleia de damasco

Hello, everyone!

I am back after spending wonderful vacation days in Spain: beautiful places, delicious food and massive amounts of Cava. :D

I returned home very happy, but also a couple of pounds heavier, even though I walked around a lot while I was there – one can’t eat all that jamón and pan con tomate and get away with it, right? :) I intend to eat lots of vegetables and fruit in the weeks to come (there’s a huge pot of vegetable soup already in my fridge), but I know I can’t survive without a slice of cake on the weekend.

Moderation is my mantra. ;)

If you’re like me, may I suggest this jam cake? It tastes delicious and it is very tender – don’t worry if the center sinks a bit, it’s totally OK because of the weight of the jam added to the batter. I haven’t tried it with other jam flavors, but I believe it would work with something sharp, not too sweet.

Apricot jam cake
from one of my favorite cookbooks

1 ½ cups (210g) all purpose flour
1 teaspoon baking powder
½ teaspoon ground cinnamon
¼ teaspoon ground cloves
¼ teaspoon baking soda
1/8 teaspoon table salt
6 tablespoons (85g) unsalted butter, softened
150g light brown sugar
1 cup apricot jam
2 eggs, room temperature
2 tablespoons sour cream

Preheat the oven to 180°C/350°F. Butter a 20cm (8in) square cake pan, line the bottom with baking paper, butter the paper as well and flour everything, removing the excess.
In a medium bowl, whisk together the flour, baking powder, cinnamon, cloves, baking soda and salt.
In a large bowl, using an electric mixer, cream the butter and sugar until light and fluffy. Beat in the jam until smooth. Beat in the eggs, one at a time. Scrape the sides of the bowl occasionally.
Add the sour cream and mix until smooth. With the mixer on low speed, gradually add the flour mixture and beat just until combined.
Pour the batter into the prepared pan and bake for about 50 minutes or until golden, risen and a toothpick inserted in the center of the cake comes out clean.
Cool completely in the pan. Carefully unmold, remove the paper and invert onto a serving plate.

* homemade sour cream: to make 1 cup of sour cream, mix 1 cup (240ml) heavy cream with 2-3 teaspoons lemon juice in a bowl. Whisk until it starts to thicken. Cover with plastic wrap and leave at room temperature for 1 hour or until thicker (I usually leave mine on the counter overnight – except on very warm nights – and it turns out thick and silky in the following morning; refrigerate for a creamier texture)

Serves 8

Monday, August 4, 2014

Buckwheat thumbprints with fig preserves - food that looks pretty

Buckwheat thumbprints with fig preserves / Biscoitinhos de trigo sarraceno com geleia de figo

I once took a test at college (given by one of the professors) and the result was that I was a synesthesic person. As I read about it and the professor explained it, the result actually felt right.

Most of my colleagues got "visual" as a result, meaning they were visual people. I'm not sure I would get the same result if I took the test today (that was seventeen years ago), but I believe that the percentage of my answers leaning towards "visual" would be higher, since I feel that really latent sometimes, especially when it comes to food. I go crazy with books, magazines and blogs packed with stunning photos and I sometimes I tend to choose a recipe because of how the food looks - that is why I love making thumbprint cookies, they always look so adorable! <3

These are made with a combination of all purpose flour and buckwheat flour, and the fig jam paired perfect with it. I believe that marmalade would be an interesting choice for the buckwheat flavor too, but I'll have to try that next time. :)

Buckwheat thumbprints with fig preserves
adapted from the great Great Cookies: Secrets to Sensational Sweets

1 ½ cups (210g) all-purpose flour
½ cup (70g) buckwheat flour
1/8 teaspoon salt
200g unsalted butter, slightly firm
½ cup (100g) granulated sugar
2 large egg yolks
1 teaspoon vanilla extract
fig preserves, or use the flavor you like the most

Preheat the oven to 180°C/350°F. Line two large baking sheets with baking paper.
Mix together the flours and salt in a large bowl. In the bowl of an electric mixer fitted with the paddle attachment, mix the butter on medium-low speed until smooth. Pour in the sugar and mix just until incorporated. Add the egg yolks and vanilla, mixing only until blended. Using a rubber spatula, stir in the dry ingredients in two additions, mixing just to combine after each addition. Do not overmix or this dough will become oily.
Roll 1 leveled tablespoon of dough into balls and place 5cm (2in) apart on a lined cookie sheet. Using a wooden spoon with a rounded handle no wider than 1cm (½in), make a deep indentation with the tip of the handle in the center of each cookie. Place the cookies in the oven. After 10 minutes, remove the cookies from the oven and re-press each indentation. Then fill the centers with preserves. Do not overfill these or the preserves will run over.
Return the cookies to the oven, rotating the pans top to bottom and front to back. Bake for 5-7 minutes longer until the cookies are golden brown around the edges. Cool in the sheets for 2 minutes, then slice the paper with the cookies to a wire rack and cool completely.

Makes about 45 cookies


Thursday, July 3, 2014

Jam and rye crumble bars - falling in love with rye flour

Jam and rye crumble bars / Barrinhas de centeio e geleia

There was some beer left from Nigella’s spectacular cake, and I started looking for a good recipe to use it in. I froze part of the beer for another day and part of it was transformed into a rye bread. Very flavorful, it was gladly devoured in open sandwich form – I mixed Brazil and Scandinavia and made the open sandwiches with hearts of palm and cheese. They were extremely simple but oh, so delicious.

I liked the bread so much I couldn’t wait to use the rye flour again, and it was such a revelation to me to use it in baked goods other than bread – I’d seen the recipes before, but hadn’t tried them myself. In these bars, for instance, it adds a very interesting depth of flavor, not to mention it paired beautifully with the jam flavors I chose – I mixed apricot jam and marmalade because I did not have 1 cup of either to use in the recipe, and it ended up being a very nice thing. Because I was using marmalade, I added orange zest to the topping, and you can’t imagine how great my kitchen smelled while the bars were in the oven.

I still have some rye flour left and several ideas in my head from the recipes I’ve seen, like using it in cakes and tarts. Such a wonderful addition to my repertoire – and it all started with a simple (yet delicious) loaf of bread.

Jam and rye crumble bars
slightly adapted from the glorious Good to the Grain: Baking with Whole-Grain Flours

Shortbread base:
55g rye flour
105g all-purpose flour
40g light brown sugar
pinch of salt
75g unsalted butter, melted and cooled
¼ teaspoon vanilla extract

Crumble topping:
70g rolled oats
2 tablespoons light brown sugar, packed
40g rye flour
25g all-purpose flour
1 ½ tablespoons granulated sugar
1/8 teaspoon table salt
finely grated zest of 1 orange
55g unsalted butter, melted and cooled
1 cup jam – I used ½ cup apricot and ½ cup marmalade

Position a rack in the middle of the oven and preheat the oven to 160°C/320°F. Lightly butter a 20cm (8in) square pan, line it with foil leaving an overhang in two opposite sides and butter the foil as well.

Crust: in a large bowl, whisk together the flours, sugar and salt. Add the melted butter and vanilla and stir until thoroughly combined. Press the dough evenly into the bottom of the pan. Put the pan in the freezer for 30 minutes.

Crumble topping: add the oats, brown sugar, rye flour, all purpose flour, granulated sugar, salt and orange zest to the bowl of a food processor and process until the oats are partially ground, about 5 seconds. Pour the mixture into a bowl. Add the melted butter and stir with your hands, squeezing the dough as you mix to create small crumbly bits. Set aside.
Bake the frozen shortbread until golden brown and firm when touched, about 30 minutes. Remove from the oven and increase the temperature to 180°C/350°F.
Spread the jam over the shortbread crust and top with the crumble. Bake the bars for about 35 minutes or until golden brown. Cool completely in the pan. Cut into squares to serve.
The bars can be kept in an airtight container for up to 2 days.

Makes 16

Monday, November 25, 2013

Berry-berry streusel bars and another fan of "The Hunger Games"

Berry-berry streusel bars / Barrinhas de frutas vermelhas

My sister, a.k.a. my movie buddy, did not watch The Hunger Games when it was released last year, so I asked her to do it last week so we could watch Catching Fire together. She did and loved it, and then loved the sequel, too, and when I arrived home there was a text message from her on my phone: “can I borrow the books?” :) I can totally relate since last year, after watching the first movie, I got hooked on the books, too and couldn’t put them aside.

As the movie production went ahead, it was a delight to hear that Philip Seymour Hoffman and Jena Malone were attached to the project, and while I wasn’t very sure about Sam Claflin playing Finnick Odair back then all I can say now is <3 <3 <3. :D

I’ll admit I was wrong about these bars, too: I’d ignored them forever because I’d made several different jam bars already. But with no fruits at home other than frozen berries and bananas, no chocolate either – the horror, the horror – and a bag of oats begging to be used I gave in and baked the bars, only to learn how delicious they were and how silly I’d been till then.


Berry-berry streusel bars
slightly adapted from the huge The Bon Appetit Cookbook: Fast Easy Fresh

Crust:
180g rolled oats
1 ½ cups (210g) all purpose flour
1 cup (175g) firmly packed brown sugar
½ teaspoon baking soda
pinch of salt
1 cup (2 sticks/226g) chilled unsalted butter, cut into small pieces

Filling:
125g frozen blueberries, out of the freezer for 30 minutes
125g frozen raspberries, out of the freezer for 30 minutes
2/3 cup raspberry jam (I used half raspberry, half cherry)
5 teaspoons all purpose flour
finely grated zest of 2 large limes

Crust: preheat oven to 190°C/375°F. Butter a 20x30cm (12x8in) baking pan, line it with foil leaving an overhand on two opposite sides, and butter the foil as well.
Combine first 5 ingredients in medium bowl. Add butter; rub with fingertips until mixture resembles coarse meal. Press half of crumb mixture onto bottom of prepared pan. Bake crust until light brown, about 15 minutes. Cool slightly.

Filling: mix blueberries, raspberries, jam, flour and lime zest in bowl. Spread filling over crust. Sprinkle remaining crumb mixture over. Bake until topping is golden, about 35 minutes. Cool in pan. Cut into squares and serve.

Makes 24

Saturday, July 28, 2012

Vanilla cupcakes with blackcurrant preserves icing

Vanilla cupcakes with blackcurrant preserves icing / Cupcakes de baunilha com cobertura de geléia de cassis

Looking for a recipe to use up the jam left in the jar after making this cake, I found an old magazine scrap with a recipe for apple cupcakes with blackcurrant icing; I thought it sounded delicious but did not have any apples around (I’d devoured them in crumble form a couple of hours before, mea culpa). Then I thought that a neutral flavor, like vanilla, would be a good substitute for the apple since it would let the icing shine – that was how these tender, simple yet flavorsome cupcakes were created.

Vanilla cupcakes with blackcurrant preserves icing
adapted from the wonderful Gourmet Today: More than 1000 All-New Recipes for the Contemporary Kitchen + an old magazine scrap

Cupcakes:
¾ cup (105g) all purpose flour
1 teaspoon baking powder
1/8 teaspoon salt
¾ stick (85g) unsalted butter, softened
1/3 cup + 2 tablespoons (90g) granulated sugar
1 large egg
1 teaspoon vanilla extract
1/3 cup + 1 tablespoon whole milk, room temperature

Icing:
½ cup (70g) icing sugar
100g blackcurrant preserves
2-3 teaspoons lemon juice

Put oven rack in middle position and preheat oven to 180°C/350°F. Line a twelve-cavity muffin pan (1/3 cup capacity each cavity) with paper liners.
Whisk together flour, baking powder, and salt in a bowl. Beat together butter and sugar in a large bowl with an electric mixer at medium-high speed until pale and fluffy, about 4 minutes. Add egg and beat until just combined. Scrape the sides of the bowl, then beat in vanilla. Reduce speed to low, then add flour mixture and milk mixtures alternately in batches, beginning and ending with flour and mixing until just combined.
Divide batter among muffin cups, filling them two-thirds full, and bake until tops are pale golden and a wooden pick or skewer inserted in centers comes out clean, about 15 minutes. Cool in the pan for 5 minutes, then carefully remove and transfer to a wire rack. Cool completely.
Make the icing: sift the icing sugar into a medium bowl. Add the preserves and mix well. Gradually add the lemon juice, mixing until desired consistency. Pour over the cooled cupcakes and set aside to set, about 30 minutes.

Makes 12

Tuesday, February 28, 2012

Blackberry coconut oat bars

Blackberry coconut oat bars / Barrinhas de aveia, coco e geléia de amora

Last Sunday, for the first time since 1997, I watched the entire Academy Awards, from the very first minute until “The Artist” was announced as best movie. Back in 1997 what made me stay up until 2 a.m. was my love for “The English Patient” – I’d become obsessed with the film after reading the book and, to me, Anthony Minghella had done such a brilliant job that I really wanted the film to get as many Oscars as possible. Ralph Fiennes did not take the award home but I wasn’t so disappointed because he lost to the fabulous Geoffrey Rush – it wasn’t something unfair like losing to Tommy Lee Jones. :)

This year, I watched the ceremony wishing with all my heart for Gary Oldman, Rooney Mara (since Tilda did not get a very much deserved nomination) and Scorsese or Malick to take the awards home, but wasn’t disappointed by the way things turned out because I loved “The Artist” and losing to Meryl Streep is an honor – it’s not unfair like losing to Paltrow, Roberts, Witherspoon or Zellweger. :)

---

I’m still interested in recipes baked in 13x9in pans, that is why the first recipe I tried from this lovely book was these bars – they are every bit delicious as they are easy to make, and you can get away with the fact that there’s a huge amount of oats in them and call them “healthy”. :)

Blackberry coconut oat bars
slightly adapted from the adorable and delicious One Girl Cookies: Recipes for Cakes, Cupcakes, Whoopie Pies, and Cookies from Brooklyn's Beloved Bakery

¾ cup (75g) sweetened shredded coconut
1 ¼ cups (175g) all purpose flour
¾ cup (131g) light brown sugar, packed
¼ cup (50g) granulated sugar
½ teaspoon table salt
¾ cup (170g) unsalted butter, cold and cut into small pieces
1 ½ cups (172g) old-fashioned rolled oats
½ cup blackberry preserves

Preheat the oven to 180°C/350°F. Butter a 32x22cm (13x9in) baking pan* and line it with foil. Butter the foil as well.
Spread the coconut on a baking sheet and toast in the oven for 2-3 minutes. Cool completely (leave the oven on).
In the bowl of an electric mixer fitted with the paddle attachment combine the flour, brown sugar, granulated sugar and salt. Mix on low speed to combine. Add the butter and mix on low speed until the dough starts to come together. Add the coconut and the oats. Mix on low for 1 minute until the dough has a crumbly texture.
Reserve ¾ cup of the mixture. Transfer the remaining dough to the prepared pan. Using your fingers, press it evenly over the bottom of the baking pan. Bake, rotating the sheet halfway through, for 14 minutes or until the crust is golden around the edges. Let the crust cool for 10 minutes (leave the oven on). Spread the blackberry preserves evenly over the crust, leaving a ½ in border.
Crumble the reserved dough over the preserves. Bake for 8-10 minutes or until the preserves are bubbling and the topping is firm. Let cool completely then cut into bars.

* I made the exact recipe above using a 20x30cm (8x12in) pan; I reserved 1 cup of the dough for the topping and used the rest for the base. Since my pan has a removable bottom I did not line it with foil

Makes 24 bars

Wednesday, January 11, 2012

Cherry-plum preserves + scones

Cherry plum preserves + scones / Geléia de cereja e ameixa + scones

I usually do not buy cookbooks without taking a look inside their pages first – I have done that in a few occasions and got really disappointed; but after reading the reviews for "Sarabeth's Bakery: From My Hands to Yours" and seeing a photo of one of the cookie recipes I felt I would love the book – and I did. It’s full of great recipes, beautiful photos and there are several recipes for preserves, which is something I intend to make more often – especially after tasting this cherry-plum preserves, which is one of the most delicious recipes I have ever made. I am sure the preserves would work beautifully over some panna cotta or served along a slice of simple pound cake or angel cake, but I went the traditional way and baked some scones to serve with it. Fantastic combination.

Cherry-plum preserves
from the gorgeous Sarabeth's Bakery: From My Hands to Yours

900g (2 pounds) cherries, pitted and halved
900g (2 pounds) ripe plums, pitted and cut into about 1cm (½in) cubes
½ cup (120ml) fresh orange juice
3 cups (600g) granulated sugar
1/3 cup (80ml) fresh lemon juice

Combine the cherries, plums and orange juice in a non-reactive large saucepan. Bring to a boil over high heat, stirring often. Reduce the heat to medium-low and simmer, stirring often, until the fruit is tender, about 15 minutes.
Stir in the sugar and lemon juice and return to a simmer. Cook, stirring often, until the fruit has fallen apart into a thick, chunky puree, about 20 minutes – the plums dissolved completely and the cherries remained in pieces.
Let cool completely, store in jars and keep in the fridge.

Makes 7 pints (4 liters) – I halved the recipe above and used 500g cherries + 400g plums

Simple scones
from the always amazing Donna Hay Magazine

2 cups (280g) all purpose flour
2 ½ teaspoons baking powder
1/3 cup (67g) granulated sugar
pinch of salt
3 tablespoons (42g) unsalted butter, cold and chopped
¾ cup (180ml) whole milk + a little extra for brushing

Preheat the oven to 200°C/400°F. Line a baking sheet with baking paper.
Combine the flour, baking powder, sugar and salt in a medium bowl. Add the butter and use your fingertips to work it into the flour mixture until it resembles fine breadcrumbs. Use a flat-bladed knife or a fork to mix in the milk until the dough is soft and sticky. Knead the dough lightly on a floured surface and press into a round approximately 3cm (1.2in) thick.
Use a 5cm (2in) plain cutter to cut rounds and place onto the prepared sheet. Brush the tops with milk and bake for 15 minutes or until risen and lightly golden.
Serve warm with the preserves.

Makes 12

Friday, May 27, 2011

Back to school raspberry granola bars and my (many) obsessions

Back to school raspberry granola bars / Barrinhas de granola e geléia de framboesa

I’m someone who obsesses with certain things from time to time – directors, actors, music, you name it. And food, of course. I obsessed with Ralph Fiennes so badly after “Schindler’s List” that I had to watch each and every film with him – and that led me to Kathryn Bigelow’s “Strange Days” (which is far better than “The Hurt Locker”, imho). Did I mention I was about 17 back then? Well. ;)

It might seem that I’m on a cake kick right now, but I’ve been really thinking about bars lately – and these are the ones to blame. They were so irresistible – and easy to make, despite the layers – that a search for great bars has begun, and the granola ones you see on the picture can certainly be part of the bar hall of fame: they were so good I almost did not share them. :)

Back to school raspberry granola bars / Barrinhas de granola e geléia de framboesa

Back to school raspberry granola bars
from The Craft of Baking

¾ cup (168g/1 ½ sticks) unsalted butter, melted and cooled to room temperature
1 cup (110g) pecans, roughly chopped
1 ½ cups (210g) all purpose flour
1 ¼ cups (143g) old fashioned rolled oats – I made a mistake and used 1 ½ cups (172g)
1/3 cup (67g) granulated sugar
1/3 cup (58g) light brown sugar, packed
½ teaspoon salt
½ teaspoon baking soda
1 cup raspberry preserves

Preheat the oven to 180°C/350°F. Butter a 20cm (8in) square baking pan, line it with foil, leaving an overhang on two opposite sides and butter the foil as well.
Place the pecans on a baking sheet and bake until lightly golden and fragrant, about 5 minutes. Cool the sheet completely on a wire rack.
In a large bowl, combine flour, oats, granulated sugar, brown sugar, salt, baking soda and the cooled pecans. Pour in the melted butter and mix until well combined. Transfer about 2/3 of the mixture to the prepared pan. Press the dough evenly into the pan, forming a firmly packed layer. Using a spatula spread the preserves over the base. Evenly sprinkle the remaining dough over the preserves. Bake, rotating the pan halfway through, until the top is golden brown and fragrant, about 40 minutes. Transfer the pan to a wire rack and cool completely. With the aid of the foil handles, carefully remove from the pan and cut into squares.
The bars can be kept in an airtight container at room temperature for up to 1 week.

Makes 16

Related Posts with Thumbnails