Showing posts with label orange zest. Show all posts

Wednesday, May 12, 2021

Orange and olive oil granola

Granola de laranja e azeite de oliva - v.2


I told you the other day that once I started making my own granola I never went back to store bought – not only I can control the amount of sugar and fat in the recipe, I can also vary the flavors and create new types of granola depending on my own taste. 

My chocolate granola is an absolute favorite – it is so delicious I have to refrain myself from eating the whole batch while it cools on the counter. But the granola I bring you today is also wonderful: perfumed with orange zest and juice, flecked with tart cranberries, full of good-for-you sesame seeds and quinoa flakes. You can use honey or make the granola vegan by replacing honey with agave.

This granola is a hit with my dear friend Tania Pereyra, who lives in NY and is a very special woman, who I adore and admire. Let me know if you give it a try too.


Orange and olive oil granola

own recipe


250g jumbo oats

50g quinoa flakes

50g de flaked almonds

3 tablespoons sesame seeds

finely grated zest of 2 small oranges

¼ teaspoon freshly ground nutmeg

¼ teaspoon ground cinnamon

1/8 teaspoon table salt

1/3 cup (80ml) honey or agave

1 tablespoon light brown sugar, packed

1/3 cup (80ml) freshly squeezed orange juice

3 tablespoons extra virgin olive oil

½ cup (65g) dried cranberries, cut in half if too large


Preheat the oven to 180°C/350°F. Line a large baking sheet with foil.

In a large bowl, mix together the oats, quinoa flakes, almond, sesame seeds, orange zest, nutmeg, cinnamon and salt. Set aside.

In a small saucepan, combine honey/agave, brown sugar, orange juice and olive oil and whisk over medium heat until melted and sugar is dissolved.

Remove from the heat and pour over dry ingredients. Stir well to coat. Spread mixture evenly over prepared baking sheet and bake for 15 minutes. Stir the granola around with a rubber spatula (careful not to tear the foil), spread it evenly again and bake for another 15 minutes – the granola will still be soft and will get crunchy once cooled.

Remove from the oven and stir the granola around again. Let cool completely, then stir in the cranberries.

Store in an airtight container at room temperature for up to 2 weeks.

Serves 10-12 

Monday, December 12, 2016

Panettone

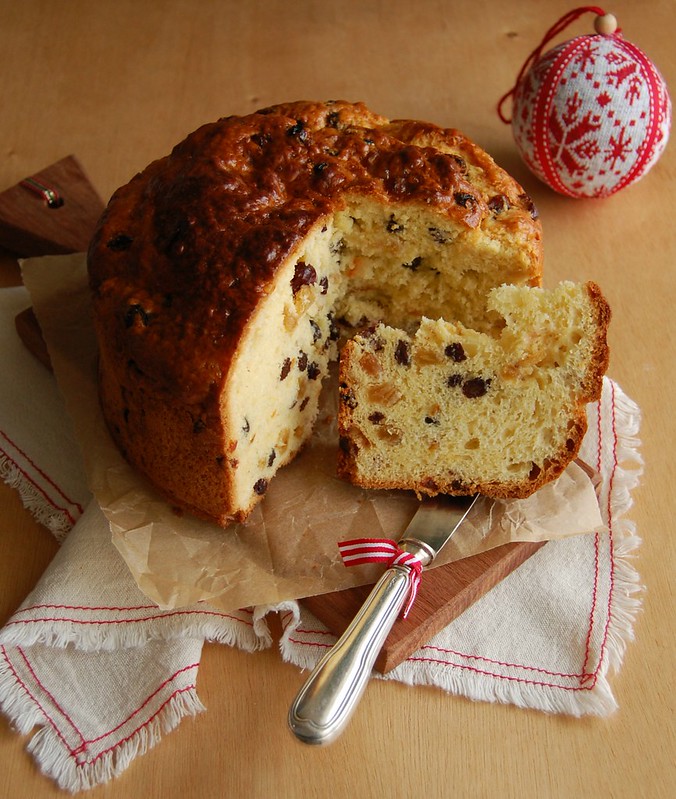
Panetone / Panettone

Even though I have been posting Christmas recipes at this time of the year for a long long time, I have not baked panettone – or chocottone, for that matter – in ages. We sometimes get panettones as gifts, and my husband sometimes buys some at this time of the year.

This year, however, Joao told me he wanted homemade panettone and since I was on a Christmas state of mind I decided to make it. It was a rainy Saturday, I did not want to go anywhere, so I made the panettone and watched Carol in between (by the way, I am still trying to understand all the fuss over the awards season).

This is an adaptation of Paul Hollywood’s panettone and it turned out really delicious – the tender brioche dough perfumed with citrus and dotted with chewy and sweet raisins and dried cranberries. But unlike Paul’s brioche, that still tastes great a day after it is made, the panettone got a little tough on the following morning – it was still delicious, but texture-wise it was better freshly baked. If your family is big, I am sure the panettone will be gone in no time, but if there are not many of you around to eat it within a day no worries: it makes a killer French toast. ;)

Panettone
slightly adapted from Paul Hollywood

14g dried yeast
140ml whole milk, lukewarm
75g granulated sugar
500g all purpose flour
¼ teaspoon table salt
5 large eggs, room temperature
finely grated zest of 1 orange
finely grated zest of 1 lemon
1 teaspoon vanilla extract
1 teaspoon Cointreau
1 teaspoon Amaretto
200g unsalted butter, softened
120g dried cranberries
120g golden raisins
120g dark raisins
50g crystallized orange peel, finely chopped

Egg wash:
1 egg, lightly beaten with a fork

In the bowl of an eletric mixer, place yeast, milk and a pinch of the sugar and mix with a fork. Set aside for 5 minutes or until foamy. Add the flour, salt, remaining sugar, eggs, orange and lemon zest, vanilla, Cointreau and Amaretto, then mix on slow using the dough hook for two minutes. Increase the speed to medium and mix for a further 6-8 minutes until you have a soft dough.

Add the softened butter and mix for another 5-8 minutes, scraping the sides of the bowl occasionally. Dough will be very soft. Mix in the dried fruit and crystallized orange peel. Transfer the dough to a large buttered bowl, cover with plastic wrap and chill overnight until the dough has firmed up enough for you to able to shape it.

Prepare a 18cm/7in panettone pan by brushing the inside generously with melted butter*.
Remove the panettone dough from the fridge, knock back the dough, shape into a ball and place into the pan. Leave to prove at room temperature for a further 2-3 hours, until the dough just starts to dome over the top of the pan.

Preheat the oven to 180°C/350°F.
Brush the top of the panettone with egg wash and bake for about 25 minutes. Reduce the temperature to 150°C/300°F and bake for a further 35 minutes, or until a skewer comes out clean. Check the panettone periodically in case of oven hot spots. Bear in mind that the sugar and butter in the dough could brown too much before it is actually fully baked – if panettone starts to brown too quickly, cover it loosely with foil.
Remove the panettone from the pan immediately and allow to cool over a wire rack.

* I used a 20cm (8in) round cake pan to bake my panettone – I made a collar with a double sheet of baking paper folded in half (that way getting 4 layers of paper) and buttered it all with melted butter (there is a photo of the prepared pan on my Instagram).

Serves 8-10

Thursday, July 3, 2014

Jam and rye crumble bars - falling in love with rye flour

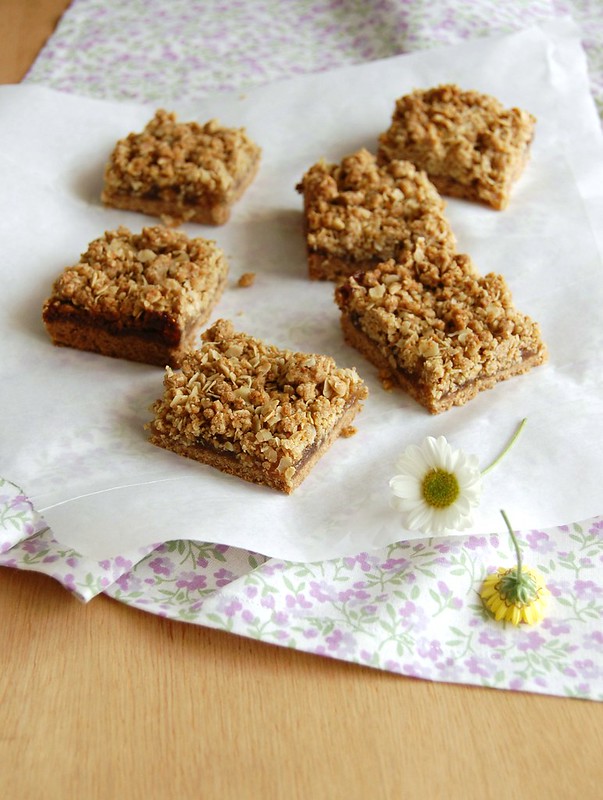
Jam and rye crumble bars / Barrinhas de centeio e geleia

There was some beer left from Nigella’s spectacular cake, and I started looking for a good recipe to use it in. I froze part of the beer for another day and part of it was transformed into a rye bread. Very flavorful, it was gladly devoured in open sandwich form – I mixed Brazil and Scandinavia and made the open sandwiches with hearts of palm and cheese. They were extremely simple but oh, so delicious.

I liked the bread so much I couldn’t wait to use the rye flour again, and it was such a revelation to me to use it in baked goods other than bread – I’d seen the recipes before, but hadn’t tried them myself. In these bars, for instance, it adds a very interesting depth of flavor, not to mention it paired beautifully with the jam flavors I chose – I mixed apricot jam and marmalade because I did not have 1 cup of either to use in the recipe, and it ended up being a very nice thing. Because I was using marmalade, I added orange zest to the topping, and you can’t imagine how great my kitchen smelled while the bars were in the oven.

I still have some rye flour left and several ideas in my head from the recipes I’ve seen, like using it in cakes and tarts. Such a wonderful addition to my repertoire – and it all started with a simple (yet delicious) loaf of bread.

Jam and rye crumble bars
slightly adapted from the glorious Good to the Grain: Baking with Whole-Grain Flours

Shortbread base:
55g rye flour
105g all-purpose flour
40g light brown sugar
pinch of salt
75g unsalted butter, melted and cooled
¼ teaspoon vanilla extract

Crumble topping:
70g rolled oats
2 tablespoons light brown sugar, packed
40g rye flour
25g all-purpose flour
1 ½ tablespoons granulated sugar
1/8 teaspoon table salt
finely grated zest of 1 orange
55g unsalted butter, melted and cooled
1 cup jam – I used ½ cup apricot and ½ cup marmalade

Position a rack in the middle of the oven and preheat the oven to 160°C/320°F. Lightly butter a 20cm (8in) square pan, line it with foil leaving an overhang in two opposite sides and butter the foil as well.

Crust: in a large bowl, whisk together the flours, sugar and salt. Add the melted butter and vanilla and stir until thoroughly combined. Press the dough evenly into the bottom of the pan. Put the pan in the freezer for 30 minutes.

Crumble topping: add the oats, brown sugar, rye flour, all purpose flour, granulated sugar, salt and orange zest to the bowl of a food processor and process until the oats are partially ground, about 5 seconds. Pour the mixture into a bowl. Add the melted butter and stir with your hands, squeezing the dough as you mix to create small crumbly bits. Set aside.
Bake the frozen shortbread until golden brown and firm when touched, about 30 minutes. Remove from the oven and increase the temperature to 180°C/350°F.
Spread the jam over the shortbread crust and top with the crumble. Bake the bars for about 35 minutes or until golden brown. Cool completely in the pan. Cut into squares to serve.
The bars can be kept in an airtight container for up to 2 days.

Makes 16

Friday, May 16, 2014

Pine nut and Marsala biscotti and making a very interesting fairy tale

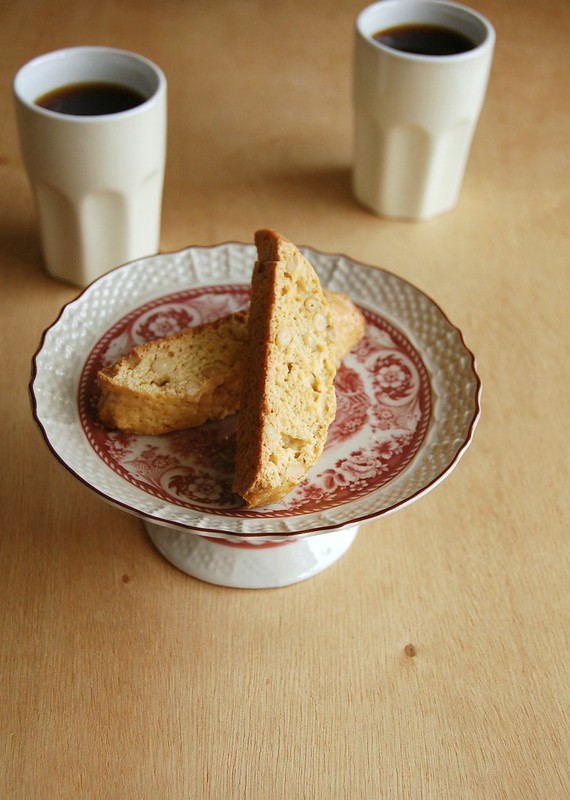
Pine nut and Marsala biscotti / Biscotti de pinoli e Marsala

At the risk of you thinking I have a heart of stone (after I told you I don’t like animated movies) I’ll confess that I’m not into fairy tales, either – I did love Alice in Wonderland as a kid, but then I went to college and learned not so great things about Lewis Carroll, so I never cared for it again the way I used to.

But, same as with biblical stories, attach great people to the project and I’m instantly interested: I learned this morning that Cinderella is directed by Kenneth Branagh – whom I adore both as an actor and as a director – and Cate Blanchett will be the Stepmother – if Charlize Theron kicked ass as the villain in that silly Snow White movie, can you imagine what Cate will do? And directed by Mr. Branagh? There's more: Helena Bonham Carter will be The Fairy Godmother and my bets are that they’re either thinking outside the box here or we’ll see the craziest Fairy Godmother of all time. :D

I’m no stranger to biscotti, as you know, and almond biscotti is something I love – however, when I opened the freezer to get the almonds I noticed I did not have any around. Bummer. But there they were, the two packages of pine nuts I’d brought from NY (because here pine nuts cost a small fortune) just begging to be used. I made the biscotti with the pine nuts instead thinking that they would either be a great idea or a waste of my precious ingredients – luckily, they turned out delicious.

Now what do you think will be the case with Helena? :D

Pine nut and Marsala biscotti
adapted from Dolci: Italy's Sweets

385g all purpose flour
150g granulated sugar
½ teaspoon baking powder
1/8 teaspoon table salt
3 heaping tablespoons honey
2 large eggs
2 large egg yolks
2 tablespoons unsalted butter, room temperature
finely grated zest of 1 large orange
1 teaspoon vanilla extract
100ml Marsala wine
120g pine nuts, lightly toasted and cooled – or use almonds as the original recipes calls for

Preheat the oven to 180°C/350°F. Line a large baking sheet with foil.
In a large bowl, combine the flour, sugar, baking powder, salt, honey, eggs, egg yolks, butter, orange zest, vanilla and Marsala. With an electric mixer, mix just until a dough forms, then mix in the pine nuts – dough is sticky, but add a tiny bit of flour if it’s too sticky.
Divide the dough into 3 equal portions and, using wet hands, form each into a 25x5cm (10x2in) cylinder. Place them 5cm (2in) apart onto the baking sheet and bake for 25 minutes or until slightly golden and firm.
Carefully slide the foil with the logs onto a wire rack and cool for 8 minutes. Line the sheet with baking paper. Using a sharp knife and one firm cut, slice each log diagonally into 1.5cm slices, place them onto the sheet, side by side, and bake for 8 minutes or until golden. Turn the biscotti and bake until golden on the other side as well. Cool completely on the sheet.
The biscotti can be kept in an airtight container for up to 2 weeks.

Makes about 35

Wednesday, January 22, 2014

Hazelnut, almond and cranberry biscotti, and when competition is fair

Hazelnut, almond and cranberry biscotti / Biscotti de amêndoa, avelã e cranberry

I have always found the Golden Globes much more fun than the Oscars, and a lot fairer, too, since they separate comedy from drama. Fair is not a word I often associate with movie and TV awards since there are always the lobbied performances that get nominated (and win) while talented people are left behind.

However, this year, as Paula Patton and Aaron Eckhart announced the nominees for Best Performance by an Actor in a Television Series – Drama, I told my husband: “this is unusual: each and every one of them deserve the award”. The Globe ended up in Bryan Cranston’s hands – much to my delight – but it would have been completely fair had Paula announced any other of the four nominees, and I would have liked it anyway. I think that deep down inside all four of them – and any other actor in a major TV drama - are celebrating the fact that, next year, Bryan Cranston is out of the competition. :D

My Bryan Cranston of biscotti recipes, Alice Medrich’s almond biscotti, has, after a good while, found some serious competition: these WS biscotti are just as delicious, and the soft, dried cranberries are a nice contrast to the crunch of the nuts. Don’t even think of omitting or replacing the orange zest: it really makes these biscotti.

Hazelnut, almond and cranberry biscotti
from the delicious Williams-Sonoma Collection: Cookies

250g all-purpose flour
½ teaspoon baking powder
½ teaspoon ground cinnamon
1/8 teaspoon salt
½ cup (113g/1 stick) unsalted butter, room temperature
¾ cup (150g) granulated sugar
2 eggs
2 teaspoons vanilla extract
80g hazelnuts, toasted, skinned and coarsely chopped
80g almonds, toasted and coarsely chopped
½ cup dried cranberries, coarsely chopped if large
finely grated zest of 1 orange

Preheat an oven to 180°C/350°F. Line a large baking sheet with baking paper.
In a medium bowl, sift together the flour, baking powder, cinnamon and salt. In a large bowl, using an electric mixer, beat the butter and sugar until light and creamy. Beat in the eggs one at a time, beating well after each addition. Beat in the vanilla. On low speed, gradually add the flour mixture and mix just until incorporated. Stir in the hazelnuts, almonds, cranberries and orange zest until evenly distributed. The batter should be very soft.

Turn the batter out onto a generously floured work surface and divide in half. With well-floured hands, transfer one-half onto the prepared baking sheet and shape into a log about 30cm (12in) long and 3.75cm (1½in) in diameter. Place on one side of the sheet. Repeat with the remaining batter, leaving 10cm (4in) the logs. (They will spread as they bake.)
Bake the logs until the edges are golden, 25-30 minutes. Transfer the pan to a wire rack and let the logs cool for 10 minutes. Slide the logs still attached to the paper from the sheet and line it again with baking paper. Using a serrated knife, cut the logs on the diagonal into slices 1.25cm (½in) wide. Carefully place the slices on their sides on the baking sheet and return them to the oven. Bake until the edges are golden, about 10 minutes more. Let the biscotti cool completely on the sheets on wire racks. Store in an airtight container.

Makes about 4 dozen biscotti – I got 32

Monday, January 6, 2014

Roscón de Reyes (King Cake)

Roscón de Reyes / Bolo de Reis

My favorite time of the year is coming to an end, and later on today I’ll put away all my Christmas decorations – it’s such a pity, I love seeing them throughout the house.

The sixth of January is also the day to celebrate the Three Kings, and to do so I bring you this delicious recipe, a sort of brioche topped with a lemon glaze – unlike the King Cake I’d seen on this book, Gourmet Traveller’s version is a lot prettier, with no plastic baby hidden inside: just tender sweet bread with almonds, ginger and cranberries.

Who said atheists can’t enjoy some of the Catholic traditions? ;)

Roscón de Reyes (King Cake)
slightly adapted from the always gorgeous Gourmet Traveller

110ml whole milk
2 ½ teaspoons dried yeast
60g granulated sugar
500g all-purpose flour
pinch of salt
55ml olive oil
finely grated zest of 1 lemon
finely grated zest of 1 orange
2 large eggs
1 teaspoon vanilla extract
75g unsalted butter, coarsely chopped and softened
glacé ginger, halved glacé cherries and blanched almonds, for decoration – I used dried cranberries instead of cherries

Lemon glaze:
100g confectioners’ sugar
juice of 1 lemon

Warm milk and 100ml water in a small saucepan over low heat until lukewarm, add yeast and 1 teaspoon of the sugar and set aside in a warm place until foaming (4-5 minutes). Combine flour, salt, oil, citrus zest and remaining sugar in an electric mixer fitted with a paddle attachment, gradually add milk mixture, beat for 5 minutes, add eggs and vanilla and beat to combine. Beating continuously, gradually add butter and beat until a soft dough forms (3-4 minutes). Cover and set aside in a warm place until doubled in size (1-1½ hours).
Knock back dough, cover and set aside to rest (10 minutes). Lightly butter a 10-cup capacity Bundt pan.
Turn onto a lightly floured surface, roll into a 30cmx50cm rectangle, then roll into a long cylinder, pinch edge to seal firmly, then bring ends together to form a ring and pinch to seal. Place seam-side down in prepared pan. Cover with greased plastic wrap and set aside in a warm place until nearly doubled in size (30-40 minutes). In the meantime, preheat oven to 180°C/350°F.
Bake the bread for 25-30 minutes or until loaf sounds hollow when tapped. Cool in the pan over a wire rack for 10 minutes, then carefully unmold onto rack. Cool completely.

Lemon glaze: sift the icing sugar into a small bowl and gradually add the lemon juice, stirring until drizzling thick drizzling consistency. Drizzle roscón with glaze, set aside until icing is almost set, then top the glaze with ginger, cherries and almonds and serve.

Serves 8-10

Tuesday, November 19, 2013

Marzipan cookies and less is more

Marzipan cookies / Biscoitos de marzipã

As I drove to work the other day listening to one of my favorite songs I started thinking about the two or three episodes of The X Factor I’ve watched recently and how everyone seems to sing in the absolute same tone – I don’t think that one has to have Christina Aguilera’s voice to make good music (and let’s just say that the girl shouldn’t feel very proud about her repertoire), and my humble ears would choose Nina Persson’s soft voice over all that screaming any day now. :)

As for baking, in a similar “less is more” moment, I baked these delicious and incredibly addictive cookies: only a handful of ingredients resulted in chewy and moist treats, and I found it hard to stop at one. Or four. :D

Marzipan cookies
from the always beautiful and delicious Gourmet Traveller

250g almond meal
200g granulated sugar
pinch of salt
2 egg whites
finely grated zest of 1 orange
1 teaspoon vanilla extract
100g pure icing sugar

Preheat oven to 190°C/375°F. Line a large baking sheet with baking paper.
Combine almond meal, granulated sugar, salt, egg whites, zest and vanilla in a large bowl and mix to a soft dough. Turn out onto a work surface and roll into a cylinder about 2cm thick. Sieve icing sugar onto work surface, roll dough in icing sugar and cut into 32 pieces. Roll each piece into a thin log, then form into an "S" shape (I never managed to do so, so I shaped my cookies as small cylinders). Dust cookies lightly with icing sugar and place cookies 2.5cm (1in) apart onto prepared sheet and bake until golden (10-15 minutes). Cool on a wire rack.
The cookies can be stored in an airtight container for up to 3 days.

Makes 32

Monday, November 11, 2013

Orange cornmeal financiers - a French-Brazilian culinary experiment

Orange cornmeal financiers / Financiers de fubá e laranja

The weather here in Sao Paulo seems to be in a roller coaster lately – in some days the temperature reaches 30°C (86°F) only to drop to 17°C (62°F) on the following morning. I prefer the cold weather but I do have something stashed in the freezer for the screaming hot periods: I made David Lebovitz’s amazing chocolate ice cream and poured it into Popsicle molds instead of churning it in the ice cream maker – the result was so good my husband is currently addicted to it. :D

With the ice cream production on full speed, my stash of frozen egg whites is regular again and that made me think of financiers once more. This time, however, I decided to add a Brazilian touch to the French treat by replacing the all purpose flour with corn flour (not corn starch), adding a touch of citrus zest to brighten up the flavor – I don’t mean to brag about my idea, but it turned out to be excellent (modesty mode off). :D

Orange cornmeal financiers
adapted from the great Simply Bill

85g almond meal (finely ground almonds)
135g icing sugar, sifted
55g corn flour (not corn starch)
pinch of salt
finely grated zest of 1 large orange
5 egg whites
95g unsalted butter, melted and cooled
1 teaspoon vanilla extract
icing sugar, for dusting

In a large bowl, combine the almond meal, icing sugar, corn flour, salt and zest. Stir in the egg whites until just combined. Stir in the melted butter and the vanilla. Cover and refrigerate the batter for 1 hour.
Preheat the oven to 180°C/350°F. Butter and flour ten 100ml capacity mini cake or muffin pans.
Pour the batter in the pans. Bake for 15-20 minutes or until golden - the financiers should spring back when touched. Remove from the oven and leave in the pan for 2 minutes before turning out onto a wire rack to cool. Dust with icing sugar to serve.
Financiers are best served the day they’re made, but can be stored in an airtight container for up to 2 days.

Makes 10

Monday, July 29, 2013

Chocolate marmalade slump cake

Chocolate marmalade slump cake / Bolo cremoso de chocolate e geleia de laranja

An open jar of marmalade in the fridge – left from making brioche – had to be used and since it was such a delicious product I had to make something just as good. Lucas Hollweg’s cake was the perfect choice: moist, full of chocolate flavor and gluten free (for those of you who follow that kind of diet).

That was a good use for an excellent ingredient (not exactly like Robert Zemeckis using the crew members of “Cast Away” to film “What Lies Beneath”). :D

Chocolate marmalade slump cake
from the beautiful and delicious beyond words Good Things to Eat (I bought mine here)

150g unsalted butter
150g good dark chocolate (60-70% cocoa solids), chopped – I used one with 53% cocoa solids
100g chunky orange marmalade
finely grated zest of 1 large orange
125g granulated sugar
4 eggs, separated
½ teaspoon vanilla extract
a pinch of salt
½ cup (45g) cocoa powder
icing sugar, for dusting

Preheat the oven to 190°C/375°F. Lightly butter a 20cm (8in) round cake pan with a removable bottom, line the bottom with a circle of baking paper and butter the paper as well.
Melt the butter in a large saucepan over medium heat. Remove from the heat, add the chocolate and let stand for 1-2 minutes. Stir until melted and smooth. Put the marmalade and zest in a food processor and blitz to a slush. Add the sugar and whizz in. Stir into the chocolate mixture.
Beat the egg yolks vigorously into the chocolate mixture, then beat in the vanilla. Sift the cocoa powder over the top and beat that in as well. Put the egg whites in a clean bowl with the salt and using an electric mixer fitted with the whisk attachment, whip until they form soft peaks. Beat a third of the whisked egg whites into the chocolate mixture to loosen it a little, then carefully fold in the rest.

Pour the mixture into the prepared pan, smooth the top and bake for 30 minutes, or until the centre is set. Cool for 30 minutes over a wire rack, then carefully remove it from the pan. Dust with icing sugar. Serve warm or at room temperature with vanilla ice cream or whipped cream.

Serves 6-8


Thursday, March 21, 2013

Colomba Pasquale

Colomba Pasquale / Colomba Pascal

My husband is not into sweets – I guess that the Universe knows better, right? :) – but he likes certain baked goods, like panettone and Colomba Pasquale. However, the store-bought versions are so heavily scented with artificial essences that he no longer eats them – he says those baked goods are not what they used to be when he was younger anymore and that all those artificial ingredients disagree with his stomach. Therefore, he was very excited about my homemade Colomba, and after having a slice of the freshly baked bread he said that not only it tasted delicious – like “the real deal” – he felt absolutely fine after eating it.

The picky-eater hubby enjoying my Colomba Pasquale really made my weekend, and reading that the production on season 2 of “House of Cards” is expected to start this month was the icing on the cake. \0/

Colomba Pasquale
slightly adapted from the always delicious and beautiful Australian Gourmet Traveller

Starter:
¾ cup + ½ tablespoon (110g) all purpose flour
⅛ teaspoon dried yeast
90ml water, room temperature

Colomba:
1 ½ cups + 1 ½ tablespoons (225g) all purpose flour
¼ cup + 1 tablespoon (62g) granulated sugar
3 tablespoons (42g) unsalted butter, softened
2 large eggs, whole
1 large egg, yolk and white separated
2 teaspoons dried yeast
1 teaspoon vanilla extract
finely grated zest of 1 orange
½ cup (75g) golden raisins
1/3 cup (35g) dried cranberries
75g dried apricots, finely diced
60g finely chopped candied orange peel

Topping:
1/3 cup (66g) demerara sugar
1/3 cup (33g) almond meal
30g flaked almonds

For starter, stir ingredients in a bowl until smooth, cover with plastic wrap and stand at room temperature for 12 hours.
Transfer starter to an electric mixer fitted with a dough hook, add flour, granulated sugar, butter, the whole eggs, the yolk, yeast, vanilla and orange zest and mix on medium speed until dough is smooth and shiny and starts to leave sides of bowl (about 8 minutes). Add dried fruit and candied peel, mix to combine, then cover and stand until doubled in size (1-2 hours).
Knock down dough and divide into two pieces, one slightly larger than the other. Shape the larger piece into a 30cm-(12in) long cylinder, tapering slightly at one end, and place on a large baking sheet lined with foil. Form remaining piece into a 20cm-(8in) long cylinder and lay across the larger cylinder, about one-third of the way down from the tapered end. Cover with a tea towel and stand until slightly risen (35-40 minutes). In the meantime, preheat oven to 190°C/375°F.
Topping: combine demerara sugar, almond meal, almonds and egg white in a bowl, scatter over dough, bake for 15 minutes, reduce oven to 160°C/320°F and bake until golden and cooked through, 15-20 minutes (cover with foil if colomba gets too brown). Serve warm or at room temperature.

Serves 10

Monday, February 11, 2013

Lady Grey tea cookies

Lady Grey tea cookies / Biscoitinhos de chá Lady Grey

I guess that when it comes to cooking and baking we all have our favorites - I certainly do, and the list includes Nigella, Jamie Oliver, Donna Hay and, of course, Martha: her baking recipes are always a hit and these cookies are no exception, delicious and dead easy to make. I got two logs of dough from this recipe and thought of keeping one in the freezer for another day, but after trying one of the cookies I knew I should bake as many as possible. :)

Lady Grey tea cookies
from one of my favorite cookbooks

2 cups (280g) all-purpose flour
2 tablespoons finely ground Lady Grey tea leaves (from about 4 bags)*
¼ teaspoon table salt
1 cup (226g/2 sticks) unsalted butter, softened
½ cup (70g) confectioners' sugar, sifted
finely grated zest of 1 large orange
1 teaspoon vanilla extract

Whisk flour, tea, and salt in a small bowl; set aside.
Put butter, sugar, orange zest and vanilla in the bowl of an electric mixer fitted with the paddle attachment. Mix on medium speed until pale and creamy, about 3 minutes. Reduce speed to low; gradually mix in flour mixture until just combined – at this point I tasted the dough and thought it wasn’t sweet enough, so I added 1 ½ tablespoons icing sugar.
Divide the dough into two equal parts. Place each on a piece of parchment paper; shape dough into logs. Fold parchment over dough; using a ruler, roll and press into a 3.5 cm (1.4in) log – like Martha does here. Wrap in parchment. Chill in freezer until very firm.
Preheat oven to 180°C/350°F; line two large baking sheets with baking paper.
Unwrap one log at a time (keep the other in the freezer). Cut into 6mm (¼in) thick rounds; space 2.5cm (1in) apart onto prepared sheets. Bake, rotating sheets halfway through, until golden brown around the edges, about 15 minutes. Cool completely on the sheets over a wire rack.

* I used this grinder to grind the tea leaves

Makes about 50 cookies

Monday, December 17, 2012

Mulled wine jelly and a giveaway

Mulled wine jelly / Gelatina de vinho quente

Christmas is coming and I have a gift for you, my dear readers: Zinio has given me 5 free magazine subscriptions to share with you! If you’re not familiar with Zinio, take a look at their website and you’ll see that there are hundreds of wonderful digital magazines for you to choose, including my favorites Donna Hay and Delicious Australia.

To enter the giveaway, just leave a comment on this post between today, December 17th and December 31st – only one entry per person, no anonymous comment will be eligible. I’ll announce the winners on January, 3rd. Good luck!

And while you take part in this great giveaway, I’ll leave you with some delicious and boozy jelly, a nice dessert idea for Christmas since it can be made in advance, and the recipe comes from DH mag, one of the great digital magazines you’ll find at Zinio.

Mulled wine jelly
from the always beautiful Donna Hay Magazine

1 ½ tablespoons gelatin powder
2 cups (480ml) cranberry juice
4 cups (960ml) red wine, such as Pinot Noir – I used Shiraz*
1 cup (200g) granulated sugar
2 cloves
2 cinnamon sticks
1 whole nutmeg
rind of 1 orange, remove with a vegetable peeler
1 cup heavy cream, whipped with 2 teaspoons icing sugar until soft peaks form

In a small bowl, combine the gelatin with ¼ cup of the cranberry juice. Set aside.
In a medium saucepan combine the red wine, remaining cranberry juice, sugar, cloves, cinnamon, nutmeg and orange rind and stir over low heat until sugar is dissolved. Increase heat to high and boil for 5 minutes. Remove from the heat and stir through the gelatin. Set aside to cool for 10 minutes. Strain mixture through a fine sieve into a 3-liter capacity serving dish (or individual cups as I did). Refrigerate for 2-3 hours or until set.
Serve with a dollop of the whipped cream.

* the jelly tasted great but to my taste it was a bit too strong on the alcoholic side – I would definitely use less wine and more cranberry juice next time

Serves 8-10

Saturday, August 11, 2012

Orange-blossom madeleines and the end of another trilogy

Orange blossom madeleines / Madeleines de água de flor de laranjeira

After two months of ups and downs, I have finally finished reading "Mockingjay", and I want to thank the readers Gertrude and Debora for their comments, for they were the reason I did not give up on the book; after what seemed to be ages – but was actually a handful of pages – the story got super interesting again, like it was in the two previous books: I could not put the book down and seriously considered taking it to the shower with me. :D
A quick visit to one of my favorite websites shows that the list of great actors for “Catching Fire” grows almost on a daily basis, and now that Peter Jackson has made me lose all the interest in “The Hobbit” I can go on and focus my attention – and anxiety – on another movie. :D

I love making madeleines and hadn’t made any in quite a while – I guess they were sort of forgotten, just as the poor “Mockinjay”. The orange blossom water adds a subtle and delicious touch, but if you haven’t gotten any – of don’t like it at all – omit it and use the zest of the whole orange to make orange madeleines.

Orange-blossom madeleines
slightly adapted from the always stunning Australian Gourmet Traveller

½ cup + 1 tablespoon (127g) unsalted butter + a bit extra, melted, for brushing
1 tablespoon honey
finely grated zest of ½ orange
½ teaspoon vanilla extract
1 cup (140g) all purpose flour
½ cup + 2 tablespoons (124g) granulated sugar
pinch of salt
2 large eggs
1 teaspoon orange-blossom water, or to taste

Cook butter in a small saucepan over medium-high heat until light golden. Remove from heat, stir in honey, orange zest, orange-blossom water and vanilla and cool to room temperature. Meanwhile, whisk flour, sugar, salt and eggs in a bowl until smooth and creamy, then set aside to rest (10 minutes). Gradually add cooled butter mixture, beat until smooth and just combined, cover with plastic wrap and refrigerate to rest (overnight).
Preheat oven to 190°C/375°F. Lightly brush 24 madeleine molds (1 tablespoon capacity each) with the extra melted butter, then refrigerate for 10 minutes. Spoon in heaped tablespoons of the madeleine batter into the molds. Bake until golden around the edges and humped in the middle (10-12 minutes), then unmold onto a wire rack. Cool completely.

Makes 24

Tuesday, June 26, 2012

Almond cake (Tarta de Santiago) + DDL

Almond cake (Tarta de Santiago) / Bolo de amêndoa (Torta de Santiago)

A long time ago I watched “Magnolia” – because lots of people had told me it was my kind of movie – and got really disappointed; despite the bunch of awards and great cast – including my beloved Julianne Moore – I did not think the movie was all that. A while later, I decided to give Paul Thomas Anderson another chance and watched “Boogie Nights”, which to me was a far superior movie (despite having been made before “Magnolia”). I liked it and added one more strong performance to the handful I have seen by Mark Wahlberg so far. Last week, I finally watched "There Will Be Blood" – because of my love for Daniel Day-Lewis – and wow, he’s fantastic beyond belief as Daniel Plainview. The movie is amazing as a whole, well directed with a beautiful cinematography, and Lewis’ performance is absolutely unforgettable (as are many of his performances), but I don’t think it was better than Viggo’s Nikolai – and that is the only thing I did not love about “There Will Be Blood”. :)

***
A month or so ago I baked the most delicious almond cake up until then – the recipe by Tamasin Day-Lewis (who happens to be DDL’s sister) became my favorite almond cake the minute I tasted the first bite. But Claudia Roden’s Tarta de Santiago, a cake from a book I want to buy as soon as possible and made with almond meal and almost nothing more, made me rush to the kitchen to try it – and now I love both cakes so much I no longer have one favorite almond cake: I have two. :D

Almond cake (Tarta de Santiago) / Bolo de amêndoa (Torta de Santiago)

Almond cake (Tarta de Santiago)
slightly adapted from Epicurious; the recipe comes from a book I cannot wait to buy

6 large eggs, separated
pinch of salt
1 ¼ cups (250g) granulated sugar
grated zest of 1 orange
grated zest of 1 lemon
1 tablespoon Amaretto
1 teaspoon vanilla extract
2 ¼ cups (225g) almond meal (finely ground almonds)
confectioners’ sugar for dusting

Preheat the oven to 180°C/350°F. Butter and flour a 28cm (11in) springform pan*, preferably nonstick.
With an electric mixer, beat the egg whites and the salt in a large bowl until stiff peaks form. Transfer to another bowl and set aside. Wash and dry the used bowl and the whisk. Again with the electric mixer, beat the egg yolks with the granulated sugar to a smooth pale cream. Beat in the zests, Amaretto and vanilla extract. Add the ground almonds and mix very well.
Fold the whites into the egg and almond mixture (the mixture is thick, so that you will need to turn it over quite a bit into the egg whites).
Pour into the prepared cake pan and smooth the top. Bake for 40 minutes, or until it feels firm to the touch and a skewer inserted in the center of the cake comes out clean. Let cool before turning out.
Just before serving, dust the top of the cake with confectioners' sugar. Or, if you like, cut a St. James cross out of paper. Place it in the middle of the cake, and dust the cake with confectioners' sugar, then remove the paper (I preferred to use a heart-shaped piece of paper).

* I made ¾ of the recipe above and used a 20cm (8in) round cake pan with a removable bottom (regular – not nonstick); I lined the bottom of the pan with a circle of baking paper and buttered and floured the paper as well.

Serves 10

Friday, May 25, 2012

Roast sweet potato and goat’s cheese salad

Roast sweet potato and goat's cheese salad / Salada de batata-doce assada e queijo de cabra

I was a kid who loved salads and I have my mom to thank for that – I was never the kid who pushed the arugula leaves to the side of the plate, much to the contrary: I was the kid who would eat a tomato as someone would eat an apple between meals. But a whole new world opened up to me when I started collecting cookbooks: it was then that I learned that the salads I already loved could become even more interesting and delicious, that I could add fruit and cheese and nuts to my salads and they would be not only more flavorful but also more nutritious.

This beautiful salad, absolutely yummy and filling, was slightly adapted from Lucas Hollweg’s stunning cookbook – a book I plan on using to exhaustion.

Try placing a tiny bit of each element of the salad into the same forkful and you will create the perfect bite - Rose Morgan's style. :)

Roast sweet potato and goat’s cheese salad
slightly adapted from the glorious Good Things to Eat (mine was bought here)

1 cup whole blanched almonds
750g sweet potatoes
2 onions, peeled and cut into eight
2 teaspoons cumin seeds
2 garlic cloves, unpeeled
finely grated zest of 1 orange
juice of ½ the orange
4 tablespoons extra-virgin olive oil
salt and freshly ground black pepper
2 teaspoons lemon juice
4 cups arugula leaves, packed
200g soft white rindless goat’s cheese

Preheat the oven to 180°C/350°F. Place the almonds in a small baking sheet and toast until fragrant and golden, stirring once or twice, 6-8 minutes. Set aside to cool completely (leave the oven on).
Peel the sweet potatoes and cut into 2cm chunks. Place in a roasting pan, add the onions, cumin, garlic and orange zest. Drizzle with 2 tablespoons of the olive oil, sprinkle with salt and pepper and toss to combine. Roast for 35-40 minutes, turning them over halfway through, or until sweet potatoes and onions are tender. Set aside to cool completely.

Remove the garlic and remove the pulp out of the skins. Transfer pulp to a small bowl and mash with a fork. Add the orange juice, lemon juice, salt, freshly ground black pepper and mix well. Mix in 2 tablespoons of the olive oil.
Arrange the arugula leaves in the plates and scatter with the sweet potato mixture. Sprinkle with the almonds and scatter around the goat cheese pieces. Drizzle with the dressing and serve at once.

Serves 4

Friday, November 5, 2010

Orange blueberry friands - and Aragorn

Orange blueberry friands / Friands de laranja e mirtilo

Let’s keep on with the sweet posts, because I have a reputation to maintain. :D

On one of my rounds at IMDb, I ended up at “The Lord of the Rings - The Fellowship of the Ring” trivia and read that Stuart Townsend was Peter Jackson’s first idea for the role of Aragorn (which was a complete shock to me). Luckily Viggo *sigh* was chosen instead – talk about a perfect replacement. :D

I have some other great replacements here for you: orange zest for vanilla and blueberries for raspberries.

Orange blueberry friands / Friands de laranja e mirtilo

Orange blueberry friands

175g unsalted butter, melted and cooled
1 cup (100g) ground almonds
6 egg whites, lightly beaten
finely grated zest of 1 large orange
1 ½ cups (210g) icing sugar, sifted
½ cup (70g) all purpose flour, sifted
¾ cup blueberries, fresh or frozen – I used frozen
icing sugar, for dusting

Preheat the oven to 190°C/375°F. Butter well ten ¾-cup (180ml) capacity mini cake or muffin pans.
Place the butter, ground almonds, egg whites, orange zest, icing sugar and flour in a large bowl and stir just until combined.
Spoon the mixture into prepared pans – they should be just over ½ full. Top each friand with 4-5 blueberries. Bake for 25 minutes or until golden and a skewer inserted in the center comes out clean.
Allow to stand in pans for 5 minutes then turn out onto a cooling rack. Dust with icing sugar to serve.

Makes 10 – I made 1/3 of the recipe above, used 3-tablespoon-capacity pans and got 7 tiny friands

Monday, May 17, 2010

Sticky caramel buns

Sticky caramel buns / Pãezinhos com especiarias e caramelo

A couple of weeks ago the lovely Ana Elisa and I had coffee together and it was so good! We talked a lot, discovered several things in common... I already liked her in the virtual world and confirmed that she is a dear in the real world, too. :)

Then I saw that she’d drawn me on her Moleskine and that made my day. :)

Breads remind me of Ana – she’s an expert in making them – and that is why I’m posting these buns, which I adapted from here.

Sticky caramel buns
adapted from Australian Gourmet Traveller

Dough:
5g dried yeast
2/3 cup (160ml) lukewarm whole milk
2 ½ cups (350g) all purpose flour
7 cloves
½ cup (100g) caster sugar
finely grated zest of 1 orange
½ cup + 2 tablespoons (140g) unsalted butter, softened
extra butter and brown sugar, for the pans

Caramel spice mix:
1/3 cup + ½ tablespoon (82g) unsalted butter, softened
1/3 cup (58g) brown sugar, packed
2 tablespoons ground cinnamon
¼ teaspoon ground allspice

Caramel glaze:
1 cup + 1 ½ tablespoons (218g) caster sugar
1 ½ tablespoons (21g) unsalted butter, coarsely chopped

Combine yeast with half the milk (1/3 cup) in a bowl, stir until yeast dissolves, then stir in 2 ½ tablespoons (25g) of the flour until smooth. Cover and stand in a warm place until doubled in size (30 minutes).
Meanwhile, combine cloves and 3 tablespoons boiling water in a heatproof bowl, cover and stand to infuse (15-20 minutes), strain and reserve liquid.
Combine sugar, orange zest, butter, remaining flour, remaining milk and yeast mixture in the bowl of an electric mixer fitted with a dough hook, mix until a rough dough forms (2-3 minutes), then add a little reserved clove liquid at a time, kneading until a smooth sticky dough forms (4-5 minutes; you may not need all the liquid). Transfer to a large buttered bowl, cover with plastic wrap and stand in a warm place until doubled in size (45 minutes-1 hour).

Meanwhile, for caramel spice mix, combine ingredients in a small bowl and set aside.
Preheat oven to 180°C/350°F. Knock back dough and roll out on a lightly floured surface into an 18cm x 50cm (7x20in) rectangle – the dough was very tender, so I rolled it on a large piece of lightly floured baking paper, which was very useful to roll the dough into a cylinder. Spread evenly with caramel spice mix and, with longest side facing you, roll into a cylinder. Cut into 12 even pieces and place each piece, cut-side up, in a canelé mould well buttered and heavily dusted with brown sugar*. Place molds on an oven tray and stand for 10 minutes, then bake until risen and golden (25-30 minutes; cover with foil if buns get too dark). Turn out of moulds immediately (be careful of hot caramel) and cool on a wire rack.

Meanwhile, for caramel glaze, combine sugar and 1/3 cup (80ml) water in a small saucepan over medium-high heat and stir until sugar dissolves. Cook until dark caramel (4-5 minutes). Remove from heat, add butter and ¼ cup (60ml) water (be careful; hot caramel may spit) and stir to combine. Serve buns warm or at room temperature, topped with caramel glaze.
Sticky caramel buns are best eaten on day of making.

* I used twelve 1/3 cup (80ml) capacity muffin pans

Makes 12

Monday, March 1, 2010

Orange cake

Orange cake / Bolo de laranja

One of the movie trailers I saw at the theater last week was for the remake of “Clash of the Titans”the original is one of my all time favorites. I remember watching it dozens of times on TV throughout my childhood and teen years – after I turned 11 and started cooking and baking, I’d always make something especially for the movie session, and there was an orange cake I’d repeat to exhaustion back then; unfortunately, I never kept the recipe.

What a lovely surprise it was for me to find this recipe in one of my old magazines – it is really, really similar to the one I used to make as a girl and brought me such fond memories from those afternoons.

Orange cake / Bolo de laranja

Orange cake
from Donna Hay magazine

½ cup + 1 tablespoon (127g) unsalted butter, softened
¾ cup + 1 tablespoon (162g) caster sugar
2 eggs
1 ½ cups + 2 ½ tablespoons (225g) all purpose flour, sifted
1 ¼ teaspoons baking powder, sifted
1 tablespoon milk
finely grated zest of 1 large orange
4 tablespoons orange juice

Orange icing:
1 ¼ cups (175g) icing sugar, sifted
2 tablespoons orange juice
zest of 1 orange, to decorate

Preheat the oven to 180°C/350°; butter a 20x10cm (8x4in) loaf pan* and line with baking paper; butter the paper as well.
Place the butter and sugar in the bowl of an electric mixer and beat for 8-10 minutes or until light and creamy. Add the eggs, one at a time, and beat well. Add the flour and baking powder and mix well. Add the milk, orange juice and zest and mix until smooth. Spoon the mixture into the prepared pan and bake for 55 minutes or until golden and cooked when tested with a skewer. Cool completely on a wire rack, then carefully unmold.
To make the icing: combine the sugar and orange juice in a small bowl and mix to form a smooth paste. Use a palette knife to spread the orange icing over the cake and top with the zest.

* the cake almost did not fit the pan – I recommend using a slightly larger pan

Serves 8-10

Wednesday, October 21, 2009

Midnight chocolate brownies

Midnight chocolate brownies / Brownies de chocolate com um toque de laranja

A few days ago someone gave me a hard ear pull, similar to the ones grandma Frida used to give me when I as a kid – my mom hated when she did that. :D

My friend Lola, the biggest chocoholic I have even known, is the one mad at me: she wants chocolate recipes and chocolate recipes only! :D
Lola, my dear, this post is especially for you – I hope you like it!

I’d love to hear my other readers’ opinions: which flavor do you like seeing here the most? I’m curious!

Midnight chocolate brownies / Brownies de chocolate com um toque de laranja

Midnight chocolate brownies
slightly changed from here

½ cup (113g/1 stick) unsalted butter + extra for greasing the pan
225g (½ pound) dark chocolate, chopped – I used 70% cocoa solids
¾ cup (131g) packed brown sugar
1 teaspoon vanilla
1 tablespoon Cointreau
finely grated zest of 2 oranges
2 eggs
¼ cup (22g) best-quality cocoa powder
¼ cup (35g) all purpose flour
1/8 teaspoon salt

Preheat the oven to 180ºC/350ºF. Butter a 20cm (8in) square baking pan and line with aluminum foil, leaving a 2.5cm (1in) overhang. Butter the bottom and sides of the foil.

Melt the butter and chocolate in a medium metal/glass bowl set over simmering water until the mixture is smooth. Stir in the brown sugar until dissolved. Remove from the heat and stir in the vanilla and Cointreau, then the orange zest. Whisk in the eggs, one at a time, until completely blended and the mixture is shiny and smooth; the mixture will be thickened at this point.

Sift together the cocoa, flour and salt, then stir the flour mixture into the batter until blended. Spoon the batter into the prepared pan, smoothing the top. Bake for 35 to 40 minutes, until puffed and almost set – mine needed only 25 minutes in the oven. Do not overbake. Cool while still in the pan, on a wire rack.

Lift the brownies out of the pan, using the foil as a handle, and cut into squares. Remove carefully from foil.

Makes 16

Thursday, September 10, 2009

Almond truffle cookies

Almond truffle cookies / Biscoitinhos de amêndoa com recheio trufado

A couple of weeks ago I watched the trailer for “The lovely bones” and now I just can’t wait for the movie to premiere. I haven’t read the book, but can certainly expect something amazing from a fantastic director working with such talented cast – Stanley Tucci scared the bejeesus out of me. Seriously.

I felt the same way about this recipe: my favorite food “director” pairing chocolate and almonds in cookie form. Heavenly.

Almond truffle cookies / Biscoitinhos de amêndoa com recheio trufado

Almond truffle cookies
from Donna Hay magazine

¼ cup (56g/½ stick) unsalted butter, room temperature
½ cup + 1 tablespoon (100g) brown sugar, both packed
½ teaspoon vanilla extract
½ teaspoon finely grated orange zest
1 egg yolk
½ cup + ½ tablespoon (75g) all purpose flour, sifted
¼ cup almond meal
¼ teaspoon baking powder

Truffle filling:*
200g dark chocolate, chopped – I used 70% cocoa solids
¼ cup (60ml) heavy cream
1 ½ tablespoons (21g) unsalted butter, room temperature

Start by making the filling: place the chocolate, cream and butter in a small saucepan over low heat and stir until the chocolate is melted and smooth. Set aside to cool completely.

Preheat the oven to 180ºC/350ºF; line two large baking sheets with baking paper.
Place the butter, sugar, vanilla and orange zest in the bowl of an electric mixer and beat for 8-10 minutes or until light and creamy. Add the egg yolk and beat well to combine. Add the flour, almond meal and baking powder and beat for 1 minute or until well combined.
Roll leveled teaspoons of dough into balls and place onto prepared sheets. Flatten each ball slightly with your fingers.
Bake for 12-15 minutes or until golden in the bottom. Cool completely on sheets.

To assemble, place the chocolate filling into a piping bag with a star nozzle and pipe a small amount onto half of the cookies. Sandwich with the remaining cookies.

* I generously filled the cookies, but there was still a lot of filling left – I believe that 2/3 of the recipe would have been enough

Makes 16 sandwich cookies

Related Posts with Thumbnails