My husband and I are not people who swap meals for sandwiches very often – we do like our rice and beans, soups, pasta dishes, and now Joao has some serious competition on my Bolognese sauce, since my 2 ½ year-old nephew loves it as much as Joao does. <3
However, when burgers or tuna salad sandwiches are involved we are happy to have sandwiches for lunch or dinner, and more recently, the sardine rillette has become part of that small list. I did not imagine my husband liked tuna salad sandwiches until the day I made this recipe, which I have been making for over 20 years. He went crazy for the tuna salad and it instantly became part of our favorite things to eat on lazy weekends.
This tuna salad goes very well with all kinds of bread – including the soft rye bread I posted a while ago – but I find it very important to have the slices toasted if the kind of bread chosen is not very sturdy: it prevents the sandwiches from getting soggy.
My tuna salad sandwiches
own recipe
1 can of tuna preserved in water (120g/4oz drained weight)
1 carrot (about 100g/3oz) peeled and coarsely grated
1 small onion, finely diced*
handful of fresh flat leaf parsley leaves, finely chopped
½ cup green olives, pitted and chopped
1 teaspoon extra virgin olive oli
2/3 cup mayonnaise – homemade is even better
salt and freshly ground black pepper
Drain the tuna very well, then transfer to a large bowl and flake it with a fork. Mix in the carrot, onion, parsley and olives. Drizzle with the olive oil and mix well. Mix in the mayonnaise, season with salt and pepper and serve immediately with your favorite kind of bread.
* this recipe is delicious too if you replace the onion with celery
Makes 5-6 sandwiches using regular, white bread
Tuesday, September 26, 2017
My tuna salad sandwiches
Friday, June 9, 2017
Soft rye bread with sardine rillette and more childhood memories
Many, many months ago, while I still had plans to write a book, I was reading about rillettes and found them very interesting – as I read recipes for pork rillettes, I instantly thought of my mother and her love for this kind of meat, which I link to her German heritage.
As I thought of how much she would love that kind of rustic pâté, I also remembered the sardine salad (which we call “patê” in Portuguese) she used to make for sandwiches when I was a kid – canned sardines were cheap (still are) and those sandwiches are part of my childhood memories (mom would always cut the crusts off mine). :)
Mixing everything in my head I thought of making the rillettes with sardines instead of the pork and a quick search online showed me some variations made with salmon, so I was on the right track. I ended up making this sardine rillette several times for both my husband and I went crazy for it.
After the third time, if I am not mistaken, I felt that the delicious mixture deserved a good homemade bread to go with it, and the strong flavor of rye seemed really right for it – Joao agreed, but asked me for a soft bread that we could have for breakfast on the following day as well. I made this rye bread, tender from the addition of milk but still flavorsome. The problem is that we ended up eating the whole thing with the rillette and there was nothing left for breakfast. :)
Soft rye bread
own creation
Bread:
150ml whole milk, lukewarm
200ml water, lukewarm
2 teaspoons dried yeast
1 teaspoon granulated sugar
½ tablespoon honey
2 cups (280g) all purpose flour
1 ¼ cups (175g) rye flour
1 ½ teaspoons table salt
For brushing the bread:
1 tablespoon whole milk, room temperature
Start with the bread: in the bowl of an electric mixer, place milk, water, sugar and yeast and mix with a fork. Set aside until foamy, about 5 minutes. Add the honey, flours and salt and mix using the hook attachment for about 8 minutes or until dough is elastic and smooth – if mixing by hand, 12-14 minutes should be enough. Form dough into a ball, transfer to a large lightly oiled bowl and cover with plastic wrap. Set aside in a draft-free area for 1 ½ hours or until doubled in volume.
Lightly brush a 6-cup loaf pan with oil or butter.
Punch the dough to remove the excess air. On a lightly floured surface, using a rolling pin, roll the dough nto a large rectangle, about 20x30cm (8x12in). Starting with one of the long sides, carefully pick up the dough and roll, forming a cylinder. Pinch the seams and place the dough into the prepared pan, seam side down. Cover with a clean kitchen towel and set aside in a draft-free area again for 40-45 minutes – in the meantime, preheat the oven to 200°C.
Brush the top of the bread with milk and bake for about 30 minutes or until golden and baked through – bread should sound hollow when tapped with your fingers. Cool in the pan over a wire rack for 5 minutes, then carefully unmold onto the rack to cool. Cool completely.
Serves 6-8
Sardine rillette
own creation
1 ½ tablespoons extra virgin olive oil, divided use
½ tablespoon unsalted butter
½ onion, finely diced
1 celery stalk, finely sliced – use a mandolin
1 garlic clove, minced
3 sprigs of fresh thyme, leaves only
pinch of smoked paprika
salt and freshly ground black pepper
350g canned sardines, drained and flaked – I used sardines packed in olive oil for better flavor
2 tablespoons dry white wine
2 tablespoons sour cream*
2 tablespoons finely chopped fresh parsley leaves
Place ½ tablespoon of the olive oil and the butter in a medium saucepan and cook over medium heat until butter is melted. Add the onion and celery and cook, stirring occasionally, until tender, 3-4 minutes. Stir in the garlic and cook until fragrant, about 1 minute. Stir in the thyme leaves and paprika, season with salt and pepper and cook, covered, on low heat for 2 minutes. Add the wine, turn the heat up and cook until wine evaporates. Remove from the heat, stir in the sardine and cool completely.
When mixture is cool, stir in the sour cream, the remaining 1 tablespoon of olive oil and the parsley. Check seasoning.
The rillette can be kept tightly covered in the fridge overnight, however it is best served at room temperature.
*homemade sour cream: to make 1 cup of sour cream, mix 1 cup (240ml) heavy cream with 2-3 teaspoons lemon juice in a bowl. Whisk until it starts to thicken. Cover with plastic wrap and leave at room temperature for 1 hour or until thicker (I usually leave mine on the counter overnight – except on very warm nights – and it turns out thick and silky in the following morning; refrigerate for a creamier texture)
Serves 2-3
Sunday, February 26, 2017
Easy fish stew and memories brought by food
Food brings a lot of memories to most people I am sure and I am no exception: certain dishes remind me of certain people.
I think of my mom whenever I eat or cook fish, for when I was a little girl she would cook it once a week, rain or shine, and would tell me every single time how good it was for the brain. :)
Mom never cooked fish the way I bring you here today, but I am sure she would approve it: the fish gets tender from cooking in this flavorsome sauce, enriched by both sweetness from the fresh tomatoes and a bit of tang from the canned ones. I make this quite regularly for my husband loves it and even though I always, always serve it with rice because of him it would be amazing with couscous, too. Easy, delicious and on the table in less than half an hour.
Easy fish stew
own creation
1 tablespoon olive oil
1 small yellow bell pepper (about 200g), deseeded and finely diced
½ onion, finely diced
2 garlic cloves, minced
1 ripe Italian tomato, deseeded and chopped
salt and freshly ground black pepper
1 x 400g can chopped tomatoes
1/2 can of water
350g white fish, cut into large chunks
handful of fresh cilantro leaves
Heat the olive oil in a large saucepan over medium-high heat – using a large saucepan is important for it will give you room to stir the fish pieces without breaking them.
Add the pepper and the onion and cook stirring occasionally until soft, about 5 minutes. Stir in the garlic and cook for 1 minute or until fragrant. Add the tomato, season with salt and pepper, and cook for about 5 minutes, stirring occasionally, until soft and mixture is pulpy. Add the canned tomatoes and the water and cook for 15 minutes, stirring occasionally. Add the fish, season with salt and pepper again and cook for 8-10 minutes or just until fish is cooked through. Stir in the cilantro, check the seasoning and serve immediately.
Serves 2
Sunday, August 30, 2015
Pasta with crispy sardine and oregano breadcrumbs
When I was a kid, my mom was always making something with canned sardines: they were cheap and a good staple for a family with a limited budget. One of the things she made the most was a sardine salad to be eaten in a sandwich – the same thing as a tuna salad, but made with sardines instead, it was delicious! I loved it.
Because of that, it is impossible not to think of mom whenever I see canned sardines, and when I saw this gorgeous can while food shopping in my last trip I knew I would not come home without it. A couple of weeks ago a new issue of the beautiful Donna Hay magazine arrived and there I found a recipe of pasta served with crispy breadcrumbs dotted with pieces of canned sardines – it was the perfect way of using my treasure.
This pasta dish is very simple and straightforward, I made it for a lazy Sunday lunch and it was ready in no time at all – my husband wasn’t too crazy about the sardine breadcrumbs, but I was more than happy to eat his share by the spoonful. :)
Pasta with crispy sardine and oregano breadcrumbs
slightly adapted from the always fantastic Donna Hay Magazine
400g spaghetti
2 tablespoons olive oil
1 cup fresh breadcrumbs
¼ cup fresh oregano leaves, packed
50g canned sardines, drained and chopped
salt and freshly ground black pepper
2 cloves garlic, finely chopped
6 ripe roma tomatoes, deseeded and cut into wedges
pinch of sugar
1 tablespoon balsamic vinegar
Cook the pasta in a large saucepan of salted boiling water until al dente. Before draining, reserve ½ cup (120ml) of the water to use in the sauce.
In the meantime, make the sauce: heat 1 tablespoon of olive oil in a large nonstick frying pan. Add the breadcrumbs, oregano and sardines and cook, stirring, for 4-5 minutes or until breadcrumbs are golden and crispy. Season with salt and pepper, remove from the heat and keep warm.
Wipe the frying pan clean with a piece of paper towel and add the remaining olive oil. Heat over medium, add the garlic and cook until fragrant, about 1 minute. Add the tomatoes and cook for 5 minutes. Add the sugar, then season with salt and pepper. Add the reserved cooking liquid and the balsamic vinegar, stir to combine and cook for 2-3 minutes or until thickened. Add the pasta to the sauce and toss to coat. Serve topped with the sardine breadcrumbs.
Serves 4
Friday, October 31, 2014
Fish kibbeh - a delicious and healthy way of cooking fish
A couple of posts ago I told you that in my opinion there are days for chocolate, cream and all things sweet and I firmly believe in that, but even I can’t eat that sort of food every single day: I crave salads, vegetables, fish and grains everyday and I feel really good when I eat them.
I am always interested in new ways of cooking fish other than the way my mom cooked at home when I was little: dusted with corn flour (not corn starch) and deep fried, which is absolutely delicious but not very healthy (I do avoid deep frying like the plague around here, and not only for health reasons).
My husband loves the corn flour dusted fish as well, but he’s willing to try fish prepared in other ways and last weekend I prepared one of Hugh Fearnley-Whittingstall’s recipes in which the fish is coated with spices like paprika and cumin and cooked with peas – it was a hit. Weeks before I’d made these fish kibbehs and they were a huge success, too: me being me I tweaked the recipe just a bit, adding more lime zest, using almonds instead of walnuts and shaping the mixture into small kibbehs instead of baking it pressed into a baking dish.
Both my husband and my sister loved the kibbeh and I thought it was a wonderful way of eating fish.
Fish kibbeh
slightly adapted from the gorgeous Brazilian chef Rita Lobo
1 tablespoon olive oil
2 small onions, finely sliced in half moons
sea salt and freshly ground black pepper
pinch of sugar
1 cup cracked wheat (fine bulgur)
500g white fish fillets
handful parsley leaves
finely grated zest of 2 limes
1/3 cup flaked almonds, finely chopped
1/3 cup (80ml) water
¼ teaspoon baharat
extra-virgin olive oil, for drizzling
lime wedges, to serve
Preheat the oven to 180°C/350°F. Line a large baking sheet with foil and brush it with olive oil.
In a nonstick frying pan over low heat, heat 1 tablespoon of the olive oil and add the onions. Sprinkle with salt and the sugar and cook, stirring occasionally, until caramelized, about 15 minutes. Cool.
Line a colander with a clean kitchen towel and place the cracked wheat on the towel. Rinse it with cold water, then squeeze it well to remove all excess water.
In a food processor, process the fish and parsley until finely chopped. Transfer to a large bowl, add the onions, the wheat, lime zest, almonds, water and stir to combine. Season with the baharat, salt and black pepper.
Using 1 ½ leveled tablespoons of mixture per kibbeh, roll into a football shape. Place onto prepared sheet 5cm (2in) apart. Drizzle generously with extra virgin olive oil and bake for 20-25 minutes or until golden and cooked through, turning them halfway the cooking time. Serve immediately with lime wedges.
Makes about 20
Monday, October 6, 2014
Sweet pea salmon pie - turning a piece of fish into something delicious
Talking to my husband the other day about food, we once again came to the conclusion that we don’t eat fish as often as we should, which is such a shame.
I did not make any promises, for breaking them makes me frustrated and that is something I really don’t need right now – instead, I decided to make roasted salmon for lunch: seasoned with lemon zest and juice, salt and pepper, baked over a layer of sliced leeks – very simple yet very delicious.
I did have left about 200g of salmon, and I did not want to eat it cooked in the same way, so I used it to make Jamie Oliver’s fish pie – he uses a combination of white fish, shrimp and salmon, but I made it with salmon only for it was what I had around. I also reduced the recipe considerably for the original serves 8 people.
It was my first fish pie ever and as I placed it in the oven it looked and smelled really good. My husband was at work, so I texted my sister and asked what she felt about having fish pie for lunch – I know she’d never had fish pie before, so I described the dish for her, and her reply was: “I have never have that, but I love everything in it – I’m coming over!”. :D
The pie tasted delicious and despite the mashed potatoes on top it is such a light dish – we devoured it but it never felt like we’d eaten a lot.
Sweet pea salmon pie
slightly adapted from the delicious Save with Jamie: Shop Smart, Cook Clever, Waste Less
250g potatoes
½ lemon
10g unsalted butter
100g frozen peas
1 small carrot
½ onions
olive oil
1 cup (240ml) whole milk
200g salmon
1 tablespoon all purpose flour
25g frozen spinach
pinch of freshly ground nutmeg
sea salt
freshly ground black pepper
Preheat the oven to 180°C/350°F.
Peel the potatoes and cut into small chunks, then put them into a small saucepan of boiling salted water for 10-15 minutes, or until cooked through. Drain and mash with a pinch of salt and pepper, the zest from the lemon and the butter.
Place the frozen peas in a colander, pour over some boiling water to defrost them, then drain well and pulse a few times in a food processor. Fold them through the mashed potato to create a rippled effect, then leave to one side.
Peel and chop the carrot and onion and cook them in a wide 2 ½ cup-capacity ovenproof dish with a drizzle of oil for 15 minutes, or until softened but not colored, stirring occasionally.
Meanwhile, heat the milk in a small saucepan on a medium heat. Once simmering, add the salmon and cook for around 10 minutes, or until cooked through, then use a slotted spoon to remove them to a plate, taking the pan off the heat. Remove the skin from the salmon.
Stir the flour into the carrots and onions, then gradually add half the milk, a tablespoon at a time, stirring continuously (discard the remaining milk). Stir in the spinach until broken down, then season with salt, pepper and nutmeg.
Flake in the salmon and the juice from ¼ of the lemon and stir gently to combine.
Top with the pea-spiked mash and smooth out, scuffing it up slightly with a fork or a spoon to give it great texture. Bake for 25-35 minutes, or until golden and the filling is bubbling.
Serves 2
Saturday, July 12, 2014
Baked fish with salsa verde and potatoes - the oven as an ally
Despite my love for fish I don’t eat it as often as I should or would like to, which is such a shame – if my mom was around she would certainly be mad at me for that. When we were little she made sure we ate fish at least once a week – mom was a health nut, over thirty years before that became fashionable. :D
My favorite way of eating fish as a kid was rolled in corn flour (very fine cornmeal, not corn starch) then deep fried – the thought of it makes me drool already. Crispy on the outside and tender on the inside, it was probably my favorite meal when it was served with a simple tomato salad (with loads of lime juice) and fluffy rice – very simple, yet delicious, especially when cooked by mom. <3
These days, however, I rarely deep fry anything: besides the health issues, I live in a small apartment and I don’t want every piece of fabric in my house (or my hair, for that matter) smelling like fried food. :P Therefore, the oven is always a good ally – I don’t use it for sweet things only, you know. :D
This recipe is really, really simple: fish fillets baked in a bed of potatoes. Nothing much, you might think. I thought so, too, until I tasted the salsa verde: I’d never tried that sauce before and my goodness, it is delicious –it transformed the simple dish into something special and very flavorsome.
I hope you give this recipe a go – if tasty and healthy don’t convince you, this is also quick and easy to put together. :D
Baked fish with salsa verde and potatoes
slightly adapted from the always fabulous Delicious Australia
300g small waxy potatoes, thinly sliced (a mandoline is ideal)
1 lemon, thinly sliced
handful fresh oregano leaves
2 tablespoons extra-virgin olive oil
salt and freshly ground black pepper
4 x 120g firm white fish fillets – I used flounder
Salsa verde:
1 small garlic clove
½ cup flat-leaf parsley leaves
½ cup basil leaves
2 tablespoons capers, rinsed, drained
finely grated zest of 1 lemon¼ cup (60ml) extra-virgin olive oil
salt and freshly ground black pepper
Preheat the oven to 200°C/400°C. Toss potato, lemon slices and oregano with the oil, season with salt and pepper and spread in a lightly oiled 20x30cm (8x12in) baking pan, in a single layer. Bake for 20-25 minutes or until potatoes start to golden.
Meanwhile, to make salsa verde, whiz garlic, parsley, basil, capers and lemon zest in a food processor until finely chopped. With the motor running, slowly add the olive oil and process until mixture is a drizzling consistency. Transfer to a small bowl, season with salt and pepper and set aside.
Remove roasting pan from oven and place the fish on top and season the fillets with salt and pepper. placing a lemon slice from the pan on top of each fillet. Return to the oven for a further 8 minutes or until the fish is cooked through.
Serve drizzled with salsa verde.
Serves 2
Thursday, March 15, 2012
Salmon with hot, sweet and sour Asian sauce + a new favorite TV show
Joao was watching TV the other day and discovered, completely unintentionally, Martin Dorey’s “One Man and His Campervan” – he rushed me to the living room and I instantly fell in love with the show: not only the places he visits are beautiful but he also cooks delicious recipes in a very small space, using just a few utensils – I wish the people who tell me that they don’t cook because their kitchen is too tiny could watch this show, too. :)
After watching a handful of episodes I placed his cookbook on my wish list – let’s see how long it will take me to buy it (heaven knows I have no sense of self control when it comes to cookbooks). :)
From a very new TV favorite of mine to the eternal #1: Nigella. This salmon is so quick to prepare and tastes so amazing that I am sure you’ll get addicted to it as I have. Make the rice way before starting with the salmon because it will take you less than 10 minutes to take it from the fridge to the table.
Salmon with hot, sweet and sour Asian sauce
slightly adapted from the fantastic Nigella Kitchen: Recipes from the Heart of the Home
2 cloves garlic, peeled and minced
2 red or green chilies, deseeded and finely chopped
2 tablespoons minced ginger
2 spring onions, white part only, finely sliced
¼ cup (60ml) fish sauce
2 tablespoons sake
2 tablespoons mirin
2 tablespoons lime juice
2 tablespoons water
1 x 600g skinless salmon fillet
Make the sauce: place the garlic, chilies, ginger, spring onion, fish sauce, sake, mirin, lime juice and water in a bowl and mix to combine. Set aside.
Sear the salmon on a flat griddle or frying pan over medium heat for 4-5 minutes on one side and 1-2 minutes on the other. The salmon should be opaque and cooked in the center. Remove from heat and transfer the fish to a plate. Flake the fish slightly and drizzle with some of the sauce.
Serve at once, with the remaining sauce on the side.
Serves 4
Monday, November 15, 2010
Pesto pasta and tuna “meatballs”
My grandmother is a very creative cook – sometimes, too creative.
A friend of mine from school once had lunch at my house and told grandma that the breaded fish was delicious, to what granny replied “oh, sweetie, thank you! But that is not fish – it’s banana skin”. :D
After that story I bet that tuna “meatballs” sound perfectly normal to you. :D
Pesto pasta and tuna “meatballs”
adapted from Australian Gourmet Traveller
Meatballs:
2 x 185g cans tuna, drained
1 cup fresh breadcrumbs
2 tablespoons chopped parsley
1 tablespoon chopped chives
¼ cup pine nuts
finely grated zest of 1 lemon
1 egg
1 tablespoon olive oil
Pasta and sauce:
400g spaghetti
¼ cup pesto sauce
¾ cup (180ml) heavy cream
finely grated parmesan and fresh basil, to serve
Place tuna, breadcrumbs, parsley, chives, pine nuts, lemon zest and egg in the bowl of a food processor and pulse until combined. Roll tablespoons of the mixture into balls. Heat oil in a non-stick frying pan over high heat. Add the tuna meatballs and cook, turning, for 2-3 minutes or until golden. Keep warm in the oven.
Cook pasta in a saucepan of salted boiling water until al dente. In the meantime, add the pesto and cream to the saucepan you cooked the meatballs in (remove excess oil if necessary) and heat over medium heat. Drain the pasta, add the sauce and toss gently to combine. Top with the meatballs, sprinkle with parmesan and basil leaves and serve.
Serves 4 – I halved the recipe above, used 1 ½ packed tablespoons of mixture per meatball and got 12 (I used the whole egg and the mixture was easy to roll into balls)
Friday, April 30, 2010
Tuna and potato salad with anchovy dressing
Even though it was published here I’m a vegetarian, that is not true – I don’t eat red meat, but like poultry and love fish.
This salad is very simple, but the dressing takes it to a whole new level.
Tuna and potato salad with anchovy dressing
from Donna Hay magazine
600g kipfler potatoes, cleaned and halved
1 tablespoon olive oil
sea salt and freshly ground black pepper
4 roma tomatoes, sliced
¾ cup basil leaves
425g (15oz) can tuna in oil, drained
Anchovy dressing:
3 anchovy fillets, chopped
1/3 cup red wine vinegar – I used ¼ cup lemon juice
¼ cup extra virgin olive oil
sea salt and freshly ground black pepper
Preheat the oven to 200°C/390°F. Place the potatoes in a baking dish, add the oil, salt and pepper and toss to combine. Roast for 45 minutes or until golden.
Make the dressing: place the anchovies, vinegar, oil, salt and pepper in a small bowl and whisk to combine (the anchovies will melt). Set aside.
Toss the potatoes with the tomatoes, basil and tuna. Drizzle with the anchovy dressing and serve.
Serves 4
Friday, December 11, 2009
Creamy tuna and chickpea salad
During the holidays we tend to go a little over with all the eating and drinking: I know I get carried away with making the food and end up eating more than I should. And kudos to those who can control themselves – God knows I’ve tried to be one of them, but got to the conclusion that it’s never gonna happen. :)
Lucky me I also love salads and they are perfect for our tropical Xmas – this is a very quick and simple idea, from DH's website.
Creamy tuna and chickpea salad
from Donna Hay magazine
¼ cup mayonnaise
2 tablespoons lemon juice
salt and cracked black pepper
1 x 400g can chickpeas (garbanzos), drained and rinsed*
2 x 185 g cans tuna in olive oil, drained
1 spring onion, finely sliced
2 tablespoons flat-leaf parsley leaves, chopped if too large
80g arugula leaves
olive oil
flatbread, to serve
Place the mayonnaise, lemon juice, salt and pepper in a bowl and stir to combine. Add the chickpeas, tuna, spring onion and parsley and toss to combine. Drizzle the arugula with olive oil, season with salt and pepper and place it by the creamy salad.
Serve with crispy flat bread or toasted sourdough croutons. Alternatively, wrap in flatbread or lavash for a portable meal.
* I soaked 1 cup dried chickpeas overnight and cooked them for 40 minutes
Serves 2
Monday, July 23, 2007
Grilled Tilapia with basil-chive butter and parmesan steak fries
Yesterday Joao and I celebrated our 2 year and a half anniversary – I was (still am) recovering from a horrible flu that got me last week so we decided to stay in and celebrate it at home.
A nice meal made with love was mandatory!! :)
The recipe for the fish was taken from the July issue of Bon Appétit – I adapted some details. If you want to make it like the one in the magazine, use halibut instead of Saint Peter fish (Tilapia) and spring onions instead of chives.
I seasoned the fish with garlic, lemon juice, salt and pepper and marinated the fillets for 2 hours, even though it’s not asked in the recipe.
The potatoes were taken from this book, and they were delicious – the only problem was that I used waxed paper instead of parchment paper and I had to peel the potato spears off the paper. Next time, a spritz of cooking spray will do the trick – thank you, Lydia, for the hint on the spray, I’ve been using it like crazy! :)
Grilled Tilapia with basil-chive butter
from Everyday Food: Great Food Fast and from Bon Appetit magazine
1 ½ cups (loosely packed) fresh basil leaves
4 tablespoons chopped chives
8 tablespoons (½ cup-112g) unsalted butter, room temperature
1 teaspoon grated lemon zest
6 x 170g (6-ounce) Tilapia fillets
extra virgin olive oil
Finely chop basil and chives in a mini food processor. Add butter, 2 tablespoons at a time, and process until blended, stopping occasionally to scrape down sides. Transfer to a small bowl, stir in lemon zest and season with salt – I used a little freshly ground black pepper, too.
Prepare barbecue (medium heat) or grilling pan.
Rub fish fillets on both sides with olive oil. Grill until fillets are just opaque in center, about 4 minutes per side.
Transfer fish to plates and immediately spread some basil butter over fish.
Serve, passing additional basil butter alongside.
Serves 6.
Parmesan steak fries
3 large egg whites – I think 2 would be enough
coarse salt and freshly ground black pepper
3 baking potatoes, 220 to 280g (8-10 ounces) each
1 ¼ cups (125g) grated Parmesan cheese
Preheat the oven to 220ºC/425ºF.
In a wide shallow bowl, whisk the egg whites with 1 teaspoon salt until frothy.
Cut each potato into 6 long spears; add to the egg whites and turn to coat.
One at a time, lift the spears out of the egg whites shaking off excess.
Working over a plate, sprinkle with the parmesan cheese until coated (do not shake the excess). Place on a parchment-lined baking sheet.
Bake without turning until the potatoes are fork-tender and golden brown – about 30 minutes.
Season with salt and pepper before serving.
Serves 4
Friday, June 1, 2007
Baked salmon and witlof (endive)
Fish – definitely, one of my favorite types of food. I grew up eating fish at least once a week – my mom used to say that fish was good for the brain; one should eat it to get smarter. :D
I had a very good piece of salmon in my freezer and I decided to use it for dinner. I had Karin’s recipe in mind, but didn’t find goat’s cheese in the supermarket I stopped by. So I opted for something else.
I liked the fish but didn’t like the baked witlof so much. :(
Anyway, this recipe made me glad because I’ve had this book forever but I’d never cooked anything from it.
There are no amounts in this recipe – you’ll have to adapt it to the number of people you want to serve.
Baked salmon and witlof (endive)
from The Cook's Companion
Toss sliced witlof with melted butter and scatter around a slice of raw salmon on a sheet of buttered foil or baking paper. Season with salt and freshly ground pepper.
Fold up the parcel and steam for 5 minutes or bake at 200ºC for 8 minutes – I baked it for 10 minutes but it was not good for my taste. I opened the parcel and baked for another 8 minutes.
Serve with a squeeze of lemon, a garnish of parsley and boiled potatoes – I had mine with chopped carrots, cooked in olive oil and onions, sprinkled with chopped parsley (not pictured).
Thursday, May 17, 2007
Garlic chickpeas with cumin fried fish
This dish reminds of my dear friend Valentina – she is crazy for chickpeas and I’m sure she’d love this.
There’s not much left to say about Donna Hay’s recipes – they look good, taste fantastic and are not over the top complicated to put together. Her success is totally deserved – she’s the real deal, in my humble opinion.
What a delicious way to have chickpeas – they were the perfect side for the fish, which was unbelievably easy to prepare and full of flavor, even though I didn’t use the chilli.
This is my contribution to this week’s Weekend Herb Blogging – I keep forgetting to mention that it was created by the lovely Kalyn - this time hosted by Rinku from Cooking in Westchester.
Garlic chickpeas with cumin fried fish
adapted from Off The Shelf: Cooking From the Pantry
3 tablespoons olive oil
3 leeks, shredded
1 tablespoon shredded lemon zest – I used lime zest
3 cloves garlic, sliced
2x 400g cans chickpeas, drained and rinsed
¼ cup chopped flat-leaf parsley
salt
freshly ground black pepper
Cumin fried fish:
1 tablespoon butter
1 tablespoon olive oil
1 tablespoon ground cumin
1 small red chilli, seeded and chopped – I didn’t have any at home
4 x 200g firm white-fleshed fish, cut into pieces
salt
Heat a frying pan over medium heat. Cook the oil, leeks and lemon zest, stirring occasionally for 8 minutes or until the leeks are golden and a little crisp. Add the garlic and cook for 1 minute. Add the chickpeas and cook for 5 minutes or until heated through. Stir through the parsley and salt.
To cook the fish, heat a frying pan over medium heat. Add the butter, olive oil, cumin and chilli and cook for 3 minutes. Add the fish to the pan and cook for 2-3 minutes on each side or until just cooked through.
Place the chickpeas on serving plates, place the fish on the side and serve with a lime wedge.
Serves 4.
Tuesday, May 1, 2007
Pasta shells with Italian tuna and artichokes
photo by Terry BLast January my foodie friend Terry cooked a recipe I’d sent him: rice and beans, Brazilian style. After that, I thought it would be lovely to cook something he would send me the recipe for, and to have some of this witty text and beautiful photos around here.
Terry, time for you to take the stage:
"When Patricia graciously invited me to do a post here at Technicolor Kitchen, it was still winter in Chicago, where Blue Kitchen is based. Naturally, I thought of roasts and stews and other hearty cold weather fare. Then I remembered that it was summertime in Brazil. The Internet has made the world seem so tiny that I sometimes forget how big it really is.
So next I thought of this dish, one of my summer favorites--a quick, colorful pasta that makes a great lunch or light supper. And the only thing you cook is the pasta, so the kitchen doesn't get too hot. A great idea, except that I was in the middle of moving--hunting for an apartment, packing, painting, deciding what to keep and what to get rid of... and then the actual move itself. Now that I'm finally getting around to sharing the recipe, it's autumn in Brazil. Oh, well. It's still pretty tasty, no matter when you make it.
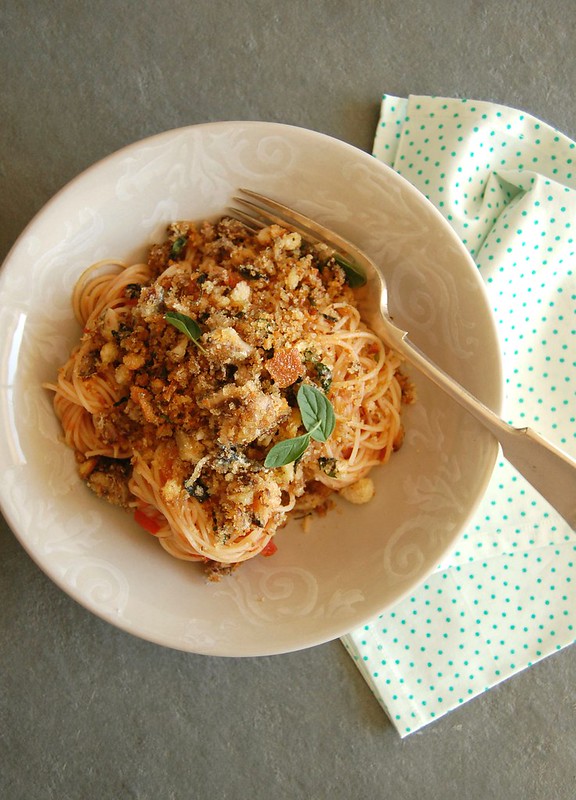
In Italy, a no-cook pasta sauce like this is called a salsa cruda. The room temperature sauce slightly cools the cooked pasta, and the pasta slightly warms the sauce, making for a meal that feels less heavy than many pasta dishes. The shells catch bits of tuna, the capers and other ingredients, delivering big taste with each bite.
A note about the tuna. For this dish, bring out the good stuff--quality tuna packed in olive oil. The olive oil becomes part of the sauce. I use a brand imported from Italy. As you can see in the photo, the quality of the flesh is far superior to the ground-up mush you often find in canned tuna.
photo by Terry BPasta shells with Italian tuna and artichokes
Serves 4
2 6-ounce (168g) cans imported Italian tuna in olive oil
1 6-ounce (168g) jar artichoke hearts, drained, bigger pieces sliced in half lengthwise
¼ cup capers, drained
grated zest and juice of 1 lemon
1 large garlic clove, minced
½ cup chopped fresh flat-leaf parsley leaves
freshly ground black pepper to taste
340g (12 ounces) medium pasta shells
Bring a large pot of water to boil to cook pasta. While water is coming to a boil, mix the salsa cruda ingredients in a large bowl, big enough to hold the pasta as well, once it's cooked. Do not drain the tuna--add the olive oil it's packed in to the bowl. Break up larger chunks of tuna into bite-sized pieces.
When water comes to boil, salt it generously, then cook pasta according to package directions, until al dente. Drain pasta, add to salsa cruda and toss. As the hot pasta mixes with the salsa, the fragrances you'd been noticing as you worked with the ingredients will explode. Garlic, lemon, parsley, tuna, artichoke hearts... and my favorite, the briny tang of the capers. Divide into four pasta bowls or plates and serve."
My thoughts about the dish: it’s just delicious! João had a big plate of pasta and kept saying how wonderful it tasted – and it’s so hard to cook for him sometimes.
I had seconds, Terry, and I wasn’t supposed to. :)
These are the things I had different from the recipe:
- I couldn’t find Italian tuna, so I bought a Spanish one that was packed in extra virgin olive oil. Very tasty and quite similar to the photo Terry sent me;
- I love capers, so I used a bit more than the amount on the recipe;
- I’m a basil worshiper so I added a handful of leaves to the salsa cruda.
This is my version of Terry's pasta:
Terry, this post was so much fun! I’m hoping we can do this again sometime!
Wednesday, March 21, 2007
Salt-baked fish stuffed with onion farofa
I’ve posted several beef recipes because those are the dishes I usually cook for João. This time I’ll post a delicious recipe of something I love so much – fish.
My mom cooked fish at least once a week – she used to say that it was good for the brain. :D
Flipping through a cookbook I found this beautiful fish, made in a very unusual way – I immediately knew I had to try it. I know my grandmother roasts rump this way, using this huge amount of salt, but doing the same with fish was something totally new to me.
On the original recipe, sprigs of dill are placed inside the fish before baking it. I went for a Brazilian touch and filled the fish with farofa. You can use dill if you want to.
I knew I had achieved tremendous success when my beef-and-potato eating husband asked me when I would make this recipe again. ;)
UPDATE: Many of my dear readers asked my about farofa - it's a very traditional Brazilian dish. It may have different flavors and sometimes it's great to use leftovers that have been around for a while. Click here to know more about farofa and here to see the delicious carrot farofa I made a while ago.
Salt-baked fish stuffed with onion farofa
from Kitchen: The Best of the Best
1.5kg whole snapper, gutted but not scaled - I used "namorado", a fish with a firm and white flesh
1.5kg coarse-grained sea salt
Farofa:
1 large onion, finely sliced
3 tablespoons olive oil
2 tablespoons parsley, chopped
50-70g manioc flour
salt
freshly ground pepper
Start with the farofa: heat olive oil in a medium saucepan, over medium heat. Add the onion and cook until golden – stir every now and then so it won’t burn.
Add the parsley and the manioc flour, mix well. Season with salt and pepper and remove from heat. Set aside to cool – the farofa has to be completely cool before you fill the fish with it.
Prepare the fish: Pre-heat the oven to 200ºC/400ºF. Rinse the fish and pat dry with paper towels. Open the cavity and gently start to stuf the fish with the farofa:
Secure with string or toothpicks.
Put approximately 1/3 of the salt on the bottom of a roasting pan to just cover the metal. Carefully put the fish on the salt and then pack the remaining salt around and over it. Using your hands, sprinkle some water over the salt, just enough to lightly dampen it. Press the damp salt with your hands to firm the packing around the fish.
Bake the fish for 30 minutes (I baked mine for 50).
Remove the pan from the oven and crack the salt encasing the fish. Carefully remove the salt from the fish, using a pastry brush to brush off any loose salt. Using a sharp knife, cut the skin down the center of the fish and pull it away from the flesh. With a spatula or large knife gently remove the flesh from the fish and place on a serving platter. Serve with a baby leaf salad, lemon wedges and lemon sauce or lemon mayonnaise.
*The scales prevent the fish from absorbing the salt so it’s essential that your fish isn’t scaled when you purchase it.
Serves 4.


