Showing posts with label garlic. Show all posts

Wednesday, January 10, 2018

Roasted garlic pecorino focaccia

Roasted garlic pecorino focaccia / Focaccia de alho assado e pecorino

I can say that after the lovely Ina my favorite Food Network presenter is Rachael Ray – she is fun and her food always looks good – even though most of the times her portions look too generous to me. :)

She constantly says how much she loves garlic and I always relate to that: I have a heavy hand with it comes to adding garlic to my food and usually double the amount requested in recipes (maybe that is why both my husband and I rarely have colds). And don’t even get me started on roasted garlic: I just love the stuff so much I had to mix it into a focaccia dough. It turned out delicious, but if you are not a fan of bold flavors you can tone this down by adding half the amount of garlic and replacing the pecorino with parmesan.

Roasted garlic pecorino focaccia / Focaccia de alho assado e pecorino


Roasted garlic pecorino focaccia
own recipe

For the roasted garlic:
1 large head of garlic, whole
1 tablespoon extra virgin olive oil

Dough:
2 teaspoons dried yeast
¼ teaspoon granulated sugar
300ml lukewarm water
3 tablespoons extra virgin olive oil, plus a little extra to drizzle over the focaccia
3 cups (455g) all purpose flour
1 teaspoon table salt
1/3 cup finely ground pecorino
2 tablespoons fresh thyme leaves

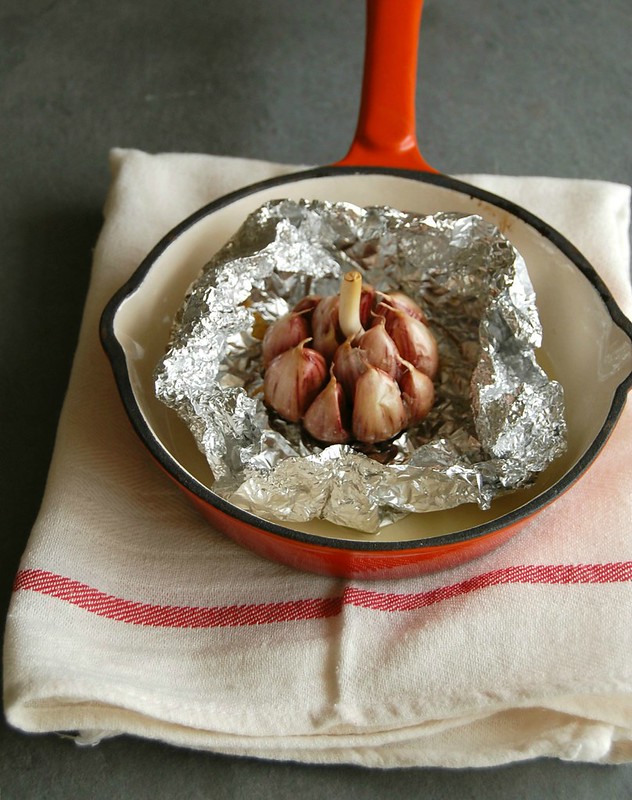
Preheat the oven to 180°C/350°F. Place the whole head of garlic in the center of a medium piece of foil. Drizzle with the olive oil and close the ends of the paper, pressing them together so the oil does not leak. Place the foil package in a small baking sheet and roast for about 45 minutes or until garlic is tender. Remove from the oven and leave to cool completely. When garlic is cold, remove the pulp from the skins and mash it with a fork to form a purée – save the olive oil left in the foil for later. Set the garlic aside.

In the large bowl of a stand mixer, combine the yeast, sugar and water and mix with a fork. Set aside for 5 minutes or until foamy. Add the olive oil, flour, salt and half of the pecorino and mix with the dough hook for 6-8 minutes or until an elastic and smooth dough forms – it kneading by hand, 10-12 minutes should do. Add the mashed garlic, half the thyme leaves and mix well. Transfer to a lightly oiled large bowl, cover with plastic wrap and set aside in a warm spot for 1 ½ hours or until doubled in volume.

Lightly brush a large baking sheet with olive oil. Carefully transfer the dough to the prepared sheet, gently so you don’t lose the air trapped in the dough. Shape it onto a 30x20cm (12x8in) oval. With lightly floured fingertips, pierce the dough in a few spots without pressing it too deep. Measure the olive oil left from roasting the garlic and add more olive oil until you have 1 tablespoon. Drizzle over the dough, then sprinkle it with the remaining thyme leaves and pecorino. Set aside in a warm place for about 20 minutes – in the meantime, preheat the oven to 200°C/400°F. Bake the focaccia for 25-30 or until golden brown. Remove from the oven and very carefully slide it onto a wire rack. Serve warm or at room temperature. The focaccia can be kept in an airtight container at room temperature for up to 2 days and tastes fresh again if reheated briefly in the oven.

Serves 8-10

Friday, August 25, 2017

Hasselback baby eggplants

Hasselback baby eggplants / Mini berinjelas Hasselback

If you have been reading me for a while now you probably know that I am a huge fan of Nigella Lawson – I was lucky enough to meet her a few years ago and got one of my books autographed. She is the one who, ages ago, introduced me to Hasselback potatoes, a recipe I find not only delicious but also really pretty.

When I was still working on the book project, I thought one day: “why not Hasselback other veggies, too?”. One day, at the farmer’s market, I saw these beautiful baby eggplants and the Hasselback feeling came back to my mind. To make things more interesting, there had to be cheese, of course, but a strong flavored one. A drizzle of garlic oil turned everything into a delicious and perfumed side dish – if my husband saw this post he would strike the word “perfumed” off, for that and “gorgonzola” cannot be in the same sentence as far as he is concerned. :D

Hasselback baby eggplants / Mini berinjelas Hasselback

Hasselback baby eggplants
own creation

12 baby eggplants (about 600g/little less than 1 ½ pounds)
4 ½ tablespoons extra virgin olive oil
1 large garlic clove
salt and freshly ground black pepper
75g gorgonzola cheese, firm enough to be sliced

Preheat the oven to 200°C/400°F. Tear 12 pieces of foil, about 20x20cm (8x8in) each, then crumple each one of them formatting into little nests – they will be the support for each eggplant, that way they don’t roll around the baking sheet.
Place the foil nests on a large baking sheet and brush their cavities with a little of the olive oil. Set aside.

In a mortar and pestle, place the garlic and salt and pound until a paste forms. Add the black pepper and the remaining olive oil and mix well.

Place each eggplant on a wooden spoon and cut into slices without going through the end – you want the eggplant to remain whole. Cut the gorgonzola into thin slices and place them inside the slits in the eggplants – make sure the cheese slices are thin enough to fit into the eggplants. Place the eggplants into the foil nests and drizzle with the garlic oil. Bake for about 25 minutes or until eggplants are tender.

Serves 4 as a side dish

Tuesday, March 21, 2017

Pesto and cheese rolls and family traditions

Pesto and cheese rolls / Pãezinhos recheados de pesto e queijo

Yesterday I started thinking about family traditions and how some of them go from one generation to the other, sometimes without us even noticing.

My brother and I have become much closer since my nephew was born, and that brings me a lot of joy. So on weekends we are inevitably all together, either they come to visit Joao and I or we visit them – I love that. It reminds me of when I was little and we would go for Sunday lunches at my grandmother’s or my aunt and uncle from the country side would come to spend the day with us – we are doing exactly what our parents did almost forty years ago and that happened so naturally I only thought of it now.

One of the times they came to visit us I had just finished baking these pesto rolls – they smelled wonderful and I thought the adults would love them, but to my surprise my nephew was the one that enjoyed them the most. I had no idea he would like bread filled with pesto – I thought he would find the flavor too strong or something like that – but I was wrong. Therefore I bring you these today and hope you the adults reading me like them as much as the little one at home did. :)

Pesto and cheese rolls
own creation

Dough:
¼ cup (60ml) lukewarm water
¾ cup (180ml) lukewarm whole milk
½ teaspoon granulated sugar
2 ¼ teaspoons dried yeast
1 large egg
2 tablespoons (28g) unsalted butter, melted and cooled
2 tablespoons extra virgin olive oil
¾ teaspoon table salt
2 ¼ cups (315g) all purpose flour
½ cup (70g) whole wheat flour

Filling:
½ cup (40g) fresh basil leaves, packed
2 tablespoons finely ground pecorino
1 small garlic clove
2 tablespoons pine nuts
¼ cup (60ml) extra virgin olive oil
freshly ground black pepper
200g shredded cheese – I used one kind of mozzarela we find here in Brazil that is yellow and drier than fresh mozzarela; replace with cheddar

Egg wash:
1 egg + ½ teaspoon water, beaten with a fork

Start by making the dough: in the bowl of an electric mixer fitted with the dough hook, mix together with a fork the water, milk, sugar and yeast. Set aside until foamy, about 5 minutes. Add the egg, butter, olive oil, salt and flours and mix on medium speed until a smooth and elastic dough forms, about 8 minutes. Transfer to a buttered bowl, cover with plastic wrap and set aside on a warm spot until doubled in size, about 1 ½ hours.

Filling: place the basil, pecorino, garlic, pine nuts, olive oil and black pepper in a blender or food processor and blitz until a paste forms – I don’t add any salt for the cheeses are already salty. Set aside. Brush a 12-hole muffin pan with butter.

Knock down the dough to remove any excess air. Roll it on a lightly floured surface until you get a 30x50cm (12x20in) rectangle. Spread the pesto over the dough, leaving a 1cm (½in) border. Sprinkle evenly with the shredded cheese. Beginning with the longer side, roll the dough tightly like a cylinder. Cut into 12 slices and place each slice, cut side up, inside a hole in the muffin pan. Cover with a clean kitchen towel and let rise again for 40-60 minutes – in the meantime, preheat the oven to 200°C.

Brush the rolls with the egg wash and bake for 20-25 minutes or until deeply golden and cooked through. Cool in the pan over a wire rack for 5 minutes, then carefully unmold each roll and transfer to the wire rack. Serve warm or at room temperature.

Rolls can be kept in an airtight container at room temperature for up to 3 days. Reheat them in a 180°C oven for 8-10 minutes before serving if desired.

Makes 12

Thursday, October 6, 2016

Marjoram orange roast chicken

Marjoram orange roast chicken / Frango assado com manjerona e laranja

I was thinking the other day about how drastically I have decreased my cookbook purchase addiction – maybe because of how much bigger my workload is compared to years ago, maybe because the food magazines I subscribe fill that need for inspiration and new recipes, maybe because some books were such disappointments (I am speaking to you, Ms. Lawson)…

My last purchase, as far as I recall, was on Oct 20 last year – this is definitely a new world record or something. :)
However, when I saw that Diana Henry had a new book coming out, I could not wait until I had it in my hands, for I am a huge fan of her beautiful work, plus she is a total dear and have spoken to me on Twitter a few times, even saying “obrigada” in Portuguese once. <3

The book is stunning and the recipes look delicious – and are simple, like the name of the book says. I love that. I decided to start with a chicken recipe and used Diana’s as inspiration, however I made it even simpler than hers. It was indeed delicious and the chicken meat was falling off the bones after a night spent in the fridge swimming in the flavorsome marinade.

Maybe I am cured from my cookbook addiction? I don’t know. What I know is that next time Diana publishes a new cookbook I will have it on my Ipad on the very same day. ;)

Marjoram orange roast chicken
adapted from the beautiful Simple

handful of fresh marjoram leaves, chopped
3 garlic cloves, crushed then finely chopped
2 oranges
3 tablespoons extra virgin olive oil
salt and freshly ground black pepper
4 skin-on bone-in chicken thighs

In a bowl, mix the marjoram leaves, the garlic, finely grated zest and juice of 1 of the oranges, the olive oil, salt and pepper. Add the chicken and toss to coat. Cover with plastic wrap and refrigerate for at least 2 hours (overnight is great).

Preheat the oven to 200°C. Line a medium roasting tray with a double layer of foil and coat the foil with olive oil. Slice the remaining orange and arrange the slices on top of the foil. Arrange the chicken over the orange slices and pour over the marinade. Roast for about 60-80 minutes or until golden and cooked through – time might vary depending on how golden you like your chicken.

Serves 2

Sunday, January 4, 2015

Caponata - easy and delicious

Caponata

Caponata is something I ate a lot growing up, but never knew the real name – my grandmother used to make it all the time, especially when there were a lot of people to feed, and she served it with bread or on small toasts, canapé style. I loved it and would ask her to make it again and again – I used to call it “my grandma’s eggplant dish”, having no idea it was such a staple of Italian cuisine.

It took me forever to make caponata myself, maybe because it has always been something so attached to my grandma’s cooking, but my husband asked me to make it and I decided to give it a go, especially after going through some of my books and finding a recipe by Andrew Carmellini on one of my favorite cookbooks – it is his the most delicious gnocchi I’ve ever made, and I ate at both Lafayette and Locanda Verde when I was in NYC, so I trust the guy. ;)

Andrew’s caponata is very easy to put together and it tastes great, not to mention it benefits from a day of two in the fridge – I’m all for making things in advance, so this recipe has become part of my repertoire and I hope it becomes part of yours, too.

Caponata

Caponata
slightly adapted from the delicious Urban Italian: Simple Recipes and True Stories from a Life in Food

1/3 cup (80ml) extra-virgin olive oil
1 red onion, diced large
1 yellow pepper, diced large
1 Italian eggplant, diced large
3 stalks of celery, diced large
1 zucchini, diced large
½ teaspoon table salt
¼ teaspoon freshly ground black pepper
½ teaspoon red pepper flakes
2 cloves of garlic, sliced thin
1 400g (14oz) can chopped peeled tomatoes
1 tablespoon balsamic vinegar
2 tablespoons thyme leaves
3 tablespoons red wine vinegar – I used sherry vinegar

Heat olive oil in a large saucepot over high heat. Add the onion, pepper and eggplant. When the vegetables have softened a bit (about 5 minutes), add the celery and zucchini. Season with half the salt and black pepper. Mix the ingredients together and continue to cook.

After ten 10 minutes, add the red pepper flakes and garlic. Cover and reduce the heat to medium, and let the steam roast the vegetables for 5 minutes. Add the tomatoes, reduce the heat to low and simmer for 10 minutes, until vegetables are soft but not falling apart and the tomatoes are well incorporated. Mix in the balsamic vinegar and cook for 2 minutes.

Remove the saucepot from the heat, add the thyme and season with remaining salt and pepper (add more salt to taste if necessary). Mix in vinegar.

The caponata can be kept in an airtight container in the fridge for 4-5 days (I thought it tasted better the day after it was made).

Serves 8-10

Friday, August 8, 2014

Garlicky cashew chicken and curiosity

Garlicky cashew chicken / Frango assado com alho, castanha de caju e coentro

My love for roast chicken is so notorious that when I tell my husband I have no idea what to cook on the weekend he always says “how about roast chicken?” :D

If I’m not feeling very inspired, I just make Donna Hay’s chicken with chorizo because I know it’s delicious and my husband and I love it, but most of the times I like to vary because there are several great recipes out there just waiting to be prepared (and devoured).

When I saw that Amanda Hessler’s recipe for barbecued chicken included a marinade made with cashew nuts I got immediately curious, especially because I could not imagine how it would turn out – some recipes feel familiar to me, and with others I try to imagine how they would taste even if I hadn’t tried them before, but not this one: I kept wondering how the nuts would flavor the chicken, and how they would behave combined with the cilantro and the soy sauce.

The only way to find that out was cooking the recipe, and that’s what I did.

(if someone tells you that Scorpios are curious, believe them). :)

The cashew nuts make the marinade very creamy and also make the chicken moist and golden without the need of too much oil. The cilantro and soy sauce add great flavor (don’t go overboard with the salt because both the soy sauce and the nuts are already salty). Would I make this chicken again? Yes, it tasted delicious, but I would add a bit more garlic next time – despite the name, it was not garlicky enough for me.

My husband still prefers Donna Hay’s chicken, though. :)

Garlicky cashew chicken
slightly adapted from the wonderful The Essential New York Times Cookbook: Classic Recipes for a New Century

1/3 cup roasted, salted cashew nuts
handful fresh cilantro leaves + a bit extra for serving
1 tablespoon canola oil
2 garlic cloves, roughly chopped
½ tablespoon soy sauce
½ teaspoon brown sugar, packed
juice of 1 large lime
salt and freshly ground black pepper
4 chicken pieces – use your favorites

In a blender or food processor, combine nuts, cilantro, oil, garlic, soy sauce, sugar and lime juice. Blend until smooth, scraping down sides as necessary. Taste and season with salt and pepper if desired.
Smear the chicken generously with the marinade. Cover with plastic and refrigerate for at least 3 hours (overnight is best).

Preheat the oven to 200°C/400°C. Line a roasting pan with a double layer of foil and brush it lightly with oil. Place the chicken onto the foil and drizzle with the remaining marinade.
Roast for about 1 hour or until cooked to your liking.
Serve sprinkled with fresh cilantro leaves.

Serves 2

Saturday, April 12, 2014

Sticky chicken wings and comfort zones

Sticky chicken wings / Asinhas de frango grudentinhas e deliciosas

I admire people who step out of their comfort zone: it’s not an easy thing to do, not everyone’s ready for it, so kudos to those who do it. But at the same time I wonder that if you’re doing something really well, why not l keep doing it?

Life is about balance, I suppose.

That came to mind when I saw the poster for Cronenberg’s Maps to the Stars – there he is again, working with Robert Pattinson (the guy who made it impossible for me to watch more than 30 minutes of Cosmopolis). Oh, David, enough already – it’s fine to change things every now and then, I admire you for that, but cut the crap and go back to working with Viggo, please. Go back to that talented comfort zone, I beg of you.

When I want something good for lunch and don’t have time to search around I stay in my foodie comfort zone and turn to the usual suspects: Nigella, Martha, Jamie – they rarely disappoint. Bill Granger is part of that list, too, with his always easy and delicious recipes, like these chicken wings that are dead simple to make and will have you licking your fingers as you eat them.

Sticky chicken wings
slightly adapted from the delicious Holiday

4 ½ tablespoons mirin
4 ½ tablespoons soy sauce
3 teaspoons granulated or caster sugar
2 large garlic cloves, minced
1 teaspoon freshly grated ginger
1 teaspoon ground cumin
juice of 1 lime
freshly ground black pepper
16 chicken wings, tips removed and halved at the joints
thinly sliced spring onions, to serve

Combine mirin, soy sauce, sugar, garlic, ginger, cumin, lime juice and black pepper in a shallow, non-metallic dish. Coat the chicken pieces with the marinade, cover with plastic wrap and refrigerate for at least 4 hours (or up to overnight).

Preheat oven to 200°C/400°F. Line a large baking sheet with a double layer of foil and brush the foil lightly with canola oil. Lift the chicken pieces from the marinade and place them onto the prepared sheet, without overlapping. Roast for 30 minutes, turning once.
Meanwhile, pour the marinade into a small saucepan and simmer until reduced by half. Pour it over the chicken and roast for 10-15 minutes longer or until chicken is sticky and deep golden brown. Sprinkle with the spring onions and serve at once.

Serves 4

Friday, April 4, 2014

Roast curry chicken, something strong and something milder

Roast curry chicken / Frango assado com pasta de curry vermelha

As I started reading the news about the books bound in human flesh discovered in Harvard I immediately thought of Sam Raimi and The Evil Dead, only to discover at the end of the piece that the writer had thought of them, too. :)

Movies are a matter of taste, just as food is: this über simple roast chicken, tenderized by the buttermilk and spiced by the red curry paste, is a nice idea even for busier days, since the oven does all the work – you just need time to let the marinade do its thing while the chicken rests in the refrigerator. However, not everyone likes super spicy food, and since curry pastes vary in heat, strength and intensity of flavor taste the one you have at hand before adding it to the marinade: it might be super strong as the 1981 movie, or a lot milder like the 2013 version. ;)

Roast curry chicken
adapted from the delicious and stunning Feed Me Now!

3 tablespoons whole milk
juice of 3 large limes
3 tablespoons red-curry paste*
2 garlic cloves, pound to a paste
salt and freshly ground black pepper
8 chicken pieces – use the ones you like the most

In a large shallow bowl, combine the milk and lime juice and set aside for 10 minutes (you’ll get buttermilk). Add the curry paste, garlic, salt and pepper and mix to combine. Add the chicken pieces, turn to coat, cover with plastic wrap and refrigerate for at least 4 hours or up to overnight.

Preheat the oven to 190°/375°F. Line a large roasting pan (large enough to hold the chicken pieces without overlapping) with a triple layer of foil and brush it lightly with oil. Arrange the chicken pieces side by side on top of the foil and pour over the marinade. Bake for about 60-70 minutes or until deep golden brown (cook it to your liking).
Serve immediately.

*curry pastes vary in heat, strength and intensity of flavor, so taste it before using it and adjust the amount accordingly – I used this one

Serves 4

Wednesday, February 12, 2014

Sicilian pasta with tomatoes, garlic and almonds and "Her"

Sicilian pasta with tomatoes, garlic and almonds / Espaguete siciliano com tomates, alho e amêndoas

As I continue my marathon to watch this year’s Oscar nominated movies, I was extremely surprised by how moved I was by Her – though genius sometimes, Spike Jonze’s style to me is on the verge of crazy (right there with Michel Gondry), therefore I really did not expect to love the movie as much as I did.

Joaquin Phoenix is an amazing actor – the Academy should have cut the trophy in half back in 2001 for him and Benicio to share it – and his performance in Her is so sublime it’s difficult to find words to describe it. I could have easily squeezed him in for Best Actor this year, and I could also vote for the film for Best Movie (despite my love for Gravity) and most definitely for Best Writing, Original Screenplay. After I read the film synopsis I kept thinking of how it would be possible for Jonze to find a decent way to end it, but he did and to me it was perfect.

Also surprising, to me, was this recipe: when I saw Nigella cooking it on TV I had no idea that something that simple could be so good – all you have to do is cook some pasta and whiz all the sauce ingredients in food processor. The sauce is not cooked and that makes this dish perfect for the insanely hot days we’ve been having here (less time in front of the stove).

Sicilian pasta with tomatoes, garlic and almonds
slightly adapted from the wonderful Nigellissima: Easy Italian-Inspired Recipes

200g spaghetti (or other pasta of your choice)
100g cherry tomatoes
2 tablespoons finely grated parmesan
10g golden sultanas
1 small garlic clove
1 tablespoon capers (drained)
25g blanched almonds
1 ½ tablespoons extra virgin olive oil
handful fresh basil

Put abundant water on to boil for the pasta, waiting for it to come to the boil before salting it. Add the pasta and cook according to packet instructions.
While the pasta is cooking, make the sauce by putting all the remaining ingredients, bar the basil, into a processor and blitzing until you have a nubbly-textured sauce.
Just before draining the pasta, remove ½ cup of pasta-cooking water and add ½ tablespoon of it down the funnel of the processor, pulsing as you go.
Return the drained pasta to the hot saucepan, pour over the sauce and toss to coat (add a little more pasta-cooking water if you need it). Sprinkle with the basil and serve.

Serves 2

Friday, January 10, 2014

Baked sausages with tomatoes, peppers and onions, a movie, many tears and a wish

Baked sausages with tomatoes, peppers and onions / Linguiça assada com tomate, pimentão e cebola

The subject of traveling in time has produced a handful of movies, some interesting, some hideous. Last night I watched another movie about it, by far the most beautiful one: a movie that made me cry like a baby (there were so many tears I had to dry them on my cardigan sleeve), that made me think of many things in life and that made me wish I could, too, go back in time.

I kept thinking of how incredible it would be to go back to my past and started imagining my mother and I in our kitchen – with the table where I used to do my homework while she did the dishes after lunch – and pictured us both cooking: I was chopping some onions, she was grilling a steak. And the funny thing is that in my head I wasn’t a kid: I was a 35-year-old adult, as I am today, standing next to her, who looked like she did when I was five. And another funny thing is that I don’t know why I thought of her grilling a steak since I hated it as a child – I usually ate my steak stone cold after seating on the table for hours, forbidden to leave as long as there was food on my plate. :)

Because Richard Curtis made me think of my mom a lot more than I already do every day, I decided to share this delicious recipe with you today: as a good German descendant, she loved pork (and cabbage – boy, she just loved the stuff) and I am sure she would go crazy for sausages cooked this way – the meat portions get golden and crispy on the outside, while tender and juicy within, and the thyme adds a wonderful touch.

Baked sausages with tomatoes, peppers and onions
from Bill Granger’s TV show “Bill’s Notting Hill Kitchen”

2 onions, peeled, halved, and each half cut into 4 pieces
1 large red pepper, seeds removed, cut into chunks
6 cloves of garlic, unpeeled
200g cherry tomatoes
extra virgin olive oil, for drizzling
salt and freshly ground black pepper
4 sausages
5-6 fresh thyme sprigs
handful black olives

Preheat the oven to 200°C/400°F. Place the onions, pepper, garlic and tomatoes in a medium roasting pan or ovenproof dish, drizzle with a little olive oil and season with salt and pepper. Mix to coat. Remove the sausage from their skins in portions (about the size of a meatball) and place over the vegetables. Scatter with the thyme sprigs, drizzle with a little more oil and bake for about 1 hour, turning the sausage halfway through cooking time so the pieces are golden all over. Remove from the oven, scatter with the black olives and serve.

Serves 2 generously

Monday, October 28, 2013

Spiced roast chicken

Spiced roast chicken / Frango assado com especiarias

As much as I love cooking and baking there are times I want to be somewhere else besides the kitchen –for those times, the oven is my best friend: with a bit of planning food can be cooked without the need of me being around it, which can be very helpful. Roast chicken is a staple at my house because both the husband and I love it and while it cooks in the oven I can do many other things (or nothing at all). :D

This recipe comes from a cookbook I acquired recently and it’s originally made with quails – the pungent flavor of the spices work beautifully with chicken, too, and the paprika gives the meat a golden, nice color.

Spiced roast chicken
slightly adapted from the delicious Do-Ahead Dinners: How to Feed Friends and Family Without the Frenzy

3 tablespoons extra-virgin olive oil
2 teaspoons ground coriander/cilantro
1 teaspoon ground cumin
1 teaspoon hot smoked paprika
4 garlic cloves, peeled and crushed to a paste
1 tablespoon honey
juice of 1 lemon
salt and freshly ground black pepper
4 chicken pieces

Heat the oil in a small saucepan over medium heat, then add the spices and cook for a minute or so, stirring continuously. Add the garlic and cook for 1 minute, then remove from the heat and add the honey, lemon juice, salt and pepper. Leave until completely cool. Place the chicken pieces in a ziplock bag, add the marinade, close and then massage the bag to make sure all the chicken pieces are covered by the marinade. Cover and chill overnight.
Preheat the oven to 200°C/400°F. Line a 20x30cm roasting pan with a double layer of foil, then brush it lightly with oil. Arrange the chicken pieces on top of the foil with a little space between them. Spoon over any extra marinade left. Bake for about 45 minutes or until cooked to your liking.

Serves 2

Saturday, July 6, 2013

Sticky chicken with lemon and honey

Sticky chicken with lemon and honey / Frango assado com limão siciliano e mel

Those of you with picky eaters at home will probably agree with me: it’s not easy and sometimes not pleasant at all to cook for them. :/ For that reason, when my husband requests something in particular for lunch or dinner I feel relieved – I know I won’t need to spend hours (and brain cells) thinking of the menu.

While watching Nigel Slater's Simple Suppers a couple of weeks ago we saw Nigel making golden and caramelized chicken pieces when Joao said: “how about that for lunch?” – I immediately agreed since we’re both crazy for roasted chicken. Nigel’s chicken is dead easy to make – the refrigerator and the oven do all the work – and turned out delicious, crunchy and sticky on the outside and absolutely tender and juicy on the inside, falling off the bone. It was so good that my husband placed it on the #1 spot with Donna Hay’s chicken baked with chorizo, which up to that day had been his favorite way of eating chicken.

Sticky chicken with lemon and honey
slightly adapted from the always wonderful Nigel Slater

4 large chicken pieces, bone in and skin on – use your favorite cuts
juice of 2 lemons
1 tablespoon runny honey
½ tablespoon Dijon mustard
3 garlic cloves, crushed into a paste
salt and freshly ground black pepper, to taste
soft butter, for preparing the baking dish

Place the chicken in a medium bowl. In a small bowl, whisk together with a fork the lemon juice, honey, mustard, garlic, salt and pepper. Pour over the chicken, mix to coat all the pieces and cover with plastic wrap. Refrigerate overnight or at least for 4 hours.
Preheat the oven at 200°C/400°F. Line a baking dish with a double layer of foil and brush the foil with the butter.
Transfer the chicken to the prepared dish and pour over any left marinade. Bake for about 45 minutes, or until cooked to your liking – we like our chicken very golden brown, as you can see on the photo, so I baked it for 1 ½ hours.
Serve immediately.

Serves 2

Friday, November 4, 2011

Tomato tart

Tomato tart / Torta de tomate

Some things instantly remind me of others (and sometimes they’re related): the first time I watched "The Cell" – I know it sounds crazy that someone would watch a movie with J. Lo more than once, but Vincent D’Onofrio and the director made that possible – I found that the red “uniform” she wears (while getting into someone else’s mind) looked a lot like the medieval war armor Gary Oldman wears at the beginning of “Dracula” (years later I read that Eiko Ishioka was responsible for the costume design of both movies). :)

This tart, while in the oven, perfumed my apartment with a delicious pizza scent; despite the similarities of smell and ingredients, it’s a completely different thing – one I think you should definitely try. ;)

Tomato tart
slightly adapted from the wonderful Martha Stewart's Baking Handbook

Pâte brisée:
2 ½ cups (350g) all purpose flour
1 teaspoon salt
1 cup (226g/2 sticks) unsalted butter, cold and cut into small pieces
¼ cup (60ml) ice water, plus more if necessary

Tart:
1 head garlic
1 tablespoon extra-virgin olive oil
½ recipe pâte brisée (recipe above)
1 cup grated Italian fontina cheese (about 85g/3oz)
3-4 ripe but firm tomatoes, sliced 6mm (¼in) thick
salt and freshly ground black pepper
a few sprigs fresh thyme

Make the pâte brisée: combine flour and salt in the bowl of a food processor and blitz to combine. Add the butter and pulse until mixture resembles coarse crumbs with some larger pieces of butter, about 10 seconds. With the machine running, add the water through the feed tube in a slow, steady stream, just until the dough holds together without being wet or sticky – do not process for more than 30 seconds. Squeeze a small amount of dough together – if too crumbly, add a bit more water, 1 tablespoon at a time.
Form dough into a ball, divide in half, then shape into two flattened disks. Wrap in plastic wrap as refrigerate for at least 1 hour or overnight – dough can be frozen for up to 1 month; thaw in the refrigerator overnight before using.
Preheat the oven to 180°C/ 350°F. Place the garlic on a large piece of foil, drizzle with 1 tablespoon olive oil and fold the foil to encase the garlic – seal the edges well. Place onto a small baking sheet and roast for about 45 minutes or until garlic is soft. Remove from the oven and set aside. When garlic is cool enough to handle squeeze the cloves out of their skins – do not discard the olive oil left in the foil. Place garlic in a small dish or bowl and mash with a fork. Set aside.
Roll out the dough between two sheets of lightly floured baking paper to a rough 35x15cm (14x6in) rectangle. Transfer to a lightly buttered 30x10cm (12x4in) tart pan and press into the edges. Trim dough flush with the top edge of the pan and prick dough all over with a fork. Freeze tart shell for 40 minutes.
Preheat the oven to 220°C/425°F. Spread the roasted garlic evenly on the bottom of the chilled tart shell. Sprinkle with ½ cup of fontina, then arrange the tomato slices over the cheese. Season the tomatoes with salt and pepper. Place a few sprigs of thyme over the tomato slices and cover with the remaining cheese then drizzle with the garlic infused oil. Bake tart until crust is golden and tomatoes are soft but still retain their shape, 35-40 minutes. Cool on a wire rack for 20 minutes then serve warm.

Serves 2 (generously)

Friday, July 31, 2009

Baked ricotta with olive salad

Baked ricotta with olive salad / Ricota assada com salada de azeitonas

Anyone who’s been reading my blog for a little while might have probably noticed I’m insanely partial to sweets – don’t get me wrong, I love food as a whole, but desserts ARE the best part of a meal. Don’t you think? :D

As a very responsible person, ahem, I know that one can’t live on cakes, cookies and ice cream – that’s why I’m always searching for delicious savory recipes that will be as much fun to prepare as their sweet counterparts.

I love cooking with ricotta, but what really caught my eye here was the olive salad and the dressing – what a fabulous combination of flavors.

Baked ricotta with olive salad / Ricota assada com salada de azeitonas

Baked ricotta with olive salad
from Australian Gourmet Traveller

Ricotta:
350g ricotta – I used homemade
2 eggs, separated
75g parmesan, finely grated
pinch of nutmeg, freshly grated

Olive salad:
200g mixed olives
½ teaspoon dried chilli flakes
1 clove garlic, crushed
½ thinly sliced zest of an orange
¼ cup firmly packed flat-leaf parsley leaves, coarsely chopped
2 tablespoons extra-virgin olive oil*

Preheat the oven to 180ºC/350ºF; grease well four 150ml-capacity well greased ovenproof dishes.

For olive salad, combine olives with chilli, garlic, orange zest, parsley and extra-virgin olive oil, season to taste – I used only freshly ground black pepper since the olives are salty already. Set aside.
Press ricotta through a fine sieve into a bowl – mine was really soft, so I skipped this part; add egg yolks, parmesan and nutmeg and stir to combine. Whisk egg whites in a large bowl until soft peaks form, add to ricotta mixture and gently fold until combined. Season to taste with salt and pepper.
Spoon ricotta into prepared dishes and bake for 15 minutes or until golden – mine needed 25 minutes; they will puff in the oven like soufflés but will deflate.
Stand for 5 minutes, then run a knife around the edges of the molds and unmold the ricotta. Serve warm or at room temperature with the olive salad.

* I used garlic infused olive oil and omitted the garlic clove from the recipe

Serves 4

Friday, May 8, 2009

Lemon and chilli marinated chicken

Lemon and chilli marinated chicken / Frango marinado com limão siciliano e pimenta calabresa

Some dishes take me way back to my childhood days - roasted chicken is one of them. My mom loved it and used to make it deliciously well: nicely golden and crisp on the outside and tender on the inside, the meat almost falling off the bones. So good! I can almost taste it as I write this. :D

I immediately thought of mom when I saw the “simple chicken classics” spread on the latest DH magazine. Since I had some marvelous lemons around, this is the recipe I chose.

Oh, and before I forget, I have added an ingredient measure list to the blog that might be useful to some of you.

Lemon and chilli marinated chicken / Frango marinado com limão siciliano e pimenta calabresa

Lemon and chilli marinated chicken
slightly adapted from Donna Hay magazine

1 x 1.5g whole chicken, butterflied – or use your favorite chicken parts
4 cloves garlic, crushed
1 teaspoon salt
1 teaspoon smoked paprika
1 tablespoon finely grated lemon zest
juice of 2 lemons
1 tablespoon chilli flakes*
1/3 cup (80ml) olive oil – I used garlic infused olive oil

Place the chicken on a baking tray lined with baking paper. Place the garlic, salt, paprika, lemon zest and juice, chilli flakes and oil in a bowl and whisk to combine. Pour over the chicken and marinate in the fridge for 1 hour.
Preheat the oven to 200ºC/390ºF. Roast the chicken for 35-40 minutes or until cooked through – I roasted mine for 1 ½ hours to get it really golden.

* the chicken turned out spicy and I loved it but my husband thought it was a bit too hot; therefore, adjust the chilli flakes amount according to your taste.

Serves 4-6

Lemon and chilli marinated chicken / Frango marinado com limão siciliano e pimenta calabresa

Friday, September 26, 2008

Olive gnocchi with parsley garlic sauce

Olive gnocchi with parsley garlic sauce

Thank you all for being so supportive about my disastrous bread. I learned that KJ and Jenjen, two of my favorite bloggers, did not have any luck with this recipe either. And Syrie, tks for the suggestion of leaving Jamie a message – it had crossed my mind, but I thought I was being too childish... :)

With all the info I have received from you and from the people who read my blog in Portuguese, I ended up thinking that Jamie’s cooking recipes are great, but his baking recipes might not be all that. I say that because the complaints are about cakes and bread and not about pasta and salads.
Anyway, my new book has arrived and I am sure I’ll be baking some amazing bread this weekend. :)

I’ll offer you something savory today: a recipe adapted from here. I omitted the mushrooms just because I wasn’t in the mood for a grocery store trip. But even with this very simple sauce it was a good pasta dish – Joao had his gnocchi with tomato sauce and loved it.

I did have to use more flour than the amount called for in the recipe, but I believe it was the potatoes’ fault. Make sure you use potatoes that are suitable for gnocchi.

Olive gnocchi with parsley garlic sauce

Olive gnocchi with parsley garlic sauce
from Australian Gourmet Traveller

Gnocchi:
800g (about 3) large desiree potatoes
3 egg yolks
80g (½ cup) black olives, pitted and finely chopped
110g plain flour*
salt

Sauce:
2 tablespoons extra-virgin olive oil
50g butter
3 cloves of garlic, thinly sliced**
1/3 cup (loosely packed) flat-leaf parsley, coarsely chopped
grated parmesan, to serve – I took the photo before adding the cheese, duh!

For gnocchi, bring potatoes to boil in a large saucepan, cook until tender (25-30 minutes). Drain, peel and pass through a potato ricer into a bowl while still hot. Beat in egg yolks and salt, add olives and flour and gently work mixture together. Turn onto a floured work surface and, using your hands, roll into 2cm-thick logs. Cut logs widthways into 1½cm pieces, pinch in the sides of each piece slightly and set aside.
Bring a large saucepan of salted water to the boil, add gnocchi and simmer over medium heat until they float to the surface (2-3 minutes). Transfer to a tray to keep warm.
Heat olive oil and butter in a large frying pan, when butter starts to foam, add garlic and cook, stirring occasionally, until soft (2-3 minutes). Add gnocchi, gently toss until coated, scatter with parsley, sprinkle with parmesan and serve immediately.

* I ended up using more flour because the dough was extremely soft
** I used garlic infused olive oil instead

Serves 6

Wednesday, September 17, 2008

Roasted tomato and goat's cheese tart with fresh oregano

Roasted tomato and goat's cheese tart with fresh oregano

Apparently, it’s still winter here – after a week of 33ºC (91.4ºF) days, we’ve been having much colder ones.

I know that tomatoes are much tastier in the summer, but I would never be able to wait that long to make Pille’s wonderful tart. Would you? :)
The only change I made was to use fresh oregano instead of thyme - just because I happen to grow it.

I used to have a hard time digesting garlic but is all in the past now: my friend Clarice told me to remove the central root off the garlic cloves before using them and it has worked like a charm.

Oh, and a little side note: remember my sake panna cotta? It was the most voted recipe on the event I made it for! Yay! :D

Roasted tomato and goat's cheese tart with fresh oregano

Roasted tomato and goat's cheese tart with fresh oregano

500g puff pastry, rolled
150g soft and creamy goat cheese*
4 teaspoons fresh oregano leaves
2 fresh garlic cloves, minced
500g ripe plum tomatoes
extra virgin olive oil
freshly ground black pepper
sea salt

Pre-heat the oven to 180ºC/350ºF.

Roll out the puff pastry to 30x40 cm rectangle and place on a slightly oiled baking sheet. Carefully score a line about 1 cm from the edge along the pastry, but do not cut through! This will help the filling to stay inside the pastry and the edges to puff up nicely.

Mix the goat cheese, minced garlic, oregano leaves, salt and pepper in a small bowl. Spread the mixture evenly on the puff pastry sheet (remaining inside the scored line).
Cut the tomatoes into 3-5mm slices and place nicely next to each other on top of the goat cheese. Sprinkle with sea salt and black pepper and drizzle some olive oil on top.

Bake for 45-50 minutes, until the pasty is golden and tomatoes have dried up a little.
Before serving, scatter some more oregano leaves on top. Cut into squares and serve.

* my cheese was a bit crumbly, so I added a bit of olive oil and mixed it all with a fork

Serves 6-8

Wednesday, August 20, 2008

Pine nut-crusted cheese with roasted pepper

Pine nut-crusted cheese with roasted pepper

I think you have all been there: you see a wonderful recipe but one of the ingredients is not easy – or worse, impossible – to find where you live. That’s fine - we use something else instead.

Valentina had told me that queijo coalho is similar to haloumi – it even “squeaks” on the teeth once bitten. So queijo coalho it is. But the type found in the supermarket was one already cut in sort of sticks. :(
Not wanting to make my poor hubby march towards another grocery store, I decided I would glue the cheese sticks on the frying pan before dipping them on the pine nut mixture. Oh, yeah, I’m so smart, aren’t I? Except for one small detail: the cheese wouldn’t melt. At all. That’s why my plan did not work, as you can see on the photo. But this is such a delicious recipe I had to share it with you.
I highly recommend it - with the right cheese, of course. :)

Pine nut-crusted cheese with roasted pepper

Pine nut-crusted cheese with roasted pepper
from Donna Hay magazine

½ cup (80g) toasted pine nuts
2 cloves garlic, crushed
1 ½ cups flat-leaf parsley leaves - I mixed parsley and fresh oregano
2 tablespoons olive oil
sea salt and freshly ground black pepper
250g haloumi, sliced
2 tablespoons olive oil, extra
450g store-bought char-grilled red bell peppers, torn*

Place the pine nuts, garlic, parsley, olive oil, salt and pepper in the bowl of a small food processor and process in short bursts until just combined. Spread the pine nut mixture on the haloumi. Heat the extra olive oil in a large non-stick frying pan over high heat. Cook the haloumi for 1-2 minutes each side or until browned.
Serve immediately with the roasted bell pepper.

* Or cut off the top of a (or more) bell pepper, cut it in half, remove all the seeds and pith and place it on a lightly oiled baking tray, skin side up. Brush the skin with olive oil and bake in a preheated oven (200ºC/400ºC) until the skin starts to blister. Remove from the oven and immediately transfer the peppers to a glass bowl, covering it tight with plastic or cling film. Set aside to cool. The skin will be removed very easily, then.

Serves 4

Wednesday, August 13, 2008

Nigella’s unpestoed pesto

Nigella’s unpestoed pesto

Part 2 - that is not something I like seeing on the title of a movie. Some do make me curious, I’ll admit it, while others... Can even become a dark spot on someone’s career - I bet that the Oscar nominee Amy Adams would agree with me here. :)

You’ll think: “she’s already posted pasta al pesto”. And you are right. Since sequels can be masterpieces, too, I present you my pesto part 2.

I saw Nigella cooking this dish on TV but couldn’t write down the recipe - I eyeballed all the ingredients. As I ended up finding it online, I’ll post it here for you.

Even though this pasta recipe is insanely simple, I’ll be honest: I prefer the original pesto sauce. But that doesn’t mean you can’t give the part 2 a try.

Nigella’s unpestoed pesto

Nigella’s unpestoed pesto

1 pound (450g) spaghetti
1 cup (240ml) olive oil – I used less
5 garlic cloves, peeled
1 bunch fresh basil leaves
½ cup pine nuts
8 ounces (224g) whole Parmesan
sea salt and freshly ground black pepper

Bring a large pot of salted water to the boil and then add the spaghetti. While the pasta is cooking, pour the olive oil into a large frying pan and throw in some peeled cloves of garlic. Cook over gentle heat until the garlic starts to turn light brown and its scent wafts upward. Remove the cloves from the pan and take the pan off the heat.
Roughly chop or shred a mound of basil leaves, set aside. In a second dry frying pan, toast a handful or so of pine nuts. When the pasta is ready, drain it, toss it in the garlic-infused olive oil, and then transfer to a warm bowl.
Using a vegetable peeler, shave in the parmesan and sprinkle with the toasted pine nuts. Toss well, throw over all but a small handful of the basil leaves, and turn again.
Sprinkle with sea salt, black pepper and the remaining shredded basil leaves and serve at once.

Serves 4

Wednesday, August 6, 2008

Grilled eggplant with tomatoes and cheese and a new home

Grilled eggplant with tomatoes and cheese

A quick post this time - I’m moving today and lots of boxes surround me right now.

If you like veggies, please, make this dish. It couldn’t be simpler and the flavors are so good. Serve it with some crusty bread and you’ve got yourself a meal.

Grilled eggplant with tomatoes and cheese

Grilled eggplant with tomatoes and cheese
inspired by a recipe from Family Food

2 eggplants, sliced
1/3 cup (80ml) olive oil*
salt and freshly ground black pepper
1 lb 2 oz (510g) cherry tomatoes, halved
2 garlic cloves, crushed
2 teaspoons capers, drained
½ cup mozzarella – the one I used seems to be similar to Monterey Jack cheese
¼ cup parmesan cheese, grated
small basil leaves, to garnish – it was raining heavily so I couldn’t go outside to pick them

Preheat the oven to 200ºC/392ºF.

Heat a nonstick frying pan over medium heat. Brush the eggplant slices with some of the oil. Grill the slices on both sides until they are soft and begin to brown, then lay them in a large, shallow baking dish. Season with salt and pepper.

Heat the rest of the oil in a small saucepan, add the cherry tomatoes and garlic, then fry briefly until the tomatoes just start to soften. Add the capers for a minute. Season with salt and pepper. Pour the tomatoes over the eggplant, and sprinkle the mozzarella and the parmesan on top.
Bake for 10-15 minutes or until the cheese is melted and golden. Remove from the oven then sprinkle the basil leaves over the top. Serve at once.

* garlic is not my best friend when it comes to digestion, so I used garlic infused olive oil and omitted the garlic cloves.

Serves 4

Related Posts with Thumbnails