Showing posts with label whole wheat flour. Show all posts

Monday, March 22, 2021

100% whole wheat bread for delicious breakfasts - or sandwiches

Pão 100% integral

For quite a long time now I have been baking this wonderful bread every week and it makes my breakfasts tastier and healthier: I found this recipe almost two years ago and it instantly became one of my all-time favorites – and many of my Brazilian readers love it too.

I usually bake this bread on the weekends, cut into slices and freeze them – I take the slices from the freezer as I need them, and even when I forget to do that in advance I can pop the slices straight onto a frying pan over medium heat and in no time I have fresh bread to go with my latte – so good.

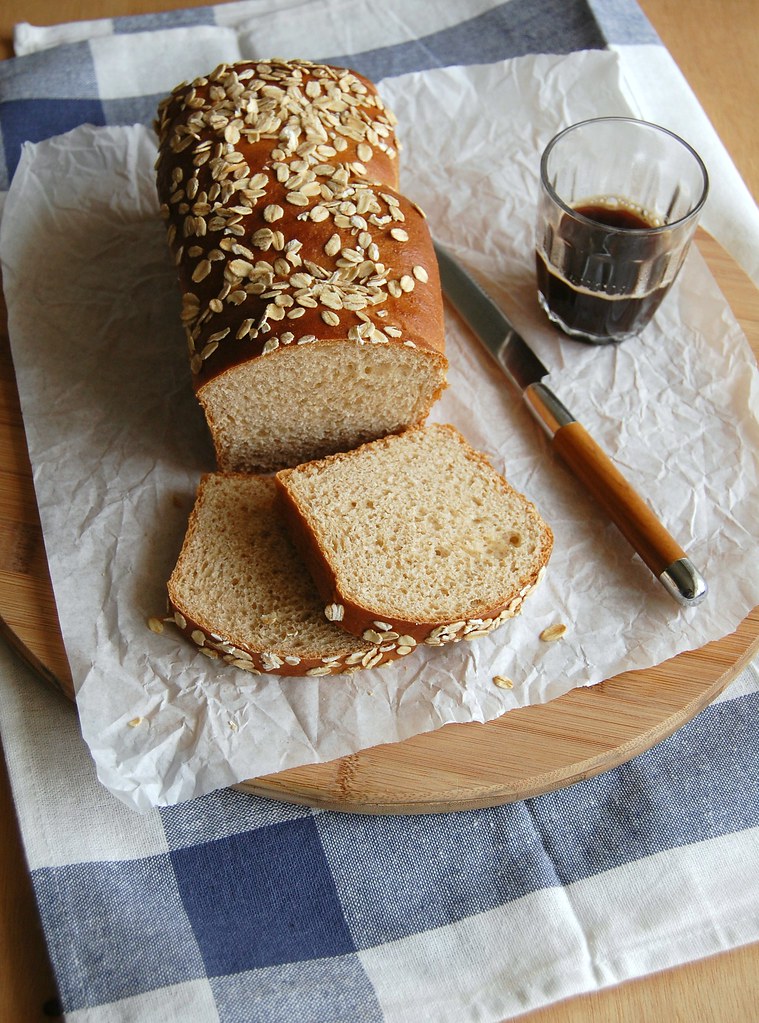
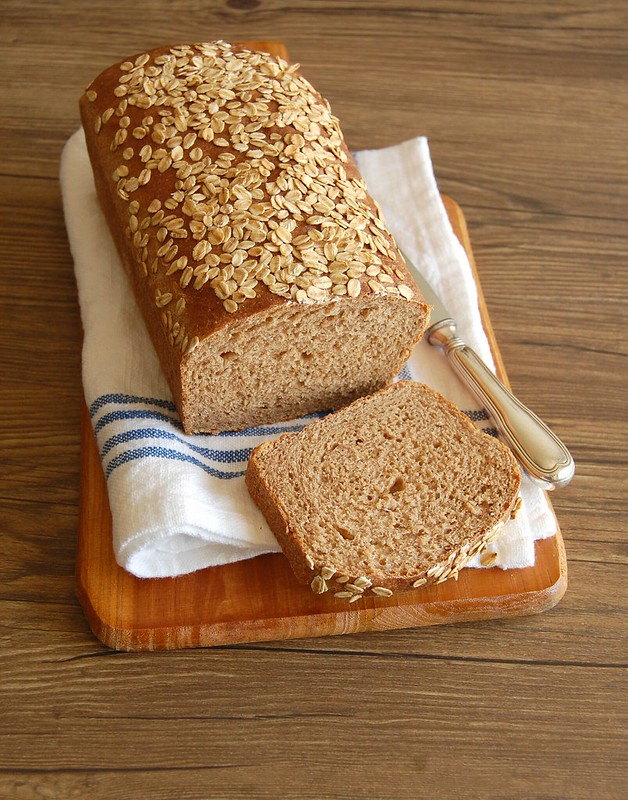
Even though this bread is made entirely with whole wheat flour it turns out so tender it is even hard to slice it sometimes. It is delicious and I feel fueled until lunch time every day. My six-year-old nephew is a fan of this bread, too – he was very surprised when I told him a long time ago that I’d made the bread myself. :)

I have also already made this bread replacing 50g of the flour with quinoa flakes and with teff flour and it worked like a charm – when using teff the flavor gets a bit nuttier.

This is a recipe I adapted from the wonderful King Arthur Flour website – if you like baking like I do, their website is perfect for you.

Pão 100% integral


100% whole wheat bread

slightly adapted from King Arthur Flour's wonderful website


1 cup (240ml) lukewarm water

2 ½ teaspoons dried yeast

2 tablespoons honey – you can also use agave or maple syrup

¼ cup (60ml) vegetable oil – I use canola

400g whole wheat flour

1 ¼ teaspoons table salt

1 tablespoon rolled or jumbo oats

Place water, yeast and 1 teaspoon of the honey in the bowl of an electric mixer fitted with the dough hook. When mixture foams (about 5 minutes) add the remaining honey, the oil, flour and salt and mix with a spatula or wooden spoon. Mix in medium speed for about 10 minutes or until dough is smooth and elastic and pulls away from the sides of the bowl – you can knead by hand for about 15 minutes too.

Cover with plastic wrap and let it proof for 70-90 minutes or until doubled in size.

Lightly brush with oil a 6-cup capacity loaf pan.

Gently deflate the dough to remove the excess air, then roll it onto a lightly floured surface until you get a rectangle of roughly 30x20cm (12x8in), then shape it into a log. Transfer to prepared pan and cover loosely with a clean kitchen towel. Let the bread rise for about 40-60 minutes, or longer if the day is too cold. In the meantime, preheat the oven to 200°C/400°F.

Brush the top of the bread lightly with water and sprinkle with the oats, pressing ever so slightly for them to stick. Bake for 30-35 minutes or until golden brown - bread should sound hollow when tapped with your fingers. Cool in the pan over a wire rack for 5 minutes, then carefully unmold onto the rack to cool. Cool completely.

Makes 12-14 slices

Thursday, September 17, 2020

Pizza flavored whole wheat waffles and very different vacations

Waffles integrais sabor pizza

I was on vacation for most of July and it was very different from all the other previous vacations I ever took: in quarantine, I stayed home all the time. I had plans to go back to NYC this year, but unfortunately had to postpone the trip to god knows when due to the pandemic. On my vacation there was no travelling, no walking around the city, no nothing. I saw one movie a day, some TV shows, cooked a lot. I organized my books and my closet, took naps after lunch and rested.

In one of the afternoons watching movies I felt like nibbling on something, and there was freshly baked cake, but I really wanted something savory. I adapted my recipe for orange olive oil waffles to make it flavored like pizza, with cheese and dried oregano, and also added a bit of whole wheat flour to make the waffles more interesting and nuttier in flavor. The waffles turned out delicious, therefore I share the recipe with you today.


Pizza flavored whole wheat waffles

own recipe


100g all purpose flour

75g whole wheat flour

2 teaspoons baking powder

pinch of salt

2 teaspoons dried oregano

1 large egg, room temperature

¼ cup (60ml) extra virgin olive oil

¾ cup (180ml) whole milk, room temperature

1 cup (70g) coarsely grated yellow mozzarella*

2 tablespoons finely grated parmesan


In a medium bowl, whisk together the flours, baking powder, oregano and salt. Set aside.

In a small bowl, whisk together the egg, olive oil and milk. Pour over the dry ingredients and stir just until incorporated – do not overmix. Stir in the cheeses.

Heat a waffle iron until very hot; lightly coat with nonstick spray – my waffle maker is nonstick, so I do not coat it.

Working in batches, cook waffles until golden and cooked through. Transfer to a wire rack set inside a baking sheet and keep warm in oven until ready to serve.

* the yellow mozzarella I used is not like fresh mozzarella balls, therefore it does not release too much liquid. Replace by cheddar or something similar texture wise.

Makes 5-6 waffles


Monday, March 12, 2018

Simple breakfast bread (dairy free)

Simple breakfast bread / Pão de forma do meu jeito

I wanted a bread recipe I could make sandwiches with, turn into toast for breakfast, and do everything we do with packaged white bread. I no longer buy that and most of the homemade versions I found called for milk or butter (or both). I thought of making Kim Boyce’s oatmeal bread, which is delicious, replacing the butter with olive oil, but the making of that recipe is not as straightforward as I needed it to be.

I reached out to King Arthur Flour’s website and I bring you my take on their white breakfast bread: a bit of whole meal flour, a bit of oats, no dairy. It is not a light bread and I like it that way, but the big surprise came when my 3-yeard old nephew saw the bread cooling on the counter and asked for some. I gave him a tiny piece, so sure that he would not enjoy such a dense kind of bread, but he devoured it in seconds and asked for seconds (and thirds). :)

Simple breakfast bread
slightly adapted from here

1 1/3 cups (320ml) lukewarm water
1 ½ teaspoons dried yeast
1 tablespoon demerara sugar – for the caramel flavor; use granulated if you prefer
½ tablespoon honey
1 ½ tablespoons extra virgin olive oil
3 cups (420g) all purpose flour
½ cup (70g) whole wheat flour
1/3 cup (30g) rolled oats
1 ½ teaspoons table salt

Place the water, yeast, sugar and honey in the bowl of an electric mixer fitted with the dough hook. Whisk with a fork and set aside until foamy. Add the olive oil, flours, oats and salt and knead for 8-10 minutes until a smooth and elastic dough forms. Transfer to a large bowl brushed with olive oil, cover with plastic wrap and set aside to prove for 1 ½ hours, or until doubled in size.

Brush with olive oil a 5-cup capacity loaf pan. Punch the dough to remove the excess of air and transfer to a slightly floured surface. Roll into a large rectangle, then fold it like a letter and fit into the prepared pan. Cover and set aside to prove again for 1 hour – in the meantime, preheat the oven to 200°C/400°F.
Bake for about 30 minutes or until golden brown – bread should sound hollow when tapped with your fingers. Cool in the pan over a wire rack for 5 minutes, then carefully unmold onto the rack to cool. Cool completely.

Makes about 10 slices

Thursday, November 23, 2017

Gorgonzola and fresh oregano grissini

Gorgonzola and fresh oregano grissini / Grissini de orégano fresco e gorgonzola

At home we like nibbling very much, especially on weekends, and that came to my mind as I set up a plate of bread, cheese and fruit last Saturday for dinner: a glass of wine and the meal was perfect.
Sometimes we have guacamole with homemade tortillas, and of course there are days I don’t even want to enter the kitchen: those are the days for pizza. :)

If you are feeling a bit more enthusiastic than me lately please have a go at these grissini: they are absolutely delicious and great for the cheese/fruit platter (and with wine, too). :)

Gorgonzola and fresh oregano grissini
own recipe

1 teaspoon dried yeast
1 teaspoon granulated sugar
200ml lukewarm water
2 cups (280g) all purpose flour
1/3 cup (46g) whole wheat flour
3 tablespoons olive oil + a bit extra for brushing
1 teaspoon table salt
2 tablespoons fresh oregano leaves, packed
50g gorgonzola, coarsely grated or crumbled if too soft
3 tablespoons finely grated parmesan

In the bowl of an electric mixer fitted with the dough hook, mix the yeast, sugar and water with a fork. Set aside for about 5 minutes or until foamy. Add the flours, olive oil and salt. Mix on medium for about 8 minutes or until mixture turns into an elastic and smooth dough – if mixing by hand, 10-12 minutes should do it. Mix in the oregano and the gorgonzola, shape the dough into a ball and transfer to a large bowl lightly brushed with olive oil. Cover with plastic wrap and set aside to prove for 1 ½ hours, or until doubled in size.

Preheat the oven to 200°C/400°F. Line two large baking sheets with foil and brush it with olive oil.
Punch the dough to remove the excess air. Divide dough in 24 equal portions e roll each of them into a 30cm (12in) sausage shape – if dough is too stick, lightly flour your counter, but avoid too much flour or the dough will be tough and dry. Place the grissini onto the foil leaving 2cm (little less then 1in) between them. Brush them with olive oil, sprinkle with parmesan and bake for 20-25 minutes or until golden brown.
Transfer the sheets to a wire rack and cool completely.

Makes 24

Wednesday, June 28, 2017

Beef and leek pide

Beef and leek pide / Pide de carne e alho-poró

I believe that the first time I saw/heard of Turkish pizza was watching one of the episodes of the fantastic Ottolenghi's Mediterranean Island Feast, a long time ago – what he actually made was called lahmacun and it looked absolutely delicious, topped with a fresh salad.

Fast forward many months and I was reading about pide recipes on a magazine (the Australian Delicious, if I am not mistaken) and it looked similar to Ottolenghi’s lahmacun, however shaped slightly differently. I decided to then search about it some more, and ended up making my own version of it.

I first made pides for lunch on a lazy Saturday, already expecting compliments from my husband for he loves sfihas; However, he went so crazy about them that from the second time onwards I started making 1 ½ recipes each time – 4 pides were not enough for the both of us. :D

Beef and leek pide
own recipe, inspired by several others

Dough:
1 teaspoon dried yeast
½ teaspoon granulated sugar
1/3 cup (80ml) lukewarm water
¼ cup (60ml) lukewarm whole milk
1 ¼ cups (175g) all purpose flour
¼ cup (35g) whole wheat flour
½ teaspoon table salt
2 tablespoons extra virgin olive oil

Filling:
2 tablespoons unsalted butter
1 large leek (120g/4oz), white/light green parts only, sliced
2 large garlic cloves, minced
250g (9oz) beef mince
1 teaspoon smoked paprika
2 ripe tomatoes, deseeded and diced
salt and freshly ground black pepper
handful of fresh parsley leaves, chopped

For brushing the dough:
1 tablespoon extra-virgin olive oil

Start with the dough: in the bowl of an electric mixer, combine yeast, sugar, water and milk and mix with a fork. Set aside until foamy, about 5 minutes. Add flours, salt and olive oil and mix using the hook attachment for about 8 minutes or until dough is elastic and smooth – if mixing by hand, 12-14 minutes should be enough. Form dough into a ball, transfer to a large lightly oiled bowl and cover with plastic wrap. Set aside in a draft-free area for about 1 hour or until doubled in volume.

While dough is proofing, make the filling: heat butter on a large saucepan over medium heat until melted. Add the leek and cook, stirring occasionally, until tender, about 5 minutes. Stir in the garlic and cook for 1 minute or until fragrant. Add the beef and cook, stirring occasionally, until golden, 5-7 minutes. Stir in the paprika, the tomatoes, season with salt and pepper and cook for another 3-5 minutes or until tomatoes are soft. Stir in the parsley, remove from the heat and cool completely.

Preheat the oven to 200°C/400°F. Line a large baking sheet with foil.
Divide the dough into 4 equal portions. Roll each portion into a rough 25cm (10in) long oval shape. Spread the cooled filling along the center. Pinch the edges together so your pide looks like a boat. Transfer to the prepared sheet and brush the dough with olive oil and bake for 25-30 minutes or until golden brown. Serve at once.

Makes 4

Tuesday, March 21, 2017

Pesto and cheese rolls and family traditions

Pesto and cheese rolls / Pãezinhos recheados de pesto e queijo

Yesterday I started thinking about family traditions and how some of them go from one generation to the other, sometimes without us even noticing.

My brother and I have become much closer since my nephew was born, and that brings me a lot of joy. So on weekends we are inevitably all together, either they come to visit Joao and I or we visit them – I love that. It reminds me of when I was little and we would go for Sunday lunches at my grandmother’s or my aunt and uncle from the country side would come to spend the day with us – we are doing exactly what our parents did almost forty years ago and that happened so naturally I only thought of it now.

One of the times they came to visit us I had just finished baking these pesto rolls – they smelled wonderful and I thought the adults would love them, but to my surprise my nephew was the one that enjoyed them the most. I had no idea he would like bread filled with pesto – I thought he would find the flavor too strong or something like that – but I was wrong. Therefore I bring you these today and hope you the adults reading me like them as much as the little one at home did. :)

Pesto and cheese rolls
own creation

Dough:
¼ cup (60ml) lukewarm water
¾ cup (180ml) lukewarm whole milk
½ teaspoon granulated sugar
2 ¼ teaspoons dried yeast
1 large egg
2 tablespoons (28g) unsalted butter, melted and cooled
2 tablespoons extra virgin olive oil
¾ teaspoon table salt
2 ¼ cups (315g) all purpose flour
½ cup (70g) whole wheat flour

Filling:
½ cup (40g) fresh basil leaves, packed
2 tablespoons finely ground pecorino
1 small garlic clove
2 tablespoons pine nuts
¼ cup (60ml) extra virgin olive oil
freshly ground black pepper
200g shredded cheese – I used one kind of mozzarela we find here in Brazil that is yellow and drier than fresh mozzarela; replace with cheddar

Egg wash:
1 egg + ½ teaspoon water, beaten with a fork

Start by making the dough: in the bowl of an electric mixer fitted with the dough hook, mix together with a fork the water, milk, sugar and yeast. Set aside until foamy, about 5 minutes. Add the egg, butter, olive oil, salt and flours and mix on medium speed until a smooth and elastic dough forms, about 8 minutes. Transfer to a buttered bowl, cover with plastic wrap and set aside on a warm spot until doubled in size, about 1 ½ hours.

Filling: place the basil, pecorino, garlic, pine nuts, olive oil and black pepper in a blender or food processor and blitz until a paste forms – I don’t add any salt for the cheeses are already salty. Set aside. Brush a 12-hole muffin pan with butter.

Knock down the dough to remove any excess air. Roll it on a lightly floured surface until you get a 30x50cm (12x20in) rectangle. Spread the pesto over the dough, leaving a 1cm (½in) border. Sprinkle evenly with the shredded cheese. Beginning with the longer side, roll the dough tightly like a cylinder. Cut into 12 slices and place each slice, cut side up, inside a hole in the muffin pan. Cover with a clean kitchen towel and let rise again for 40-60 minutes – in the meantime, preheat the oven to 200°C.

Brush the rolls with the egg wash and bake for 20-25 minutes or until deeply golden and cooked through. Cool in the pan over a wire rack for 5 minutes, then carefully unmold each roll and transfer to the wire rack. Serve warm or at room temperature.

Rolls can be kept in an airtight container at room temperature for up to 3 days. Reheat them in a 180°C oven for 8-10 minutes before serving if desired.

Makes 12

Wednesday, April 22, 2015

Slice and bake chocolate chip cookies

Slice and bake choc chip cookies / Cookies com gotas de chocolate do tipo slice and bake

Since I’ve been hooked in slice and bake cookies – who can blame me, right? –, I thought “why not make the most iconic cookies in that same way?”

I found a recipe for slice and bake chocolate chip cookies in Fanny Zanotti’s cookbook and it looked wonderful, but I added a bit of whole wheat flour for the nutty flavor, decreased the amount of sugar and replaced the milk chocolate for dark chocolate: the cookies turned out delicious!

They are not super easy to slice because of the chocolate chunks, but I did not find that to be a problem: a bit of fixing with the tip of the fingers before baking and the cookies came out of the oven perfect.

I am sure that the idea of having a batch of chocolate chip cookies minutes away will make everyone reading me now quite happy, probably as happy as I am with the return of Mad Men, even though it is the last season.

Slice and bake chocolate chip cookies
slightly adapted from Paris Pastry Club: A Collection of Cakes, Tarts, Pastries and Other Indulgent Recipes

160g all purpose flour
40g whole wheat flour
½ teaspoon baking powder
¼ teaspoon table salt
90g unsalted butter, softened
110g light brown sugar
40g granulated sugar
1 teaspoon vanilla extract
1 egg
75g dark chocolate, chopped into small chunks – I used one with 70% cocoa solids

In a medium bowl, whisk together the flours, baking powder and salt. Set aside.
Using an electric mixer, beat butter and sugars until creamy and light. Beat in the vanilla, then the egg. Scrape the sides of the bowl. On low speed, mix in the dry ingredients just until combined. Stir in the chocolate.

Divide the dough into two equal parts. Place each on a piece of parchment paper; shape dough into logs. Fold parchment over dough; using a ruler, roll and press into a 3.5 cm (1.4in) log – like Martha does here – if dough is too soft, refrigerate it for 10 minutes before shaping into logs. Wrap in parchment. Chill in the fridge until very firm, about 3 hours (the dough logs can be kept in the fridge for up to 3 days or stored in the freezer for up to 1 month.)

Preheat oven to 180°C/350°F; line two large baking sheets with baking paper - I like Beyond Gourmet a lot.
Unwrap one log at a time (keep the other in the fridge). Cut log into 6mm (¼in) thick rounds; space 5cm (2in) apart onto prepared sheets. Bake until golden brown around the edges, about 10 minutes. Cool on the sheets for 5 minutes, then slide the paper with the cookies onto a wire rack and cool completely.

Packed airtight, the cookies will keep for about 5 days at room temperature or in the freezer for a month.

Makes about 25

Friday, April 10, 2015

Simple banana cake for the weekend

Simple banana cake / Bolo simples de banana

I don’t know about you guys, but weekends for me mean cake: a slice for lazy breakfasts or to eat while watching a movie on the couch.

I told a while ago that it is difficult for me to bake with bananas because my husband and I eat them all in no time, but because of the summer that changed a bit: we continued to eat bananas like crazy, but because of the hot days they would become too ripe too fast, therefore now I have some bananas in my freezer and the first recipe I made with them was this cake, a recipe from the always great Stephanie Alexander.

The cake is insanely moist and tender, with a hint of cinnamon and a lovely banana flavor – I thought of icing it with a chocolate glaze, but then I thought that it was called “simple banana cake”, so I kept it simple and served it with a dusting of icing sugar only – it was a very good decision, for this cake needs nothing more than that.

Simple banana cake
slightly adapted from the oh, so wonderful The Cook's Companion: The Complete Book of Ingredients and Recipes for the Australian Kitchen

1 ½ cups (210g) all purpose flour
¼ cup (35g) whole wheat flour
1 teaspoon baking soda
pinch of salt
½ teaspoon ground cinnamon
125g unsalted butter, softened
1 ¼ cups (250g) granulated sugar
2 eggs
2 large ripe bananas, mashed with a fork
½ teaspoon vanilla extract
½ cup (120ml) buttermilk*
icing sugar, for dusting

Preheat oven to 180°C/350°F. Butter a 20cm (8in) square cake pan, line the base with baking paper and butter the paper as well. Sprinkle with flour and knock out the excess.

In a medium bowl, whisk together the flours, baking soda, salt and cinnamon. Set aside. Cream the butter and sugar until pale and fluffy. Beat in eggs, one at a time, beating well after each addition and scraping the sides of the bowl. On medium speed, beat in the banana and vanilla. On low speed, beat in the dry ingredients in three additions, alternating with the buttermilk in two additions, and mix just until incorporated. Pour into the prepared pan and bake for about 50 minutes, or until golden and risen and a fine skewer inserted in the center comes out clean. Cool cake completely in the pan over a wire rack. Dust with icing sugar before serving.

* homemade buttermilk: to make 1 cup buttermilk place 1 tablespoon lemon juice in a 240ml-capacity measuring cup and complete with whole milk (room temperature). Wait 10 minutes for it to thicken slightly, then use the whole mixture in your recipe

Serves 16

Friday, February 20, 2015

Toasted oat, cherry and hazelnut cookies, Michael Keaton again and the readers

Toasted oat, cherry and hazelnut cookies / Cookies de aveia e avelã tostadas e cerejas secas

I know I’ve told you several times already that I love having a food blog and I’ve given you lots of reasons for that, but what can I do if that is the absolute truth? My readers keep on giving me joy and I apologize for being sounding like a broken record. :)

Days ago I posted on the Facebook that I now that I have two baby nephews I started browsing baby clothes in department stores and got so mad because 90% of them are for girls – it was a matter of moments before many readers commented that they had boys, too, and agreed with me, and others even recommended websites in which I can find more options. How great is that? I mean, I have a food blog but I can write about anything I want and get a nice response from the readers.

Something else that I love is when they see something cool and think of me: today, for instance, a reader sent me this link because of my love for Birdman and I laughed so hard I had tears in my eyes – I am now, more than ever, hoping that Michael Keaton takes the award home next Sunday. Thank you, Andreza! I loved the video!

I get such nice messages and they surely make me want to go on writing on this blog and bringing you good, delicious recipes – the cookies I bring you today are like a tasty version of granola bars and they can be adapted to your liking: the hazelnuts and dried cherries can be replaced by other nuts and dried fruit, such as almonds, Brazil nuts, dried apricots, raisins… I even think that rye flour could be used here – its nuttiness would go beautifully well with the flavor of the hazelnuts.

Toasted oat, cherry and hazelnut cookies
slightly adapted from the oh, so beautiful Scandilicious Baking

150g rolled oats
50g flaked hazelnuts
100g all purpose flour
50g whole wheat flour
¾ teaspoon baking powder
¼ teaspoon baking soda
¼ teaspoon ground cinnamon
1/8 teaspoon table salt
125g unsalted butter, softened
100g light brown sugar
50g granulated sugar
1 egg
1 teaspoon vanilla extract
100g sour cream*
75g dried cherries, halved if too large

Preheat the oven to 180°C/350°F. Place the oats and hazelnuts in a medium baking pan and roast for 10 minutes, stirring halfway through. Cool (turn off the oven).

In a medium bowl, whisk together the flours, baking powder, baking soda, cinnamon and salt. Using an electric mixer, cream butter and sugars until light and creamy. Beat in the egg. Scrape the sides of the bowl. Beat in the vanilla. Using a rubber spatula, fold in the flour mixture, sour cream, oats and hazelnut and cherries and stir just until incorporated. Cover and refrigerate for 45 minutes.

Preheat the oven to 180°C/350°F. Line two large baking sheets with baking paper.
Using 2 leveled tablespoons of dough for each cookie, drop batter onto prepared sheets 5cm (2in) apart. Bake cookies until the edges are golden brown and the centers are still slightly soft, 12-14 minutes.
Let cookies cool for 5 minutes on the baking sheet, then slide the paper with the cookies onto a wire rack and cool completely.

* homemade sour cream: to make 1 cup of sour cream, mix 1 cup (240ml) heavy cream with 2-3 teaspoons lemon juice in a bowl. Whisk until it starts to thicken. Cover with plastic wrap and leave at room temperature for 1 hour or until thicker (I usually leave mine on the counter overnight – except on very warm nights – and it turns out thick and silky in the following morning; refrigerate for a creamier texture)

Makes 28

Sunday, February 8, 2015

Ginger twist

Ginger twist / Pão trançado de gengibre

I’ve asked my readers over at the blog’s Facebook page if they like to cook and bake on weekends and what they like to make – I love being in the kitchen on weekends because it is when I have more time and get to make more complex things, recipes that take a while to be ready or/and have many steps, such as this ginger twist.

Spending a lot of time in the kitchen can be frustrating if the results aren’t what we expect – and trust me, I’ve been there many times – but in this recipe’s case every bit of work and every second were worth it: the bread looked beautiful and tasted amazing, too.

It is a bit time consuming, I won’t lie, but I recommend you bookmark it for a cold, rainy day when you’re not at all interested in going out – just imagine that after all the work you’ll have something this delicious to go with a cup of tea or coffee. :D

Ginger twist
slightly adapted from the always amazing Gourmet Traveller

Dough:
140ml lukewarm whole milk
2 ½ teaspoons dry yeast
120g granulated sugar
400g all purpose flour
50g whole wheat flour
2 teaspoons ground ginger
1 teaspoon ground cinnamon
finely grated zest + juice of 1 orange
2 eggs, room temperature
100g unsalted butter, softened
1 egg, extra, for brushing the loaf

Filling:
70g unsalted butter, softened
50g brown sugar
50g granulated sugar
1 teaspoon ground ginger
130g pecans, chopped
100g almonds, chopped

Topping:
1 tablespoon all purpose flour
1 tablespoon granulated sugar
1 tablespoon (14g) unsalted butter, cold

Dough: stir milk, yeast and a pinch of the sugar in a small bowl to dissolve and stand until foamy (5 minutes). Meanwhile, combine dry ingredients and zest with a pinch of salt in an electric mixer fitted with a dough hook. Add yeast mixture, 2 eggs and orange juice, then mix on medium speed to form a soft dough. Gradually add butter, beating on medium speed to form a soft dough, then transfer to a buttered bowl, cover with plastic wrap and stand in a warm place until doubled in size (1 hour).

Filling: mix all the ingredients together and refrigerate until needed. Set aside 30g of the filling for the topping.

Knock back dough on a well-floured surface, roll out to a 30x60cm (12x24in) rectangle and spread evenly with filling. Roll from the longest side to form a cylinder, then cut in half. Twist each half around one another to form a rope and place in a buttered 12x25cm (5x10in) loaf tin. Stand until slightly risen (30 minutes) – in the meantime, preheat oven to 180°C.

Using your fingertips, mix the 30g reserved filling with the topping ingredients until a crumble forms. Refrigerate until needed.

Beat the extra egg with a pinch of salt and brush loaf with the mixture. Scatter with the topping and bake until golden and risen (45 minutes to 1 hour). Cover with foil if loaf gets too dark. Cool in the pan for 10 minutes, then carefully unmold onto a rack to cool.

Serves 8-10

Wednesday, November 26, 2014

Whole wheat thumbprint cookies

Whole wheat thumbprints / Biscoitinhos thumbprint integrais

After making a batch of cookies that failed miserably, a lovely friend of mine asked what my favorite cookie recipe was and I found the question a very difficult one - I have baked several different cookies so far and have more than one that I love. Since the failed recipe was for chocolate chip cookies I stayed on that subject and told her that one of my favorites are Kim Boyce’s whole wheat choc chip cookies – they are delicious beyond words and before making them I would never have believed that a cookie made exclusively with whole wheat flour could be so good.

On that same day, I still had my mind set on baking more cookies – bad recipes drive me nuts, I’ll say – and decided to bake another cookie recipe made with whole wheat flour, but this time there was a little hazelnut meal to make them even nuttier: Louise Fulton Keats’ thumbprints, filled with blackberry jam. They turned out delicious and were super easy to put together – another win for whole wheat flour.

Two days later the cookies were a bit on the soft side, but still tasty – it didn’t bother me much, but next time I’ll try baking them without the jam first and then fill them when they are out of the oven and see if that fixes the problem.

Whole wheat thumbprints / Biscoitinhos thumbprint integrais

Whole wheat thumbprint cookies
from the delicious and beautiful Something for Everyone: Family Meals for Baby, Toddler and Beyond

250g unsalted butter, softened
150gbrown sugar
1 teaspoon vanilla extract
1 egg
260g whole wheat flour
55g ground hazelnuts
pinch of salt
blackberry jam, or the your favorite flavor

Preheat the oven to 180°C/350°F. Line two baking large baking sheets with baking paper.
Using an electric mixer, cream the butter and sugar until pale and creamy. Add the vanilla and egg and beat until combined.
With the mixer on low speed, add the flour, ground hazelnuts and salt, mixing until the dough just comes together to form a ball. Cover and refrigerate for at least 1 hour.

Take 1 leveled tablespoon of the dough per cookie at a time and roll into balls. Place 5cm (2in) apart onto prepared sheets. Using a wooden spoon with a rounded handle or other gadget, make a deep indentation in the center of each cookie. Fill the indentations with jam, then bake for 12-15 minutes or until cookies are golden.
Cool in the sheets for 2 minutes, then slice the paper with the cookies to a wire rack and cool completely.

Makes about 55

Saturday, October 11, 2014

Banana, ginger and honey cake

Banana, ginger and honey cake / Bolo de banana, gengibre e mel

As much as I love banana cakes, sometimes months go by without me baking any – my husband and I are crazy for the fruit and end up eating all the bananas before they go brown and I get a chance to do anything with them.

No one has muscle cramps here, I can assure you. :D

Last week I bought a huge bunch of bananas, and even though we ate a lot of them there were still two by the end of the week, very freckled and turning brownish, perfect for baking. A banana cake from Rachel Allen’s latest cookbook was the perfect way to use those wonderful bananas, but I’ve adapted it a little to use honey instead of golden syrup (explanation here).

The cake is delicious fresh out of the oven, so tender, but I have got to tell you that toasting the slices and slathering them with butter is something almost mandatory. :)

Banana, ginger and honey cake
slightly adapted from the delicious All Things Sweet

110g unsalted butter, softened
½ cup (44g) light brown sugar, packed
100g honey
2 eggs
1 teaspoon vanilla extract
100g all purpose flour
50g whole wheat flour
2 teaspoons baking powder
2 teaspoons ground ginger
pinch of salt
2 medium ripe bananas, mashed

Preheat the oven to 180°C/350°F. Lightly butter a 5 ½ cup-capacity loaf pan, line it with baking paper and lightly butter the paper as well.
In a large bowl, using an electric mixer, cream butter until soft. Beat in the sugar and honey, then beat until light and fluffy. Beat in the eggs, one at a time (mixture might look curdled, carry on anyway). Beat in the vanilla. Sift flours, baking powder, ginger and salt over mixture and fold to combine. Fold in the bananas, mixing until incorporated. Pour batter into prepared pan and bake for about 45 minutes or until risen and golden and a skewer inserted in the center of the cake comes out clean.
Cool in the pan over a wire rack for 25 minutes, then carefully unmold and transfer to the rack to cool completely. Peel off the paper and serve.

Serves 8

Monday, September 1, 2014

Monte Carlos - beautiful and delicious

Monte Carlos

Since I'm all for food that looks beautiful, it won't come as a surprise for you that the minute I saw these cookies I had to make them: delicate and pretty, they looked like miniature versions of a Victoria sandwich, with the cream and jam layers.

When I tried one cookie, I noticed that they weren't just pretty: they were delicious as well. The beautiful and flavorsome combo reminded me of The Great British Bake Off and how annoying Paul Hollywood was on the fourth season, telling one contestant over and over again that she was a case of "style over substance" - needless to say, by the end of that season I couldn't stand the show anymore.

These cookies, my friends, are definitely not a case of style over substance - they are cute and taste great. Give these a go and let me know if you agree with me.

Monte Carlos
slightly adapted from the beautiful and delicious The Baking Collection (The Australian Women's Weekly)

Cookies:
200g all purpose flour
100g whole wheat flour
2 teaspoons baking powder
pinch of salt
40g desiccated unsweetened coconut
185g unsalted butter, softened
110g light brown sugar
1 teaspoon vanilla
1 egg

Filling:
60g unsalted butter, softened
120g icing sugar, sifted
1 teaspoon vanilla extract
2 teaspoons whole milk, room temperature
about 50g blackberry jam

Preheat the oven to 180°/350°F. Line two large baking sheets with baking paper.
In a medium bowl, whisk together flours, baking powder, salt and coconut. Using an electric mixer, beat butter, sugar and vanilla until light and creamy. Beat in the egg. On low speed, add the dry ingredients and mix just until incorporated.
For each cookie, roll 1 leveled tablespoon of dough , place 2,5cm (1in) apart onto prepared sheets and flatten with a fork. Bake for 12-15 minutes or until golden on the edges. Cool on the sheets for 2 minutes, then slide the paper with the cookies to a wire rack and cool completely.

Cream filling: using an electric mixer, beat butter, sugar and vanilla and light and fluffy. Beat in milk.

Spread jam in half the cookies and cream in the remaining half, then sandwich them together.

Makes 22 sandwich cookies

Thursday, August 28, 2014

Apple, sour cream and cinnamon crunch muffins

Apple, sour cream and cinnamon crunch muffins / Muffins de maçã, creme azedo e canela

I have to be careful while cooking or baking with certain ingredients for the reason that I adore snacking on them! Cherry tomatoes, carrots, olives, cheese, nuts – I have to control myself not to eat everything before adding the ingredients to the recipe itself. :D

Depending on the ingredient, my husband does the same, and there goes dinner.

Add to that list roasted pumpkin seeds – they’re delicious and I have to avoid getting carried away by the fact that they’re healthy. While preparing these muffins, I set aside the 2 tablespoons needed for the recipe and measured out 2 more tablespoons so I could snack on while baking – they were gone in no time (I’d just whisked the dry ingredients together in the large bowl).

I told myself that it was better to eat a handful of pumpkin seeds than a handful of candy and stopped worrying about it. ;)

Feel free to use raw pumpkin seeds in these muffins – they’re the ones called for in the original recipe – I used roasted seeds because I had them in my pantry. The cinnamon, almonds and the apple make these muffins super tasty, while the sour cream makes them moist and tender.

Apple, sour cream and cinnamon crunch muffins
slightly adapted from Grains: 150 Recipes for Every Appetite

Topping:
70g almonds, roughly chopped
2 tablespoons pumpkin seeds – I used roasted seeds
45g light brown sugar
½ teaspoon ground cinnamon

Muffins:
100g whole wheat flour
100g all purpose flour
1 teaspoon baking powder
¼ teaspoon ground cinnamon
pinch of salt
75g unsalted butter, melted and cooled
75g light brown sugar
150g sour cream
1 egg, lightly beaten
1 tablespoon whole milk
1 large Gala apple (about 250g), peeled and chopped in small cubes

Preheat the oven to 180°C/350°F. Line a 12-hole muffin pan with paper cases.
Topping: in a small bowl, mix together the almonds, pumpkins seeds, brown sugar and cinnamon. Set aside.
Muffins: in a large bowl, whisk together the flours, baking powder, cinnamon and salt. In a medium bowl, whisk together the butter, brown sugar, sour cream, egg and milk. Pour this mixture into the dry ingredients and stir lightly – batter will be lumpy; do not overmix. Stir in the apple and divide the batter among the paper cases. Sprinkle with the topping and lightly press it down the batter to adhere.
Bake for 20-25 minutes or until golden and risen and a skewer inserted into the middle of a muffin comes out clean. Leave to rest in the pan for 5 minutes before lifting the muffins out.

* homemade sour cream: to make 1 cup of sour cream, mix 1 cup (240ml) heavy cream with 2-3 teaspoons lemon juice in a bowl. Whisk until it starts to thicken. Cover with plastic wrap and leave at room temperature for 1 hour or until thicker (I usually leave mine on the counter overnight – except on very warm nights – and it turns out thick and silky in the following morning; refrigerate for a creamier texture)

Makes 12

Wednesday, August 20, 2014

Eggplant turnovers and the wonderful Internet

Eggplant turnovers / Tortinhas de berinjela

The Internet, this wonderful thing: while reading a text on feminism (too bad it’s not in English, I would gladly recommend it to Shailene Woodley), I got to a video of George Carlin - I don’t know why on earth I did not know this genius man, and I’m really glad that has been corrected now.

On my daily visits to IMDb I learned that Raymond "Red" Reddington is coming back soon, on September 22nd, to be more precise. \0/

I saw the first teaser for the last season of Sons of Anarchy, and it is amazing.

I learned that Jason Reitman might actually make me like a movie with Adam Sandler – I’m in awe with the beauty of this trailer. <3

And I also came across these eggplant turnovers, a recipe by Dan Lepard (someone who usually doesn’t disappoint when it comes to food), and I have to tell you: the husband and I weren’t too thrilled about the filling – it tasted good, but sort of bland – but this pastry is absolutely fantastic: very flaky and tasty. It is made in a similar way to the rye pastry I adore so much, and all that folding and turning really transform already good pastry into something even better.

I might not have been too happy with this eggplant filling (despite my love for the veggie), but this pastry is worth making again with different fillings – it might become my official empanada pastry instead of the one I posted here a while ago.

Eggplant turnovers
slightly adapted from Dan Lepard

Filling:
2 medium eggplants (about 700g total)
salt and freshly ground black pepper
300g ricotta – I used homemade
2 chopped spring onions
1 tablespoon chopped fresh oregano

Pastry:
200g all purpose flour
100g whole wheat flour
1 teaspoon table salt
1/3 cup flat-leaf parsley leaves, packed
1 ½ tablespoons olive oil
100g unsalted butter, cold and cut into 1cm cubes
½ cup (120ml) cold water
1 egg, beaten with a fork, for brushing

Preheat the oven to 180°C/350°F. Line a large baking sheet with foil.
Halve the eggplants lengthwise and place them onto the foil cut side down. Prick them all over with a fork, piercing the skin. Bake for 1 hour.
Scrape out the flesh, spoon into a sieve over a bowl with ½ a teaspoon of salt and drain for an hour. Stir in the ricotta, onions and oregano. Let it drain again.

In the meantime, make the dough: put the flour and salt in a bowl, stir in the parsley, and rub in the oil and butter. Add the cold water, coax into a rough dough and chill for 30 minutes. Using extra flour, roll out to a rough 40x15cm (16x6in) rectangle, fold in by thirds (as if you were folding a letter), repeat the roll and fold, then wrap and chill for another 30 minutes. Repeat the double roll and fold steps twice more at 30-minute intervals. Roll the dough about 3mm thick and cut into 12 squares.

Preheat the oven to 200°C/400°C. Line a large baking sheet with baking paper.

Season the filling, discard the liquid, and spoon a little onto each pastry square. Seal like pasties, place onto the sheet, brush with eggwash and bake for 30 minutes or until golden and crisp.

Makes 12

Monday, August 18, 2014

Cheese straws for hungry friends

Cheese straws / Palitinhos de queijo

As someone who loves food, I always make sure that my friends have something to eat the minute they enter my house – I believe that nothing like a drink and something to snack on to make one feel welcome. :)

I like to serve something small enough to be eaten without cutlery and without much mess either, and tiny portions so everyone is still hungry when dinner is served. I made these cheese straws the other day, when I had a couple of friends over for pizza, and they turned out delicious and flaky.

I baked the straws in the afternoon and kept them in an airtight container. When my friends arrived, I just arranged the straws in glasses and served them with drinks – no more hungry guests. :)

Cheese straws
slightly adapted from the lovely and delicious National Trust Simply Baking

155g all purpose flour
70g whole wheat flour
115g unsalted butter, cold and diced
¼ teaspoon salt
freshly ground black pepper, to taste
85g Parmesan cheese, finely grated
1 egg, beaten

Topping:
½ egg, beaten with a fork
dried oregano, to taste

Place the flours, cheese, salt and pepper into the food processor and blitz to combine. Add the butter and pulse until mixture resembles coarse meal. Mix in the egg 1 ½ tablespoons of the ice water and, with the motor running, pour this into the mixture and stop processing as soon as the crumbs begin to hold together – add more water if necessary, but do it gradually.
Turn out on to a lightly floured surface and gather the dough together with your hands. Divide the dough in half, wrap in plastic and refrigerate for 20 minutes.

Preheat the oven to 180°C/350°F. Line two large baking sheets with baking paper.
Roll half the dough about 5mm (¼in) thick (keep the other half in the fridge) - the pastry needs to be thick enough to twist without breaking. Trim the edges and cut into strips, each about 15cm (6in) long and 1cm (½in) wide. Gently twist each strip and lay onto the baking sheets. Repeat with the remaining pastry. Re-roll the trimmings and repeat until you’ve used all the dough and made around 40 straws.
Carefully brush all the straws with the beaten egg and sprinkle with the dried oregano. Chill for 15 minutes, then bake for 15-20 minutes or until golden brown. Cool on the sheets over a wire rack.
They will keep for a few days in an airtight can.

Makes about 40

Wednesday, July 30, 2014

Vanilla and cinnamon bread

Vanilla and cinnamon bread / Pão de baunilha e canela

Many people I know have been complaining a lot about the weather for many days now, but not me – I’m actually celebrating the cold days, especially after the dreadful summer we had months ago. \0/

Nothing worse than to start sweating seconds after taking a shower – I’m glad that is part of the past (at least for now).

Because of the low temperatures, keeping the oven on is always a great idea: you stay warm and there is delicious food as a result – win/win situation. :)

Last weekend was perfect for baking, and making bread is something I enjoy deeply. Without thinking too hard about what to prepare, I chose Signe Johansen’s vanilla loaf to be my afternoon project, and added cinnamon, whole wheat flour, oats and a bit more sugar to make it more my taste. The bread turned out delicious and it was also great toasted and slathered with butter.

Besides being tasty, the bread was the perfect project for another reason: I could watch a couple of Law and Order: SVU episodes while the dough proved twice.

Vanilla and cinnamon bread
slightly adapted from the über beautiful and delicious Scandilicious Baking

½ vanilla bean, split lengthwise, seeds removed with the back of the knife
1 cup (240ml) whole milk
50g unsalted butter
2 teaspoons vanilla extract
400g all purpose flour
100g whole wheat flour
½ teaspoon ground cinnamon
75g granulated sugar
¼ teaspoon table salt
3 teaspoons dried yeast
1 egg, beaten
1 tablespoon whole milk, extra, for brushing the loaves
handful rolled oats, for sprinkling

Place the vanilla seeds, milk, butter and vanilla extract in a small saucepan and heat until almost boiling and then allow to cool till lukewarm.
In the bowl of an electric mixer, fitted with the dough hook, mix the flours, cinnamon, salt and sugar. Make a well in the center and sprinkle in the dried yeast. Pour over the egg and the warm milk mixture and mix on low speed until the ingredients are incorporated. Continue mixing on low-medium speed until dough is elastic and smooth, about 8 minutes.
Place the dough in a lightly buttered large bowl and cover with plastic wrap. Leave to rise in a warm place for 45-60 minutes or so until it has doubled in size. Butter two 4 cup capacity loaf pans.
Knock back the dough and divide it in half. Roll each half into a large rectangle, roughly 20x30cm (8x12in), then roll each forming a tight cylinder. Place each cylinder into the prepared pans. Cover and leave to prove in a warm place for about 40 minutes – in the meantime, preheat the oven to 200°C/400°F.
Brush the loaves with the extra milk and sprinkle with the oats. Splash a little water in the bottom of the oven to create steam to help the loaf rise, then bake on the upper middle shelf for about 30 minutes or until the loaves are deep golden and sound hollow when tapped on the base.
Cool in the pans for 10 minutes, then carefully unmold and transfer to a wire rack to cool completely.

Makes 2 loaves

Friday, July 25, 2014

Amaranth choc chip cookies, and one month without movies

Amaranth choc chip cookies / Cookies com gotas de chocolate e farinha de amaranto

I had a confession to make: I haven’t watched a movie in weeks. Several weeks – it might be a record or something.

The last movie I watched was The Fault in Our Stars, then the World Cup began and I breathed soccer for a month – I believe I wasn’t the only one. :) After the German team took home the Cup I got obsessed with season 6 of SoA, so there was no room for movies – I had to know how things would end up (for the record, I did not like it at all).

My plans for the weekend: to watch as least one movie. And to bake, of course. :)

Movies weren’t the only forgotten thing around here: I hadn’t baked chocolate chip cookies in quite some time I did not even remember when I’d done that last. Being in possession of a 70% chocolate bar made me think of choc chips cookies, they would be the perfect way to use up such great chocolate. I’d seen these and they looked so good, and then I saw that they were an adaptation of a recipe I’d made, too, from a cookbook I adore (and the cookies were delicious).

I was out of buckwheat flour so I changed the recipe ever so slightly and used amaranth flour instead – the cookies turned out fantastic, beautifully golden, with a slightly different flavor. I had a couple while they were still warm from the oven and it was hard not to eat several in a row, I must tell you. There was a very, very subtle grainy texture to them while still warm – to me, not a problem at all – and that became less evident once they were completely cool.

If you’re out of amaranth flour, don’t fret: try the whole wheat version, it is equally delish.

Amaranth choc chip cookies
adapted from this wonderful cookbook, one of my favorites

2/3 cup (93g) whole wheat flour
2/3 cup (93g) all purpose flour
¼ cup (35g) amaranth flour
¾ teaspoons baking powder
½ teaspoon baking soda
¼ teaspoon salt
½ cup (1 stick/113g) cold unsalted butter, chopped
½ cup (88g) light brown sugar, packed
½ cup (100g) granulated sugar
1 egg
1 teaspoon vanilla extract
100g dark chocolate (70%), coarsely chopped

Preheat the oven to 180°C/350°F. Line two large baking sheets with baking paper.
In a large bowl, whisk the flours, baking powder, baking soda and salt.
In a large bowl, using an electric mixer, beat the butter and sugars on low speed just until the ingredients are blended, 2 minutes. Scrape down the sides of the bowl. Add the eggs, one at a time, mixing on medium until each is combined. Mix in the vanilla. Add the dry ingredients at once and blend on low just until the flour is barely combined, about 30 seconds. Add the chocolate chunks at once and mix on low speed just until the chocolate is evenly combined – to avoid overmixing the dough, finish incorporating the ingredients with your a spatula.
Place 2 leveled tablespoons of dough per cookie onto the prepared sheets, 5cm (2in) apart. Bake until golden brown around the edges, 12-16 minutes.
Cool in the pan for 2 minutes, then slide the paper with the cookies onto a wire rack and cool completely.

Makes about 20

Wednesday, July 23, 2014

Whisky and nutmeg pound cake

Whisky and nutmeg pound cake / Bolo de uísque e noz-moscada

I know, I know, there’s nothing “healthy” about whisky, but I believe that there is nothing wrong with adding a bit of alcohol to your cooking and baking occasionally – I can’t cook risotto without a splash of white wine, and beer can do wonders to a beef recipe (my bolognese sauce turned into something even more delicious after I started adding red wine to it).

All that written by someone who once made a cake drenched in rum. :D

The cake I bring you today has a lot less alcohol, but it is very flavorsome still and I bumped into the recipe because I wanted to bake something with whole wheat flour – my first thought was to bake bread, but when I checked the whole wheat flour container it was almost empty. Alice Medrich’s cake was then a very good choice, since the recipe called less than ½ cup of flour. It turned out tender and delicious – as all cakes should be – and with a beautiful golden hue.

I thought the cake was great with a cup of tea (it was a cold weekend), but I am sure it would be wonderful served with whipped cream and berries or fresh fruit, as the plated trifles Nigella makes, for a summery dessert. Or with vanilla ice cream topped with chocolate sauce, or salted caramel sauce.

Ok, I’ll stop. :)

Whisky and nutmeg pound cake
slightly adapted from the delicious Pure Dessert

2 tablespoons whole milk, room temperature
1 tablespoon whisky
3 large eggs, room temperature
1 teaspoon vanilla
105g cake flour (homemade: 15g corn starch + 90g all purpose flour)
55g whole wheat flour
150g granulated sugar
¾ teaspoon baking powder
1/8 teaspoon table salt
½ teaspoon freshly grated nutmeg
180g unsalted butter, softened and in chunks

Preheat the oven to 180°C/350°F. Lightly butter a 4 to 5 cups loaf pan, line it with baking paper and butter the paper.
In a medium bowl, whisk the milk, whisky, eggs, and vanilla to combine.
In the bowl of an electric mixer, whisk the flours, sugar, baking powder, nutmeg, and salt. Add the butter then pour in half of the egg mixture. Beat on low speed just until the dry ingredients are moistened. Increase the speed to medium and beat for 1 minute. Scrape the sides of the bowl. Add half of the rest of the egg mixture and beat for 20 seconds. Add the rest of the egg mixture and beat for 20 seconds. Scrape the sides and bottom of the bowl.
Transfer the batter to the prepared pan and smooth the surface. Bake until golden and risen and a toothpick comes out clean, 55-60 minutes. Cool the cake in the pan for 20 minutes, unmold carefully and transfer to a wire rack. Cool completely, then peel off the paper.

Serves 8-10

Friday, April 25, 2014

Cinnamon and chocolate rolls for a mind unable to forget

Cinnamon and chocolate rolls / Cinnamon rolls com chocolate

For days in a row I had cinnamon rolls in mind and I wasn’t really sure why – maybe because I’d seen some at Starbucks when I stopped by with a friend? That makes sense. But then again I’d seen blueberry muffins there, too, and they did not cross my mind at all. My mind works in mysterious ways, I guess. :)

Because it was Easter I felt like baking with chocolate, so why not add a handful of the ingredient to some already delicious cinnamon rolls? I did, inspired by Eric Lanlard, and to make the buns more interesting I switched a bit of the all purpose flour for whole wheat flour – not only was the flavor great paired with the chocolate and the cinnamon but it also added a beautiful golden hue to the rolls (and it lightened a bit the guilty factor). :D

I chose not to glaze the rolls for two reasons: I thought it would be overkill and without the glaze they can be reheated in the oven for a couple of minutes before serving – the melted chocolate combined with the cinnamon permeating the soft roll is something I can’t recommend highly enough.

Cinnamon and chocolate rolls
adapted from two wonderful sources: Chocolat and The Beekman 1802 Heirloom Dessert Cookbook: 100 Delicious Heritage Recipes from the Farm and Garden

Dough:
2 ½ teaspoons dry yeast
¼ cup (50g) + 1 teaspoon granulated sugar
¼ cup (60ml) warm water
6 tablespoons (85g/¾ stick) unsalted butter, at room temperature
4 large egg yolks
¾ cup (180ml) buttermilk*
½ teaspoon table salt
80g whole wheat flour
3 to 4 cups (420g to 560g) all-purpose flour

Filling:
100g light brown sugar
2 teaspoons ground cinnamon
pinch of table salt
3 tablespoons unsalted butter, very soft
100g dark chocolate, grated – I used one with 53% cocoa solids and blitzed it in the food processor

icing sugar, for dusting

Dough: in a small bowl, dissolve the yeast and 1 teaspoon granulated sugar in the warm water. Let stand for 5 minutes, or until foamy.
Meanwhile, in a stand mixer fitted with the paddle attachment beat the butter and ¼ cup granulated sugar until smooth. Beat in the egg yolks, buttermilk, and salt until well combined (mixture might look curdled). Beat in the yeast mixture. Add the whole wheat flour and 3 cups of the all purpose flour and mix until combined. Transfer the dough to a lightly floured work surface and knead until smooth, adding more flour if necessary – I switched the paddle attachment for the dough hook and kneaded the dough using mixer; in total, I used 470g all purpose flour.
Transfer the dough to a lightly buttered large bowl, cover with plastic wrap, and let stand at room temperature until doubled in volume, about 1 hour.

Filling: in a small bowl, mix the brown sugar, cinnamon and salt. Set aside.
Transfer the dough to a lightly floured work surface and roll to a 30x45cm (12x18in) rectangle. Spread the butter over the dough, then sprinkle with the cinnamon mixture followed by the chocolate. Starting at the longest end, roll tightly into a cylinder. Cut crosswise into 16 equal pieces.
Line a large baking sheet with foil and brush it lightly with butter. Place the slices side by side, 2.5cm (1in) apart. Cover loosely with plastic wrap and let rise until light and puffed, about 45 minutes – in the meantime, preheat the oven to 180°C/350°F.
Bake for 20-25 minutes, or until the buns are golden brown and well risen. Remove from the oven and let cool in the pan for 10 minutes, then transfer to a wire rack. Serve warm or at room temperature, dusted with icing sugar.

* homemade buttermilk: to make 1 cup buttermilk place 1 tablespoon lemon juice in a 240ml-capacity measuring cup and complete with whole milk (room temperature). Wait 10 minutes for it to thicken slightly, then use the whole mixture in your recipe

Makes 16

Related Posts with Thumbnails