Monday, August 31, 2009

Rocky road cupcakes

Rocky road cupcakes / Cupcakes de chocolate com marshmallow e Nutella

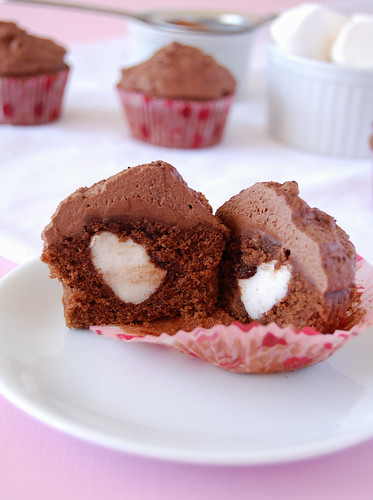
When I saw these cupcakes on DH magazine, I though they were chocolate cupcakes. But I was wrong – they were rocky road cupcakes! With marshmallow and Nutella... Yum. :D

It was like the first time I heard “Crazy” on the radio – I could’ve sworn it was Moby...

Rocky road cupcakes / Cupcakes de chocolate com marshmallow e Nutella

Rocky road cupcakes
from Donna Hay magazine

250g unsalted butter, softened
1 ¼ cups + 2 tablespoons (274g) caster sugar
4 eggs
2 cups + 2 tablespoons (300g) all purpose flour
¼ cup hazelnut meal*
2 teaspoons baking powder
1 cup (240ml) milk
200g dark chocolate, melted – I used 70% cocoa solids
12 large marshmallows
½ cup store-bought chocolate hazelnut spread (Nutella)

Whipped chocolate cream:
2 cups (500ml) whipping cream
3 tablespoons icing sugar
½ cup (45g) cocoa powder + extra for dusting

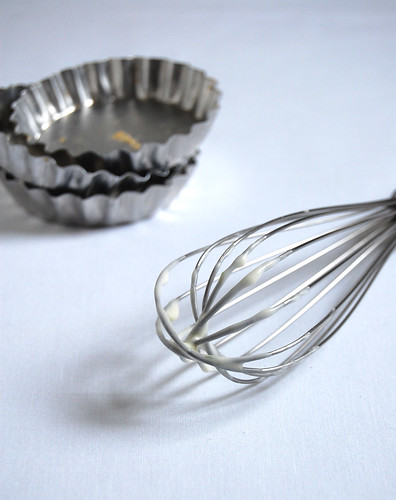
Preheat the oven to 160ºC/320ºF. Place the butter and sugar in the bowl of an electric mixer and beat until light and creamy. Gradually add the eggs and beat well. Sift over the flour, hazelnut meal and baking powder and beat until combined. Fold through the milk and chocolate and spoon the mixture into two 6-hole 1-cup capacity muffin pans lined with paper cases. Bake for 15-20 minutes or until cooked when a tested with a skewer. Allow to cool slightly. While still warm, make a hole in the center of each cupcake using a serrated paring knife. Remove the cake center and set aside. Fill each hole with 1 marshmallow and 1 teaspoon chocolate hazelnut spread. Press the centers back into the holes.

To make the whipped chocolate cream, place the cream, sugar and cocoa in a non-metallic bowl and whisk until soft peaks form (I did not understand this “non-metallic” issue; used a stainless steel bowl and it worked fine). Spread the whipped chocolate cream over the cupcakes with a palette knife. Dust with a bit of cocoa powder and serve.

* I used almond meal (ground almonds)

Makes 12 – I halved the recipe above and got 12 cupcakes, using 1/3-cup (80ml) capacity pans; because my pans were smaller I added 1/3 of one marshmallow + ½ teaspoon Nutella to each cupcake

Friday, August 28, 2009

Roasted cheese, bacon and tomato salad

Roasted cheese, bacon and tomato salad / Salada com tomate, bacon e queijo assados

I told you the other day that desserts are my favorite part of a meal – indeed, they are. But the savory recipes on the DH magazine are impossible to resist – I especially love the soups and salads, like this one.

I’ve tweaked it a bit, using arugula and balsamic vinegar instead of spinach and red wine vinegar; minor changes – nothing silly like choosing John Malkovich over Hugh Laurie. :D

Roasted cheese, bacon and tomato salad / Salada com tomate, bacon e queijo assados

Roasted cheese, bacon and tomato salad
slightly adapted from Donna Hay magazine

250g haloumi*, sliced
4 bacon slices, coarsely chopped
200g sourdough bread, chopped
2 tablespoons olive oil
250g cherry tomatoes
100g arugula leaves

Dressing:
3 tablespoons balsamic vinegar
2 tablespoons olive oil
1 clove garlic, crushed**

Preheat the oven to 220ºC/425ºF. To make the dressing, place the ingredients in a bowl and stir to combine. Set aside.

Place the haloumi, bacon, bread and olive oil on a baking tray and toss to combine. Roast for 5-6 minutes. Turn the haloumi and add the tomatoes. Roast for a further 6-8 minutes or until the tomatoes are cooked and the croutons are golden. Place in a bowl, add the arugula, drizzle with the dressing and toss to combine.

* I used queijo coalho, which is very easy to find here in Brazil and is similar to haloumi

** I used garlic infused olive oil and omitted the garlic clove

Serves 4

Tuesday, August 25, 2009

Vanilla buttermilk cake with whipped passion fruit ganache for a very special someone

Vanilla buttermilk cake with whipped passion fruit ganache / Bolo de baunilha e buttermilk com ganache de maracujá

Last year, it was lemon and strawberries; this time, vanilla and passion fruit take the stage to celebrate my sister’s birthday.

I don’t bake layer cakes as often as I would like to, but when I do this is the first book I reach for – again, the results were great. The cake layers turned out tender and the ganache was delicious and light, yet easy to spread and firm enough to hold the cake together (I adapted a white chocolate ganache recipe from the book).

Not completely sure if Jessica’d liked the cake, I asked: “wanna take some home?” - when she smiled and eagerly said “yes!” there was no doubt left. :D

Vanilla buttermilk cake with whipped passion fruit ganache / Bolo de baunilha e buttermilk com ganache de maracujá

Vanilla buttermilk cake with whipped passion fruit ganache
adapted from Sky High: Irresistible Triple-Layer Cakes

Cake:
4 whole eggs
2 egg yolks
2 teaspoons vanilla extract
1 ¼ cups (300ml) buttermilk – divided use
3 cups (420g) cake flour, sifted*
2 cups (400g) sugar – I used vanilla infused sugar
4 ½ teaspoons baking powder
½ teaspoon salt
1 cup (226g/2 sticks) unsalted butter, room temperature

Passion fruit ganache:
168g (6oz) white chocolate, finely chopped
1/3 cup + 1 ½ cups (440ml) heavy cream – divided use
2 tablespoons sugar
½ cup (120ml) pulp of passion fruit

Preheat the oven to 180ºC/350ºF. Butter the bottom and sides of three 8-inch round cake pans or spray to coat with vegetable oil. Line the bottom of each pan with a round of parchment or waxed paper and grease the paper.

Put the eggs and the yolks in a medium bowl, add the vanilla and ¼ cup (60ml) of buttermilk. Whisk to blend well.

Combine the flour, sugar, baking powder, and salt in a large mixer bowl – it has to be large, because there will be a huge amount of batter; whisk to blend. Add the butter and the remaining 1 cup (240ml) buttermilk and butter to these dry ingredients and with the mixer on low, blend together. Raise the mixer to medium speed and beat until light and fluffy, about 2 minutes.

Add the egg mixture in 3 additions, scraping down the sides of the bowl and mixing only until thoroughly incorporated. Divide the batter among the prepared pans.

Bake the cake layers for 28-32 minutes or until a cake tester or a wooden toothpick inserted in the center comes out clean and the cake begins to pull away from the sides of the pan. Let the cake layers cool in the pan for 10 minutes; then carefully turn out onto wire racks, peel off the paper liners and let cool completely.

Prepare the ganache: put the white chocolate in a small heatproof bowl. In a small saucepan, bring 1/3 cup (80ml) of the cream to a boil. Pour the hot cream over the chocolate, let stand for 1 minute then whisk until smooth. Let stand until cool to room temperature.
Process the passion fruit pulp in a food processor or blender to crack the seeds. Pass through a fine sieve directly onto the white chocolate mixture and mix well (I left a bit of seeds in the ganache just to make the cake look more like a passion fruit).
In a chilled bowl, with chilled beaters, beat the remaining 1 ½ cups of cream (360ml) with the sugar until softly whipped. Stir in the passion fruit cream and beat until fairly stiff, taking care not to overbeat the mixture, which would cause the ganache to separate.

To assemble the cake, place one layer, flat side up, on a cake stand or serving plate. Spread about ½ cup of the whipped ganache over the layer right to the edge. Repeat with the next layer. Plate the last layer on top and use the remaining ganache to frost the top and sides of the cake.

* homemade cake flour: 1 cup (140g) all purpose flour minus 2 tablespoons + 2 tablespoons corn starch

Serves 12-16

Monday, August 24, 2009

Strawberry ice cream with caramel sauce and my new email

Strawberry ice cream with caramel sauce / Sorvete de morango com calda de caramelo

Before today’s recipe, there’s something I need to share with you: I’ve been having some problems with my email account and therefore I’ll use my Gmail from now on. Because I don’t know when I’ll be able to log in to the old account again, can I ask you guys something? If you have emailed me in the last couple of days, would you please resend me the email at patricia (dot) scarpin (at) gmail.com?
Thank you!

After all the trouble with my email, I needed something to cool off – nothing better than ice cream for that. And after spotting the gorgeous redder-than-red-strawberries Joao’d bought, I knew exactly which flavor to try. :D

This is not an overly sweet ice cream and goes perfectly with the caramel sauce.

Strawberry ice cream with caramel sauce / Sorvete de morango com calda de caramelo

Strawberry ice cream with caramel sauce
slightly adapted from Donna Hay magazine

½ cup (120ml) whole milk
1 cup (240ml) heavy cream
½ vanilla bean, halved lengthwise
3 egg yolks
¼ cup + 2 tablespoons (74g) caster sugar
500g strawberries, hulled
¼ cup (50g) caster sugar

Caramel sauce:
1/3 cup (80ml) water
¾ cup (150g) caster sugar
2/3 cup (160ml) heavy cream

Combine milk and cream in a 1- to 2-quart heavy saucepan. With tip of a knife, scrape seeds from vanilla bean into mixture, then add pod. Heat the milk, cream and vanilla bean in a saucepan over medium heat until it starts to boil. Remove from heat, cover and let stand for 30 minutes.
Reheat cream mixture over medium heat, stirring, until hot. Place the egg yolks and sugar (74g) in a bowl and whisk until thick and pale. Slowly pour hot milk mixture into the egg mixture, whisking continuously. Return to the saucepan and stir over low heat for 4 minutes or until the custard thickens and coats the back of a spoon. Strain custard through a fine-mesh sieve into a metal bowl, return vanilla pod to mixture, cover and refrigerate for 3-4 hours.
Place the strawberries and extra sugar (50g) in a food processor and process until smooth. Add the strawberry purée to the cooled custard, mix well, then pour into an ice cream maker (remove vanilla bean). Follow the manufacturer’s instructions. Transfer ice cream to an airtight container and put in freezer until firm, at least 4 hours.

Make the sauce: place the water and sugar in a small saucepan over low heat and stir until sugar is dissolved. Increase the heat to high and boil for 7 minutes or until golden in color – do not stir during this time, just swirl the pan around. Remove from the heat and allow the bubbles to subside. Carefully add the cream and stir – mixture will bubble. Set aside to cool.

Serves 6-8

Strawberry ice cream with caramel sauce / Sorvete de morango com calda de caramelo

Thursday, August 20, 2009

Lavender lollipops

Lavender lollipops / Pirulitos de lavanda

I’d planned a salad for today’s post – a very good one, actually – but I’m desperately in need of something sweet and colorful, even if virtually. :D

These were really fun to make and turned out better than the first lollipops I tried - can’t wait to try new flavors. Any suggestions? :D

Lavender lollipops / Pirulitos de lavanda

Lavender lollipops
adapted from this recipe

½ cup (120ml) water
2 teaspoons edible dried lavender buds
1 cup (200g) sugar
1/3 cup light corn syrup
few drops of purple food coloring – I used Wilton’s and added it using a toothpick

Start by making a lavender infusion: place water and lavender in a small saucepan over medium heat and bring to a boil. Reduce heat to low and boil for 2-3 minutes. Remove from heat, cover and set aside until completely cold – I made the infusion the day before and left it covered at room temperature. Strain the infusion.

Oil a marble slab or baking sheet. Have ready at least a dozen wooden sucker sticks.

In a heavy 2-quart saucepan, combine the sugar, corn syrup and 1/3 cup (80ml) of the lavender infusion; stir to blend. Place over medium heat and bring to a boil, stirring occasionally. Cover and boil for 2-3 minutes. Uncover and insert a candy thermometer in the pan. Increase the heat to medium-high and cook, stirring occasionally, until the temperature reaches 143ºC/290ºF. If sugar crystals form on the pan sides, wash the down with a pastry brush dipped in warm water.
Remove the pan from the heat and immediately dip the bottom of it into a pan of cold water to arrest cooking, removing quickly before the mixture gets too cold. Place on a dry kitchen towel and add the food coloring.
Using a large metal spoon, immediately spoon a little less than 4cm (1½ in) pools of syrup onto the prepared marble slab/sheet*. Lay one end of the lollipop stick in each pool of syrup while still soft and push gently to secure in place. Dot a little extra syrup on the embedded end of the stick. Let cool at room temperature until completely set, about 2 hours.

Wrap each lollipop in cellophane or waxed paper. Store in an airtight container at room temperature for up to 1 month.

* once the mixture got cold and difficult to mold, I returned the pan to medium heat, stirring, until it became soft again (30 seconds or so)

Makes about 12

Lavender lollipops / Pirulitos de lavanda

Tuesday, August 18, 2009

Apple slice

Apple slice / Barrinhas de maçã

My blog has been featured on the Brazilian Elle mag blog! :D

Patricia Oyama interviewed me by phone and I felt really comfortable talking to her – nothing like my usual shy self; it was like chatting with a friend over some tea and cookies – or these delicious apple slices. :D

Thank you, Patricia, for the lovely post!

Apple slice / Barrinhas de maçã

Apple slice
from Donna Hay magazine

Apple filling:
5 Gala apples, peeled and chopped
1 ½ tablespoons unsalted butter, room temperature
½ teaspoon ground cinnamon

Crumble topping:
1¼ cups + 1 tablespoon (185g) all-purpose flour
1 teaspoon baking powder
½ cup + 1 tablespoon (127g) unsalted butter, room temperature
¾ cup + 1 tablespoon (162g) caster sugar

Base:
100g unsalted butter, room temperature
½ cup + 1 tablespoon (112g) caster sugar
1 egg
1 cup + 1 tablespoon (150g) all-purpose flour, sifted
1 teaspoon baking powder, sifted
1 tablespoon milk
icing sugar, to dust

Preheat oven to 160ºC/320ºF; butter a 20x30cm (8x12in) pan and line with non-stick baking paper or foil (if using foil, butter it, too) extending paper/foil over the edges of pan.

Start by making the filling: place the apples, butter and cinnamon in a saucepan over low heat and cook for 5 minutes or until softened. Allow to cool.

Now, the crumble: combine flour, baking powder, butter and sugar in a bowl and mix using your fingertips until mixture resembles breadcrumbs. Set aside.

Make the base: place the butter and sugar in an electric mixer and beat until creamy. Add the egg and beat well. Fold through the flour, baking powder and milk. Spread into prepared pan – it will be a thin layer - top with the apple filling and crumble and bake for 40 minutes until golden. Allow to cool, unmold using the foil “handles” and cut into squares. Dust with icing sugar to serve.

Serves 6-8 – I made ¾ of the recipe above, used a 20cm square pan and got 16 bars

Monday, August 17, 2009

Lemon tart ice cream

Lemon tart ice cream / Sorvete de torta de limão siciliano

The weather has been crazy here lately – 29ºC (84ºF) days in the middle of winter. I like the cold and the hearty food that comes with it, but have enjoyed the sunny days as well – after all, they are the perfect excuse for making ice cream. :D

I chose this flavor because of my sister’s love for all things lemon – I wonder where she got that from... :D

This is the recipe I used but the idea of adding cookie bits came from my dear friend Luna’s ice cream. :D

Lemon tart ice cream / Sorvete de torta de limão siciliano

Lemon tart ice cream

Lemon curd:
50g unsalted butter, room temperature, chopped
2 eggs, lightly whisked
¼ cup (60ml) fresh lemon juice
Finely grated zest of 2 lemons
1 cup + ½ tablespoon (106g) caster sugar

Custard:
1 cup + ½ tablespoon (106g) caster sugar
1 ¼ cups (300ml) heavy cream
1 cup (240ml) whole milk
4 egg yolks
100g digestive cookies, broken into pieces

Start by making the curd: combine the butter, eggs, lemon juice, zest and sugar in a medium saucepan. Cook, stirring constantly with a wooden spoon, over low heat for 5 minutes or until mixture thickens slightly. Remove from heat. Strain lemon curd through a fine sieve into a medium heatproof bowl*. Cover with plastic wrap touching the surface of the curd to prevent a skin from forming. Refrigerate for 30 minutes or until cool.

Combine cream and milk in a medium saucepan. Bring to a simmer over medium heat. Remove from heat and set aside to cool slightly.
Whisk the egg yolks and sugar together in a medium heatproof bowl until thick and pale. Gradually stir the warm cream mixture into the egg mixture. Return to saucepan and place over low heat. Cook, stirring constantly with a wooden spoon, for 10 minutes or until the custard coats the back of the spoon. Transfer to a medium heatproof bowl. Set aside for 10 minutes to cool.
Gradually stir the custard into the lemon curd and stir to combine. Refrigerate, covered, for 2-3 hours, then pour the mixture into an ice cream maker and follow the manufacturer’s instructions. Scoop the ice cream into a container and stir in the cookie pieces. Put in freezer until firm, at least 4 hours.

* next time I make this ice cream, I’ll be adding the zest after straining the curd, so it won’t get stuck inside the sieve

Serves 6-8

Friday, August 14, 2009

Crunchy-top pear muffins

Crunchy-top pear muffins / Muffins de pêra com cobertura crocante

I have received several comments and emails regarding the better than brownie cookies I posted a while ago - the recipe worked out fine for some of you but not so much for others... I’m sorry to hear that and have updated the post with info on the chocolate I used and on cooling the chocolate + butter mixture for 5 minutes prior to adding the other ingredients - I hope it helps!

If you’ve had a hard time baking the better than brownie cookies, may I suggest these muffins? A stress-free recipe that will cheer you up. And even if you haven’t baked those cookies, make the muffins anyway – they are really good. :D

Crunchy-top pear muffins / Muffins de pêra com cobertura crocante

Crunchy-top pear muffins
adapted from Holiday

1 ¼ cup + 1 tablespoon (185g) all purpose flour
3 teaspoons baking powder
2 teaspoons ground cinnamon
100g rolled oats
½ cup + ½ tablespoon (94g) brown sugar, both packed
2 eggs
1 cup (240ml) plain yogurt
½ cup (120ml) vegetable (light-flavored) oil
1 pear, peeled and diced

Topping:
¼ cup (44g) brown sugar, packed
1/3 cup (50g) unblanched almonds, finely chopped

Preheat the oven to 180ºC/350ºF; line six 240ml (1 cup) muffin pans with paper cases (or just grease well).

Sift the flour, baking powder and cinnamon into a large bowl, add the oats, brown sugar and stir together. Make a well in the centre.
Whisk together the eggs, yogurt and oil. Pour into the well in the dry ingredients and stir with a fork until just combined. Fold through the pear, being careful not to overmix. Spoon into the muffin cases.
To make the crumble topping, mix the brown sugar and almonds. Sprinkle over the muffin mixture and then bake for 20–25 minutes until golden brown.

Makes 6 – I halved the recipe, used 1/3 cup (80ml) capacity muffin pans and got 7 muffins

Wednesday, August 12, 2009

Orange poppy seed sugar cookies

Orange poppy seed sugar cookies / Cookies de laranja e sementes de papoula

I have tried, people. I swear I have. I’ve baked with strawberries and bananas to shake things up a little around here. But then I go to Joy’s beautiful blog and there is this amazing column there, on the right, called “citrus bits”, full of mouthwatering photos... I gave in. :D

These cookies are very easy to make and you can freeze one of the dough logs for later – but I don’t think that’s gonna happen. Honestly.

Orange poppy seed sugar cookies / Cookies de laranja e sementes de papoula

Orange poppy seed sugar cookies

2 cups (280g) all purpose flour
½ teaspoon salt
½ teaspoon baking powder
½ cup + 2 tablespoons (140g) unsalted butter, at room temperature
1 cup (200g) sugar
1 egg
1 egg yolk
1 teaspoon pure vanilla extract
1 ½ tablespoons poppy seeds
finely grated zest of 2 large oranges

Sift the flour, salt and baking powder into a medium bowl and poppy seeds together.
Put the sugar in a medium size bowl, add the orange zest and use the tips of your fingers to rub them together until sugar is fragrant.
Using an electric mixer, preferably fitted with a paddle attachment, beat the butter at medium speed for a minute or so, until smooth. Beat in the fragrant sugar and zest and continue to beat for about 2 minutes until mixture is light and pale.
Add the egg and yolk and beat for another minute or two. Beat in the vanilla.

Reduce the mixer to low speed and steadily add the flour mixture, mixing only until it has been incorporated. Because the dough is best when it is worked the least, you might want to stop the mixer before the flour is thoroughly blended into the dough, and finish the job with a rubber spatula. When mixed, the dough will be soft, creamy and malleable.

Turn the dough out onto the counter and divide in half. Shape each half into a chubby sausage - about 5cm (2in) in diameter* - and wrap in baking paper. The dough must be chilled or at least two hours. Well wrapped the dough can be refrigerated up to 3 days or frozen up to 2 months.

Center the rack in the oven and preheat oven to 180ºC/350ºF. Line two baking sheets with parchment paper or silicone mats.
Use a sharp, thin knife to slice into 6mm (¼-in) thick rounds, and place the rounds on prepared baking sheets, leaving a little over 3.5cm (1 ½-in) of space between them.

Bake the cookies one sheet at a time for 9 to 11 minutes, rotating the sheet at the midpoint. The cookies should feel firm, but they should not color much, if at all. Remove the pan from the oven and let the cookies rest 1 minute before carefully lifting them onto a rack to cool to room temperature. Repeat with the remaining dough, cooling the baking sheets between batches.

* my dough sausages were 4cm in diameter and I got 5cm (2in) cookies

Makes about 45 cookies

Monday, August 10, 2009

Kugelhopf with honeyed apples

Kugelhopf with honeyed apples / Kugelhopf com maçãs ao mel

One of the things I hate the most is being helpless over something - I want to change certain things but can’t. Feeling powerless drives me nuts and I don’t deal well with all the anxiety generated by my hands being tied. :S

But as far as my recipes are concerned I can take some action: this kugelhopf looked beautiful, but I did not have all the ingredients around; at least in my kitchen I can do things my way.

Kugelhopf with honeyed apples / Kugelhopf com maçãs ao mel

Kugelhopf with honeyed apples
from Australian Gourmet Traveller

Kugelhopf:
1 egg
100ml warm milk
50g golden raisins
60ml (¼ cup) brandy
1 ¾ cups + ½ tablespoon (250g) all purpose flour
¼ cup (50g) caster sugar
1 teaspoon dried yeast
½ teaspoon salt
75g unsalted butter, softened
50g dark chocolate (70% cocoa solids), roughly chopped

Honeyed apples:
1 cup + 2 tablespoons (224g) caster sugar
1 tablespoon honey
1 cup (240ml) water
2 Gala apples, halved, then each half cut into quarters
2 cinnamon quills
3 tablespoons brandy

Start by making the kugelhopf: lightly whisk egg and milk together in a bowl and set aside. In a separate bowl, combine raisins and brandy to soak and set aside.
Combine flour, sugar, yeast and salt in a food processor and process until mixture resembles breadcrumbs. Add butter and process for 2 minutes, then add egg mixture and process until well combined. Transfer dough to a lightly floured surface and knead for 5 minutes, adding more flour to stop dough from sticking, if necessary – I did the whole process in my Kitchen Aid, using the hook attachment, adding only 1 tablespoon flour.
Transfer to a lightly floured large bowl, cover with plastic wrap and stand in a warm place for 1½ hours or until dough doubles in size. Knead dough again on a lightly floured surface, adding chocolate and drained raisins (I did not add the brandy because the dough was very soft) kneading until combined.

Preheat oven to 180ºC/350ºF. Lightly butter and flour a 5 cup-capacity, 16cm-diameter kugelhopf mould*, shaking excess flour from mould. Roll dough out into a log shape, long enough to fit mould, then join ends to form a circle. Carefully place log into mould and press dough down. Cover with a tea towel and stand for about 1 hour or until dough has risen to rim of mould. Bake for 30 minutes or until golden brown, then turn onto a wire rack to cool.

For honeyed apples, combine sugar, honey and water in a saucepan and cook over medium heat for 5-7 minutes or until mixture begins to simmer. Reduce heat to low, add apples, cinnamon and 1 ½ tablespoons brandy and simmer for 15-20 minutes or until apples are tender and caramelized. Remove from heat and stir in remaining brandy. Set aside to cool.

To serve, transfer kugelhopf to a serving plate, place honeyed apples around cake and drizzle some syrup over cake - I found the kugelhopf a little dry on its own, but the syrup solved that problem.

* a kugelhopf mould is turban-shaped. If unavailable, use a Bundt cake pan – I used a plain 5-cup capacity ring pan

Serves 6

Kugelhopf with honeyed apples / Kugelhopf com maçãs ao mel

Friday, August 7, 2009

Lemon and broccolini soup

Lemon and broccolini soup / Sopa de brócolis e limão siciliano

Girls, thank you for all the haircut suggestions – I’m so glad you shared your thoughts with me! I’ll let you know when I make up my mind. :D

Because you are so sweet and dear to me, I’m offering you this soup: I could be offering you cookies or something with chocolate – I’d like that a lot more - but I want you to be healthy and strong. So soup it is. :D

Lemon and broccolini soup / Sopa de brócolis e limão siciliano

Lemon and broccolini soup
slightly adapted from Donna Hay magazine

2 tablespoons (28g) unsalted butter
½ tablespoon olive oil
1 onion, finely chopped
2 cloves garlic, crushed*
400g broccolini, coarsely chopped
4 cups (960ml) vegetable stock
100g spinach leaves
1 cup (240ml) heavy cream
1 tablespoon lemon juice
salt and freshly ground black pepper
sour cream or crème fraîche, to serve

Heat a deep, medium saucepan over high heat. Add the butter, olive oil, onion and garlic and cook, stirring, for 5 minutes or until the onion is tender. Add the broccolini and cook for another minute. Add the stock, bring to the boil and cook for 8-10 minutes or until the broccolini is tender. Add the spinach and cook for a further 1-2 minutes. Pour mixture into a blender or use an immersion (hand-held) blender to blend the soup until smooth - be careful because you are dealing with hot liquid; keep the end of the blender immersed in the soup all the time to stop the liquid from spilling. Stir in the cream, lemon juice, salt and pepper.
Ladle into bowl, top with about 1 tablespoon sour cream/crème fraîche, sprinkle some freshly ground black pepper over and serve.

* I used garlic infused olive oil and omitted the garlic cloves

Serves 4

Wednesday, August 5, 2009

White chocolate cupcakes with strawberry frosting

White chocolate cupcakes with strawberry frosting / Cupcakes de chocolate branco com cobertura de morango

I might have a decision-making disability. :S

I’ve been thinking of getting a new haircut for months, but can’t decide which one I like best – the horror, the horror. Sometimes I feel like going really short; other times I wonder how it would look long (haven’t worn my hair long in 8-9 years).

Same thing happens in the kitchen: I want to bake a new recipe, but can’t pick one out of the tons I have bookmarked. Luckily this time the strawberries in my fridge worked as a source of inspiration - these are the fluffiest cupcakes I have ever made/eaten.

Oh, I’m accepting suggestions on the hair dilemma. :D

White chocolate cupcakes with strawberry frosting / Cupcakes de chocolate branco com cobertura de morango

White chocolate cupcakes with strawberry frosting
adapted from Australian Gourmet Traveller

½ cup + 1 tablespoon (127g) soft unsalted butter
½ cup (100g) caster sugar
3 eggs
80g white chocolate, melted and slightly cooled
¾ cup + 1 tablespoon (115g) all purpose flour
1 teaspoon baking powder

Strawberry frosting*:
½ cup + 1 tablespoon (127g) soft unsalted butter
½ cup (70g) icing sugar, sifted
75g strawberries, hulled, puréed and strained

Start by making the cupcakes: preheat the oven to 180ºC/350ºF.

Using an electric mixer, beat butter and sugar until light and fluffy. Add eggs one at a time, beating well after each – the mixture will look curdled, but don’t worry – carry on. Add white chocolate and stir to combine. Sift flour and baking powder over cake batter and fold in until combined. Line two 6-hole (1/3 cup-capacity) muffin pans with 8 paper cases, then divide mixture among cases and bake for 20 minutes or until cakes spring back when lightly pressed. Cool completely before icing.

For strawberry frosting, using an electric mixer, beat butter until pale and fluffy, add icing sugar and beat until soft peaks form, then add strawberry purée and beat until combined. Spread frosting over cupcakes and serve.

Cupcakes will keep in an airtight container for up to 3 days.

* I’ve halved the frosting recipe here since it was enough to ice all the cupcakes

Makes 8 – I got 9 (using 1/3 cup capacity muffin pans); some of the batter almost spilled over, I should have filled the pans a little less

Monday, August 3, 2009

Lime tartlets

Lime tartlets / Tortinhas de limão

I’m such a softie - just can’t say “no” to my sister.

She finally stopped by and we spent last Saturday together. When I told her I was going to make sfiha – because she loves it – she replied: “It’s been ages since I last had lime tart...” :D

I wanted something different from my last lemon tart and for that I combined Deb’s fantastic sweet tart shell (it doesn’t shrink!) and Nigella's fresh lime filling. If my sister is any indication – she asked to take some tartlets home – this recipe is a keeper. :D

Lime tartlets / Tortinhas de limão

Lime tartlets

Tart shells:
1 ½ cups (210g) all-purpose flour
½ cup (70g) confectioner’s sugar
¼ teaspoon salt
126g (1 stick + 1 tablespoon) very cold (or frozen) unsalted butter, cut into small pieces
1 large egg

Lime filling:
finely grated zest and juice of 2 limes
¾ can (295g/10.5oz) sweetened condensed milk
2/3 cup (160ml) heavy cream

Start by making the shells: pulse the flour, sugar and salt together in the bowl of a food processor. Scatter the pieces of butter over the dry ingredients and pulse until the butter is coarsely cut in. (You’re looking for some pieces the size of oatmeal flakes and some the size of peas.) Stir the egg with a fork, just to break it up, and add it a little at a time, pulsing after each addition. When the egg is in, process in long pulses – about 10 seconds each – until the dough, which will look granular soon after the egg is added, forms clumps and curds. Just before you reach this stage, the sound of the machine working the dough will change–heads up – I used my Kitchen Aid with the paddle attachment in the whole process.
Turn the dough out onto a work surface and, very lightly and sparingly, knead the dough just to incorporate any dry ingredients that might have escaped mixing. Chill the dough, wrapped in plastic, for about 2 hours before rolling.

To roll the dough: butter twelve 9cm (3 ½in) tartlet pans with removable bottoms - alternatively, use one 22cm (9in) tart pan. Roll out small portions of chilled dough on floured sheet of parchment paper to 11.5cm (4 ½in) rounds, lifting and turning dough occasionally to free from paper. (Alternately, you can roll this out between two pieces of plastic, though flour the dough a bit anyway.). Transfer dough into prepared tartlet pans and seal any cracks in dough. Fold overhang in, making double-thick sides, and if too thick, push the dough down with your fingers towards the bottom of the pan. Pierce crust all over with fork.

Freeze the crusts for at least 30 minutes, preferably longer, before baking.

Preheat the oven to 190ºC/375ºF. Butter the shiny side of a piece of aluminum foil (or use nonstick foil) and cut roughly into twelve squares; place the foil squares, buttered side down, tightly against the crust. And here is the very best part: Since you froze the crust, you can bake it without weights. Put the tartlet pans on a large baking sheet and bake the crusts for 20 to 25 minutes, or until lightly golden.
Carefully remove the foil. If the crust has puffed, press it down gently with the back of a spoon. Bake the crust about 10 minutes longer to fully bake it, or until it is firm and golden brown, brown being the important word: a pale crust doesn’t have a lot of flavor. Transfer the pans to a rack and cool the crusts to room temperature

Do ahead: the dough can be wrapped and kept in the refrigerator for up to 5 days or frozen for up to 2 months. While the fully baked crust can be packed airtight and frozen for up to 2 months, the flavor will be fresher bake it directly from the freezer, already rolled out.

Filling: using an electric mixer, whisk all the ingredients in a large bowl until thick and creamy. Pour into the baked and cooled tart shells and chill for a further 30 minutes or until set.

Makes 12

Lime tartlets / Tortinhas de limão

Related Posts with Thumbnails