Showing posts with label dough. Show all posts

Tuesday, March 30, 2021

Broccolini, feta and pine nut gozleme and being inspired by TV shows

Gozleme de brócolis, feta e pinoli

One of the things I love the most about watching TV food shows is to learn about different foods and ingredients from places far from Brazil – when I traveled in the past I always wanted to try as many new things as I could while abroad. I remember when I visited my friend Valentina in London in 2009 and I begged her to buy me some rhubarb - I had never seen it in Brazil until then. :)

The same way Ottolenghi introduced me to pide, or Turkish pizza, Ainsley Harriott ate gozleme in his show and I immediately wanted to make it a home!

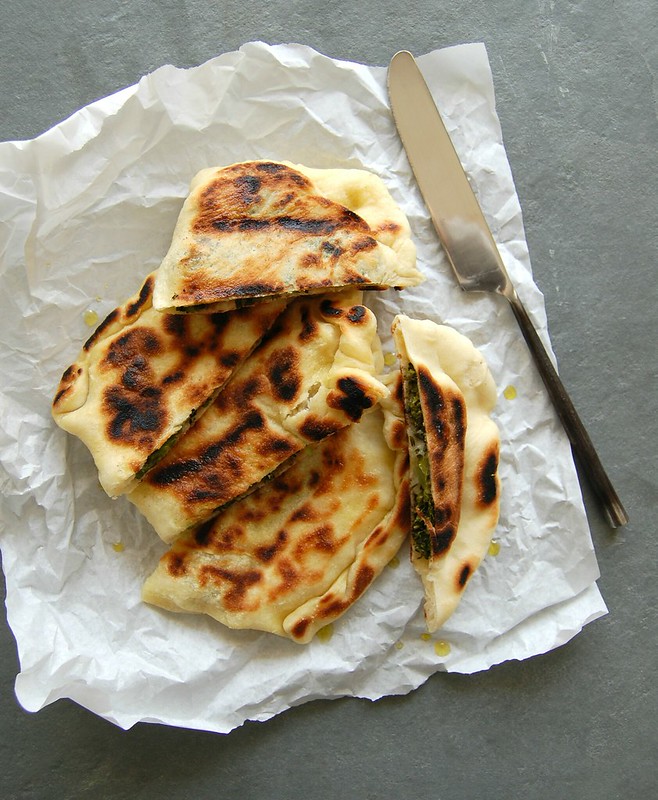
I used broccolini, feta and pine nuts in these gozleme, but you can pretty much use whatever you want for the filling – the sky is the limit! I am a sucker for all things feta – I like it so much that my dear friend Ellen who lives in California told me she will take me to a Greek restaurant when I come visit (cannot wait, Ellen!). 

I want to make this recipe again and use other vegetables for the filling, such as zucchini or eggplant, and other types of cheese as well.


Broccolini, feta and pine nut gozleme

own recipe, inspired by many I have seen online


Dough:

1 teaspoon dried yeast

½ teaspoon sugar

¾ cup (180ml) lukewarm water

1 teaspoon extra virgin olive oil

2 cups (280g) all purpose flour

1 tablespoon plain yogurt

1 teaspoon table salt


Filling:

1 tablespoon olive oil

1 garlic clove, minced

200g broccolini florets

salt and freshly ground black pepper

1 tablespoon Marsala wine – it gives a lovely smoky flavor to this recipe, but replace with white wine if Marsala is not available

100g feta cheese, finely chopped or crumbled

1 ½ tablespoons lightly toasted pine nuts


In the bowl of an electric mixer fitted with the dough hook, mix the yeast, sugar and water. Stir with a fork and set aside until foamy, about 5 minutes. Add the olive oil, flour, yogurt and salt and knead on medium speed for 6-8 minutes or until dough is smooth and elastic – if kneading by hand, it should take 10-12 minutes. Shape the dough into a ball and transfer to a large oiled bowl. Cover and set aside to proof for 60-80 minutes, depending on how warm the day is, or until doubled in size.

In the meantime, make the filling: heat the olive oil in a large nonstick frying pan over medium-high heat. Add the garlic and cook for 1 minute only – do not let it burn or it might turn bitter. Stir in the broccolini, cooking for 2-3 minutes. Season with salt and pepper (be careful with the salt, since feta can sometime be quite salty), add the Marsala and cook for another minute so the wine evaporates. Remove from the heat, let it cool, then stir in the feta and pine nuts.

Divide the dough into 4 equal portions. In a lightly floured surface, roll each portion of dough until you get a roughly 22-25cm (9-10in) circle. Place ¼ of the filling onto one half of the circle, then fold the other half over the filling, sealing the edges well.

Heat a nonstick frying pan over high heat. Brush one of the sides of the gozleme with olive oil and place brushed side down onto the pan. Cook for 2-3 minutes, or until golden. Brush the other side with olive oil and flip it, to cook the other side, for another 2-3 minutes or until golden. Repeat the process with the remaining gozleme. Serve immediately.

Makes 4

Thursday, December 14, 2017

Piadina

Piadina

I haven’t cooked much lately but I still like to make something nice on the weekends, and also try new recipes. And even though my husband and I are not big sandwich eaters, there are Saturdays when I make piadina for lunch: the dough is quick put together and since it is made with baking powder instead of yeast it does not take long to proof – it just rests for 30 minutes while you get on with other things in the kitchen.

Piadina is also great for it is very democratic: you can fill it with whatever you like or have in the fridge.

Piadina
own recipe

Dough:
3 cups (420g) all purpose flour
1 teaspoon table salt
1 ½ teaspoons baking poder
3 tablespoons extra virgin olive oil
2/3 cup (160ml) whole milk, room temperature
½ cup (120ml) water, room temperature

Fillings:
cheeses, prosciutto, ham, salad leaves, whatever you like

In a large bowl, whisk the flour, salt and baking powder – whisk well to evenly distribute the baking powder and salt throughout the flour. Add the olive oil, the milk and the water and mix with a wooden spoon until a dough starts to form. Start kneading – with your hands or with an electric mixer attached with the dough hook – until an elastic and smooth dough forms, about 8 minutes using the mixer and 12 by hand. Shape dough into a ball, transfer to a large bowl lightly brushed with olive oil and cover with plastic wrap. Set aside at room temperature for 30 minutes.

Turn the dough into a lightly floured surface and divide it into 6 equal pieces – each one should be about 120g (4oz). Shape each portion into a ball and cover them with a clean kitchen towel to prevent them from drying out. Heat a large nonstick frying pan on high heat.

Working on a lightly floured surface, roll out each dough ball until you get a rough 23cm (9in) circle. Transfer the circle to the frying pan and cook for 2-3 minutes each side. When the piadina is cooked, slide it into a plate and cover with a clean kitchen towel. Cook the remaining dough the same way.

To serve, fill each piadinha with whatever you prefer and fold it in half – when I fill mine with cheese I place them back in the frying pan, over medium heat for a minute, until cheese is melted.
Serve immediately.

Makes 6


Thursday, November 23, 2017

Gorgonzola and fresh oregano grissini

Gorgonzola and fresh oregano grissini / Grissini de orégano fresco e gorgonzola

At home we like nibbling very much, especially on weekends, and that came to my mind as I set up a plate of bread, cheese and fruit last Saturday for dinner: a glass of wine and the meal was perfect.
Sometimes we have guacamole with homemade tortillas, and of course there are days I don’t even want to enter the kitchen: those are the days for pizza. :)

If you are feeling a bit more enthusiastic than me lately please have a go at these grissini: they are absolutely delicious and great for the cheese/fruit platter (and with wine, too). :)

Gorgonzola and fresh oregano grissini
own recipe

1 teaspoon dried yeast
1 teaspoon granulated sugar
200ml lukewarm water
2 cups (280g) all purpose flour
1/3 cup (46g) whole wheat flour
3 tablespoons olive oil + a bit extra for brushing
1 teaspoon table salt
2 tablespoons fresh oregano leaves, packed
50g gorgonzola, coarsely grated or crumbled if too soft
3 tablespoons finely grated parmesan

In the bowl of an electric mixer fitted with the dough hook, mix the yeast, sugar and water with a fork. Set aside for about 5 minutes or until foamy. Add the flours, olive oil and salt. Mix on medium for about 8 minutes or until mixture turns into an elastic and smooth dough – if mixing by hand, 10-12 minutes should do it. Mix in the oregano and the gorgonzola, shape the dough into a ball and transfer to a large bowl lightly brushed with olive oil. Cover with plastic wrap and set aside to prove for 1 ½ hours, or until doubled in size.

Preheat the oven to 200°C/400°F. Line two large baking sheets with foil and brush it with olive oil.
Punch the dough to remove the excess air. Divide dough in 24 equal portions e roll each of them into a 30cm (12in) sausage shape – if dough is too stick, lightly flour your counter, but avoid too much flour or the dough will be tough and dry. Place the grissini onto the foil leaving 2cm (little less then 1in) between them. Brush them with olive oil, sprinkle with parmesan and bake for 20-25 minutes or until golden brown.
Transfer the sheets to a wire rack and cool completely.

Makes 24

Wednesday, October 4, 2017

Spinach, cheese and chorizo calzones

Spinach, cheese and chorizo calzones / Calzones de espinafre, queijo e chorizo

When I have difficult and/or very busy days I usually take a breather and go to People magazine’s website: I get to read about celebrities and for that I don’t need to use any of my brain cells. :D

Today I read about how Kim Cattrall “killed” the plans of a third SATC movie, and for that we all have to send Kim a big thank you card – the first movie was nice, but the second was absolutely ridiculous and just the thought of certain scenes makes me agonize all over again. Some of the comments suggest that the writers kill Samantha Jones and do the movie with the other three women instead, however I don’t find it a smart decision for the fun of the TV show was the four of them together, and Samantha was always my favorite character (followed very closely by Miranda).

I will borrow inspiration from SATC and present you these delicious calzones: the filling is a combination of spinach, cheese and chorizo and I beg of you not to remove any of the ingredients from it: the calzones would not be the same. The spinach and the cheese benefit intensely from the saltiness of the chorizo, however if you can’t find it bacon goes well here too.

Spinach, cheese and chorizo calzones
own recipe

Dough:
2 teaspoons dried yeast
½ teaspoon granulated sugar
1 ¼ cups (300ml) lukewarm water
2 tablespoons extra-virgin olive oil
3 ¼ cups (455g) all purpose flour
1 teaspoon salt

Filling:
¾ cup (105g) finely diced chorizo
2 large garlic cloves
2 cups (120g) fresh spinach leaves, packed
salt and freshly ground black pepper
2 cups (200g) coarsely ground yellow mozzarella*
extra virgin olive oil, for brushing the calzones

Start with the dough: in the bowl of an electric mixer fitted with the dough hook, mix the yeast, sugar and water with a fork. Set aside until foamy, about 5 minutes. Add the olive oil, flour and salt and mix for 6-8 minutes or until a soft and elastic dough forms. Shape dough into a ball and transfer to a lightly oiled bowl. Cover with plastic wrap and set aside to proof in a warm place for about 1 hour or until doubled in size.

In the meantime, make the filling: heat a large nonstick frying pan over high heat. Add the chorizo and cook stirring occasionally until the pieces are golden and crispy. Add the garlic and cook for 1 minute or until fragrant – do not let it burn or it will get bitter. Stir in the spinach leaves and cook until wilted. Season with salt and pepper – go easy on the salt for the chorizo is usually salty. Cool, then stir in the cheese.

Preheat the oven to 400°F/200°F. Line a large baking sheet with foil and brush it lightly with olive oil.
Divide the dough into 8 equal parts – each will be around 100g (3 ½ oz.). Roll out each portion of dough on a lightly floured surface until you get a rough 25cm (10in) circle. Place some of the filling on one side of the dough and fold the other half over, pinching the seams well to keep the filling inside. Repeat the process with the remaining dough and filling. Place the calzones onto the prepared sheet and brush them lightly with olive oil. Bake for 25-30 minutes or until golden. Serve immediately.

* the yellow mozzarella I used is not like fresh mozzarella balls, therefore it does not release too much liquid. Replace by cheddar or something similar texture wise.

Makes 8

Friday, April 25, 2014

Cinnamon and chocolate rolls for a mind unable to forget

Cinnamon and chocolate rolls / Cinnamon rolls com chocolate

For days in a row I had cinnamon rolls in mind and I wasn’t really sure why – maybe because I’d seen some at Starbucks when I stopped by with a friend? That makes sense. But then again I’d seen blueberry muffins there, too, and they did not cross my mind at all. My mind works in mysterious ways, I guess. :)

Because it was Easter I felt like baking with chocolate, so why not add a handful of the ingredient to some already delicious cinnamon rolls? I did, inspired by Eric Lanlard, and to make the buns more interesting I switched a bit of the all purpose flour for whole wheat flour – not only was the flavor great paired with the chocolate and the cinnamon but it also added a beautiful golden hue to the rolls (and it lightened a bit the guilty factor). :D

I chose not to glaze the rolls for two reasons: I thought it would be overkill and without the glaze they can be reheated in the oven for a couple of minutes before serving – the melted chocolate combined with the cinnamon permeating the soft roll is something I can’t recommend highly enough.

Cinnamon and chocolate rolls
adapted from two wonderful sources: Chocolat and The Beekman 1802 Heirloom Dessert Cookbook: 100 Delicious Heritage Recipes from the Farm and Garden

Dough:
2 ½ teaspoons dry yeast
¼ cup (50g) + 1 teaspoon granulated sugar
¼ cup (60ml) warm water
6 tablespoons (85g/¾ stick) unsalted butter, at room temperature
4 large egg yolks
¾ cup (180ml) buttermilk*
½ teaspoon table salt
80g whole wheat flour
3 to 4 cups (420g to 560g) all-purpose flour

Filling:
100g light brown sugar
2 teaspoons ground cinnamon
pinch of table salt
3 tablespoons unsalted butter, very soft
100g dark chocolate, grated – I used one with 53% cocoa solids and blitzed it in the food processor

icing sugar, for dusting

Dough: in a small bowl, dissolve the yeast and 1 teaspoon granulated sugar in the warm water. Let stand for 5 minutes, or until foamy.
Meanwhile, in a stand mixer fitted with the paddle attachment beat the butter and ¼ cup granulated sugar until smooth. Beat in the egg yolks, buttermilk, and salt until well combined (mixture might look curdled). Beat in the yeast mixture. Add the whole wheat flour and 3 cups of the all purpose flour and mix until combined. Transfer the dough to a lightly floured work surface and knead until smooth, adding more flour if necessary – I switched the paddle attachment for the dough hook and kneaded the dough using mixer; in total, I used 470g all purpose flour.
Transfer the dough to a lightly buttered large bowl, cover with plastic wrap, and let stand at room temperature until doubled in volume, about 1 hour.

Filling: in a small bowl, mix the brown sugar, cinnamon and salt. Set aside.
Transfer the dough to a lightly floured work surface and roll to a 30x45cm (12x18in) rectangle. Spread the butter over the dough, then sprinkle with the cinnamon mixture followed by the chocolate. Starting at the longest end, roll tightly into a cylinder. Cut crosswise into 16 equal pieces.
Line a large baking sheet with foil and brush it lightly with butter. Place the slices side by side, 2.5cm (1in) apart. Cover loosely with plastic wrap and let rise until light and puffed, about 45 minutes – in the meantime, preheat the oven to 180°C/350°F.
Bake for 20-25 minutes, or until the buns are golden brown and well risen. Remove from the oven and let cool in the pan for 10 minutes, then transfer to a wire rack. Serve warm or at room temperature, dusted with icing sugar.

* homemade buttermilk: to make 1 cup buttermilk place 1 tablespoon lemon juice in a 240ml-capacity measuring cup and complete with whole milk (room temperature). Wait 10 minutes for it to thicken slightly, then use the whole mixture in your recipe

Makes 16

Monday, January 23, 2012

Golden mixed greens pie

Golden mixed greens pie / Torta de verdura

It might look like I live on sweets, but no – I eat savory food, too, and try to eat my greens as frequently as possible. :)
This tart is delicious and not difficult to make – you just need to plan accordingly so the dough has time to rise and the good thing is: you can make it in advance and reheat it before serving.

Golden mixed greens pie
slightly adapted from the absolutely gorgeous Home Baking: The Artful Mix of Flour and Traditions from Around the World

Dough:
1 teaspoon active dry yeast
2 tablespoons warm whole milk
1 cup (140g) all purpose flour
2 large eggs
1 tablespoon sugar
¾ teaspoon salt
1 tablespoon unsalted butter, softened
½ cup (60g) cake flour*
melted butter, for brushing

Filling:
1 large bunch dandelion greens or other bitter greens – I used escarole
1 large bunch spinach
½ tablespoon olive oil + more if necessary
1 garlic clove, minced
1 scallion, white and most of green parts, chopped
salt, to taste (about ¾ teaspoon)
1/8 teaspoon freshly ground nutmeg
1 ½ tablespoons pine nuts, lightly toasted and cooled

Dough: dissolve the yeast in the lukewarm milk and stir in 1 ½ tablespoons of the all purpose flour.
Break the eggs into the large bowl of an electric mixer (attached with the dough hook) and lightly whisk them with a fork. Add the yeast mixture and the remaining all purpose flour and mix on low speed until very smooth. Add the sugar, salt and butter and mix well. Add the cake flour and knead on low speed for 5 minutes or until smooth.
Transfer the dough to a lightly buttered large bowl, cover well with plastic and let rise until doubled, about 2 hours.
Meanwhile, make the filling: chop the greens into 2.5cm (1in) pieces, discarding any thick stems.
In a very large saucepan, heat the olive oil over medium heat. Add the garlic and scallions and cook for about 1 minute, until the scallions begin to soften. Raise the heat to high, add the chopped greens, salt and pepper and cook, stirring constantly, for about 1 minute or until greens are wilted (work in batches if necessary). Transfer the greens to a plate and let cool to room temperature. Taste for salt the stir through the nutmeg and pine nuts.
Preheat the oven to 230°C/450°F. Line a large baking sheet with foil then lightly brush the foil with oil.
Turn the dough onto a lightly floured surface and cut into 2 slightly unequal pieces: the larger one will be the bottom crust. Flatten the larger piece of dough onto an oval about 40x25cm (16x10in) and transfer onto the prepared sheet. Press the filling onto a colander, using your hands too, to extract the maximum water possible. Spread the filling over the dough leaving a generous 2.5cm (1in) rim all around uncovered. Roll the remaining piece of dough onto an oval about 37x20cm (15x8in). Place it over the filling and fold the edges of the bottom dough up over the edges of the top to seal the edges in the filling, then twist it, making a twisted rolled edge all round. Use a sharp knife to make slits in the top crust. Brush with the melted butter (I forgot to do that).
Bake the pie for 8 minutes, then lower the heat to 200°C/400°F and bake for another 8-10 minutes or until pie is deep, rich golden brown.
Transfer the pie to a wire rack and cool for 20 minutes.
Serve warm or at room temperature.

* homemade cake flour: 1 cup (140g) all purpose flour minus 2 tablespoons + 2 tablespoons corn starch

Serves 8-10

Friday, June 11, 2010

Milk chocolate-filled cinnamon doughnuts

Milk chocolate-filled cinnamon doughnuts / Doughnuts com canela recheados com chocolate ao leite

Still on the feasible side of promises and resolutions, I’ve been trying to make more yeasted recipes – because I always tell people I love working with yeast but taking a look at my blog that doesn’t sound very true.

I got this recipe here – the same magazine these buns came from – and highly recommend it: the doughnuts are tender, taste great and imho don’t necessarily need the chocolate filling.
Just need to warn you the recipe yields a lot – not a bad thing if you have a big family, but that is not my case. :)

Milk chocolate-filled cinnamon doughnuts
from Australian Gourmet Traveller

2 ¼ teaspoons (7g) dried yeast
1 cup buttermilk, at room temperature
¼ cup + ½ tablespoon (56g) caster sugar
5 cups + 1 tablespoon (710g) all purpose flour
¼ cup + 3 tablespoons (98g) unsalted butter, melted
3 eggs
pinch of salt
100g milk chocolate, coarsely chopped
milk, for brushing
vegetable oil, for frying
cinnamon sugar, for dusting

Combine yeast, buttermilk, sugar and ¼ cup (60ml) warm water in the bowl of an electric mixer and stand for 10 minutes or until foamy. Add flour, butter, eggs and a pinch of salt and mix using dough hook attachment. Turn onto a floured surface and knead until smooth – I used the mixer for the whole process. Form the dough into a ball and place in a lightly oiled bowl, turning to coat, cover with plastic wrap and stand for 1 hour or until doubled in size.
Turn dough onto a lightly floured surface and roll to 3mm thick. Using a 7.5cm (3in) round cutter dipped in flour, cut out rounds, re-roll dough and repeat. Divide milk chocolate among half the rounds, placing in center, brush edges with milk and top with remaining rounds. Using a 6.5cm (2 ½in) round cutter dipped in flour, trim rounds, pressing to seal. Place 2.5cm (1in) apart on a lightly floured tray and stand for 30 minutes or until doubled in size.
Heat oil in a large deep saucepan or deep-fryer to 160°C/320°F. Deep-fry doughnuts, in batches, turning occasionally for 2-3 minutes, or until puffed and golden. Place over paper towels to absorb excess oil.
Roll in cinnamon sugar and serve immediately.

Serves 15 – I halved the recipe above and got 22 doughnuts

Friday, June 19, 2009

Onion tartlets

Onion tartlets / Tortinhas de cebola

Two people I hold very dear will be turning away at the blog upon seeing this recipe: my brother JP and my good friend C. - they hate onions with every fiber of their beings! :D

I’m not a fan of raw onions, but love them cooked or roasted. In these tartlets the onion slices are cooked in butter for a good while and after being mixed with the other filling ingredients and baked they became really soft, almost sweet.

The dough shrunk in the oven, resulting in smaller tart cases – because of that, there wasn’t much room for the filling, causing it to leak (I used loose-bottomed pans). The great flavor made me forget all the trouble. :D

Onion tartlets / Tortinhas de cebola

Onion tartlets
from Australian Gourmet Traveller

Tarte:
250g plain flour
125g cold unsalted butter, diced
1 teaspoon salt
1 egg

Onion filling:
60g unsalted butter
600g (about 2 large) onions, cut in half then thinly sliced
3 eggs, beaten
200ml crème fraîche*
½ teaspoon freshly grated nutmeg
salt and freshly ground black pepper

Start with the dough: process flour, butter and salt in a food processor until mixture resembles breadcrumbs. Add egg, then while pulsing gradually add 2-3 tablespoons iced water until pastry forms into a ball. Transfer to a floured surface, knead for 30 seconds, wrap in plastic wrap and refrigerate for 30 minutes.
Preheat oven to 200ºC/400ºF. Roll out pastry to 5mm thick on a floured surface, cut out four 16cm-diameter rounds and use to line four 12cm-diameter tart pans, trimming excess pastry with a knife. Prick dough with a fork and place pans in freezer for 10 minutes, then bake for 12 minutes or until golden. Set aside until ready to use.
For onion filling, melt butter in a large saucepan over low heat, add onions and cook, stirring occasionally, for about 30 minutes or until softened but not brown. Transfer to a bowl and cool. Whisk eggs, crème fraîche and nutmeg together and season with salt and black pepper. Add to onions and combine well. Divide filling among tart pans and bake for 15 minutes or until golden. Serve warm or cold.

* I’ve never seen crème fraîche around here, so I added lime juice to heavy (whipping) cream and set aside, in room temperature, until thick

Serves 4 – I halved the recipe and got six 9cm tartlets

Onion tartlets / Tortinhas de cebola

Friday, July 18, 2008

Lemon tart

Lemon tart

I love listening to music while I’m cooking/baking. And I sing along, too – oh, my poor neighbors... :)

Certain recipes remind me of certain songs, probably because I was listening to them on repeat mode – another bad habit of mine – while preparing the food. The Darkest Chocolate Crepe Cake, for example, instantly brings Steve Winwood’s “Valerie” to my mind, and vice versa. Crash Hot Potatoes = Clapton’s “It’s in the way that you used it”. The list goes on and on.

The radio was off when I made this tart, but something tells me that this song would go with it very well. :)

Lemon tart

Lemon tart
from Donna Hay magazine

- metric and imperial measurements found in the magazine; I used my scale

Dough:
1 1/3 cups (200g/7oz) all purpose flour
100g (3 ½oz) cold unsalted butter, chopped
1 tablespoon caster sugar
1 egg, lightly beaten
¼ teaspoon vanilla extract

Lemon filling:
1 cup (8 fl oz) single or pouring cream
2 eggs
3 egg yolks
½ cup (110g/3 ¾oz) caster sugar
½ cup (4 fl oz) lemon juice

Place the flour, butter and sugar in a food processor and process until the mixture resembles breadcrumbs. Add the egg and vanilla and process in short bursts until the pastry just comes together. Turn out and bring together to form a ball. Flatten the pastry, wrap in plastic and refrigerate for 15 minutes.
Roll out the pastry on a lightly floured surface until 3mm (1/8 in) thick. Line a deep 22cm (9in) round pastry ring* with the pastry, trim and prick the base with a fork. Refrigerate for 30 minutes.
Preheat the oven to 180ºC/360ºF. Line the pastry with non-stick baking paper, fill with baking weights or dried beans and bake for 15 minutes. Remove the weights/beans and paper and bake for a further 2-3 minutes or until golden. Set aside.
Reduce the oven to 140ºC/285ºF. To make the lemon filling, place the cream, eggs, egg yolks, sugar and lemon juice in a bowl and whisk to combine. Pour the mixture into the tart shell and use the back of a metal spoon to skim the surface to remove any bubbles. Bake for 20 minutes or until just set. Allow to cool and refrigerate until completely set.

* I used a shallow pan and there was some dough left; I froze it and to avoid wasting lemon filling I halved the recipe.

Serves 8

Thursday, April 17, 2008

Sfiha

Sfihas

Besides the cake, I made savory snacks for the boys’ birthday get together at my house last month. Simple yet good food, easy and quick to put together, because they’d arrive at lunch time and I would not have much time to cook. So I went for mini carne louca sandwiches and sfihas.

As much as it sounds like a big cliché, Brazil is a melting pot and we have been influenced by many different cultures. Our food is a great example of that. Italian, Portuguese, Japanese – you’ll find all those flavors in our menu. Not to mention the dishes we inherited from the indians (Brazil’s first habitants) and from the slaves that came from Africa centuries ago.

There’s also a large Syrian-Lebanese community here (at least in Sao Paulo), so sfihas are extremely popular. These are so delicious, I’m sure you’ll love them – I did, even though I can’t stand beef. And my Italian/Portuguese/German family loved them, too.

Sfihas

Sfiha

Filling:
½ kg (17 ½ oz) ground beef
2 ripe tomatoes, seeds removed, finely diced
½ onion, finely diced
½ cup chopped parsley
2 teaspoons salt
juice of 1 lime
freshly ground black pepper*

Dough:
30g fresh yeast
500ml warm milk – I used 1% fat
3 tablespoons sugar
1 ½ teaspoons salt
2 tablespoons vegetable oil
5 ½ cups (about 780g) all-purpose flour – I used only 730g

Start with the filling: place all the ingredients in a large bowl and mix well until smooth. Set aside.

Preheat the oven to 220ºC/428ºF.

Now, the dough: place the yeast in a large bowl and add the milk. Mix well with a fork until the yeast is dissolved. Add the sugar, salt and oil. Start adding the flour, gradually, mixing with a wooden spoon until a smooth dough forms. Cover with a clean kitchen towel and let it rest for 5 minutes. Turn dough onto a lightly floured surface and knead it for about 5 minutes. Take small portions of dough – the size of a walnut – and make them into balls. Place onto a floured baking sheet, cover with a kitchen towel and set aside for another 5 minutes.
Using your fingers – I used a rolling pin, it was a lot easier – open each dough ball into a circle. Place ½ tablespoon of beef filling** into the center of the circle. Fold in the lower third of the circle towards the center of the sfiha, then the left and right thirds of the circle, forming a triangle. Pinch the ends together to seal the filling inside.
Place the sfihas, 1 inch apart, onto an oiled baking sheet.
Bake for about 30 minutes or until golden.

If you prefer your sfihas softer, place them inside a pot right after they’re out of the oven and put the lid on (I did not do that).
You can also use an egg wash on the sfihas before baking them, which I think is completely unnecessary.

* the original recipe calls for 1 teaspoon bahrat; I didn’t have any in my pantry, that’s why I used black pepper instead.

** the ground beef is used raw in the filling and releases water and blood after being mixed with the other ingredients. To prevent the dough from being watery, I placed the filling inside a colander over a bowl and squeezed the small portions of filling between my fingers to get rid of any excess liquid before putting them in each dough circle.

Makes 60

Sfihas

Tuesday, June 26, 2007

The Daring Bakers present: Bagels

Bagels

When I read that this month’s challenge was to make bagels, I was very excited – I’d never tasted the famous bread and what a nice chance to do so!

I loved the dough: delicious to be kneaded and rises like no other. I also had loads of fun with the whole “making of”… I just felt sad about the look of the bagels – they’re so ugly, the poor things. Wrinkled like a Shar-Pei. :(

Anyway, I thought the flavor was really good – even though I haven’t tasted a real bagel to compare – and I’ll try to make them again, hoping to get shiny and smooth bagels as it should be.

Liked this sort of Seinfeld post? Check the other Daring Bakers’ blogs – I’m sure you’ll find some pretty good bagels there!

Bagels

Bagels

840-1,120g (6-8 cups) bread (high-gluten) flour
4 tablespoons dry baking yeast
6 tablespoons granulated white sugar or light honey (clover honey is good)
2 teaspoons salt
720ml (3 cups) hot water
a bit of vegetable oil
3.8 liters (1 gallon) water
3-5 tablespoons malt syrup or sugar
a few handfuls of cornmeal

First, pour three cups of hot water into the mixing bowl. The water should be hot, but not so hot that you can't bear to put your fingers in it for several seconds at a time. Add the sugar or honey and stir it with your fingers (a good way to make sure the water is not too hot) or with a wire whisk to dissolve. Sprinkle the yeast over the surface of the water, and stir to dissolve.

Wait about ten minutes for the yeast to begin to revive and grow. You will know that the yeast is okay if it begins to foam and exude a sweetish, slightly beery smell.

At this point, add about 420g (3 cups) of flour as well as the 2 teaspoons of salt to the water and yeast and begin mixing it in – use your hands or a wooden spoon; I prefer the latter.

When you have incorporated the first three cups of flour, the dough should begin to become thick-ish. Add more flour, a half-cup or so at a time, and mix each addition thoroughly before adding more flour. As the dough gets thicker, add less and less flour at a time. Soon you will begin to knead it by hand – do it in the bowl, in case it’s big enough, or on a clean and lightly floured countertop.
Add bits of flour if necessary to keep the dough from sticking. Soon you should have a nice stiff dough. It will be quite elastic, but heavy and stiffer than a normal bread dough. Do not make it too dry, however... it should still give easily and stretch easily without tearing.

Place the dough in a lightly oiled bowl, and cover with one of your clean kitchen towels, dampened somewhat by getting it wet and then wringing it out thoroughly. If you swish the dough around in the bowl, you can get the whole ball of dough covered with a very thin film of oil, which will keep it from drying out.

Place the bowl with the dough in it in a dry, warm (but not hot) place, free from drafts – I always use my microwave oven for this step when I make bread or pizza dough. Allow it to rise until doubled in volume – I let it rise for 1 hour and it was huge when I took it out of the oven.

While the dough is rising, fill a stockpot with about the water and set it on the fire to boil. When it reaches a boil, add the malt syrup or sugar and reduce the heat so that the water just barely simmers; the surface of the water should hardly move.
Once the dough has risen, turn it onto your work surface, punch it down, and divide immediately into as many hunks as you want to make bagels. For this recipe, you will probably end up with about 15 bagels, so you will divide the dough into 15 roughly even-sized hunks. Begin forming the bagels. There are two schools of thought on this. One method of bagel formation involves shaping the dough into a rough sphere, then poking a hole through the middle with a finger and then pulling at the dough around the hole to make the bagel – this is how I did it.
The other method involves making a long cylindrical "snake" of dough and wrapping it around your hand into a loop and mashing the ends together. Whatever you like to do is fine. DO NOT, however, give in to the temptation of using a doughnut or cookie cutter to shape your bagels. Just like snowflakes, no two genuine bagels are exactly alike.

Begin to preheat the oven to 205ºC/400ºF.

Once the bagels are formed, let them sit for about 10 minutes. They will begin to rise slightly. Ideally, they will rise by about one-fourth volume... a technique called "half-proofing" the dough. At the end of the half-proofing, drop the bagels into the simmering water one by one. You don't want to crowd them, and so there should only be two or three bagels simmering at any given time. The bagels should sink first, then gracefully float to the top of the simmering water. If they float, it's not a big deal, but it does mean that you'll have a somewhat more bready (and less bagely) texture – that’s what happened to me.
Let the bagel simmer for about three minutes, then turn them over with a skimmer or a slotted spoon. Simmer another three minutes, and then lift the bagels out of the water and set them on a clean kitchen towel that has been spread on the countertop for this purpose. The bagels should be pretty and shiny, thanks to the malt syrup or sugar in the boiling water.

Once all the bagels have been boiled, prepare your baking sheets by sprinkling them with cornmeal. Then arrange the bagels on the prepared baking sheets and put them in the oven. Let them bake for about 25 minutes, then remove from the oven, turn them over and put them back in the oven to finish baking for about ten minutes more. This will help to prevent flat-bottomed bagels – I didn’t turn them because I didn’t want the toppings to fall down. I baked them for 35 minutes straight.

Remove from the oven and cool on wire racks, or on dry clean towels if you have no racks. Do not attempt to cut them until they are cool... hot bagels slice abominably and you'll end up with a wadded mass of bagel pulp. Don't do it.

To customize bagels: After boiling but before baking, brush the bagels with a wash made of 1 egg white and 3 tablespoons ice water beaten together. Sprinkle with the topping of your choice: poppy, sesame, or caraway seeds, toasted onion or raw garlic bits, salt* or whatever you like. Just remember that bagels are essentially a savory baked good, not a sweet one, and so things like fruit and sweet spices are really rather out of place.

* I used coarse salt and thought that it became a bit wet on the following day.

blue_sil

Tuesday, May 8, 2007

Dulce de leche brioche rolls

Dulce de leche brioche rolls

The minute I saw Helene’s wonderful rolls I knew I had to make them – my dad is absolutely crazy for dulce de leche!

So I invited dad, my brother and my sister to have dinner at my house. I baked the bread and left it on the dinner table, while I was making the pizzas in the kitchen. You should have seen the look on his face when he arrived and saw the rolls… He immediately asked what those were and I said they were dulce de leche rolls that I had made especially for him. The man was thrilled!
And so was my 13-year-old sister – I saw her whispering something to my father and asked what was going on. He told me that she was asking if she could get some of those for herself. :)
She told me later that she took the rolls to school and had them as a snack during class recess – but she had to share them with a friend, who asked to have some! :)

Helene, this recipe is absolutely divine: the buttery dough is very tender and soft and the filling complements it perfectly. Thank you so much for sharing!

Dulce de leche brioche rolls

Dough:
80ml (1/3 cup) warm water
80ml (1/3 cup) warm milk
14g (5 teaspoons - 2 envelopes) dry yeast
525g (3 ¾ cups) all purpose flour
2 teaspoons salt
3 large eggs
50g (¼ cup) sugar
340g (1 ½ cups - 3 sticks) unsalted butter, each stick cut into 4 pieces, room temperature

Filling:
approx. 300g (1 cup) dulce de leche, room temperature

Glaze:
1 egg, beaten to blend with 1 tablespoon water

Place warm water, warm milk, and yeast in a bowl of standing heavy-duty mixer - I don’t own one so I used my old and not so heavy standing mixer, with the beaters that look like springs - stir until yeast dissolves. Fit mixer with dough hook. Add flour and salt to bowl; mix on low speed just until flour is moistened, about 10 seconds. Scrape sides and bottom of bowl.
Beat in 3 eggs on low speed, then add sugar. Increase speed to medium and beat until dough comes together, about 3 minutes. Reduce speed to low. Add butter, 1 piece at a time, beating until each piece is almost incorporated before adding next (dough will be soft and batter-like). Increase speed to medium-high and beat until dough pulls away from sides of bowl, about 7 minutes.
Cover bowl with plastic wrap. Let dough rise at room temperature until almost doubled in volume, about 1 hour. Lift up dough around edges and allow dough to fall and deflate in bowl.
Cover bowl with plastic and chill until dough stops rising, lifting up dough around edges and allowing dough to fall and deflate in bowl every 30 minutes, about 2 hours total. Cover bowl with plastic and refrigerate an hour.
Take the dough out of the fridge and divide in half.

For the buns: roll out the dough to a 35x22cm (14x9in) rectangle. Spread the dulce de leche leaving a 2.5cm (1in) border. Roll into a log and cut into 12 pieces. Place them in a buttered 22.5cm (9in) round pan, cover and refrigerate until the next morning. The dough will rise slowly overnight.*
In the morning, bake at 175ºC/350ºF for 20-25 minutes.

You can repeat with the other half or make a brioche loaf – like Helene did.

* I halved the recipe, baked the rolls in a 25cm round pan and l let them rise for 1 hour baking them instead of refrigerating them until the next day.

Wednesday, April 25, 2007

Waiter there's something in my... bread! Berry Twist Bread

Berry Twist Bread

Sometimes I wonder why it takes me forever to choose certain recipes. I make up my mind just to change it a minute later. So complicated.
Just for a change, the same thing happened while I was trying to decide what to bake for this “Waiter there’s something in my… bread”, hosted by Spittoon Extra.

waitertheressomething

In the last minute before leaving the office yesterday I picked a recipe from this site. And I was so pleased with the results I’m already planning to bake this bread again – simply delicious.

The dough is so soft and tender you won’t believe it. I feel like trying it with a number of different jams, even though raspberry is my favorite.

Berry Twist Bread

Dough:
120ml (½ cup) warm milk – I used
80ml (1/3 cup) warm water
7g (¼-ounce package) active dry yeast
420 to 490g (3 to 3 ½ cups) all-purpose flour – I used 430g
50g (¼ cup) sugar
57g (¼ cup) butter, melted
1 egg
1 1/8 teapoons salt
2 tablespoons seedless raspberry jam – I used 3 tablespoon. I couldn’t find any so I sieved the one I had. Some of the seeds remained.

Glaze:
90g (¾ cup) icing sugar
1 to 2 tablespoons orange juice – I used 1 ½
1 teaspoon freshly grated orange peel, if desired – I was short on time, so I skipped this

Combine warm milk and water in large bowl; add yeast. Stir to dissolve. Stir in 385g (2 ¾ cups) flour, sugar, butter, egg and 1 teaspoon salt until soft dough forms.
Turn dough out onto lightly floured surface. Knead dough, adding additional flour 1 tablespoon at a time, if necessary, until dough is smooth (5 to 10 minutes). Place dough into greased bowl; turn greased-side up. Cover; let rise until double in size (45 to 60 minutes).

Knead dough on lightly floured surface (30 seconds). Cover; let rest 10 minutes.
Roll dough into 37x25cm (15x10-inch) rectangle. Combine jam and 1/8 teaspoon salt in small bowl. Spread dough with jam mixture to within ½ inch of edge. Roll up, beginning with 37cm (15-inch) side. Place onto large greased baking sheet. Form into circle; pinch ends to seal. Cut ¾ the way through dough every 1 ½ inches on outside edge with kitchen shears or serrated knife. Twist each section of dough, turning it on side to form ring – I had trouble here. :S

Cover; let rise until double in size (30 to 45 minutes).

Preheat oven to 175ºC/350°F. Bake for 20 to 30 minutes or until golden brown. Remove from pan; cool completely on wire rack – even though the recipe didn’t call for it, I brushed the bread with milk before baking it.

Meanwhile, combine powdered sugar, 1 tablespoon orange juice and orange peel, if desired, in small bowl. Add enough additional orange juice for desired glazing consistency. Drizzle over cooled bread.

Serves 16

Berry Twist Bread

Thursday, April 19, 2007

Hearts of palm empadinhas and Limeade with raspberries

Hearts of palm empadinhas

I loved this Blog Party theme, hosted by The Happy Sorcerer: picnic food!!! Yay!!!

My parents, my brother and I used to have great picnics when I was a kid. We spent great days in a park in São Paulo. My brother and I would play and run around and after all that “work out” we’d have the wonderful snacks prepared by my mom. That was great!

To take part I decided to make a very Brazilian recipe: empadinhas. These are my first empadinhas so I still need to get the hang of it – some of them almost opened up while in the oven.
Besides that, they are wonderful – the crust is flaky without being too crumbly and the filling completes it perfectly.

I got the dough recipe from a very talented Brazilian foodie and the filling was adapted from a Brazilian website.

Step-by-step photos by João.

Hearts of palm empadinhas

Dough:
450g (3 ¼ cups) all purpose flour
1 teaspoon salt
120g unsalted butter, cold and diced
100g shortening, cold and diced
1 large egg, lightly beaten
70ml ice water

Filling:
4 tablespoons vegetable oil – canola would be great 2 medium onions, chopped2 tomatoes, seeds removed, finely diced580g (4 cups) hears of palm, finely chopped60g (½ cup) olives, chopped4 tablespoons cornstarch 240ml (1 cup) milk salt

Egg wash:
1 egg yolk – I wasn’t paying attention and used the whole egg :S
1 tablespoon water

Place the flour, salt, butter and shortening in a food processor and pulse until it resembles breadcrumbs. Add the egg and water and process until a soft and smooth dough forms. Wrap in cling film and refrigerate for 30 minutes.
Since my food processor is tiny, I made the dough by hand: place the flour, salt, butter and shortening in a bowl and rub with the tip of your fingers until it resembles breadcrumbs. Add the egg and water, mix well and knead until a soft and smooth dough forms. Wrap in cling film and refrigerate for 30 minutes.

For the filling: in a large pan over high heat, heat the oil and add the onions. Cook until golden. Add the hearts of palm, tomatoes and olives and cook for 8-10 minutes.
In a cup, place the cornstarch and milk and mix well using a fork. Add this mixture to the hearts of palm and stir constantly until creamy. Season to taste, remove from heat and set aside to cool.
Preheat the oven to 180ºC/355 ºF.
Grab a small amount of dough and flatten it. Place it inside an empadinha pan - or use a muffin pan - and line the bottom and the sides with the dough. Repeat the process with other pans.

Place tablespoons of filling inside the prepared pans.

Roll portions of dough and cut circles. Place the circles on top of empadinhas and seal well.
Brush with the egg wash and bake for 30 minutes or until golden – in the last 5 minutes I raised the oven temperature to 200ºC.

Remove from the oven and set aside it cool for 5 minutes. Unmold the empadinhas and serve.

Makes about 45 empadinhas, about 5cm each

Limeade with raspberries

1 large lime
200ml water
1 ½ tablespoons frozen raspberries
sugar
ice

Squeeze the lime, add the water and sugar to taste. Pour in a nice glass and add the raspberries and ice.
Serve immediately.

Makes 1 glass.

Monday, April 9, 2007

Hearts of palm quiche

Hearts of palm quiche

As some of you know, I love cooking with hearts of palm. So, for my first participation on Weekend Herb Blogging – this time hosted by Anh - I decided to make a hearts of palm quiche.

aaWeekendHerbBlogging

I got the recipe from a Brazilian cookbook but the crust called for Crisco. I don’t like cooking with it. Call me silly, but I don’t even buy it.
Instead, I made a delicious crust out of a Gordon Ramsey’s recipe that had been posted by Valentina.
You see, Gordon’s recipe + Tina’s magic hands = perfection. :)

I had to adapt the amounts because my pan was a bit smaller than the required on the recipe. Next time I’ll add a bit more filling.

In the end, the quiche was so delicious I even had a piece at night, totally cold, and it still tasted good.

Hearts of palm quiche

Dough:
250g all-purpose flour
1 teaspoon salt
125g butter, cold and diced
1 egg, lightly beaten
1 tablespoon olive oil
1 egg yolk

Filling:
200g hearts of palm, chopped
½ small onion, chopped
2 tablespoons butter
½ teaspoon salt
20g parsley, chopped
100ml cream
4 eggs

Make the crust: in a bowl, combine flour, butter and salt, mixing with your fingertips until crumbly. Add the beaten egg and 1 tablespoon ice water and mix a little more. Knead it a little, wrap in cling film and refrigerate for 20 minutes.

Pre-heat the oven to 190ºC/375ºF. Brush a 24cm quiche pan with removable bottom* with the olive oil and sprinkle with salt and pepper.
On a lightly floured surface, roll out dough and line the pan with it.
Cover it with a circle of baking paper or foil and fill with uncooked beans – the blind baking process.
Bake for 20 minutes. Remove from the oven, remove the beans and the paper/foil and brush the crust with egg yolk. Bake for 5 minutes. Remove again from the oven and brush the crust again with egg yolk. Bake for 10-15 minutes or until golden.
This process will prevent the filling from leaking.
Remove from the oven. Keep the oven temperature at 190ºC/375ºF.

Make the filling: in a large frying pan, heat the butter over high heat. Add the onion and cook until lightly golden. Add the hearts of palm and salt and cook quickly. Remove from heat and add the parsley, mixing well.
In a separate bowl, beat the eggs and add the cream. Mix well. Add this mixture to the hearts of palm and mix.
Fill the baked quiche dough with this mixture and bake in a preheated oven (190ºC/375ºF) until firm.
Unmold and serve immediately.

* I used a regular teflon pan and had no trouble ummolding the quiche.

Serves 10

Thursday, March 15, 2007

Big, Fat, Chewy Chocolate Chip Cookies

Big, Fat, Chewy Chocolate Chip Cookies

Joao’s nieces are the cutest things ever: they’re 3 and 2 and they call me “aunt Patricia” – I love it! :)

I wanted to bake them some cookies and used a recipe from this blog.
The cookies turned out delicious but they were so huge the girls could barely hold them with their tiny little hands…

I used a 1 ½ tablespoon to drop the dough on the baking sheets and got 8cm cookies – you can bake them smaller if you want.

Big, Fat, Chewy Chocolate Chip Cookies

280g (2 cups) all-purpose flour
½ teaspoon baking soda
½ teaspoon salt
170g (3/4 cup) unsalted butter, melted
220g (1 cup) packed brown sugar - mine was dark, the original cookies look a lot better
100g (½ cup) white sugar
1 tablespoon vanilla extract
1 egg
1 egg yolk
340g (2 cups) semisweet chocolate chips or chunks

Preheat the oven to 165ºC/325ºF. Grease cookie sheets or line with parchment paper.
Sift together the flour, baking soda and salt; set aside.
In a medium bowl, cream together the melted butter, brown sugar and white sugar until well blended. Beat in the vanilla, egg, and egg yolk until light and creamy. Mix in the sifted ingredients until just blended. Stir in the chocolate chips by hand using a wooden spoon.
Drop cookie dough 1/4 cup at a time onto the prepared cookie sheets. Cookies should be about 7cm apart.
Bake for 15 to 17 minutes or until the edges are lightly toasted.
Cool on baking sheets for a few minutes before transferring to wire racks to cool completely.

Makes 38-40 cookies

Big, Fat, Chewy Chocolate Chip Cookies

Tuesday, February 27, 2007

Chocolate fingers

Chocolate fingers

João loves chocolate fingers so I decided to make them at home. I found a recipe on this website and since I’ve made several recipes from there I thought I should give it a try.

Just a few ingredients, a soft dough that comes together quickly and that makes a lot of cookies – I halved the recipe and got 50 fingers, 9cm each.

My husband loved the cookies - he doesn’t want the store-bought version anymore… ;)

Chocolate fingers

Chocolate fingers

260g all-purpose flour
120g butter, at room temperature - not too soft
2 tablespoons baking powder
100g caster sugar
1 small egg, lightly beaten
500g semisweet or bittersweet chocolate – I used bittersweet and it worked wonderfully with the sweet flavor of the cookies

Pre-heat the oven to 170ºC/335ºF and line two baking sheets.
Place the sifted flour, baking powder and the butter in a bowl and rub them together with your fingertips until you have the texture of wet sand. Add the sugar, egg and mix until the dough comes together.
Grab small amounts of dough and roll into small "sausages" – line your working surface with baking paper to shape the cookies – it will be easier.
Carefully place the fingers in prepared baking sheets and bake for 15 minutes or until light golden.
Let the cookies cool in the pans then remove them carefully so they don’t break:

Chocolate fingers

Now, you have to temper the chocolate – it has to be done properly, otherwise your coating won’t dry correctly and won’t be glossy and resistant to temperature changes.
Click here to learn how to temper chocolate correctly.

Using a fork, dip each cookie into chocolate and turn it to ensure even coating. “Fish them” out of chocolate and remove excess by tapping the fork at the edge of the bowl.
Place the covered cookies on a lined baking sheet and then refrigerate for 10-15 minutes – until the chocolate has set.
Store the chocolate finger in an air-tight container – I kept mine in a cookie tin and they were crunchy and delicious for 5 days.

Makes 75 chocolate fingers – I halved the recipe and still got 50.

Friday, February 23, 2007

Walnut braided bread

Walnut braided bread

I had a sudden urge to make bread – that happens, sometimes – but didn’t have many ingredients at home.
There was a bag of walnuts that would go rancid pretty soon unless I used them – and that’s what I did.
I used a recipe from a Brazilian website and, instead of filling the bread with apricots and jam, I used brown sugar and chopped walnuts.

The dough is soft and comes together really quickly. I liked it so much I want to make it again, using apple and cinnamon for filling - can’t wait to try it.

Walnut braided bread

Walnut braided bread

Dough:
240ml lukewarm milk
15g fresh yeast
6 tablespoons sugar
1 teaspoon salt
500g all-purpose flour, sifted
1 egg, lightly beaten
75g unsalted butter, softened

Filling:
80g brown sugar
100g walnuts, chopped

1 tablespoon milk - to brush the bread

Grease and flour a 28cm X 40cm baking sheet.

For the filling: mix both ingredients in a bowl. Set aside.

For the dough: pour the milk in a bowl, add the yeast, sugar and salt and stir. Add 120g of the flour and mix until the mixture is uniform.
Cover with cling film or a piece of plastic and let it rise, in a warm place, for 40 minutes.
Add the egg and the butter to the dough and mix well. Add the remaining flour gradually and knead for 10 minutes or until it is smooth and elastic – it will not be sticky.
Place the dough back in the bowl, cover with cling film/plastic and let it rise, in a warm place, for 25 minutes – it will double in size.
On a lightly floured surface, roll out dough making a 35cm X 45cm rectangle. Divide this rectangle in 3 equal parts. Brush each part with just a little water and sprinkle with 1/3 of the filling. Roll each part as if they were jelly rolls, pinching the seams to “lock” the filling inside.
Place the three rolls of dough on the prepared baking sheet, placing the seams down – a detail I forgot. :)
Braid the rolls and pinch the ends together.

Let it rise again for 30 minutes – 10 minutes before you bake the bread, pre-heat the oven to 180ºC.
Brush the bread with milk and bake it for 40 minutes or until it’s golden and cooked through – if it starts browning too fast, cover loosely with foil.

Makes 12 slices - I got a 1.050g bread.

Monday, February 12, 2007

Pastel

Pastel is a very common food here in Brazil – at least in the south-east, where I live.

It is sold in open-air markets and usually eaten with a glass of caldo de cana – a.k.a. garapa – which is sugarcane juice. It’s delicious!
Some of us like to add a tablespoon of “vinagrete” - a kind of salsa made with tomatoes, onions, bell peppers and parsley – to our pastel before each bite:

It’s easy to buy ready to use pastel dough, but since I wanted to share this food with my foreign readers I decided to make the dough from scratch, using a recipe from a dear friend of mine.

I was having a hard time trying to put into words a good description of pastel and my dear friend Valentina came to my rescue – she told me they’re similar to wontons and can also be described as a cross between Chinese spring rolls and Indian Samosas.

It was really, really hard to roll the dough without a cylinder or a pasta machine – I used a rolling pin. I kept thinking about all the calories I was burning before even eating the pastéis… :)
In the end, the pastéis were delicious and totally worth the effort. ;)

UPDATE - Freya left a comment saying she'd like a dulce de leche pastel (a pretty delicious choice, I must add). ;)
I forgot to write that sweet pastéis are even more delicious sprinkled with sugar and cinnamon after they're fried.
Tks for reminding me, Freya!

Pastel

500g all purpose flour
1 tablespoon vegetable oil
1 teaspoon salt
1 tablespoon cachaça
warm water
vegetable oil for frying

Filling – you can use a huge number of flavors, such as cheese, ground beef, ham + cheese and tomato, hearts of palm. Sweet fillings are also possible: dulce de leche, guava paste, chocolate.
Use your imagination, the sky is the limit!

I made half filled with pizza cheese and dried oregano and the other half with hearts of palm cooked in olive oil with chopped onions – you can find a good recipe here, which I used to make bread boats. I added a pitted olive to each pastel, too.

Mix the flour, oil, cachaça and salt in a bowl. Add water, a little at a time, and work with your hands until you form a smooth dough – firm but not sticky.
Take amounts of dough and roll them using a cylinder or pasta machine – they should be very thin. Lightly dust your working surface with flour and place rolled out dough on it.

Place portions of filling in one side of rolled out dough then fold other half of sheet over filling:

Cut to form the pastéis and press down firmly around each one of them using a fork so they won’t break when you fry them:

Place them in a baking sheet, separating the layers with cling film or plastic:

Heat a generous amount – 3 cups would do - of vegetable oil on a medium saucepan and fry the pastéis until they’re golden – the oil has to be very hot and the pastéis will be ready fast. Remove from oil and place them in a baking sheet lined with paper towel:

Makes 16 pastéis – aprox. 15x7cm each.

Wednesday, January 3, 2007

Pizza

Last week I invited my father and my brother over for dinner. The menu was... homemade pizza!

I got the recipe from Dough: Simple Contemporary Breads - which is one of my favorite cookbooks. The photos are beautiful and I felt like running to the kitchen to prepare ALL the recipes the minute I started flipping through the book. There's a DVD included, which shows Richard Bertinet's way of preparing dough. I liked it a lot, too.

I got 3 big pizzas with the dough - each one around 30cm large.

I had already made this recipe before, but I used all purpose flour and had to add more flour to get it right (something against the author's technique). But this time I used a special bread flour that was released here in Brazil and it worked perfectly!

The idea of posting pictures of the entire preparation process was my husband's, who also worked as the photographer. :D

Pizza


510g bread flour
15g fresh yeast
2 teaspoons salt
360ml water, room temperature
62ml olive oil

Place the flour in a large bowl. Add the yeast and rub it with the flour using your fingertips. Add the salt, water and olive oil and mix until you have a mixture that resembles porridge.
You won't knead the dough the way you are used to - instead, you'll use your fingers as if they were "forks" and lift the dough, swing it upwards and then slap it back down, away from you, onto the counter. It will be sticky, but go ahead. Have no fear. :D
Stretch the front of the dough towards you, then lift it back over itself to form an arc - this will trap the air - still stretching it forwards and sideways and tucking it in around the edges. Repeat this sequence until the dough is not sticky anymore.
Place the dough in a lightly floured bowl, cover and let it rest for 70 minutes or overnight in the freezer, for better crust and taste - mine rose for 3 hours.

Pre-heat the oven to 250ºC (475ºF)
Turn the dough onto a lightly floured surface, shape into a ball and let it rest for 10 minutes.
Divide the ball into three even parts.
Continue to work on an evenly floured surface so your dough won't stick to it.
Place the heel of your hand in the center of each ball and push it away from you to stretch the dough out. Keep stretching until you have a large round pizza - the book says 20-22cm, but mine were 30cm:

Spread some tomato sauce on the dough - I was inspired that day so I made my own tomato sauce:

Sprinkle with mozzarella, parmesan, basil leaves or whatever your imagination calls for - I made one with broccoli, olives, cheese and onions:


Slide the pizza to a pre-heated baking tray or stone and bake for 20 minutes or until the dough is cooked and golden. I don't have a baking stone and placed the pizza on cool baking trays, so it took my oven 40 minutes to bake them.

Makes 3 large pizzas
Related Posts with Thumbnails