Thursday, November 27, 2008

Alfajores

Alfajores

I’m kind of tired of war movies – don’t get me wrong, there are wonderful ones out there, I just think that maybe I have seen too many in a short period of time. But tell me, how will I be able to resist such a beautiful poster?

In the same way, you must be tired of seeing so many cookies around here. Bear with me, please – it’s just one more thing I cannot resist. :)

The alfajores were a present for a dear coworker of mine, Adriana – it was her birthday last week and I made these especially for her.

I used Katia’s recipe and the alfajores turned out wonderful – the dough is not hard to work with and yields a good amount of cookies. Just make sure you use firm dulce de leche – a runny kind won’t stay put inside the alfajores.

Alfajores

Alfajores

1 ¼ cup (150g) cornstarch
1 cup (140g) flour
1 teaspoon baking powder
½ cup (113g/1 stick) unsalted butter, room temperature
¾ cup (150g) sugar
2 egg yolks
2 tablespoons cognac
dulce de leche
icing sugar

Sift cornstarch, flour and baking powder in a bowl. Set aside.

In large mixer bowl cream the butter and sugar until light and fluffy. Add the egg yolks one at a time and mix until incorporated. Add cognac and mix well.

In slow speed, add the sifted ingredients and mix until the dough comes together – don’t overmix.

Preheat the oven to 180ºC/350ºF; line two large baking sheets with baking paper.

Roll out dough between two pieces of baking paper to ¼ inch (0.60cm) thickness. Using a 2-in (5cm) round cutter, cut cookies and place on prepared sheets – don’t reroll the dough more than twice. If you are working on a warm place, refrigerate the dough for a couple of minutes before rolling it.
Bake for 10-15 minutes or until barely brown on the bottom - tops will be pale. Set on cooling rack to cool.
Sandwich the cookies with the dulce de leche and dust with icing sugar before serving.
This recipe can be easily doubled.

Makes 25 sandwich cookies

Alfajores

Monday, November 24, 2008

Chewy strawberry almond bars

Chewy strawberry almond bars

You know that feeling? When something is so good we don’t want it to get ruined?

I was watching “August Rush” on the weekend and, besides crying my eyes out, I kept thinking “Oh, please don’t let this adorable boy get lost. Don’t let him grow up and become an idiot, a crackhead, a wife beater, or anything like that”

I’d cried and laughed with Freddie Highmore before, but this time I felt like wrapping him in a very warm blanket and serving him a plate of these cookies, with some hot cocoa sprinkled with lots of marshmallows.

Chewy strawberry almond bars

Chewy strawberry almond bars
adapted from here

1 cup (226g) unsalted butter, softened
2 cups (350g) packed brown sugar
2 teaspoons baking powder
1 egg
1 teaspoon almond extract*
2 cups (280g) all-purpose flour
2 cups (230g) regular rolled oats
½ cup sliced almonds
¾ cup strawberry preserves
3 tablespoons sliced almonds, extra, for the topping

Preheat oven to 180ºC/350ºF. Line a 30x20x5cm (8x12x2in) baking pan with foil, extending foil over the edges of the pan. Grease foil; set pan aside.

In a large bowl, beat butter with an electric mixer on medium to high speed for 30 seconds. Add brown sugar and baking powder. Beat until combined, scraping side of bowl occasionally. Beat in egg and almond extract until combined. Add flour, oats, and ½ cup almonds and mix it all in slow speed – dough will be stiff.

Remove ¾ cup of the dough and set aside. Press the remaining dough evenly into the bottom of the prepared baking pan. Spread with preserves. Crumble the remaining dough evenly over preserves layer and sprinkle over the almonds.

Bake for about 35 minutes or until lightly browned. Cool completely in pan on a wire rack. Using the edges of the foil, lift the uncut cookies out of the pan. Cut into bars.

* I thought the flavor was much too strong – I’d use half the amount next time, or even replace it with vanilla

Makes about 27 bars

Chewy strawberry almond bars

Wednesday, November 19, 2008

Pasta with eggplant and pine nuts

Pasta with eggplant and pine nuts

Thank you all for your comments and emails – the nerd girl that never fit in is feeling pretty popular right now. :)
I’m looking forward to my next blogging year!

After all that icing – so much it could block one’s arteries just by looking at it – I thought you deserved something fresh and a lot lighter. Pasta + veggies seemed perfect.

Despite the tiny list of ingredients, this is one of the most delicious pasta dishes I have ever tried. Make it, even if you don’t have pine nuts around – it tastes great anyway.

Pasta with eggplant and pine nuts

Pasta with eggplant and pine nuts
slightly adapted from here

400g pasta
2 large eggplants
olive oil, for brushing
4 tablespoons extra virgin olive oil
a large handful of basil leaves
4 tablespoons pine nuts
fleur de sel and freshly ground black pepper
juice of 4 small limes

Preheat oven to 200ºC/400ºF.
Cut each eggplant in half lengthways, then make criss cross cuts on the flesh nearly all the way down to the skin. Brush with olive oil, place in a lightly oiled baking pan and bake for 25 minutes or until soft. In the meantime, cook the pasta until al dente and toast the pine nuts on a non stick frying pan.Remove the eggplant from the oven and, using a spoon, scrape the flesh out of the skins and place in a bowl. Pour the extra virgin olive oil gradually mixing it with eggplant until you get to a smooth paste. Season it with fleur de sel and pepper
Drain the pasta and mix it with the eggplant to coat it really well. Add the basil , pine nuts and lime juice.

Serves 4

Monday, November 17, 2008

Two years of blogging and a polka dot cake to celebrate it

 Two years of blogging and a polka dot cake to celebrate it

Lots of recipes and photos. Tons of comments and emails that have put hundreds of smiles on my face. So many wonderful people I have lost track of.
These are the results of 2 years of blogging – one of the most positive things I have ever done.

I read “The Hairy Ape” almost ten years ago and that book kept me thinking about several things. One of them was the feeling of “belonging”. That is something I used to have trouble with – I just did not fit in. The people I knew were very different from me – we did not have anything in common. I felt like a stranger most of the time. And my love for cooking and the idea of having fun in the kitchen were considered weird by others.

Blogging has opened an entire new world to me and knowing people who share my passion for cooking and baking has changed my life in many levels. I do feel like I belong now. And you, my dear readers and fellow bloggers, are responsible for this.

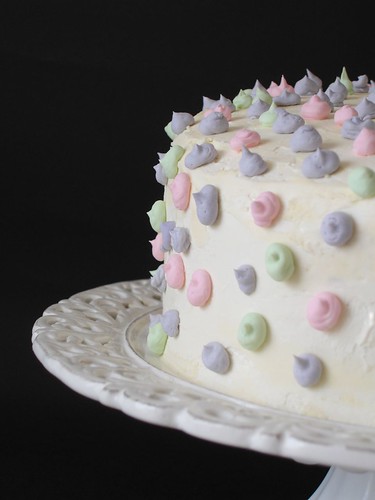
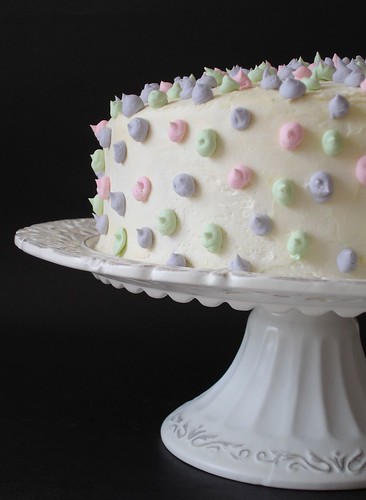
Thank you for standing by me for so long. I wish I could send each and every one of you a slice of this cake, with a big hug on the side.

 Two years of blogging and a polka dot cake to celebrate it

Polka dot cake
Cake and filling recipes adapted from The Whimsical Bakehouse; buttercream recipe from Sky High: Irresistible Triple-Layer Cakes
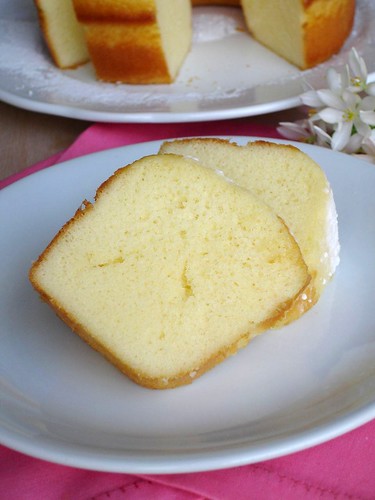
Golden butter cake:
170g (1 ½ sticks) unsalted butter, room temperature
1 ½ cups (300g) sugar
4 large egg yolks
1 teaspoon vanilla extract
2 ½ cups + 2 tablespoons (370g) cake flour*
1 tablespoon baking powder
generous pinch of salt
1 cup + 2 tablespoons (270ml) milk

Grease two 20x5cm (8x2 inch) round pans. Preheat the oven to 180ºC/350ºF.
Sift together the flour, baking powder and salt. Set aside.
In the bowl of an electric mixer, beat butter and sugar at high speed until light and fluffy. Add the yolks and vanilla and beat on medium speed until fluffy.
At low speed, add the dry ingredients, alternately with the milk, beating until incorporated.
Divide the batter between the prepared pans and bake for 30-35 minutes or until a skewer inserted into the center of the cake comes out clean.
Cool the cakes on a wire rack for 15-20 minutes before turning them out of their pans. Let them cool completely before continuing with the recipe.


Syrup:
½ cup (120ml) water
2 tablespoons sugar
¼ teaspoon vanilla extract

Place water and sugar in a small saucepan and mix well to combine. Heat over medium heat until it boils. Remove from heat, add the vanilla and set aside to cool.


Cookies and cream filling:
450ml heavy cream
3 tablespoons confectioners’ sugar
½ teaspoon vanilla extract
15-18 chocolate sandwich cookies, such as Oreos, crushed into medium pieces (place them inside a thick plastic bag and crush them with a rolling pin)

In the bowl of an electric mixer at high speed, whip the cream, sugar and vanilla until stiff. Gently fold in the crushed cookies.


Vanilla buttercream:
1 cup (200g) sugar
¼ cup (60ml) water
3 egg whites
1 ½ cups (340g/3 sticks) unsalted butter, at room temperature
2 teaspoons vanilla extract

In a small heavy saucepan, combine the sugar and water, stirring to dissolve sugar. Bring to a boil over medium heat, stirring to dissolve the sugar. Continue to boil without stirring, occasionally washing down the sides of the pan with a wet pastry brush, until the syrup reaches the soft-ball stage, 238ºF (114ºC) on a candy thermometer. Immediately remove from the heat.

In a large mixer bowl, with an electric mixer on medium speed, beat the egg whites until frothy. Continue beating while gradually adding the hot syrup in a thin, slow stream, pouring it down the sides of the bowl; avoid hitting the beaters, or the syrup may splatter. When all the syrup has been added, raise the speed to medium-high and beat until the mixture is very fluffy and cooled to body temperature.

Reduce the mixer speed to medium-low and gradually add the softened butter, 2 to 3 tablespoons at a time, beating well between additions. As you're adding the last few tablespoons of butter, the frosting will appear to break, then suddenly come together like whipped butter. Beat in the vanilla extract.


To assemble the cake: using a long, serrated knife cut each cake in half. Place a cake layer, flat side up, on a cake stand or serving plate. Brush it lightly with the syrup and spread 1/3 of the cookies and cream filling. Repeat the procedure with the remaining cake layers and filling, brushing all the cakes with syrup and finishing it all with a cake layer. Frost the sides and top of the cake with a thin layer of vanilla buttercream frosting. Place the cake in the refrigerator until the crumb coat firms up. Frost the cake completely with more buttercream.
Tint the remaining buttercream with desired colors and decorate the cake as you desire.

* there’s no cake flour here in Brazil, so I used the following: 1 cup cake flour = 7/8 cup (123g) all purpose flour + 2 tablespoons corn starch

Serves 12-14

 Two years of blogging and a polka dot cake to celebrate it

Friday, November 14, 2008

Hawaiian macadamia coconut cookies

Hawaiian macadamia coconut cookies

“Oh, no. Walnut cake. Why does he always ask for walnut cakes??” :(

That used to be little Patricia complaining about her uncle’s birthday cakes always being walnut flavored cakes. And little Patricia did not like walnuts. In fact, little Patricia thought that walnuts tasted weird.
But little Patricia has become a big girl – she’s 30 now! – and has learned to love not only walnuts, but all things nuts. And the buttery, delicious macadamias are now one of her favorite ingredients, not to mention they are wonderful paired with coconut.

Patricia has become such a centered, responsible adult that she has made everyone eat oats disguised as cookies. Again! :)

Hawaiian macadamia coconut cookies

Hawaiian macadamia coconut cookies
from here

1 cup (226g) unsalted butter, at room temperature
¾ cup (150g) granulated sugar
¾ cup (132g) firmly packed brown sugar
1 egg
grated zest of 1 large orange
1 ½ cups (210g) all-purpose flour
1 ¼ cups (145g) rolled oats
1 teaspoon baking powder
½ teaspoon salt
¾ cup (68g) sweetened desiccated coconut
¾ cup (100g) macadamia nuts, coarsely chopped

Preheat oven to 180ºC/350ºF; line 2 large baking sheets with baking paper.

In a large bowl, cream butter and both sugars. Add egg and beat well. Add orange rind and beat well.
In a separate bowl, combine flour, oats, baking powder and salt. Beat into creamed mixture. Stir in coconut and macadamia nuts.

Make balls with 1 tablespoon full of dough – it’s soft, so don’t roll it too much - and place them on the sheet, about 5cm (2in) apart. Press down the tops with a lightly floured fork to flatten slightly. Bake for 12 to 15 minutes or until edges are golden – mine took 18 minutes for that.

Cool for 5 minutes before removing from sheet. Cool on wire racks.

Makes about 3 dozen – I got 38

Wednesday, November 12, 2008

Yeasted banana bread

Yeasted banana bread

I have to start this post by deeply thanking a Brazilian reader of mine, Debora – after reading my desperate request for a good yeasted banana bread, she left a comment with a link for a recipe, and it looked like what I wanted.

I finally baked the bread and what a wonderful recipe this is! The rolls came out extremely tender and with a delicious banana hint. Since they are not overly sweet, you can use your imagination and slather them with butter, jam, or make sandwiches with multiple choices of fillings.

I used this recipe and Dominic sent me a very kind email after I left him a comment - he suggests the addition of ground cardamom to the bread. I only reduced the amount of salt and proofed the yeast before mixing all the other ingredients.

I knew I could count on my readers and fellow food bloggers to put an end on my banana bread quest. Thank you!

Yeasted banana bread

Yeasted banana bread

2 teaspoons instant yeast
3 tablespoons sugar
¾ cup (180ml) lukewarm water
3 cups (420g) unbleached all purpose flour
1 teaspoon salt
4 tablespoons (56g) unsalted butter, softened
¼ cup nonfat dry milk
1 ripe banana, slightly mashed

Place the yeast in the bowl of a stand mixer, add 1 pinch of the sugar and cover with the water. Mix well and set aside until foamy.
Add the flour, salt, remaining sugar, butter, dry milk and banana and mix them using the dough hook (or knead by hand) until you've made a smooth, soft dough – 5 minutes were enough for me. It should be barely tacky. Don't add a lot of extra flour - you'll end up with a dry loaf. Place in an oiled bowl and cover with plastic wrap. Allow to rise 1 to 1 ½ hours until almost doubled in bulk.

Remove dough from bowl and place it onto a lightly floured surface; knead it lightly for 10 seconds, then cut it into 8 pieces and roll into balls. Butter a 25cm (10 in) round cake pan and place the balls inside it, forming a circle. Cover with a clean kitchen towel and let it rise again for 1 hour.

Preheat the oven to 180ºC/350ºF; bake bread for 35-40 minutes, until golden. If it seems to be getting too brown toward the end of cooking, you can tent with foil.

Remove from oven and transfer the pan to wire rack for at least an hour to cool completely. Unmold bread.

Makes 8

Yeasted banana bread

Monday, November 10, 2008

Pear and cinnamon madeleines

Pear cinnamon madeleines4

I have a cousin who is less than a month older than me. One could see that as an opportunity for a close friend. But not me. She and I were enemies growing up – the more our parents forced us to be play together, the more we loved to punch each other down. Her parents came to the point of enrolling her into the school I attended. It never worked – we couldn’t stand one another.
I would always get the worst punishments, because I would never cry nor apologize, even though she was three times my size - yes, I was really petite. And mean. :)

I was such a bad kid that my love for pink would be mine and mine only. Pretty much everything I owned was pink – clothes, shoes, notebooks – and my cousin was not allowed to like pink, too. No, not her. I’d always tell her that green was her favorite color.
To this day I cannot believe what a little devil I used to be. :)

This story crossed my mind when I was taking these photos. I’ve realized that even though my favorite color is blue, my love for pink is not dead.

Pear cinnamon madeleines

Pear and cinnamon madeleines
from here

150g all-purpose flour
1 teaspoon baking powder
1 teaspoon ground cinnamon
100g unsalted butter, softened
50g light brown sugar
75g white sugar
2 eggs, lightly whisked
½ cup pear sauce*
granulated sugar for coating – I used caster sugar for that


Preheat oven to 180ºC/350ºF; spray madeleine molds with non stick spray or generously butter them.
In a bowl combine flour, baking powder, and cinnamon; set aside. In a mixer cream together butter and sugars until light and fluffy. Add in eggs and pear sauce and beat until combined. Stir in the flour mixture and fold until the flour has been incorporated into the wet mixture. Place a heaping teaspoon of the mixture in each mold and bake for 12-14 minutes or until the tops are golden. Remove from the oven and cool for 5 minutes in the tray and then coat lightly with sugar.

* I peeled, cored and chopped 2 small, ripe pears, then cooked them in the microwave oven for 2 minutes; smashed them with a fork, set aside to cool then pushed through a sieve to remove excess water.
The pear flavor was very subtle - maybe it would have been stronger if I has used store bought pear sauce.

Makes 24 – I halved the recipe and got 16

Friday, November 7, 2008

Polenta-crusted roasted ratatouille tart

Polenta-crusted roasted ratatouille tart

Thank you all for your comments and concern – your positive thoughts and kind words were very important for my getting better, for sure!

I have been thinking a lot about sweets lately – due to Christmas coming and the gifts I want to make for my friends and colleagues. I have so many recipes bookmarked I don’t even know where to start, really...

I found this recipe going through cookie and candy recipes for the holidays. I have no idea why it was filed in my sweet folder, but I considered it a sign. I’d rather have a sign like this than the one Francesca had in Tuscany. Eeew! :)

Polenta-crusted roasted ratatouille tart

Polenta-crusted roasted ratatouille tart
slightly adapted from here and here

Crust:
1 cup (155g) instant polenta
½ cup (70g) all purpose flour
¼ teaspoon + a pinch of salt
3 tablespoons cold, unsalted butter, in cubes
3 tablespoons olive oil
4-5 tablespoons water

Filling:
3 tablespoons olive oil
½ large onion, thinly sliced
1 small eggplant, sliced
1 small zucchini, sliced
2 tomatoes, sliced
salt and freshly ground black pepper
dried oregano
fresh oregano leaves, to taste
1 ½ cups shredded mozzarella cheese – I used the yellow mozzarella we have here, made with cow’s milk and that looks similar to Monterrey Jack cheese
3 tablespoons freshly grated Parmesan

Start with the filling: preheat the oven to 200ºC/400ºC. Heat 1 tablespoon of olive oil in a pan over medium heat; sauté onion until soft, about 5 to 6 minutes. Spray 2 baking trays with cooking spray. Arrange the eggplant, zucchini and tomato slices on the trays in a single layer and brush with the remaining olive oil. Season with salt and pepper, sprinkle the tomatoes with dried oregano and roast the vegetables until soft but not browned, about 15 minutes. Remove the vegetables from oven and cool.

Now, the crust: lower the oven temperature to 180ºC/350ºF.
Combine polenta, flour and salt in the bowl of a food processor – I used my Kitchen Aid with the paddle attachment. Pulse to incorporate. Add butter and oil and pulse about 20 times, until mixture resembles small pebbles. Add water and pulse until mixture forms a loose dough. Remove dough from processor and press into bottom and sides of a lightly oiled 24cm tart pan with a removable bottom (my pan doesn’t have very high sides).
Press aluminum foil or baking paper over the dough weigh down with uncooked rice, beans or pie weights. Place tart pan on a baking sheet and bake for 10-12 minutes. Remove from oven and remove rice and foil. Return to oven, rise the temperature to 200ºC/400ºF and bake for an additional 5-8 minutes, or until no longer shiny and wet. Remove from oven and let cool.

Lower the oven temperature to 180ºC/350ºF.
Lay the eggplant slices on the bottom of tart; cover with 1/3 of the mozzarella cheese and some of oregano leaves. Add the zucchini and onion, top with another 1/3 of the mozzarella and oregano, then the tomatoes. Top with rest of the mozzarella cheese, oregano leaves and the parmesan. Bake for 25 to 30 minutes, or until cheese is melted and vegetables have further wilted.
Remove from oven and let cool for 5 minutes before unmolding it. Serve warm.

Serves 6

Wednesday, November 5, 2008

Sweetened condensed milk cake

Sweetened condensed milk cake

Wow, almost a week without a new recipe around here... You guys must be bored to tears with my crepe photo. :)

A stomach flu kept me away from cooking, posting and reading my favorite blogs. But now I’m feeling well again – thanks to tons of medicine and rest – and eager to go to the kitchen.

This is something I baked before I got sick; you know I can’t resist recipes with sweetened condensed milk – right, Lynn? – and the thought of a cake made with it instead of sugar was too good for me to pass.

It’s a very light and sort of spongy cake. No decadent fillings or icings – just a simple cake, to be enjoyed with a cup of coffee or tea. Or a glass of orange juice on a hot day.

Sweetened condensed milk cake

Sweetened condensed milk cake
from a Brazilian cookbook

1 can (395g) sweetened condensed milk
4 eggs
120g all purpose flour
½ tablespoon baking powder
50g unsalted butter, melted and cooled
icing sugar, for dusting

Preheat the oven to 180ºC/350ºF; generously butter a 22cm* (9in) ring cake pan.
Place all the ingredients in a large bowl and mix well. Pour the batter into prepared pan and bake for 20 minutes, or until risen and a skewer inserted in the cake comes out clean (my cake took 35 minutes to bake).
Remove from the oven and place on a wire rack to cool completely before unmolding.
Dust with icing sugar before serving.

* I used a 20cm (8 in) pan.

Serves 10-12

Related Posts with Thumbnails