Many people I know have been complaining a lot about the weather for many days now, but not me – I’m actually celebrating the cold days, especially after the dreadful summer we had months ago. \0/
Nothing worse than to start sweating seconds after taking a shower – I’m glad that is part of the past (at least for now).
Because of the low temperatures, keeping the oven on is always a great idea: you stay warm and there is delicious food as a result – win/win situation. :)
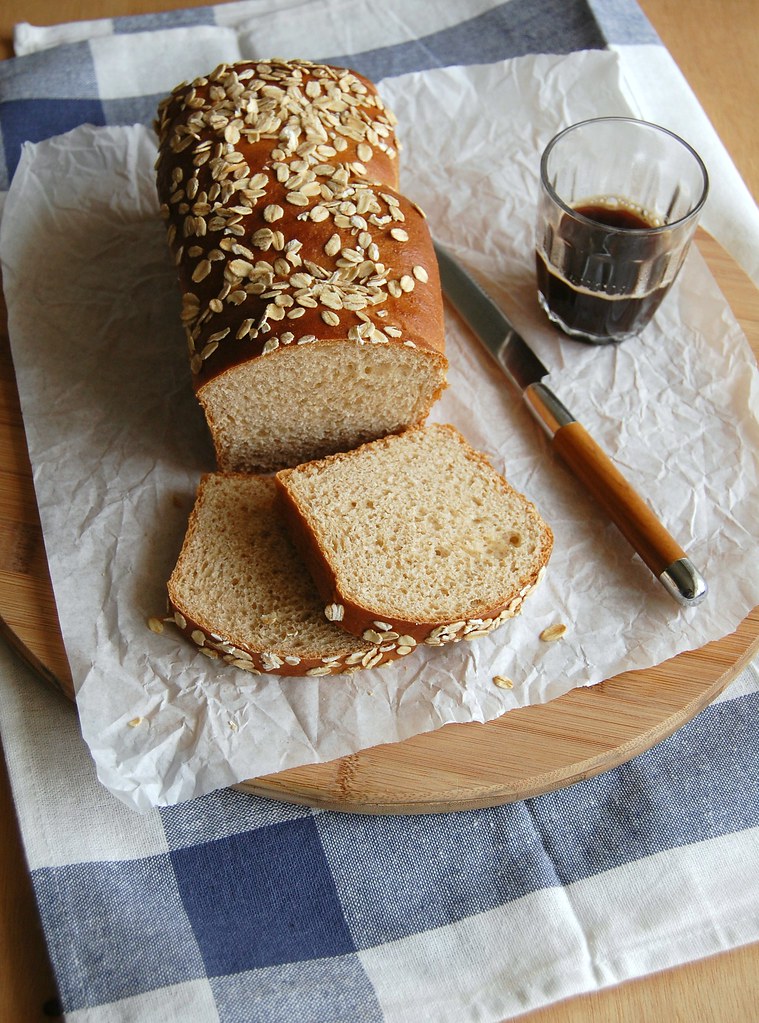
Last weekend was perfect for baking, and making bread is something I enjoy deeply. Without thinking too hard about what to prepare, I chose Signe Johansen’s vanilla loaf to be my afternoon project, and added cinnamon, whole wheat flour, oats and a bit more sugar to make it more my taste. The bread turned out delicious and it was also great toasted and slathered with butter.
Besides being tasty, the bread was the perfect project for another reason: I could watch a couple of Law and Order: SVU episodes while the dough proved twice.
Vanilla and cinnamon bread
slightly adapted from the über beautiful and delicious Scandilicious Baking
½ vanilla bean, split lengthwise, seeds removed with the back of the knife
1 cup (240ml) whole milk
50g unsalted butter
2 teaspoons vanilla extract
400g all purpose flour
100g whole wheat flour
½ teaspoon ground cinnamon
75g granulated sugar
¼ teaspoon table salt
3 teaspoons dried yeast
1 egg, beaten
1 tablespoon whole milk, extra, for brushing the loaves
handful rolled oats, for sprinkling
Place the vanilla seeds, milk, butter and vanilla extract in a small saucepan and heat until almost boiling and then allow to cool till lukewarm.
In the bowl of an electric mixer, fitted with the dough hook, mix the flours, cinnamon, salt and sugar. Make a well in the center and sprinkle in the dried yeast. Pour over the egg and the warm milk mixture and mix on low speed until the ingredients are incorporated. Continue mixing on low-medium speed until dough is elastic and smooth, about 8 minutes.
Place the dough in a lightly buttered large bowl and cover with plastic wrap. Leave to rise in a warm place for 45-60 minutes or so until it has doubled in size. Butter two 4 cup capacity loaf pans.
Knock back the dough and divide it in half. Roll each half into a large rectangle, roughly 20x30cm (8x12in), then roll each forming a tight cylinder. Place each cylinder into the prepared pans. Cover and leave to prove in a warm place for about 40 minutes – in the meantime, preheat the oven to 200°C/400°F.
Brush the loaves with the extra milk and sprinkle with the oats. Splash a little water in the bottom of the oven to create steam to help the loaf rise, then bake on the upper middle shelf for about 30 minutes or until the loaves are deep golden and sound hollow when tapped on the base.
Cool in the pans for 10 minutes, then carefully unmold and transfer to a wire rack to cool completely.
Makes 2 loaves
Wednesday, July 30, 2014
Vanilla and cinnamon bread
Wednesday, February 19, 2014
Lime, vanilla and poppy seed madeleines and a very interesting character
The young ones reading me today won’t remember it, but back in the 90s a pop group called the Spice Girls became a huge hit and their main motto was “girl power” – I was about eighteen when “Wannabe” was released and, back then, I didn’t think there was anything empowering to women in what the group sang or did (and to be honest I’m 35 now and still don’t get it).
Cut to many years later: because of what I’d been watching, Netflix suggests The Fall, and I got immediately interested in the series both because of its dark nature and of Gillian Anderson – that is how I’m introduced to Stella Gibson, the most feminist character I’d seen on TV shows and definitely one of the most interesting ones. As I watched the five episodes of The Fall – and thought of how much I wanted those five to be fifteen, twenty –, the more I liked Anderson’s character and the more I thought of her as the personification of girl power, so much more than an empty slogan shouted at the top of a hotel in Cannes.
The way Stella behaves and the things she says on the show are truly amazing – I believe she’s sending a message to everyone watching, and it’s a very positive one. That kind of strong female character is a delight to watch and Gillian Anderson is sheer perfection portraying Stella Gibson – the good news is that there will be a second season, so there’s more real girl power coming our way. \0/
And because this is a feminist post about a feminist character, nothing better than a baked good with a woman’s name to go with it.
Lime, vanilla and poppy seed madeleines
slightly adapted from the always stunning Gourmet Traveller
80g unsalted butter
finely grated zest of 1 large lime
65g granulated sugar
1 vanilla bean, halved lengthwise, seeds scraped with the back of a knife
½ tablespoon light brown sugar
2 eggs, room temperature
½ tablespoon mild honey
1 teaspoon vanilla extract
115g all purpose flour
½ teaspoon baking powder
pinch of salt
½ tablespoon poppy seeds
melted butter, extra, for brushing the molds
icing sugar, for dusting
Melt butter in a saucepan over low heat, add lime zest and set aside until cooled to room temperature but still liquid (2-3 minutes).
Place the granulated sugar and vanilla beans in the bowl of an electric mixer and rub them together with your fingertips until sugar is fragrant. Add the brown sugar, eggs, honey and vanilla extract and beat until light and fluffy (4-5 minutes). Sift over flour, baking powder and salt, add the poppy seeds and fold through.
Fold in butter mixture a little at a time until just incorporated, cover with plastic wrap and refrigerate (4 hours or up to overnight).
Preheat oven to 200°C/400°F. Brush twenty two 2-tablespoon capacity madeleine molds with melted butter and refrigerate for 10 minutes. Brush the molds again and refrigerate for another 10 minutes. Divide the mixture between the molds (do not spread it out). Bake until golden and cooked through (8-10 minutes), then immediately unmold onto a wire rack.
Dust with icing sugar. Serve warm or at room temperature.
Makes 22
Wednesday, December 11, 2013
Vanillekipferl (Viennese vanilla crescents), and a not so fair competition
The people behind the Oscars have apparently developed a strategy of leaving the most powerful performances out of the competition (maybe to make sure the-not-so-great ones get the awards? Who knows). Last year both Tilda and Michael Shannon weren’t included in the game (and they were absolutely magnificent in We Need to Talk About Kevin and Take Shelter, respectively), and 2013 will be remembered by me as the year Marion Cotillard got ignored even though she kicked everyone else’s butts with Rust and Bone. The movie is so amazing I haven’t been able to write a single line about it so far (the“The Tree of Life effect”, as I call it), and Marion’s portrait of Stéphanie is something sublime. Harvey Weinstein must have felt relieved when Marion did not get nominated, for she would definitely make things a lot harder for Jennifer Lawrence – I adore her, but that Oscar was a joke (and a demonstration of the power of lobby).
These cookies, with their German name and their amazing vanilla flavor, are one of the best I have ever made (and I have made quite a few); they are delicious, melt in the mouth, and since they also look pretty they would be great as a gift or as an addition to the Christmas table – I just feel sorry for any other cookie around them as I don’t think it would be a fair competition... ;)
Vanilla beans are a luxurious ingredient and I don’t use them often, but since it’s Christmas I thought a bit of splurge wouldn’t hurt; if you intend to make the cookies don’t forget to plan ahead since the sugar needs some time alone with the vanilla. ;)
Vanillekipferl (Viennese vanilla crescents)
slightly adapted from the über complete The Gourmet Cookbook: More than 1000 recipes
Vanilla sugar (for dusting the cookies):
170g confectioners’ sugar
1 vanilla bean, split lengthwise, seeds remove with the back of a knife
Cookies:
245g all-purpose flour
25g confectioners’ sugar
pinch of salt
70g almond meal
1 vanilla bean, split lengthwise, seeds remove with the back of a knife
170g cold unsalted butter, diced
2 teaspoons vanilla extract
Start by making the vanilla sugar: place the sugar, vanilla seeds and bean in a small bowl and mix with your fingers to perfume the sugar. Cover with plastic wrap and set aside at room temperature overnight.
Cookies: in a food processor blend together the flour, confectioners’ sugar, salt, almond meal and vanilla seeds. Add the butter, pulse to combine. With the motor running, add the vanilla extract and process just until a dough forms. Form the dough into a disk, wrap it in plastic and refrigerate for at least 2 hours or up to overnight.
Preheat the oven to 180°C/350°F; line two large baking sheets with baking paper.
Roll ½ tablespoon (leveled) of dough per cookie into a cylinder, then bend the ends over to create a half-moon. Arrange the crescents onto prepared sheets 2.5cm (1in) apart and bake for about 10-15 minutes or until pale golden.
While the crescents are still warm, gently toss them in the vanilla sugar, then allow to cool completely on wire racks.
Let the cookies cool completely before transferring them to storage tins. Sift more vanilla sugar over the cookies before serving.
Makes about 50 cookies
Monday, February 13, 2012
Vanilla-spiked plum galette
Plums are one of my favorite fruits and I usually eat them all in a very short period of time, before I can actually bake something with them. But this time the plums I’d bought were too tart – even for my citrusy taste – and they became this fabulous galette; the super flaky pastry is delicious and holds all the juices without getting soggy, and the plums, soft and perfectly sweet, get a boost from the vanilla seeds – a perfect combo. I’m usually very controlled around my baked goods but this time I had two huge slices of galette at once. :S
If I’m controlled about food – at least, sometimes – I cannot say the same about my favorite movies: I watched "Shutter Island" for the third time last night. :D
Vanilla-spiked plum galette
from the delicious and beautiful Rustic Fruit Desserts
Dough:
1 ¾ cups (245g) all purpose flour
1 tablespoon granulated sugar
¼ teaspoon table salt
¾ cup (168g) unsalted butter, cold and diced
3 tablespoons ice water, more if necessary
1 teaspoon freshly squeezed lemon juice
Filling:
¾ cup (150g) granulated sugar
1 vanilla bean, split lengthwise, seeds scraped with the back of the knife
1 tablespoon corn starch
pinch of salt
6 plums, pitted and each cut into eighths – 675g/1½ pounds prepped
sour cream*, crème fraîche or vanilla ice cream, to serve
Make the dough: put the flour, sugar and salt in the bowl of a food processor and place it in the freezer for 10 minutes or until very, very cold.
Place the bowl onto the food processor and blitz to combine the ingredients. Add the butter and pulse until the mixture is coarse and crumbly. Stir in the water and lemon juice together and add to the dough while pulsing – pulse until the pastry is shaggy but holds together when squeezed in the palm of your hand; add more water if necessary. Dump the pastry onto a lightly floured surface and form it into a disk, without handing the dough too much. Wrap in plastic and refrigerate for at least 1 hour (well wrapped, the dough can be kept in the refrigerator for up to 3 days, or frozen for up to 3 months).
Line a large baking sheet with foil.
Make the filling: in a large bowl, rub together the sugar and vanilla bean seeds. Rub in the cornstarch and salt. Set aside 2 tablespoons of this mixture then add the plums to the bowl, tossing to cover the fruit completely with the mixture.
Roll out the dough into a 32-35cm (13-14in) circle then transfer to the prepared sheet. Sprinkle the reserved sugar mixture over the center of the dough, leaving a 5cm (2in) border around the edge.
The plums will release some juice while in the sugar mixture, therefore lift each slice of plum from the bowl and arrange the slices on the dough in a spiral over the sugar mixture sprinkled on the dough. Drizzle with 1 tablespoon of the juices – more than that will make your dough soggy. Fold the outer edge of the dough over the fruit, pleating the dough as necessary.
Place the galette in the refrigerator for 20 minutes – in the meantime, preheat the oven to 200°C/400°F.
Bake the galette for 30 minutes, then turn the oven down to 180°C/350°F and bake for an additional 20-25 minutes or until the crust is golden and the fruit is bubbling – if the crust begins to get too dark towards the end of the cooking time cover the galette loosely with foil. Cool the galette for 30 minutes before serving.
Covered with a tea towel the galette will keep at room temperature for up to 2 days.
* homemade sour cream: to make 1 cup of sour cream, mix 1 cup (240ml) heavy cream with 2-3 teaspoons lemon juice in a bowl. Whisk until it starts to thicken. Cover with plastic wrap and leave at room temperature for 1 hour or until thicker (I usually leave mine on the counter overnight – except on very warm nights – and it turns out thick and silky in the following morning; refrigerate for a creamier texture)
Serves 8-10
Friday, November 18, 2011
Vanilla bean and blueberry mini cheesecakes
My initial idea was to make Nigella’s peanut butter cheesecake – that was why I bought several packages of cream cheese after all. Peanut butter cheesecake with a milk chocolate glaze... Yum, yum. But I had a surprise after opening the peanut butter jar: it was almost empty; I was furious for a couple of seconds then remembered that I’d had several spoonfuls of peanut butter lately. Too many, I guess. So I went after another cheesecake recipe and found one on my currently favorite dessert bible
. The blueberries were the icing on the cake (I apologize for the lame pun – I just couldn’t help it). ;)
Vanilla bean and blueberry mini cheesecakes
adapted from the wonderful Bon Appetit Desserts: The Cookbook for All Things Sweet and Wonderful
Crust:
1 cup (100g) graham cracker or digestive cookies crumbs
2 tablespoons sugar
¼ cup (56g) unsalted butter, melted
Filling:
300g cream cheese, room temperature
½ cup (100g) sugar
1 vanilla bean, split lengthwise, seeds removed with the back of the knife
2 large eggs
½ cup (120ml) sour cream*
generous ½ cup fresh blueberries
Start by making the crust: preheat the oven to 180°C/350°F. Butter four 1-cup (240ml) capacity mini cake pans (mine have removable bottoms).
Mix graham cracker crumbs and sugar in processor. Add melted butter; process until crumbs are evenly moistened. Press crumb mixture onto bottom (not sides) of prepared pans. Place pans onto a baking sheet and bake until crust is set and deep golden, 6-8 minutes. Cool crust while making filling. Maintain oven temperature.
Now, the filling: place the cream cheese, sugar, vanilla seeds, eggs and sour cream in the bowl of a food processor and process until smooth. Divide the filling evenly among pans. Sprinkle the filling with the blueberries. Bake until set around edges, and center moves slightly when pan is gently shaken, 25-30 minutes. Cool completely over a wire rack then refrigerate uncovered for 3-4 hour or overnight. Carefully unmold and serve.
* homemade sour cream: to make 1 cup of sour cream, mix 1 cup (240ml) heavy cream with 2-3 teaspoons lemon juice in a bowl. Whisk until it starts to thicken. Cover with plastic wrap and leave at room temperature for 1 hour or until thicker (I left mine on the counter overnight – on a cold night – and it was beautifully thick and silky the next morning)
Makes 4
Monday, October 3, 2011
Vanilla bean and candied kumquat financiers + a movie everyone should watch
I watched "Trust" last Saturday and liked it a lot: well directed with great performances, which to me is imperative when such a delicate subject is being portrayed. I took my sister with me because I thought it would be important for her to watch that movie and I think that parents, teenagers and even young adults should watch it, too.
One thing about the movie that surprised me was the director, David Schwimmer: I do not know much of his work – except for “Friends” – and to me he handled “Trust” perfectly. I will definitely pay attention to his next projects – versatility is one quality I deeply admire in actors and directors.
From versatile people to versatile recipes: these financiers are delicious and the perfect canvas for your imagination – I made them once with cherries and they worked really well with candied kumquats, too.
Vanilla bean and candied kumquat financiers
adapted from two great books: Simply Bill e Baking for All Occasions
Candied kumquats:
1 dozen kumquats
¾ cup (180ml) water
½ tablespoon light corn syrup
1 cup + 2 tablespoons (224g) superfine sugar
Financiers:
2/3 cup (67g) almond meal (finely ground almonds)
¾ cup (105g) icing sugar, sifted + extra for dusting
1/3 cup (46g) all purpose flour, sifted
pinch of salt
4 egg whites
1 vanilla bean, split lengthwise, seeds removed with the back of the knife
1 teaspoon vanilla extract
1/3 cup (75g) unsalted butter, melted and cooled
Start by making the candied kumquats: using a small serrated knife, trim off the stem end of each kumquat and then cut into about 6mm (¼ in) slices. In a medium, heavy saucepan, combine the water, corn syrup and sugar over medium heat and heat, stirring just until the sugar dissolves. Raise the heat to medium-high and bring to a boil without stirring. Add the kumquat slices, reduce the heat to medium and simmer until the fruit is tender and the sugar syrup is syrupy, 15-25 minutes. Remove from the heat and transfer the mixture to a heatproof bowl. Set aside to cool completely. Candied kumquat slices can be kept in the syrup, in an airtight container in the fridge, for up to 1 month.
When you are ready to bake the financiers, remove the kumquat slices from the syrup and place onto a cooling rack to dry for 2-3 hours.
Now, the financiers: preheat the oven to 180°C/350°F. Lightly butter ten 1/3 cup (80ml) silicone molds or butter and flour muffin pans.
Mix together the ground almonds, icing sugar, flour and salt. Stir in the egg whites until just combined. Add the vanilla seeds and extract. Stir in the melted butter.
Pour the batter into prepared. Arrange 2-3 kumquat slices on top of each financier.
Bake for 25-30 minutes or until risen and golden and a skewer inserted in the center comes out clean. Remove from the oven and leave in the pans for 5 minutes before turning out onto a wire rack to cool.
Dust with icing sugar to serve; store in an airtight container.
Makes 10
Thursday, July 28, 2011
Strawberry and rose hazelnut tart, music and a baking bonus
When I was 10 years old I got the Arena album as a gift from a cousin I deeply love. I used to listen to it nonstop, 24/7. I still have the album but since I no longer have a record player I bought the CD a while ago – I love listening to it while I drive to/from work. So good.
The CD version has two bonus tracks, but unfortunately “Girls on Film” and “Rio” are songs I never cared about (and still don’t).
Like one of my all time favorite albums, this recipe has a bonus, too, but in this case it’s a really good one: you get a delicious, fresh tart for dessert and also yummy slice and bake cookies with the leftover pastry. The cookies are so good you might consider postpone making the tart and stick to the pastry alone. :)
Strawberry and rose hazelnut tart
slightly adapted from the always stunning and delicious Australian Gourmet Traveller
Spiced hazelnut pastry:
¾ cup + ½ tablespoon (176g) unsalted butter, softened
1 cup + 1 tablespoon (148g) icing sugar, sifted
finely grated zest of 1 orange
3 egg yolks
1 ¾ cups + ½ tablespoons (250g) all purpose flour
¾ cup (75g) hazelnut meal (finely ground hazelnuts)
¾ cup (75g) almond meal (finely ground almonds)
1 teaspoon ground cinnamon
½ teaspoon ground nutmeg
1 teaspoon baking powder
Filling:
700g strawberries, hulled and coarsely chopped
1/3 cup + ½ tablespoon (72g) superfine sugar*
¼ cup (30g) corn starch
finely grated zest and juice of ½ orange
3 teaspoons rosewater
seeds of 1 vanilla bean
heavy cream, for brushing
icing sugar, for dusting
crème fraîche, to serve
Start by making the spiced hazelnut pastry: beat butter, icing sugar and orange zest in an electric mixer until creamy, add yolks and beat to combine. Add remaining ingredients and mix until just combined. Form into a disc, wrap in plastic wrap and refrigerate until firm (2-3 hours).
Roll two-thirds of hazelnut pastry to 3mm-thick between two large pieces of lightly floured baking paper and line a lightly buttered 24cm (9in) diameter tart pan with a removable bottom. Trim edges, prick pastry all over with a fork and freeze until firm (15 minutes). Roll out remaining dough on a lightly floured piece of baking paper to a rough 24cm-long rectangle, place on an oven tray and refrigerate between the paper pieces until firm (15-20 minutes).
Preheat oven to 180°C/350°F. Combine strawberries, sugar, corn starch, zest, juice and vanilla seeds in a bowl and fill pastry case.
Remove the pastry rectangle from the fridge, remove the paper piece on the top and cut the pastry into your favorite shapes using a cookie cutter (mine was a drop shaped cutter about 3cm long). Place them randomly over strawberry mixture, leaving some of the filling uncovered**. Brush pastry with heavy cream, place tart pan onto a baking sheet and bake until crisp and golden (35-40 minutes), cool completely in the pan over a wire rack. Dust with icing sugar and serve with crème fraîche.
* after tasting the tart I though the filling needed a bit more sugar – have a taste of your strawberries and adjust the sugar amount accordingly to their sweetness
** I gathered up the pastry leftover pieces and made slice and bake cookies with the remaining pastry – they tasted delicious!
Serves 10
Wednesday, May 25, 2011
Swedish visiting cake + music lyrics
One of my favorite things about learning English was being able to understand music lyrics – I think some of you agree with me on that. :)
That said, there are times I want to listen to complex lyrics and there are others when almost no lyrics is the way to go. I feel the same about the cakes I bake: there are times for complex, layered beauties, and times when only simple will do. ;)
Swedish visiting cake
from Dorie’s baking bible
1 cup (200g) superfine sugar + a little more for sprinkling
finely grated zest of 1 lemon
2 large eggs
¼ teaspoon salt
1 teaspoon vanilla extract
1 vanilla bean, cut lengthwise, seeds scraped with the back of a knife – or use ½ teaspoon almond extract, as per the original recipe
1 cup (140g) all purpose flour
½ cup (113g/1 stick) unsalted butter, melted and cooled
about ¼ cup sliced almonds (blanched or not)
Preheat the oven to 180°C/350°F. Butter a seasoned 23cm (9in) cast iron skillet or other heavy ovenproof skillet, a 23cm (9in) round cake pan or pie pan.
Combine the sugar and the lemon zest in a large bowl and rub them together with your fingertips until sugar is fragrant. Whisk in the eggs, one at a time, until well blended. Whisk in the salt and the extracts/vanilla seeds. Using a silicone spatula, stir in the flour, and then fold in the butter.
Transfer batter to the prepared pan and smooth the surface. Sprinkle with the almonds and extra sugar (if you’re using a cake or pie pan, place it on a baking sheet).
Bake for 25-30 minutes or until golden and a little crisp at the edges – the inside of the cake will remain moist. Remove from the oven, let the cake cool 5 minutes in the pan, over a wire rack, then run a thin knife around the sides and bottom of the cake to loosen it*. Serve the cake warm or cool.
* I used a fluted tart pan and it was impossible to do that; I cooled the cake in the pan completely then carefully unmolded it, first loosing some of the edges with the handle of a teaspoon, then loosing the bottom of the cake with a large metal spatula
Serves 8-10
Tuesday, April 19, 2011
Vanilla flan with gingerbread crumbs
Those of you who – sometimes – devour lunch with an eye on dessert, please, raise your hand. 0/
I made a beautiful, delicious salad with tuna – from this book – for lunch and, even though I happily savored each bite of it, I was really interested in trying this flan. :)
And since I know you are all so dear and won’t judge me, there goes the recipe. :D
Vanilla flan with gingerbread crumbs
adapted from the wonderful Bon Appetit Desserts and the beautiful Australian Gourmet Traveller
Gingerbread cookies:
1 cup (140g) all purpose flour
½ teaspoon unsweetened cocoa powder
¼ teaspoon baking soda
1 teaspoon ground cloves
2 teaspoons ground ginger
1 teaspoon ground cinnamon
pinch of salt
¼ cup (56g) unsalted butter, softened
¼ cup (50g) caster (superfine) sugar
1 large egg yolk
¼ cup molasses
Flan:
1 ¾ cups (420ml) heavy cream
1 cup (240ml) whole milk
pinch of salt
1 vanilla bean, split lengthwise, seeds removed with the back of the knife
1 cup (200g) + 7 tablespoons (84g) caster (superfine) sugar, divided
1/3 cup (80ml) water
3 large eggs
2 large egg yolks
Start with the gingerbread: in a medium bowl, sift together the flour, cocoa, baking powder, cloves, ginger, cinnamon and salt. Using an electric mixer, beat butter and sugar until pale and creamy, add egg yolk and beat until combined. Add molasses, beat to combine, then add sifted ingredients and stir until just combined. Place dough on a large piece of parchment paper; shape dough into a log. Fold parchment over dough; using a ruler, roll and press into a 4cm log – like Martha does here. Wrap in parchment. Refrigerate for 3 hours.
Preheat oven to 180°C/350°F; line a large baking sheets with baking paper.
Unwrap log. Cut into 6mm (¼in) thick rounds; space 5cm (2in) apart onto prepared sheets. Bake until golden, 15-17 minutes. Let cookies cool completely on the sheet over a wire rack.
Store cookies in airtight containers at room temperature for up to 1 week.
Makes 20
Now, the flans: place cream, milk and salt in a heavy medium saucepan and mix to combine. Add the vanilla seeds and bean and bring to a simmer over medium heat. Remove from heat, cover and let infuse for 30 minutes.
Meanwhile, combine 1 cup (200g) sugar and water in a heavy medium saucepan. Stir over low heat until sugar is dissolved. Increase heat to high and cook without stirring until syrup is deep amber color, swirling the pan a couple of times. Occasionally brushing down the sides of the pan with a wet pastry brush. Immediately pour caramel into six ¾ cup (180ml) capacity ramekins. Using oven mitts, tilt each ramekin to coat sides with caramel. Place ramekins in a 20x30cm metal baking pan.
In a medium bowl, whisk eggs, egg yolks and remaining 7 tablespoons sugar. Gradually add the cream mixture, whisking without creating a lot of foam. Pour custard through a small sieve into the prepared ramekins. Add enough hot water to the baking pan to come halfway up the sides of the ramekins.
Bake flans until center is gently set, about 40 minutes – do not overbake. Carefully remove from the oven, transfer ramekins to a wire rack and cool completely. Refrigerate, lightly covered, overnight.
When ready to serve, place some of the gingerbread cookies in a bag and crush with a rolling pin (or use a food processor). Sprinkle each flan with some of the gingerbread crumbs and serve.
Serves 6
Sunday, March 20, 2011
Mini rhubarb pavlovas
I told you once how much I adore “True Blood” – the show got me so addicted that after watching the 3 seasons I started reading Charlaine Harris’ books – in a very incessantly way, I might add. :)
Something similar happened when I watched some of Sophie Dahl’s videos on You Tube: her soft, lovely way around her beautiful kitchen and the delicious food got me hooked – I immediately bought her book.
The original recipe calls for cooking the rhubarb for only 5 minutes but to me it tasted raw and sort of astringent; I added more water and sugar and cooked it longer – the result was a wonderful, jammy compote.
Mini rhubarb pavlovas
slightly adapted from Miss Dahl's Voluptuous Delights
Meringues:
3 large egg whites
¾ cup + 1 ½ tablespoons (168g) caster (superfine) sugar
pinch of salt
Rhubarb compote:
225g rhubarb, chopped in rounds
1/3 cup (80ml) water
3 tablespoons caster (superfine) sugar – or more, to taste
1 teaspoon vanilla extract
To assemble the dessert:
½ cup (120ml) heavy cream, very cold
½ vanilla bean, split lengthwise, seeds scraped with the back of the knife
1 tablespoon icing sugar
2-3 tablespoons lightly toasted sliced almonds
Start by making the meringues: preheat the oven to 140°C/285°F. Line a large baking sheet with baking paper. In a very clean bowl, with no traces of fat or water, whisk the egg whites in medium-high speed until soft peaks form. Gradually add the sugar, whisking well until the mixture is thick and glossy – rub a bit of the mixture between your fingers: you should no longer feel the sugar granules.
Drop 6 large blobs of meringue onto the prepared pan, 5cm (2in) apart. Bake for 1 hour, or until crisp and firm. Leave to cool inside the oven with the door ajar.
Now, the compote: place the rhubarb, water and sugar in a small heavy saucepan and cook over medium heat, stirring occasionally, until a jammy consistency, 10-15 minutes. Add the vanilla, remove from heat and cool completely.
Whip the cream, vanilla seeds and sugar until soft peaks form. To assemble: place a meringue on a serving place, top with a generous spoonful of whipped cream and finish with another generous spoonful of rhubarb compote. Sprinkle with the toasted almonds and serve immediately.
Serves 6
Monday, February 21, 2011
Pastel vasco with blackberry compote
I have been using my cookbooks a lot more lately and there’s one person to be “blamed” for that: my baking buddy, the lovely Susan. :)
Putting my cookbooks to good use was one of my New Year’s resolutions and I’m glad it’s one I’ve been able to keep.
This cake has become one of my favorites: it’s already filled when you remove it from the oven and the rum smell is just wonderful; the batter is not very sweet cake – and I think that’s why it goes really well with the compote. I did not toast the cake slices as the recipes calls for, but only because it was gone before I had the chance to. :)
Now I want to know if Susan liked the cake as much as I did - I've had a quick look of her stunning cake and that is making me drool already. :)
Pastel vasco with blackberry compote
from Sunday Suppers at Lucques
Blackberry compote:
½ cup (100g) granulated sugar
1 vanilla bean
1/3 cup (80ml) water
1 tablespoon corn starch
2 heaping cups (300g) blackberries – I used frozen, slightly thawed
2 tablespoons brandy
Pastel vasco (cake):
2 ¼ cups + 1 tablespoon (325g) all purpose flour
1 tablespoon baking powder
¼ teaspoon salt
4 large eggs
1 cup + 1 tablespoon (212g) granulated sugar + a little extra for sprinkling over the cake
14 tablespoons (196g) unsalted butter, melted + 3 tablespoons (42g) unmelted
2 tablespoons dark rum
1 teaspoon vanilla extract
¼ cup (60ml) fresh orange juice
1 cup heavy cream, to serve
Start by making the compote: pour the sugar into a medium saucepan. Cut the vanilla bean in half lengthwise and use the back of the knife to scrape the seeds into the sugar. Add the water and bring to a boil over medium heat, without stirring. Cook about 10 minutes, swirling the pan occasionally, until the mixture in an amber caramel color.
While the sugar is caramelizing, stir 2 tablespoons of water into the corn starch in a small bowl. Set aside.
When the sugar has reached the desired color, add half the blackberries and the brandy to the pot – be carefully for the mixture will spit. The sugar will harden. Continue cooking for 3-5 minutes, without stirring, over medium-low heat, until the berries release their juices and the sugar dissolves. Strain the berries over a bowl and pour the liquid back to the saucepan. Transfer the cooked berries to the bowl and stir in the remaining uncooked berries. Bring the blackberry caramel back to a boil over medium heat and slowly whisk in the corn starch mixture, a little at a time. Cook for a few more minutes, stirring often, until the sauce thickens. Pour the thickened juices over the berries and stir to combine. Set aside to cool completely.
Now, the cake: sift the flour and baking powder together. Set aside.
Whisk 3 eggs in a large bowl. Whisk in the sugar, melted butter, rum, vanilla extract and orange juice. Fold in the dry ingredients, cover the bowl with plastic wrap and refrigerate the batter for 30 minutes.
Preheat the oven to 200°C/400°F, generously butter a loaf pan*.
Pour ¾ of the batter into the prepared pan, and spoon ¾ cup blackberry compote over it. Top with the remaining batter, letting some of the berries show through.
Beat the remaining egg and brush some of it over the batter. Sprinkle with a handful of granulated sugar over the top. Bake for about 1 hour, or until risen and golden and a toothpick inserted into the center comes out clean (I used a long, thin knife so it would reach the bottom of the pan).
Let the cake cool completely in the pan over a wire rack. Unmold, and then cut into little less than 2cm (¾ in) slices, and butter lightly on both sides.
Warm the remaining compote in a small saucepan over low heat.
Heat a griddle or large cast iron pan over medium-high heat. Toast each slice of cake lightly for a minute or two each side, until it’s golden brown and crispy. Arrange the slices on a plate, spoon the warm compote over and serve with a small pitcher of cream.
* since the size of the pan is not mentioned on the book, I made ¾ of the recipe and used a 20x8cm loaf pan
Serves 6-8
Wednesday, February 2, 2011
Plum and cinnamon jellies
Plum jellies – to me, this dessert sounded so unusual; my thoughts exactly after reading, a long time ago, that Sean Penn would play a gay man in a movie. Turns out he was perfect for the part and the movie was excellent – and I’m not even a fan of Gus Van Sant.
As for the jellies, I ate 3 out of the 4 portions – I thought you should know that. :)
Plum and cinnamon jellies
from Kitchen: The Best of the Best
6 large plums, stoned and quartered
1 cup + 1 ½ tablespoons (218g) caster (superfine) sugar
1 cinnamon stick, broken in half
1 vanilla bean, halved lengthwise, seeds scraped with the back of the knife
750ml water
juice of 1-2 oranges
6 gelatin leaves
sweetened whipped cream, to serve
Put the plums, sugar, cinnamon stick, vanilla seeds and bean and the water into a saucepan. Bring to the boil, then reduce the heat and simmer for 30 minutes. Remove from the heat and strain the syrup through a fine sieve into a measuring jug. Add enough orange juice to make 600ml plum syrup*.
Soak the gelatin leaves in a large bowl of cold water for 10-15 minutes or until very soft. Return the syrup to the saucepan over low heat, until the syrup is warm. Squeeze any excess liquid from the gelatin leaves, then stir them into the warm syrup. Pour the jelly into four 150ml capacity molds and refrigerate for 3 hours or overnight. Serve with cream.
*I got 600ml without having to add any orange juice
Serves 4
Monday, January 31, 2011
Summer nectarine and vanilla pie
Not sure why, but I’ve realized that as I get older very simple things make me really happy; do you feel the same way?
You wouldn’t believe how pleased I was by making a pie that looked like the ones I saw in cartoons when I was little – those pies put by the window to cool down. It really made me smile. :)
Summer nectarine and vanilla pie
adapted from Bon Appetit
Crust:
2 ½ cups (350g) unbleached all purpose flour
1 ½ teaspoons caster (superfine) sugar
½ teaspoon salt
½ cup (1 stick/113g) chilled unsalted butter, cut into 1.25cm (½in) cubes
½ cup (113g) chilled solid vegetable shortening, cut into 1.25cm (½in) cubes
5 tablespoons (or more) ice water
2 tablespoons whipping cream
Filling:
2/3 cup (133g) + 2 teaspoons caster (superfine) sugar
½ vanilla bean, cut crosswise into 1.25cm (½in) pieces
3 tablespoons unbleached all purpose flour
1.680g (3 ¾ pounds) firm but ripe nectarines, halved, pitted, each half cut into 4 slices (about 10 cups)
1 ½ tablespoons unsalted butter, room temperature
Start with the crust: blend flour, sugar, and salt in processor. Add butter and shortening; using on/off turns, blend until mixture resembles coarse meal. With the machine running, add the ice water and process until dough begins to clump together, adding more water by teaspoonfuls if dry. Gather dough together. Divide dough in half; flatten each half into disk. Wrap each disk in plastic and refrigerate at least 1 hour (can be made 3 days ahead. Keep refrigerated. If necessary, soften slightly at room temperature before rolling out).
Preheat to 200°C/400°F; lightly butter a 23cm (9in)-diameter glass pie dish.
Combine 2/3 cup of the sugar and the vanilla bean in processor; blend until vanilla bean is very finely minced. Sift vanilla sugar through strainer into large bowl; discard any large bits in strainer. Mix flour into vanilla sugar. Add nectarines to flour-sugar mixture and toss gently to coat.
Roll out 1 pie crust disk on floured surface to 30cm (12in) round. Transfer to prepared dish. Trim dough overhang to 1.25cm (½in). Spoon peach mixture into crust; dot with butter. Roll out second pie crust disk on lightly floured surface to 30cm (12in) round. Drape dough over peach filling; trim overhang to 4cm (1½in). Fold top and bottom edges under, pressing together to seal. Crimp edges decoratively. Using small sharp knife, cut 5cm (2in)-long X in center of top crust to allow steam to escape. Brush crust lightly with whipping cream; sprinkle with remaining 2 teaspoons sugar.
Place pie on rimmed baking sheet. Bake until crust is golden, nectarines are tender, and juices bubble thickly through cut in top crust, about 1 hour 15 minutes. Transfer pie to rack and cool until lukewarm, about 2 hours.
Serve pie lukewarm or at room temperature with vanilla ice cream.
Serves 8
Tuesday, December 28, 2010
Cherry and almond tartlets
I know, I know – another cherry tart in less than a week… But be honest with me: would you be able to resist such a beautiful dessert? I ran to the kitchen the moment the magazine arrived at my door. :D
Cherry and almond tartlets
slightly adapted from Australian Gourmet Traveller
Filling:
500g crème fraîche*
100ml pouring cream
20g pure icing sugar, sifted, plus extra for dusting
fresh cherries, to serve
Cherry vanilla jam:
300g cherries, pitted and halved
1 cup (200g) caster (superfine) sugar
juice of 1 lemon and 1 orange
1 vanilla bean, split, seeds scraped
Almond pastry:
90g natural almonds
250g unsalted butter, room temperature
½ cup (100g) caster (superfine) sugar
2 cups + 2 tablespoons (300g) all purpose plain flour
For cherry vanilla jam, combine ingredients in a saucepan and stir over medium-high heat until sugar dissolves. Bring to the boil and cook, stirring occasionally, until mixture reaches setting point (6-8 minutes; see note), refrigerate until well chilled (1-2 hours).
Meanwhile, for almond pastry, process almonds in a food processor to form coarse crumbs (1 minute). Beat butter and sugar in an electric mixer until creamy, scrape down sides of bowl, add flour and almonds, beat to just combine. Form into a disc, wrap in plastic wrap and refrigerate for 1 hour to rest.
Butter a 20x28cm rectangular tart pan.
Roll out pastry on a lightly floured surface to 3mm thick and line the prepared pan, trim edges, prick with a fork and freeze until firm (30 minutes).
Preheat oven to 180°C/350°F. Line the pastry with a large piece of foil and fill it with baking weights or dried beans. Bake until light golden (10-12 minutes), remove paper and weights/beans, bake until golden and crisp (6-8 minutes), cool completely.
Whisk crème fraîche, cream and icing sugar in a bowl until firm peaks form (2-3 minutes), refrigerate until required.
Spread jam in base of pastry case, spoon over crème fraîche mixture, top with fresh cherries, dust with icing sugar and serve.
Note: to test for a jam’s setting point, place several saucers in the freezer before you start cooking the jam. When the mixture becomes thick, remove from heat, spoon a little onto a chilled saucer and return to freezer for 30 seconds. When you draw your finger through the mixture it should hold a trail. If it doesn’t, cook for 1-2 minutes longer and test again.
* I made a different filling, inspired by a trifle recipe by Bill Granger: I combined equal parts of heavy cream and plain yogurt (1/3 cup of each for ½ the recipe above), 1 tablespoon icing sugar and the seeds of ½ a vanilla bean, then beat the ingredients together until soft peaks formed
Serves 6 – I halved the recipe above, used 9cm tartlet pans and got 10 tartlets
Tuesday, December 14, 2010
Cinnamon-chocolate fruit mince tarts
I’d been meaning to make mincemeat pies forever, because I think they look absolutely adorable! But I always gave up at the idea of using suet, or anything similar to it.
That is why this recipe is perfect: besides being suet-free, both the pastry and the filling are delicious, with a not-very-Christmas-but-yummy hint of chocolate.
Cinnamon-chocolate fruit mince tarts
slightly adapted from Australian Gourmet Traveller
270g dark brown sugar
300g raisins
300g dried cranberries
3 tablespoons brandy
100g unsalted butter, melted
100g glacé orange, finely chopped
2 Granny Smith apples, coarsely grated
1 orange, finely grated zest and juice
½ teaspoon ground cinnamon
¼ teaspoon ground cloves
¼ teaspoon ground ginger
¼ teaspoon freshly grated nutmeg
1 vanilla bean, halved lengthwise, seeds scraped
100g dark chocolate (70% cocoa solids), coarsely chopped
1 ½ tablespoons demerara sugar, for scattering
Cinnamon pastry:
180g softened unsalted butter
200g pure icing sugar, sifted
1 tablespoon ground cinnamon
4 eggs
500g all purpose flour
pinch of salt
Combine all ingredients except chocolate and demerara sugar in a large bowl, stir to combine, then spoon into sterilized jars* and refrigerate for at least 1 day or up to 2 weeks, inverting jar occasionally. Makes about 5 cups of fruit mince.
For cinnamon pastry, beat butter, sugar and cinnamon in an electric mixer until creamy, but not fluffy (4-5 minutes). Add eggs one at a time and beat until well combined. Beat in flour and salt, turn onto a lightly floured surface and knead lightly until just smooth (at this point I needed to add 1 ½ tablespoons of flour because the dough was too soft), then divide pastry in half, wrap each half in plastic wrap and refrigerate for 3 hours to rest.
Roll out each pastry half on a lightly floured surface to 3mm thick, cut out 11cm-diameter rounds with a pastry cutter, place on a tray and refrigerate until required. Cut out small stars or other decorative shapes from the pastry scraps, place on a tray lined with baking paper and refrigerate until required. Re-roll any remaining scraps to 3mm thick, refrigerate until firm (30 minutes), then cut out more rounds and decorative shapes with small biscuit cutters and add shapes to tray.
Preheat oven to 180°C/350°F; butter twenty four ½ cup (120ml) capacity muffin pans. Line the pans with the pastry rounds and refrigerate until required.
Add chocolate to fruit mince mixture, stir to combine. Spoon fruit mince mixture into each pastry-lined pan, leaving a 5mm gap at top. Top each with a pastry shape, brush lightly with water, scatter with demerara sugar and bake until pastry is golden and crisp (12-15 minutes). Cool completely in pans, then remove. Fruit mince tarts will keep stored in an airtight container for up to 1 week.
* I did not sterilize the jars and kept the mince mixture in the fridge for only 2 days
Makes 24 – I made 1/3 of the recipe above, used 1/3 cup (80ml) capacity pans and got 12 tartlets
Monday, November 22, 2010
Rhubarb and vanilla crumble
If you read this post the fact that I burned my tongue eating this crumble will come as no surprise. :D
I made the crumble before the tartlets, and my curiosity for the rhubarb flavor would not be stopped by a piping hot bowl of dessert, right?
Just so you know it, it was all worth it. :D
Rhubarb and vanilla crumble
from Simple Essentials Fruit
850g rhubarb, trimmed and chopped
¾ cup + 1 tablespoon (162g) demerara sugar
1 vanilla bean, split lengthwise, seeds scraped with the back of a knife
Topping:
1 cup + 1 tablespoon (150g) all purpose flour
1/3 cup + 1 tablespoon (78g) caster sugar
100g unsalted butter, cold and chopped
Preheat the oven to 180°C/350°F. Combine the rhubarb, sugar and vanilla bean and seeds in a bowl. Transfer to a 6-cup (1.5l) capacity ovenproof dish. To make the topping, combine the flour, sugar and butter in a bowl and rub with your fingertips until mixture resembles breadcrumbs. Pile the mixture on top of the fruit and bake for 50 minutes or until the topping is golden and the fruit is soft.
Serves 4 – I made 1/3 of the recipe above and used a 2 ½ cup (600ml) capacity bowl
Wednesday, November 17, 2010
Lemon-poppy seed cake with vanilla-cream cheese frosting and 4 years of blogging
Thank you all for the birthday wishes! You guys are the best! ♥
I turned 32 a couple of days ago, and this blog turns 4 today – for this double celebration I baked a lemon cake (and please let’s pretend you are surprised with the flavor choice). :D
Lemon-poppy seed cake with vanilla-cream cheese frosting
slightly adapted from Sky High: Irresistible Triple-Layer Cakes
Cake:
3 cups (420g) cake flour*
2 cups (400g) caster sugar
4 ½ teaspoons baking powder
½ teaspoon salt
3 tablespoons poppy seeds
1 cup (2 sticks/226g) unsalted butter, room temperature, coarsely chopped
grated zest and juice of 1 large lemon
1 ¼ cups (300ml) buttermilk
5 egg whites
1/3 cup (80ml) water
Vanilla cream cheese frosting:
2 vanilla beans
5 cups (700g) confectioners’ sugar, sifted
224g (8oz) cream cheese, room temperature
1 cup (226g/2 sticks) unsalted butter, room temperature
1 tablespoon vanilla extract
Preheat the oven to 180°C/350°F. Butter three 20cm (8in) round cake pans. Line the bottom of each with a round of parchment paper and butter the paper.
Combine the flour, 1 ¾ cups (350g) of the sugar, baking powder, salt and poppy seeds in the large bowl of an electric mixer. Beat on low speed to blend the ingredients and break up any lumps, about 30 seconds. Add the butter, lemon zest and 1 cup of the buttermilk to the flour mixture. Beat on low – be careful, the flour may fly everywhere – until completely mixed. Raise the speed to medium and beat for 1-2 minutes to lighten and aerate the batter.
In a medium bowl, combine the egg whites with the remaining ¼ cup buttermilk; whisk to blend thoroughly. Add this mixture to the batter in 2-3 additions, scraping down the sides of the bowl and beating only enough to incorporate. Divide the batter among the prepared pans.
Bake for 25-30 minutes or until a toothpick inserted in the center comes out clean. Let the cakes cool in the pans for 10 minutes.
While the cakes are cooling, make the lemon syrup: in a small nonreactive saucepan, combine the remaining ¼ cup (50g) of sugar, the lemon juice and the water. Bring to the boil, stirring to dissolve the sugar.
Turn out the cake layers onto wire racks and generously brush them hot lemon syrup over the warm cakes to moisten evenly. Let cool completely.
Make the frosting: split the vanilla beans lengthwise and scrape the seeds into the sugar with the back of a knife. In the large bowl of an electric mixer, beat the cream cheese and butter on medium speed until light and fluffy. Gradually add the sugar, 1 cup at a time, beating well after each addition and scraping down the sides of the bowl. Continue to beat until very fluffy, 3-4 minutes. Add the vanilla extract and beat well.
Assembling the cake: place one cake layer, top side down, on a cake plate and spread about a fifth of the frosting over the cake to cover evenly. Repeat with the second cake layer + another fifth of the frosting, then place the third layer on top. Frost the top and sides of the cake with the remaining frosting. Garnish with whatever strikes your fancy.
* homemade cake flour: 1 cup (140g) all purpose flour minus 2 tablespoons + 2 tablespoons corn starch
Serves 12-16 – I made the exact cake recipe above but only 2/3 of the frosting and it was enough to fill and frost the entire cake
Tuesday, October 5, 2010
Yogurt panna cotta with caramelized tangerine slices
A while ago I told you how much I was enjoying Twitter, but something changed some days ago – I haven’t felt that way anymore. It is probably my fault – I should follow other people, people I might have more in common with. :S
I think I need something sweet – I’ll go have another panna cotta. :D
Yogurt panna cotta with caramelized tangerine slices
from here and from Australian Gourmet Traveller
Panna cotta:
¾ cup (180ml) heavy cream
½ vanilla bean, split lengthwise and seeds scraped with the back of a knife
¼ cup + ½ tablespoon (56g) caster sugar
2 leaves gelatin
250g skim milk yogurt – I used regular yogurt
Caramelized tangerine slices:
¼ cup (50g) caster sugar
1 ½ tablespoons water
½ teaspoon unsalted butter
1 teaspoon orange-blossom water
vegetable oil, for greasing
2 tangerines, thickly sliced horizontally
Heat the cream in a small saucepan over medium heat just until it comes to a boil. Add the vanilla seeds and bean, stir, cover and let infuse for 30 minutes.
Add the sugar to the cream and reheat, stirring to dissolve the sugar, again just until it boils. Remove from the heat.
Soak the gelatin in a bowl of cold water until soft. Squeeze out the excess water and drop the gelatin into the hot cream mixture and whisk until dissolved. Add the yogurt and whisk until smooth.
Strain the mixture through a fine sieve, discard the vanilla bean, then divide between four ½-cup capacity (120ml) ramekins. Set aside to cool, cover with plastic wrap and chill for at least 3 hours, or until just set.
Make the tangerine slices: combine sugar and water in a small saucepan over medium heat, stir to dissolve sugar, then cook until dark caramel (4-5 minutes). Remove from heat, add butter and orange-blossom water (be careful as hot toffee may spit), then return to heat and stir until dissolved. Pour onto an oiled metal tray and set aside to cool. When cool, break into coarse pieces and process in a food processor until finely ground. Place mandarin slices on a baking tray, scatter with orange-blossom toffee, then caramelize with a blowtorch (or under a hot grill) until golden (2-3 minutes). Serve immediately with the panna cotta.
Serves 4 - this panna cotta is also delicious served with this blackberry lemon swirl